Introduction

Suivez ce tutoriel pour remplacer l'écran cassé ou défectueux de votre Fairphone 4.
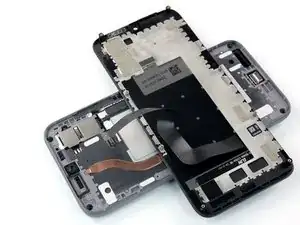
  1. IZiZiekpwsw1ZZQ1
    IZiZiekpwsw1ZZQ1
    YuF1pGqCbIOZ2EEe
    • Veillez à éteindre votre téléphone avant de commencer.

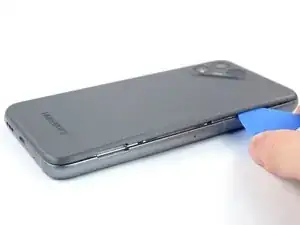
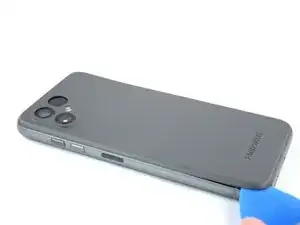
    • Insérez votre ongle, ou bien un outil à levier comme une spatule (spudger), dans l'encoche en bas à droite de la coque arrière.

    • Soulevez la coque arrière pour commencer à ouvrir les clips en plastique.

  2. s1wWZCXSZkQr1Zsl
    s1wWZCXSZkQr1Zsl
    6UWRDSpaKfnoMcmv
    n2lDPKWglBUxWrhX
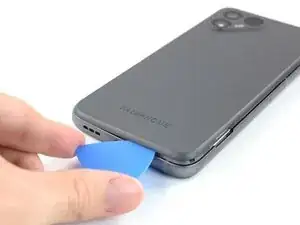
    • Progressez le long du côté droit de la coque arrière, pour détacher les clips en plastique qui s'y trouvent.

  3. SEBkuuHe4FMXMxUc
    SEBkuuHe4FMXMxUc
    kBJSAQPsCpbJx6cF
    4DM3tdBSvuEsclVN
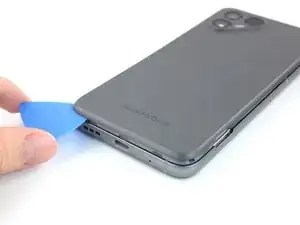
    • Faites glisser votre médiator le long du bord inférieur pour détacher les clips en plastique.

  4. jkWp61XqnGKWViuj
    jkWp61XqnGKWViuj
    DDYUhYDnLoCQ6FgA
    G4yKxBVRmZnek2Gg
    • Progressez le long du bord gauche pour défaire les clips plastique.

    • Soulever la coque arrière pour détacher les clips en plastique restants.

    • Pour remonter la coque arrière, appuyez fermement dessus jusqu'à ce que vous entendiez les clips s'enclencher.

  5. JPdxUZBdrS1vWTe5
    JPdxUZBdrS1vWTe5
    4T6nYgpqxDKBEgJO
    LBR3NbQqfKPJlcrR
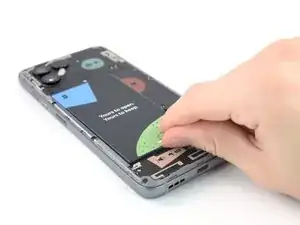
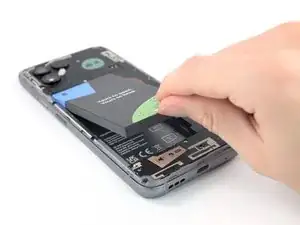
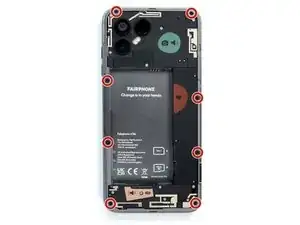
    • Mettez votre ongle ou un outil à levier dans l'encoche indiquée pour soulever la batterie hors de son logement.

    • Soulevez la batterie hors de son logement.

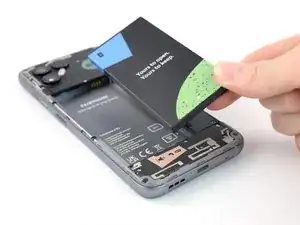
    • Retirez la batterie.

    Thank you for this very helpful guide. However I fail to see why you would conclude that replacing the battery is 'moderate'. Could you elaborate on this a little bit more, please?

    For me 'moderate' means it is (very) complicated (i.e. plenty of steps) but feasible in general (i.e. there is a good chance you're not gonna brick your device) for which there is only one escalation level left: 'not feasible at all'. Non of that is true for the FP4. Could removing the battery more user-friendly, though? Well yes, of course but it is still by far very simple and straight forward.

    Again, thank you very much for this great contribution.

    Dave S. -

    Hey Dave S.,

    thanks for your comment. You're totally right, the "moderate" rating was due to an oversight as it is the default in the system. I've changed the rating.

    Manuel Haeussermann -

  6. EVZL1k5KbD5Csh4g
    • Retirez les huit vis cruciformes de 4,8 mm.

    Screw head size is PH0

    Ryan Brierley -

    Screw head size is PH00, as mentioned in the official video: https://www.youtube.com/watch?v=SUJERxuY...

    Michiel -

  7. mecITJYw55HXHWFT
    mecITJYw55HXHWFT
    jGJPXBoRH611dqg6
    G2KTjCLELJCMdMIC
    • Retournez le téléphone de façon à ce que l'écran soit orienté vers le haut.

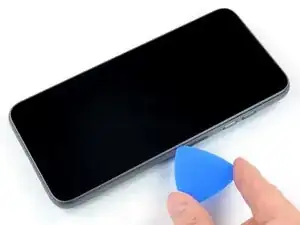
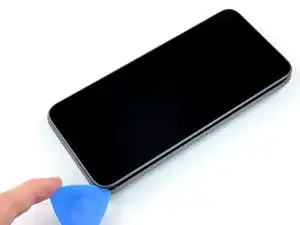
    • Insérez un médiator entre l'écran et le châssis.

  8. rpFJvEViWwmJmkwm
    rpFJvEViWwmJmkwm
    dZgMMFMFQTJGbfWb
    • Faites glisser votre médiator le long du bord, jusqu'au coin supérieur droit.

  9. XUMVHuCtxvp4uxwN
    XUMVHuCtxvp4uxwN
    TrZTUJVGR6UdCS1T
    • Continuez à faire glisser votre médiator le long du bord supérieur.

  10. K4PPIbBsCJLtEMpg
    K4PPIbBsCJLtEMpg
    54DfF5G4xPj636pZ
    eSRI6ZoXQ6buTZU3
    • Progressez le long du bord gauche jusqu'au coin inférieur gauche.

  11. 62fy3ld1QLdOkBbd
    62fy3ld1QLdOkBbd
    I6sGlF5aulkScDjj
    HgTquQPABg1mAMHD
    • Ne retirez pas encore l'écran. Il est toujours relié au reste du téléphone par une nappe.

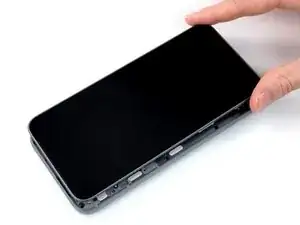
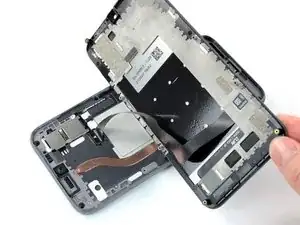
    • Saisissez l'écran et soulevez-le juste assez pour dégager ses ergots du châssis.

    • Faites pivoter l'écran soigneusement dans le sens des aiguilles d'une montre et retournez-le pour avoir accès au connecteur.

    • Placez l'écran sur l'appareil avec l'écran vers le bas.

  12. r3GWyjjaDqBbTWAR
    r3GWyjjaDqBbTWAR
    nHVLSjmQSiD3xIDt
    • Utilisez un médiator pour soulever et déconnecter la nappe d'écran.

    • Retirez l'écran.

    • Comparez votre pièce de rechange avec l'originale. Il se peut qu'il faille retirer le film de protection anti-poussière de la caméra frontale avant de l'installer.

    the new screen will have a tiny sticker in the selfie cam on the inside to prevent scratches don't forget to take it out before putting all the screws back in

    The Kodo -

    Thanks for adding this advice!

    Manuel Haeussermann -

    This is the connector that a lot of users seem to experience being unreliable — the symptom is rapid false-touch inputs right up the centreline of the screen from time to time.

    Augmenting the thickness of the pressure pad (that aligns to the connector from the back of the screen frame) seems to help.

    Ryan Brierley -

    I wish Google would do a better job of indexing comments like this, this was my exact problem and I didn't figure out the cause until I read this comment, while replacing my screen 😕

    mrmonster -

Conclusion

Pour remonter votre appareil, suivez ces instructions en sens inverse.

Déposez vos déchets électroniques dans un point de recyclage certifié.

Votre réparation Fairphone 4 ne s’est pas déroulée comme prévu ? Consultez nos conseils basiques de diagnostic ou notre Forum pour obtenir de l’aide.

Manuel Haeussermann

Membre depuis le 13/07/22

18068 Réputation

10 commentaires

20-40 Minutes? ... more like 10 ... and I wasn't even pushing it

Patrick Küster -

Thanks for your comment! The time estimate was set a little too high, you're right. I've adjusted it!

Manuel Haeussermann -

Vielen Dank für die präzise Anleitung. Auf alle heiklen Punkte wurde hingewiesen. Habe es locker geschafft und war danach ganz stolz!

Johanna -

I can confirm that you need a #0 screwdriver, not a #00, as has been changed in the latest unchecked version.

Jonathan -

Hi Jonathan, thanks for you comment! While a #0 screwdriver will work, we recommend a #00 as Fairphone themselves do, see their website: "The only tool you will need is a Phillips #00 screwdriver to access all spare parts of the Fairphone 4."

Manuel Haeussermann -

Hi Manuel, that is odd - my #00 did have a tendency to slip and wear out the screw, while I did not have that issue with the #0.

Jonathan -

My replacement screen came with a dust cover over the selfie camera opening so the selfie camera didn't function: it just showed slight changes of lighting but no image. The instructions should contain a warning to remove this paper cover as it took me quite a while to figure out why the camera didn't work.

Rick Hall -

I've looked up this guide to just double check how the small ribbon cable connects again. while doing that finished the replacement in exactly10 minutes (set up a stopwatch just for fun.

I've used a LTT ratchet screwdriver, the supplied bits had a correct one.

10/10 would recommend to replace your screen your self. going to a store to get it done will take longer for sure

Erik -

After removing the old screen and replacing it with a newly-purchased on that arrived today, neither my existing, broken screen (which was working this morning, just with cracked glass) nor the new replacement module are recognising touch inputs.

Can you provide more information on actions and checks I need to do please?

R M Carter -

Hi R M Carter,

I'm sorry to hear about the issues during your repair. Based on your comment, it sounds like the display itself is working as expected? Did you try a hard reboot already? If that doesn't fix the issue, there might be a problem with the display connector. Reseat the connector, and if that doesn't do the try, check the connector socket for damages or dirt/dust. Please also check our general troubleshooting advice.

Manuel Haeussermann -