
Introduction
Ce tutoriel apprendra aux utilisateurs comment ouvrir la coque arrière et retirer les vis afin d'accéder à la batterie.
Pièces
-
-
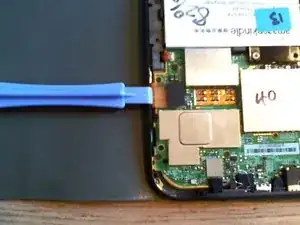
Retournez l'appareil et insérez un outil pour faire levier entre les deux coques.
-
Déplacez l'outil de levier autour du bord du boîtier, en libérant les 18 clips. N'insérez pas votre outil trop loin, car vous risqueriez d'endommager les composants près des bords de l'appareil.
-
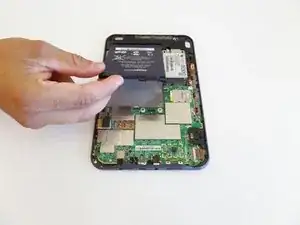
Tirez ou faites glisser la coque arrière pour libérer les deux clips restants près du centre.
-
-
-
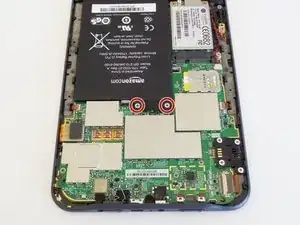
Dévissez les deux vis cruciformes argentées de 4 mm qui fixent le connecteur de la batterie.
-


Pour remonter votre appareil, suivez ces instructions en sens inverse.
23 commentaires
Hi Allison Monahan,
thank you very much for yor help! By using your guide I made my nearly 6 years old Kindle Keyboard fixed - great!
I went to mpfproducts.com and ordered my new battery which came in today. I’ve changed out the battery and my Kindle 3 is now charging. YAHOO!!!
Where did you get the battery? I couldn’t find it on Amazon. Do you have a model number for the battery? Thanks.
sand1k -
The old Amazon link has been removed. There’s now a link at the top of this guide to an eBay vendor that stocks the battery. Good luck!
Thanks, Allison and IFIXIT!!! God, I love this site. Cheers, Tom
Ah, I put it on in the wrong order, then figured out that starting at the bottom works best. I did the bottom, top and corners and then the sides, because I already had the top done.
kwood -
BE VERY CAREFUL HERE!! 15mm below the "next page" button was directly where the flex cable was. And it is an extremely fragile cable, even for flex cables. Which means I, of course, tore right through it without knowing until I got the cover off. So don't do that. Start 15mm above the lower corner, if anything, or start on the opposite side. Starting on the side with a single-point-of-failure is a really risky choice. The opposite side has basically nothing up against the edge, so you're free to poke it.
The other thing that isn't stated here is that the flex cable is inherently tied into the screen. Which means that if you, like me, damage that cable, the entire screen now broken and needs replacing. And if you, like me, was just trying to replace the battery or the motherboard, now it just makes sense to replace the entire device, both environmentally and financially. Whomp whomp.
bhurwitz -
As is, the guide sets you up SPECIFICALLY to DAMAGE THE SCREEN by prying into its very delicate ribbon cable.
A Kenny -
Apart from the buttons, are there any other specific places where we shouldn't pry, because it would damage something?
okojoijohoij -
There are clips a several centimeters from the edge of the Kindle across from the page-turning buttons. Undoing these clips was the most difficult part of opening the back of the Kindle. Be careful and take your time here.
It's a good idea to start on at the left page-turning button to help minimize risk of damage to the flex cable.
John Thoreson -
I've submitted an edit clearing up where to start the pry tool. Please folks, if you encounter something like this don't hesitate to remove bad information! With the contradictory instructions here I ended up starting on the left and piercing the cable like so many before me, which is very frustrating.
Jakob C -
Die Anleitung sollte in diesem Punkt wirklich überarbeitet werden. Das ist die absolut gefährlichste Stelle, das Gerät zu öffnen. So habe ich das Flex-Kabel eines funktionierenden Displays zerstört. Ich schreibe dies auf Deutsch und bitte darum, die englischen Erläuterungen zu lesen, wo man besser öffnet.
Kajetan Hinner -
I submitted an edit adding that the corners are another good place to start (it's how I just opened mine with no trouble) and moved the ribbon cable warning up to make sure people see it.
Neal Sofge -