Introduction

Ce tutoriel de réparation Google Pixel XL provient de l'équipe iFixit et n'a pas été soumis à l'approbation de Google. Pour en savoir plus sur nos tutoriels de réparation, c'est par ici.

Ce tutoriel montre comment retirer et remplacer l'ensemble d'écran du Google Pixel XL, qui comprend l'écran et le vitre tactile.

Le panneau d'écran non renforcé du Pixel XL est fragile et est fixé au châssis avec un adhésif puissant, ce qui rend les réparations difficiles. Les chances de casser l'écran sont considérables, surtout s'il présente déjà des micro-fractures. Veillez à appliquer beaucoup de chaleur et à être extrêmement prudent lorsque vous faites levier.

  1. JCWIBsMDNLhS3ugB
    JCWIBsMDNLhS3ugB
    IsbHv3IfVrsgV3Yk
    csYWfVjLGAnK2GIa
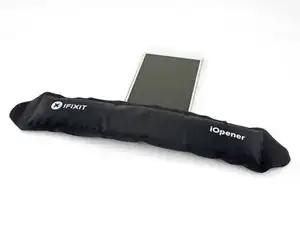
    • Chauffez un iOpener et posez-le sur le bord supérieur de l'écran pendant deux minutes.

    • Vous pouvez également utiliser un sèche-cheveux, un pistolet thermique ou une plaque chauffante, mais veillez à ne pas surchauffer le téléphone : l'écran et la batterie interne sont tous deux susceptibles d'être endommagés par la chaleur.

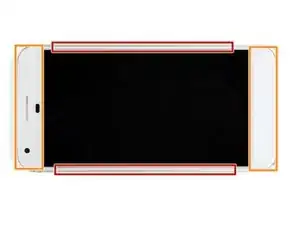
    • Prenez note des zones suivantes avant de commencer à faire levier :

    • Adhésif fin collé contre le panneau écran

    • Adhésif épais

    • Le panneau écran OLED, qui est très susceptible d'être endommagé

    • La nappe d'écran, qui peut être endommagée lorsque vous faites levier

    From my experince, it’s better to use a heat gun (if iFixit sold a good heat gun in volume, they should spruik that). Also, heat ALL sides at the same time BUT concentrate on the top part of the phone where the foam adhesive tape is thickest, second on the bottom where the foam is almost as thick. It also helps to use the 2nd & 3rd images in the series to visualise where the adhesive is.

    Jon T. -

    Ty for the advice I prefer heat gun but my first pixel

    Michael Koch -

  2. qASf1QrPQmpGloI5
    qASf1QrPQmpGloI5
    G1uOPFiNFQAx2AYG
    k1w2b3IGML5O5Ltu
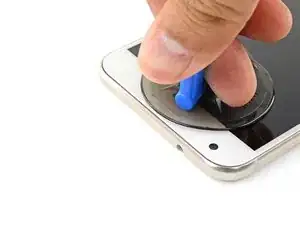
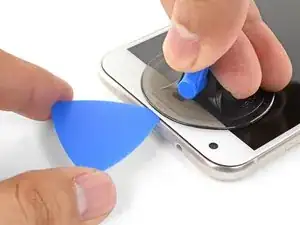
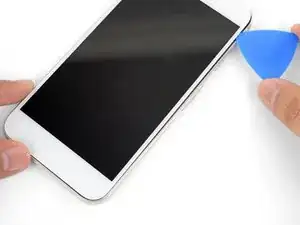
    • Une fois que le bord est chaud au toucher, appliquez une ventouse près du bord.

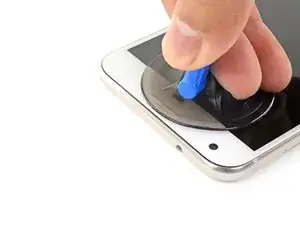
    • Soulevez la ventouse et insérez un médiator dans l'interstice.

    • N'insérez pas le médiator à plus de 13 mm (0,5 pouces), sinon vous risqueriez d'endommager l'ensemble de l'écran.

    • Si vous avez du mal à créer un espace, réchauffez le bord et réessayez.

    • Vous pouvez également essayer d'utiliser une carte à jouer au lieu d'un médiator pour faciliter l'entrée initiale.

    From my experience, I had to use a thin blade (such as the ones included with the deluxe iFixit repair kit) to slide into the small gap, and cut away at the foam adhesive. Once enough of a gap is created, the picks can then be used to push the adhesive aside - but the adhesive is so thick, especially -as Brewmaster396 observed in the comments below - at the top right corner behind the screen, that the knife is required to cut it. I failed here - cracking the back layer of my screen - because I didn’t take time to cut all the adhesive away from that thick part, and kept trying to pull the screen off. It doesn’t take a lot of pressure to crack - so maybe it’s more a thing of cutting and floating the screen up, not pulling and prying.

    Jon T. -

    Mark the picks with lines that show how deep you can go in that part of the screen. This will help keep you from accidentally hitting the fragile screen

    Matthew Goodwin -

    Matthew Goodwin - Excellent suggestion.

    casper911ca -

    Jon T made a great suggestion about creating a mark on the picks (see above).

    Matthew Goodwin responds with an “Excellent suggestion.”

    Here we are 8 months later and no lines on the picks in my new pro-tech tool kit, not sure why this hasn’t been implemented at this point in time.

    Bob H.

    Bob Hawley -

    Thin, but sturdy pieces of paper (playing cards, bits of paper box packaging) helped me a lot when trying to open my screen. The plastic picks are useful, but very slippery so you should use extra caution when applying pressure with those.

    diplomat -

  3. SMZnqLZpAXo1VRBW
    SMZnqLZpAXo1VRBW
    VsRjq1iUnCfBoJPf
    Wid4niEfNUS4OGlP
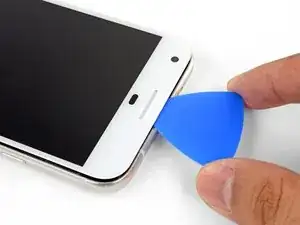
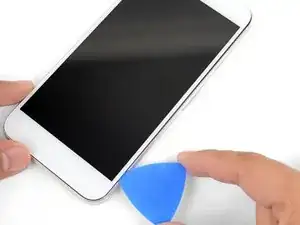
    • Faites glisser le médiator le long du bord supérieur pour découper l'adhésif.

    • Veillez à ne pas couper à une profondeur supérieure à 13 mm (0,5 pouces), sous peine d'endommager l'écran.

    • Le haut-parleur interne est recouvert d'une grille sur le bord supérieur de l'écran. Si vous n'avez pas de grille de remplacement, veillez à ne pas endommager ou perdre ce composant.

    • Laissez un médiator inséré dans le bord pour éviter que l'adhésif ne se referme.

  4. NEbOsdqV3KJ5ZDYJ
    NEbOsdqV3KJ5ZDYJ
    Ea54AOUcRKSxcBPx
    sUVRPYSMABVFCEDF
    • Chauffez un iOpener et posez-le sur le bord droit du téléphone pendant deux minutes.

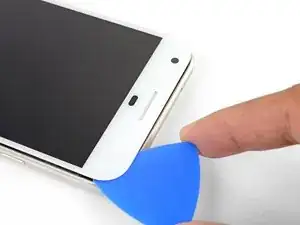
    • Insérez un médiator près du bord supérieur du téléphone, à l'endroit où vous avez déjà découpé l'adhésif.

    • Faites passer lentement le médiator autour du coin droit.

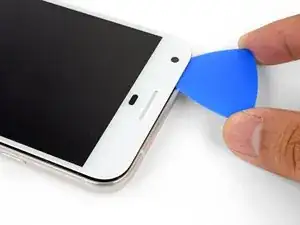
    • Faites glisser délicatement le médiator le long du bord droit du téléphone pour découper l'adhésif.

    • N'insérez pas le médiator à plus de 1 mm (1/32") du bord, sous peine d'endommager l'écran.

    • Répétez l'opération pour le bord gauche du téléphone.

  5. DS5CTgYQ5c2wdS6D
    DS5CTgYQ5c2wdS6D
    M3AN6f2NGJ43UVMZ
    • Chauffez le bord inférieur avec un iOpener pendant deux minutes.

    • Insérez un médiator près du bord droit, là où vous avez déjà décollé l'adhésif.

    • Faites passer délicatement le médiator autour de l'angle.

    • Faites glisser le médiator le long du bord inférieur pour découper l'adhésif.

    • Ne tranchez pas à une profondeur supérieure à 8,5 mm (1/3"), sous peine d'endommager la nappe de l'écran.

  6. GQmZMQBPF3AkZoqx
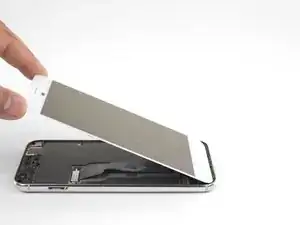
    • Une fois que vous avez fait le tour du téléphone, soulevez délicatement l'écran en le tenant par les coins droits.

    • N'essayez pas de retirer l'écran. Il est toujours fixé par une nappe.

    • Utilisez un médiator pour découper l'adhésif restant.

    As long as you’ve disengaged the adhesive relatively evenly around all sides, I found mounting the suction cup in the middle (biased a little to the left or right side), helps a lot on this step.

    casper911ca -

    do I need to get a screen adhesive when it goes back?

    dzboy15 -

  7. PIERGMK3Gtacn6aA
    PIERGMK3Gtacn6aA
    XHJEpWcHnAbJjCvF
    4vLYP1IQBnVBBWRY
    • Soulevez l'écran par le haut et faites-le pivoter de manière à ce qu'il repose à l'envers sur le châssis.

    • Veillez à ne pas tirer sur la nappe lorsque vous faites pivoter l'ensemble.

  8. ZZGE4WvqaqrACxPP
    ZZGE4WvqaqrACxPP
    2fAiN1W2cPLIDxRf
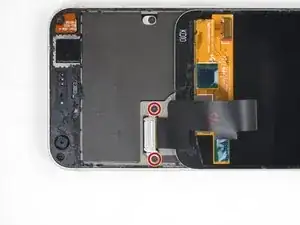
    • Retirez les deux vis T5 de 4 mm qui fixent le support de la nappe d'écran.

    • Tout au long de cette réparation Google Pixel XL, gardez la trace de chacune des vis et veillez à les revisser toutes là où elles étaient auparavant, pour éviter d'endommager votre appareil.

    • Retirez le support de la nappe d'écran.

  9. HliwdtsQpkqAcMWj
    HliwdtsQpkqAcMWj
    pI2dWacJFpklo1so
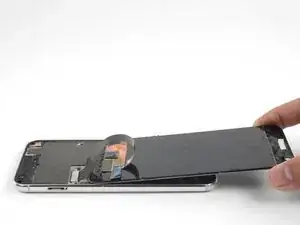
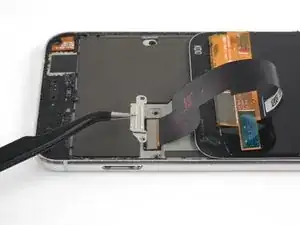
    • Utilisez la pointe d'une spatule (spudger) pour faire levier et déconnecter la nappe d'écran de son connecteur.

    • Pour rebrancher un connecteur à emboîter comme celui-ci, alignez-le soigneusement et appuyez d'un côté jusqu'à ce qu'il s'emboîte, puis recommencez de l'autre côté. N'appuyez pas au milieu. Si le connecteur n'est pas aligné correctement, les broches risquent de se déformer et de causer des dégâts irréversibles.

    i have to agree with the comment here about the connector. If you press it in the middle, it will bend. Resulting in either bent pins on the motherboard or the display. In my case it was both !

    Richard St.Hilaire -

    Be careful prying up the connector and apply force only from the side as shown in the picture cause in the longest side there are capacitors that can be broke doing the lever ( happened to me Repair missing capacitor near display connection port )

    Daniele Maggio -

  10. 2mnuHXKublYPptTh
    2mnuHXKublYPptTh
    TOKGWQrGUFvol5sE
    tJRxJuCIDcoV4ERh
    • Retirez le module de l'écran.

    • Pour obtenir des instructions complètes sur la réinstallation de l'écran du Pixel XL, suivez ce tutoriel.

    • Si votre écran de rechange n'est pas équipé d'une grille de haut-parleur, utilisez une pincette pour décoller délicatement la grille adhésive de votre ancien écran et la transférer sur l'écran de remplacement.

    • Avant d'installer un nouvel écran, veillez à retirer toute trace d'adhésif du châssis. Utilisez une spatule (spudger) ou un outil d'ouverture pour gratter l'adhésif et utilisez de l'alcool isopropylique à haute concentration pour éliminer tout résidu.

    • Si vous réinstallez le même module écran, veillez à retirer tous les résidus de colle du panneau et du châssis avant d'appliquer le nouvel adhésif.

    • Veillez à allumer votre téléphone et à tester votre réparation avant d'installer un nouvel adhésif et de refermer le téléphone.

    • Au cours du processus de démarrage après le remontage, l'écran passe par une séquence de calibrage. Ne touchez pas l'écran pendant ce processus, car cela pourrait entraîner un mauvais calibrage tactile et créer des problèmes de toucher.

    The Parts List does not state you need a replacement display. Is this portion of the Repair Guide copied and pasted from another guide (perhaps the screen replacement guide) or will I need to procure a replacement screen before I attempt to replace the battery?

    casper911ca -

    It is possible to replace the battery without replacing the display, but there is a significant chance you may break the display during removal. It depends on if your display already has micro-fractures, and how stubborn the screen adhesives are. I would personally buy a screen just in case, and return the part if I didn’t need it.

    Arthur Shi -

    Hello, I recently bought a refurb screen off of eBay to fit. The phone was 100% working before and just needed a new display/battery.

    The battery came before the display. I wanted to test the display before doing too much reassembly, so I plugged in the battery, connected the mother/daughter boards with the interconnect cable, and then plugged in the LCD.

    When I press the power button there is the usual single buzz from booting, but the display is completely blank.

    Is the replacement screen DOA, or are there important traces/connections made by fully assembling the midframe and missing screws before testing the LCD?

    If I already have all the ingredients for a fair test of the LCD, then it seems the LCD is bad?

    Like I said the phone worked perfectly before… and if the new battery is dead, I would expect no buzz, or at least a battery graphic?

    John -

    Hi John,

    If the phone buzzed, that usually signifies that it has booted up—having no image at that point usually means some kind of display issue. I would suggest disconnecting the display connector, carefully checking for any debris in the socket, and carefully re-connecting it.

    I’ve also seen a comment in another Pixel guide that suggests plugging in the display connector before the battery. If that works, please leave a comment!

    Arthur Shi -

    battery connector is not accessible without removing the display first………. and reassembling, battery has to be connected first, then the plastic piece and then the display

    Alan Sears -

Conclusion

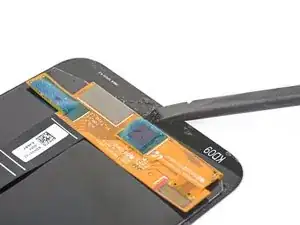
Comparez votre nouvelle pièce de changement à la pièce d'origine. Vous devrez peut-être transférer les pièces restantes ou retirer les supports adhésifs de la nouvelle pièce avant de l'installer.

'Si votre Pixel ne s'allume pas après le changement de l'écran, il est possible que le téléphone se soit allumé silencieusement lorsque la batterie est rebranchée. Maintenez le bouton de marche pendant quelques secondes jusqu'à ce que le téléphone vibre hors tension. Ensuite, rebranchez l'écran et réessayez.

Pour remonter votre appareil, suivez ces instructions en sens inverse.

Déposez vos déchets électroniques dans un point de recyclage certifié.

Votre réparation Google Pixel XL ne s'est pas passée comme prévu ? Consultez notre Forum pour obtenir de l'aide.

Arthur Shi

Membre depuis le 03/01/18

271462 Réputation

11 commentaires

I just connected the screen to the phone, but the screen doesn’t start. Do I have to restart in a special way the phone to make it works? All possible button combinations to restart the phone doesn’t work

David Torralbo -

The iFixIt iOpener tool is a complete waste of money. It didn’t loosen up the glue at all. I am requesting a refund on Amazon.com

Drew Hookway -

Hi Drew, sorry to hear that your iOpener didn’t work too well in your repairs. We like to think it’s a pretty valuable and inexpensive tool, but it does have its quirks — namely, not everyone’s microwave is specced to operate at the same temperatures, so not everyone will achieve the most optimal temperature during that heating process.

For what it’s worth, we do put a Lifetime Warranty on the iOpener tools, so our Support team would be happy to replace that one for you, if you’d like. If so, please reach out to them by using the Contact link on the help page: http://help.ifixit.com. Otherwise, you are welcome to request a refund via Amazon and we will oblige.

We wish you all the best in your future repairs.

Kadan Sharpe -

I am sure the iOpener does work, but it probably takes a long time to heat the adhesive enough for screen removal and would require several applications. I got one as part of my screen replacement kit, although I have a heat gun so I didn’t end up using it. That being said my screen took at least four minutes of heating, with some re-heating to remove the broken shards. I would also imagine that adhesives vary from manufacturer, since this is my first screen replacement all I know is that the adhesive on the Pixel XL is really strong!

Dan E -

Don’t forget to transfer the speaker cloth to the new screen. I got it all back together before realizing that there was just an ugly hole.

John-Paul Andrusky -

Thanks! I probably would have missed it. Since I changed the screen color from white to black I colored the screen black with a permanent Sharpie, worked perfectly.

Dan E -

First time repairing a smartphone. I broke my Pixel XL’s screen months ago and although it was still fully functional, the screen was broken at the top near the grill. I was motivated to fix it myself since I didn’t trust leaving at a repair center and I thought it would be an interesting to try it myself.

Parts: Google Pixel XL Screen and Digitizer (includes adhesive and tools)

Tools used: 1100W heat gun, suction cup, opening picks, plastic spudger, T5 Torx screwdriver and angled tweezers

Tools not used: iOpener

Time to complete: 1+ hour

I referenced the guide when necessary. I didn’t use the iOpener, I can’t see this working well as it took well over 4 minutes of heating the screen with my 1100W heat gun, which I used on low since high would probably have cooked my phone! My screen was broken near the top grill so I had to re-heat that area and remove the shards with tweezers. The repair time was an hour, not including prep and clean up. Removing the tiny shards and adhesive was the most time consuming.

Dan E -

This guide is very good but beware removing a cracked screen. Removing my cracked screen was particularly tricky. Using picks to run around the edges works until you encounter a crack. If you’re lucky the pick will glide past the crack but if you’re not then you might not be able to get past that crack. Try again from the other side of the crack if possible. Shattered parts of the glass screen might render the suction cup useless making certain parts of the screen impossible to remove easily. Try your best to get as much of the glass/screen up in one piece. Regularly apply heat via the iOpener to keep the glue soft and pliable and keep working at the shattered areas (I just removed the shattered pieces using the tweezers).

Alex Gemmell -

You know, I really wish you guys had an actual detailed how to of how to actually replace the screen. Everything including the actual screen replacement is left out. Now that I've done it, I can say this is a very poor how to.

-You don't describe installing the screen adhesive, which can be tricky and is easy to lay out of place.

-You don't describe how to properly lay the screen.

I've just noticed the adhesive "protector” on the back of the screen with the blue tab isn't supposed to be fully removed. Yet, I realized it all came off after I laid the screen. When you're holding the screen in one hand and trying to separate all the “protective film" you don't really have a free hand to try to pick at it and decide what's supposed to stay.

So I would like someone to contact me for another screen to be sent or my money back. I am totally displeased with everything other than the part. I read your how to, and it was not done properly because your how to isn't sufficient. And PS, this isn't my first phone repair.

Cody Fennern -

Hi Cody,

I’m sorry to hear of your repair troubles! Many of your issues could be answered in the detailed adhesive guide linked in the last step—here is a quick link. Please contact our customer support and we will get the issue resolved!

Arthur Shi -

The iOpener doesn't open a device. It's just a big radiator that's useful for keeping the temperature up. An alternative is repeatedly heating with a heat gun, and allowing parts to cool down while you cut through the gummy goo.

You cannot heat the adhesive such that the pieces can simply be pulled apart. The adhesive should be heated so that it becomes soft enough to cut through with a plastic sheet or playing card. I heat an edge with a heat gun, keeping track of the temp with a non-contact thermometer. When a side is up to temp, I then use the iOpener to keep it from cooling down quickly.

Take the time to read through the processes. Watch a video or two. Stop blaming the tools.

David Bauman -