
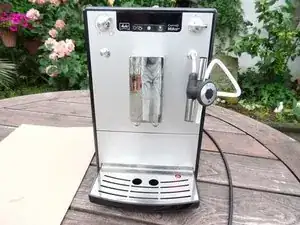
Introduction
Lorsque les meules sont usées, les grains de café ne sont plus broyés correctement. Le café moulu devient inégal et l'arôme en souffre. Voici comment changer les meules de votre machine à café Melitta Caffeo Solo.
-
-
Retirez le réservoir d'eau et l'égouttoir.
-
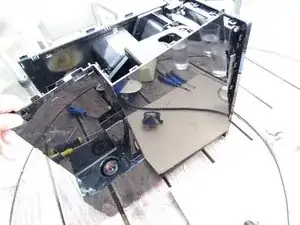
Retirez le couvercle latéral et sortez le groupe café.
-
Retirez tous les grains de café.
-
-
-
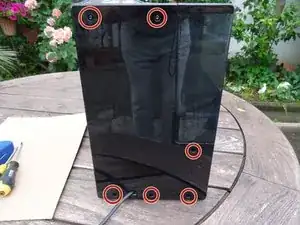
Retirez les six vis Torx T10 à l'arrière.
-
Soulevez le panneau arrière. Il est souvent coincé et vous devez alors forcer un peu. Assurez-vous d'utiliser des outils de levier en plastique pour éviter tout dommage.
-
-
-
Utilisez un tournevis plat ou une spatule en métal pour appuyer délicatement dans les fentes des deux panneaux latéraux pour détacher les attaches sur le dessus. Celles-ci sont très serrées et il faut appuyer assez fort.
-
Il devrait maintenant y avoir un espace entre les panneaux supérieur et latéraux. Soulevez le panneau supérieur avec un outil en plastique. Il se coince souvent et vous devez utiliser beaucoup de force.
-
-
-
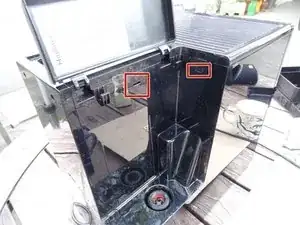
Insérez un outil en plastique dans l'espace entre le panneau avant et le panneau latéral gauche et agrandissez-le. Faites ensuite glisser le panneau latéral vers l'arrière. Il reste souvent coincé et vous devez utiliser beaucoup de force.
-
Débranchez le tuyau qui relie le réservoir d'eau à la pompe.
-
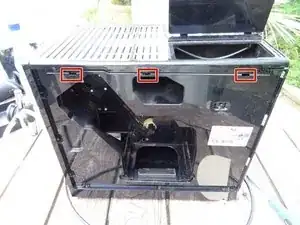
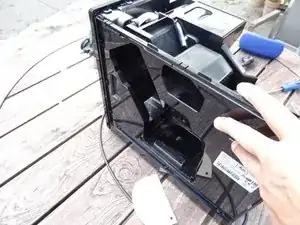
Retirez le panneau latéral.
-
-
-
Insérez un outil en plastique dans l'espace entre le panneau avant et le panneau latéral droit et agrandissez-le. Faites ensuite glisser le panneau latéral vers l'arrière. Il est souvent coincé et vous devez utiliser beaucoup de force.
-
Retirez le panneau latéral.
-
-
-
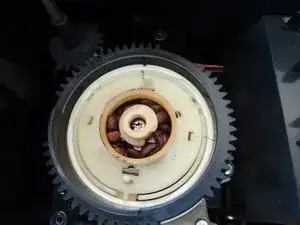
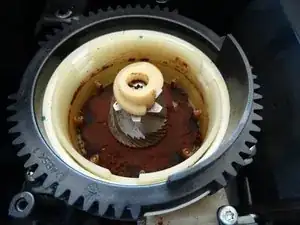
Le broyeur se trouve à l'arrière à droite de la machine. Le dispositif de réglage et la bague extérieure peuvent être déclipsés, mais cela n'est nécessaire que si le broyeur doit être complètement remplacé. Soyez prudent et utilisez une force mesurée pour le soulever.
-
Les images suivantes proviennent d'une Jura et il y a de légères différences. Mais puisque le broyeur est le même, la réparation machine à café est fondamentalement la même.
-
-
-
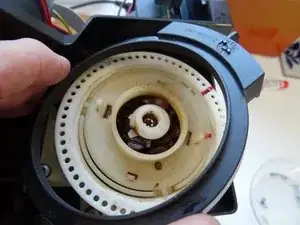
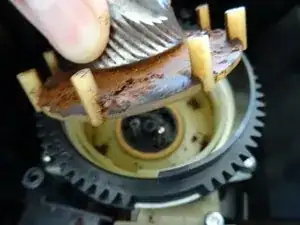
Le broyeur est ouvert. Prenez une photo du réglage, puis forcez un peu pour tirer l'engrenage de réglage vers le haut.
-
Selon le modèle, il y a également un joint en silicone sur la bague de broyage. Tirez-le simplement vers le haut.
-
Notez les marquages d'usine, ici en vert. Vous devrez les prendre en compte lors du remontage. Faites tourner l'engrenage noir dans le sens inverse des aiguilles d'une montre d'environ 90 degrés. Cela signifie que la bague de broyage complète avec l'insert est libre et peut être retirée.
-
-
-
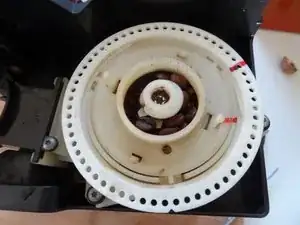
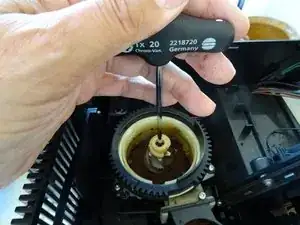
Le cône de broyage est fixé avec une longue vis Torx T20. La tête de vis est souvent recouverte de restes de grains de café. Dégagez-la et dévissez la vis dans le sens antihoraire.
-
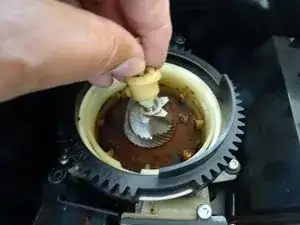
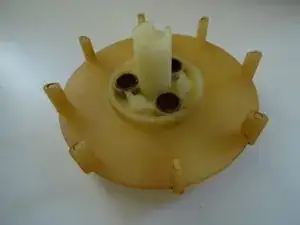
Maintenant, le chargeur de grain (la petite pièce blanche hélicoïdale) peut être retiré. Le cône du broyeur et l'entraînement peuvent maintenant être soulevés avec précaution.
-
-
-
La plupart du temps, le broyeur est fermé avec de l'adhésif. Tout doit être bien nettoyé à nouveau, pour que l'arôme du café soit à nouveau bon.
-
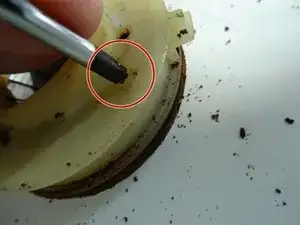
L'anneau de feutre autour de l'entraînement peut être soigneusement soulevé avec une aiguille puis nettoyé. Ne le lavez pas, sinon il va gonfler. Tournez-le simplement la première fois, de sorte que le côté propre soit vers le haut.
-
L'intérieur du broyeur peut être nettoyé avec un pinceau et un chiffon humide, l'entraînement avec une brosse à vaisselle et de l'eau tiède. Laissez bien sécher !
-
-
-
Appuyez sur les deux petits loquets, puis appuyez alternativement à gauche et à droite, puis le cache se détache.
-
Il suffit de retirer les deux clips de maintien de la bague.
-
Après nettoyage et changement de la bague, le cache est reclipsé. La bague de broyage a maintenant été remplacée.
-
-
-
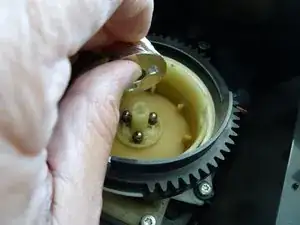
Insérez d'abord l'entraînement nettoyé, puis les trois douilles, les ressorts et les billes. Montez maintenant le cône de broyage sur les trois billes.
-
Insérez ensuite le chargeur de grains, vissez les vis centrales. Lors du vissage, appuyez sur le cône vers le bas et assurez-vous que tout s'enclenche.
-
-
-
Insérez la bague de broyage. L'engrenage noir est de nouveau tourné vers la droite jusqu'à ce que les trois repères soient alignés. Ensuite, réinstallez l'engrenage de réglage tel qu'il était à l'origine.
-
Ensuite, assemblez les pièces restantes dans l'ordre inverse.
-
Vous pouvez affiner le degré de mouture en plaçant un rouleau de papier toilette vide à la verticale sur le broyeur ouvert et en versant quelques grains de café. Branchez la machine à café (attention !), sélectionnez une tasse de café et regardez le café moulu sortir du broyeur.
-
-
-
Les deux photos sont absolument authentiques : le café avant l'échange est fin et transparent. Après, il est noir et corsé, il a plus de crème. Aucun autre réglage n'a été modifié ! La réparation en valait vraiment la peine.
-


Effectuez les étapes dans l'ordre inverse pour remonter votre appareil.
4 commentaires
Hello there. Congratulations for you instructions. I am preparing to change the grinderstones on my Melitta too. Please tell me , probably it is necesary, which parts are better to be greased/regreased before reassembly ? Also do you have any knowledge of improved version of grindstones with better metal ? Some shop claim that they sell newer/improved version like for example version 5.2 . Any ideeas ? Thank you.
@ursanandrei I would buy the original ones. They do last for about 10 000 cups, I think this is OK ;-). The grinder (and the stones) for Jura, Melitta, Nivona, some Bosch, Siemens, AEG, Krups... are all the same. If you live in EU the price will be around 25€, e.g. here.
And: Normally there is no grease on the grinder. If the large gear wheel can no longer be turned easily because there are coffee grounds between the wheel and the grinder, you need to clean it and possibly lubricate it very thinly with food-safe silicone oil.
VauWeh -
Thank you for your answer. Can you tell me if the grindstones kit with the code H432712 are suitable for my Melitta E 957-240 ? ******
I think so, yes it should fit. This is the standard kit for the normal Melitta. In the unlikely case it does not fit, be prepared to give it back.
VauWeh -
bei meiner Maschine muss ich die Schale 3-4 mal rausnehmen / einsetzten damit sich das Signal von „dauerhaft an“ auf „blinkend“ einstellt, deutet das daraufhin das der mikroschalter getauscht werden sollte. Übrigens, danke für das tolle Tutorial ..lg Tom
Hans-A Shole -
Problem ist behoben, Schalter getauscht, Position des Schalters ist bei der Caffeo Solo 950 sehr gut erreichbar. Alter Schalter konnte auch wieder gangfähig gemacht werden und dient nun als Ersatz.
Hans-A Shole -