Introduction

Ce tutoriel montre comment retirer et changer la prise jack sur le Samsung Galaxy S10e.

Si vous essayez de résoudre des problèmes de connexion intermittente avec vos écouteurs filaires, essayez de nettoyer la prise jack avant de la remplacer.

  1. RYlDyYuZKYnLSdGA
    • Ouvrir votre téléphone endommagera ses joints étanches. Procurez-vous de l'adhésif de remplacement avant de commencer ou veillez à ne plus mouiller votre téléphone si vous le remontez sans remplacer l'adhésif.

    • Veiller à éteindre complètement votre téléphone avant de commencer cette réparation.

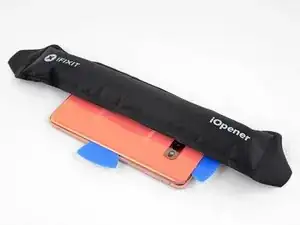
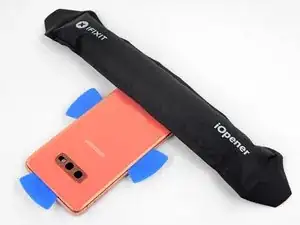
    • Préparez un iOpener et chauffez le dos du téléphone le long du bord droit pendant environ deux minutes. Cela contribuera à ramollir l'adhésif qui fixe la coque arrière.

    • Vous aurez peut-être besoin de refaire chauffer et de reposer l'iOpener plusieurs fois avant que le téléphone soit suffisamment chaud. Suivez les instructions de l'iOpener pour éviter de le surchauffer.

    • Un sèche-cheveux, un pistolet à air chaud ou une plaque chauffante peuvent également faire l'affaire. Veillez cependant à ne pas surchauffer le téléphone. L'écran OLED et la la batterie interne sont tous deux sensibles à la chaleur.

    L'écran OLED et la la batterie

    Isidore LECHAT -

    My s10e is 4 years old now and I found glue had weakend and heating was uneccissary.

    ervan.hady -

    I purchased my S10e refurbished, so the exact age and prior repairs are unknown. I believe it had ~200 charge cycles. After 2.5 years, the side adhesive started to fail and there was a noticeable slit under the rear cover. It was unclear if the lithium battery was starting to swell, which would have been a more dangerous thing. As such, 3 out of the 4 sides were easy to open just with sliding the pick.

    I heated the iOpeners for 30s in my 1000W microwave and it reached a temp of 180oF. I placed this on the final corner and it released fairly easily.

    WL1 -

    Is 180 degrees a good temperature to set the air temperature to if a heat gun is used?

    Gee Foe -

    Mine released without heat, just caught the edge with a fingernail and was able to work it free without any tools.

    Gee Foe -

    I would definitely NOT use a heat gun; the iOpener is the right thing to use. I've repaired many devices and I have lots of heat guns, but a heat gun puts out a tremendous amount of heat, and spreads it everywhere instead of in a controlled manner. The iOpener is about 150 F -- just getting uncomfortable to touch -- and the heat is all in a thin strip. You want to gently heat the edges of the cover, not cook the battery and electronics. Smart phones are expensive and the iFixit tools are cheap. Don't risk your phone to save a few bucks.

    MikeT-NYC -

  2. WgNulxIYUqQiYs5a
    WgNulxIYUqQiYs5a
    QoB1vTltD5AnZMwV
    • Au cours des étapes suivantes, vous allez trancher l'adhésif qui fixe la coque arrière.

    • Vous pouvez voir la répartition de la colle sur la première image, qui montre l'intérieur de la coque, une fois celle-ci retirée.

    • Vu de l'extérieur, vous allez faire céder l'adhésif dans les zones entourées de rouge et de jaune.

    • L'adhésif est plus fin du côté droit du téléphone, juste en dessous du bouton Bixby.

    glad to see Samsung has improved back glass quality since the tortilla chip on the Note 5. much friendlier to open.

    Steve B -

    My S10e was two years old so the adhesive was really weak, and it was really simple to open. Still, this guide was totally useful.

    Rafael Sánchez Treviño -

    That's encouraging, hopefully the older-than-2 years S10e I'm looking to do proves as easy to open-

    Gee Foe -

    Mine was fairly easy, 3 years old and I was able to just pick it open carefully using only my fingernails. The hard part was the battery, which I did slowly to reuse the original adhesive, getting it off in one continuous strip.

    Gee Foe -

  3. wipE2wUqUAWtD34B
    wipE2wUqUAWtD34B
    jMiCSZVTACR1YiVH
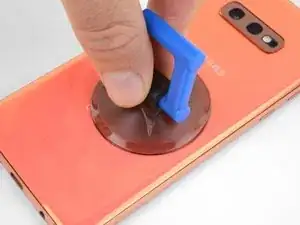
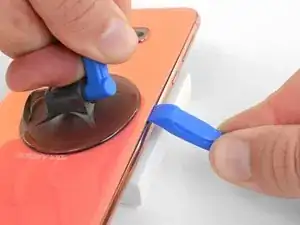
    • Fixez une ventouse sur la coque arrière, le plus près possible du bord chauffé, juste en dessous du bouton Bixby, là où l'adhésif est plus fin.

    • La ventouse n'adhérera pas correctement sur la partie incurvée de la vitre, veillez donc à ne pas la poser trop près du bord.

    • Si la coque arrière est craquelée, la ventouse risque de ne pas adhérer. Essayez de la soulever avec du ruban adhésif épais, ou bien collez la ventouse avec de la super glue et laissez sécher avant de continuer.

    La ventouse n'adhérera pas correctement sur la partie incurvée de la vitre ,

    Sur la partie incurvée de la coque.

    Isidore LECHAT -

    It is 2024 and I had a difficult time with creating the initial gap. I applies the heat tube for a little longer and that worked. The back of the phone basically came entirely off after the initial opening

    Footage4366 -

  4. ibRia3sRxmirKq3R
    ibRia3sRxmirKq3R
    SidBmgyn3NSdqejr
    ZTxO2THHS4IXqphH
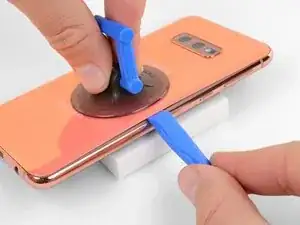
    • Surélevez le côté chauffé du téléphone en le posant sur un objet d'environ 13 mm (0,5 pouce) de haut. Il sera plus facile d'insérer l'outil d'ouverture dans le téléphone sous cet angle.

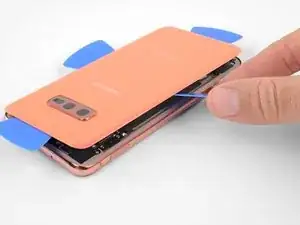
    • Soulevez le bord droit de la coque arrière avec votre ventouse pour ouvrir un léger espace entre la coque arrière et le châssis.

    • Cela nécessitera de forcer quelque peu. Si vous avez du mal, faites chauffer plus pour continuer à ramollir l'adhésif et recommencez. L'adhésif refroidit très vite, vous devrez donc peut-être vous y reprendre à plusieurs reprises.

    • Si vous utilisez un iOpener, suivez ses instructions de chauffage pour éviter de le surchauffer. Le gel risque sinon d'exploser.

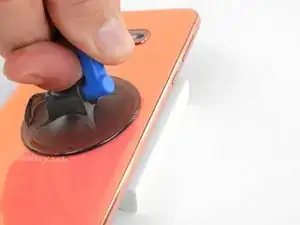
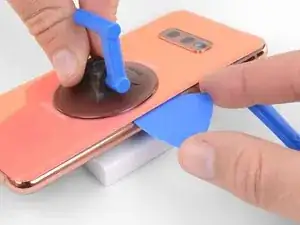
    • Introduisez le bout d'un outil d'ouverture dans l'espace.

    • La coque arrière risque de se casser si vous forcez trop ou essayez de faire levier avec des outils en métal.

  5. qsHFt1fweURqHcTl
    qsHFt1fweURqHcTl
    Ypt5KfriEDhxXBVI
    JHNNmQSKmCIE55cg
    • Faites glisser l'outil d'ouverture le long du bord droit du téléphone pour faire céder l'adhésif qui fixe la coque arrière.

    I found that using opening picks for the entire repair was much easier then the pry tool, but that could just be me

    Jake Simek -

    You are criminals! This "tutorial" is full of destructive instructions. And whenever trying to make a comment, iFixid admin hides behind the bot personality telling: "Your comment was marked as spam"

    People, do not trust them! They tell you everything to break your phone so you will need to bring it to service!

    Someone fromjapan -

    You are criminals! No one ever should use the triangular "mediator" pick for iPhones, or planar connector picks! The back cover is NOT gorilla-glass, and it will crack in multiple places immediately! Only very thin "watchmaker" opening plates(initial pickup) and 0.1mm rigid PP stripes (cut from cheap tool packages, or 7-eleven food packs) may be used there. Before that the side rim - not the cover itself should be heated to boiling point and constantly re-heated while tearing the two-sided scotch. The opening strip may be replaced 2-3 times while reaching the opposite side, because it collects the torn glue. This instruction from iFixit is a pure sabotage for tricking non-expecting users to repair-shops.
    The same goes to battery, if you don't risk using solvents, which may damage the screen and the circuit. Only rounded PP strips may tear off the battery scotch. It should be preheated from the screen side, until the battery becomes hot.

    Someone fromjapan -

    The commenter who keeps saying "you are criminals" over and over may have been using this guide to repair a different phone, so he or she is confused. On the Galaxy S10e, I had no trouble heating and lifting the cover as described (though I had to reheat the iOpener several times). If you heat it gently with the iOpener and long enough, you're not stressing the back cover because the glue will come loose almost immediately. (I could have almost lifted it with a fingernail).

    MikeT-NYC -

  6. CymkJTNoPNTeZUka
    CymkJTNoPNTeZUka
    aKLeT25rEdLpYZDc
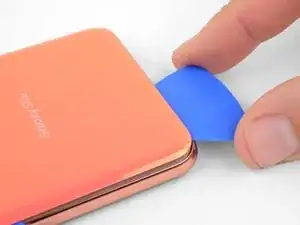
    • Insérez un médiator à côté de l'outil d'ouverture. Laissez-le en place pour empêcher que la colle adhère de nouveau.

  7. DajMoKG3ZVtX2H13
    • Posez un iOpener chaud sur le bord supérieur du téléphone pendant deux minutes.

  8. lvjkvNLjJpAFVWl6
    lvjkvNLjJpAFVWl6
    MTdMIIvoAaIAINRe
    rPKSLCevjL5MNVfR
    • Insérez un médiator à côté du coin supérieur droit du téléphone et faites-le glisser le long du coin et du bord supérieur du téléphone.

    • La partie enduite de colle est plus large ici, vous devrez donc enfoncer le médiator plus en avant pour décoller.

    • Laissez le médiator en place pour empêcher que l'adhésif colle de nouveau.

    This was the only part on my phone that had viable adhesive after it started to naturally separate.

    WL1 -

  9. qhP1UXkqFmCwufXo
    • Posez un iOpener chauffé sur le bord gauche du téléphone pendant deux minutes.

    Insérez un nouveau médiator à côté du bord

    Insérer un autre mediator

    Isidore LECHAT -

  10. oZx6joj2KDeKLxEe
    oZx6joj2KDeKLxEe
    o5XgEUsmvx5EEmDn
    PuNPkK45faEWJfJ1
    • Insérez un nouveau médiator à côté du bord supérieur gauche et faites-le glisser le long du bord gauche du téléphone.

    • Cette fois encore, laissez le médiator inséré dans le bord gauche du téléphone pour que l'adhésif ne recolle pas.

  11. Fh2TG26nw2cGHX5K
    • Posez un iOpener chaud sur le bord inférieur du téléphone pendant deux minutes.

  12. bnITFSXskpHsDNtt
    bnITFSXskpHsDNtt
    O3J2tKCsAQKMKJ4g
    ahpVJTbPhDpKgqJP
    • Insérez un médiator du côté du coin inférieur du téléphone et faites-le glisser le long du bord inférieur pour en faire céder l'adhésif.

    • La zone enduite de colle est plus large ici, vous devrez donc enfoncer le médiator plus en avant pour décoller.

  13. EcddTJkeF1rNcZTZ
    EcddTJkeF1rNcZTZ
    EVXuMTykjnn1OkEB
    BbfxPHc36hsCeTBU
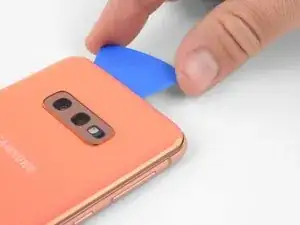
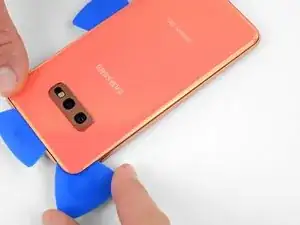
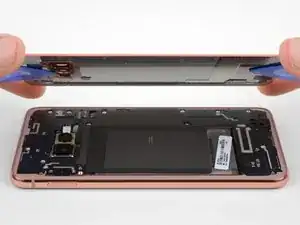
    • Soulevez très soigneusement la coque arrière à l'aide des médiators.

    • Si vous sentez la plus légère résistance, arrêtez de faire levier et prenez un médiator pour couper les restes d'adhésif.

    • Enlevez la coque arrière.

    WARNING: Once the cover is off, protect both the inside of the camera window in the back and the camera lens in the phone itself with pieces of paper held on by masking tape. This will prevent accidentally getting cleaner or fingerprints on them.

    MikeT-NYC -

  14. aFFmcJMKDdeYeKB4
    • Consultez ce tutoriel pour remonter la coque arrière et poser une nouvelle couche d'adhésif.

    • N'oubliez pas d'allumer votre téléphone et de tester votre réparation avant de poser le nouvel adhésif et de sceller à nouveau le téléphone.

    • Si vous le souhaitez, vous pouvez remonter la coque arrière sans remplacer l'adhésif. Retirez les plus gros résidus d'adhésif qui pourraient empêcher la coque arrière de tenir. Puis faites chauffer la coque arrière et appuyez dessus pour la faire adhérer. Ce ne sera pas étanche, mais la colle restante suffit pour maintenir la coque en place.

    This should be the very last step in the guide, but the edit button seems to only allow editing the content, not the positioning in the guide. Not sure how to fix this.

    James Beegle -

    The photo seems to show someone lifting the old glue off with tweezers. That certainly wasn't true for my glue! I scrubbed it off with isopropyl alcohol and fabric. (Don't use a paper towel or Kleenex because they fall apart. I used a postage-stamp-size square cut from an old athletic sock. With this and the alcohol I was able to get the cover and the phone as clean as they were at the factory.

    When doing this, hold the phone at an angle in your other hand so any alcohol dribble to the outside and not to anywhere important.

    MikeT-NYC -

  15. VrNWnP6nMMSKFeFw
    • Dévissez les huit vis cruciformes de 3,9 mm qui fixent le châssis supérieur au téléphone.

    Again, criminal lies! These screws have different length! Take notes which are where! There are at least 4 versions of antenna/coil modules, so each time it may be a little different.

    Someone fromjapan -

    Interesting observation! I did not see this comment until after I reassembled the midframe and closed everything, so I can not confirm. If true, I either got lucky or it didn't matter.

    WL1 -

    I'll note this and see about maintaining the same order for reinstallation -

    Gee Foe -

    Mine appeared to be all identical, so it was easy

    Gee Foe -

    The screws on my SM-G970F/DS were all identical.

    James Beegle -

    The screws in my phone were also identical. I think the "criminal lies" commenter above was confused and was using these instructions to repair a different phone. Too many of his or her comments are just not relevant to this job.

    MikeT-NYC -

  16. IDa2Iq4HaRdASA1d
    IDa2Iq4HaRdASA1d
    bIsuLnDFxGSePZ4S
    • Faites glisser un médiator sous le coin inférieur droit du châssis supérieur pour faire céder l'adhésif qui le fixe au châssis inférieur.

    I also had to use a little bit of heat here from the iOpener.

    MikeT-NYC -

  17. wqbmoM5oZ4OGl6KX
    wqbmoM5oZ4OGl6KX
    crcmA6ihTKRpPucJ
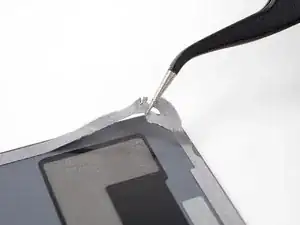
    • Insérez la pointe d'une spatule (spudger) dans la petite encoche du côté droit de la partie en plastique du châssis supérieur, à côté du bouton Bixby.

    • Faites levier avec la pointe de la spatule pour séparer le châssis central du châssis du téléphone.

    Criminals! These instructions are given for breaking your phone! Never use the puncher-picker! The antenna module, after gently unglued in the single spot, is pulled down! Not up! DOWN, I said! And it comes off without any force. Minimal force will be required to push it back (after putting it flat on place).

    Someone fromjapan -

  18. naJQHs4K4goepoCk
    • Saisissez le châssis central par sa partie en plastique et retirez-le du téléphone.

    • Pour le remonter, commencez par insérer la partie supérieure dans le châssis du téléphone, Puis appuyez délicatement sur le reste de l'ensemble pour l'encastrer.

    In my phone there was a lot of residual adhesive on the top section, so I initially just flapped it over like a hinge while I finished the other steps. For me, I found, and it should be emphasized, for the reinstall, the top edge needs to be placed flat and snapped UP into the chassis for it to fit.

    WL1 -

  19. ao22gUSksYhVU4O1
    ao22gUSksYhVU4O1
    GBx52kUUqspTFd3U
    • Servez-vous du bout plat d'une spatule pour soulever le connecteur de la batterie tout droit vers le haut et le débrancher de sa prise.

    This manual is a pure SABOTAGE! Never pick up the connector from the camera side! You risk damaging the camera, and the connector itself. Pick it up gently in two steps from left first, then from right, if it does not jump up immediately.

    Someone fromjapan -

    Going from the sides also avoids shorting the battery contacts if you use anything other than a non conductive tool. So the side is best.

    Gee Foe -

  20. XpsijOF21jagwGBO
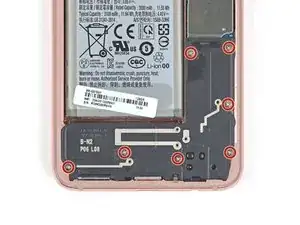
    • Utilisez un tournevis cruciforme pour défaire les sept vis de 3,9 mm qui fixent le haut-parleur.

  21. VlpgPU2WMfeejSkF
    VlpgPU2WMfeejSkF
    cdh1hQRLewyX42Gd
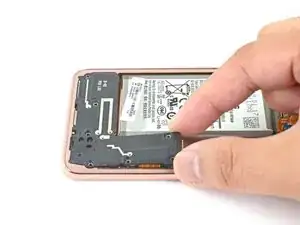
    • Insérez la pointe d'une spatule (spudger) dans le cran sur le bord droit du haut-parleur.

    • Faites levier avec la spatule pour détacher le haut-parleur.

  22. rfdaXJHSXHPwriHX
    rfdaXJHSXHPwriHX
    DFqjNNOHhyXWIFHt
    4Qqe1TLioiltEmMT
    • Soulevez le haut-parleur et retirez-le.

    • Pour le remonter, appuyez sur les bords du haut-parleur jusqu'à ce qu'il s'emboîte.

  23. o3UnNFJKCjjWsjaj
    o3UnNFJKCjjWsjaj
    nrIoPXhpNgZDi2Sq
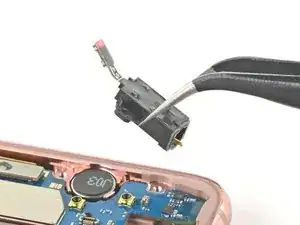
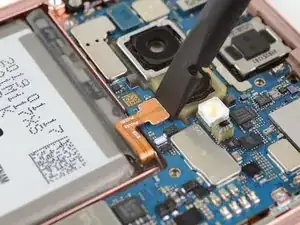
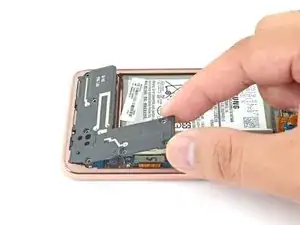
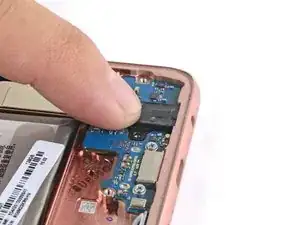
    • Utilisez une spatule (spudger) pour faire levier et déconnecter le connecteur de la prise jack de sa prise sur la carte mère.

  24. vZMiBUdCSIyqqIlt
    vZMiBUdCSIyqqIlt
    EgcXM66f6btFyi1v
    WFe4dqRjAVbGtUim
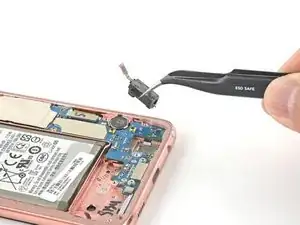
    • Insérez la pointe d'une spatule dans le port de la prise jack.

    • Poussez fermement vers le haut sur la spatule jusqu'à ce que la prise jack se détache du châssis.

    • La prise jack risque de s'éjecter une fois qu'elle est détachée.

  25. nbkYGHMIRdIYuScD
    nbkYGHMIRdIYuScD
    TBF6T2VWQraaUWcU
    • Retirez la prise jack.

  26. LitXxMJZNjQQA4JC
    LitXxMJZNjQQA4JC
    B1JDonPBpGqNAgAU
    • Pour la remonter, placez la prise jack dans son logement, puis utilisez votre doigt pour la pousser fermement vers le bas jusqu'à ce que vous sentiez qu'elle s'enclenche.

Conclusion

Pour remonter votre appareil, suivez ces instructions dans l'ordre inverse.

Une fois la réparation terminée, suivez ce tutoriel pour tester votre réparation.

La réparation Samsung Galaxy S10e ne s'est pas déroulée comme prévu ? Essayez quelques astuces de diagnostic ou demandez de l'aide sur notre Forum.

Arthur Shi

Membre depuis le 03/01/18

271465 Réputation

Un commentaire

Thank you for the guide =)

Andrew Lviv -