Introduction

Ce tutoriel de réparation a été rédigé par le personnel d'iFixit et n'a pas été approuvé par Google. Apprenez plus sur nos tutoriels de réparation ici.

Suivez ce tuto iFixit pour changer votre écran Pixel 4a 5G.

  1. BjHu3IQZrLUOOOfX
    BjHu3IQZrLUOOOfX
    whCVBCH5sAn2AjWX
    2jAVOXWTQEtatJHY
    • Vous devrez soulever l'écran pour le retirer du téléphone. Lisez attentivement les notes suivantes avant de continuer.

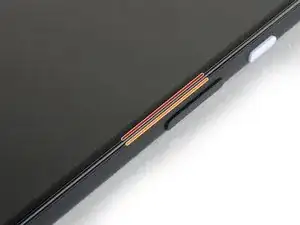
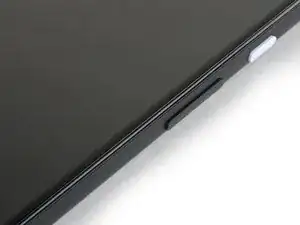
    • Prenez note des deux jointures sur le bord de votre téléphone :

    • Jointure d'écran : cette jointure sépare l'écran du reste du téléphone. C'est là qu'il faut faire levier.

    • Jointure du cadre : c'est là que le cadre en plastique rencontre la coque arrière. Il est maintenu en place par des vis. Ne faites pas levier sur cette jointure.

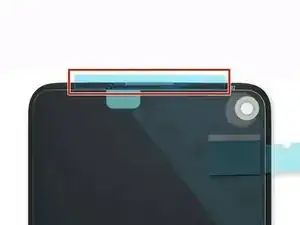
    • Avant de commencer, notez les zones suivantes sur l'écran :

    • Nappe d'écran : n'insérez pas le médiator plus profondément que prévu, vous risqueriez d'endommager cette nappe.

    • Périmètre adhésif : faire levier au-delà de ce périmètre étroit sans incliner le médiator endommagera le panneau OLED.

    i don't understand the "screen flex cable" nor the "adhesive perimeter" instructions

    Jonas Baumann -

  2. 1shUoWThMUmcKsOP
    • Appliquez un iOpener chauffé sur le bord droit de l'écran pendant une minute pour ramollir l'adhésif.

    • Un sèche-cheveux, un pistolet thermique ou une plaque chauffante peuvent également être utilisés, mais veillez à ne pas surchauffer le téléphone - l'écran et la batterie interne sont tous deux susceptibles d'être endommagés par la chaleur.

  3. 22sNsmCMdWrQj2dT
    22sNsmCMdWrQj2dT
    bGfHPsVOSiS6AIx2
    adhLllJ3twF4oWNB
    • Si votre écran est sérieusement fissuré, le recouvrir d'une couche de ruban adhésif transparent peut permettre à la ventouse d'adhérer. Alternativement, du ruban adhésif très résistant peut être utilisé à la place de la ventouse. Si tout échoue, vous pouvez coller la ventouse sur l'écran cassé.

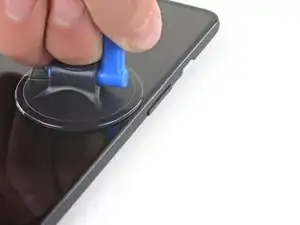
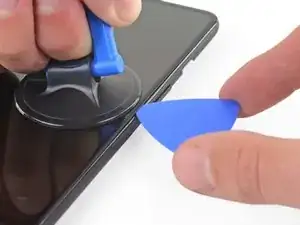
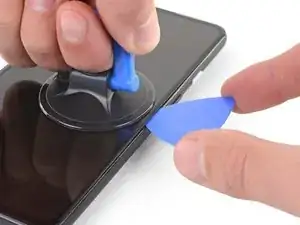
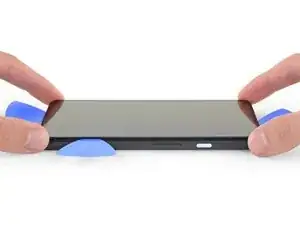
    • Placez une ventouse sur l'écran aussi près que possible du bord droit.

    • Soulevez la ventouse avec une force forte et constante.

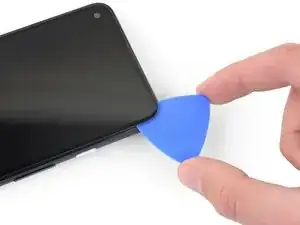
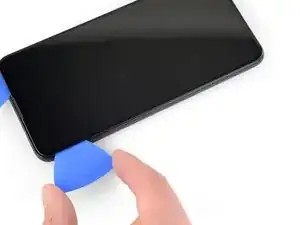
    • Insérez la pointe d'un médiator dans la jointure de l'écran sur 1 mm maximum.

    When "lifting" the suction cup, press down while pivoting the handle away from the front/edge, as if opening a door.

    Soon-Hee -

    For a very cracked screen, I placed clear packing tape on top of the screen to use the suction cup at all. Also had to suction cup and pry/pick at multiple sides of the screen. Small fragments of broken glass won't pry up, so had to use tweezers to pull at glass fragments to release them from the adhesive underneath.

    Soon-Hee -

  4. EKWSEDUtR4UMD4kh
    EKWSEDUtR4UMD4kh
    Fn1sUW1B2NmQPv11
    sNcqGLdHL1lNTpbI
    • Cette étape montre comment insérer votre médiator sans endommager le panneau OLED. Faites-le avant de trancher l'adhésif.

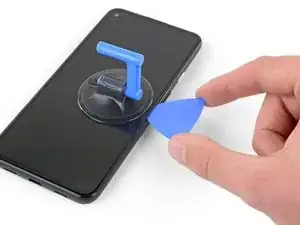
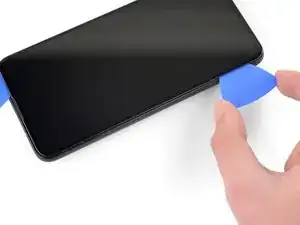
    • Avec le médiator enfoncé d'1 mm dans l'interstice, faites pivoter le médiator vers le haut à un angle prononcé.

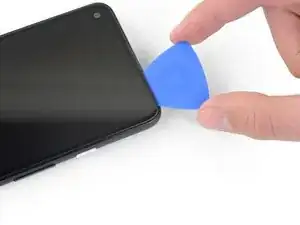
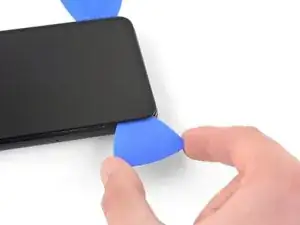
    • À un angle prononcé, poussez délicatement le médiator dans l'interstice d'environ 6 mm. Le médiator doit glisser sous le panneau OLED.

    • Arrêtez-vous si vous sentez que la pointe du médiator heurte un point dur. Le médiator est peut-être en appui contre le bord du panneau OLED. Inclinez le médiator et réessayez.

    You don't exactly have to be utterly careful about damaging the panel. The glass+OLED screen as a whole is being replaced here. So it doesn't really matter if you accidentally damage the old OLED panel.

    Soon-Hee -

    If only the battery needs to be replaced, be sure to pay attention to the angle at which the pick is moved. Even the slightest deviation and the display is crap. I followed the instructions, but obviously I got to the display somewhere. Unfortunately the display now remains black and I have a flashing green bar at the top. So be careful.

    RiKER “MANiAC -NI-” -

  5. QWiugoSfJ62HsgtF
    QWiugoSfJ62HsgtF
    IDLicOJLOMeF4SGR
    qqjwfukS22qIkiPE
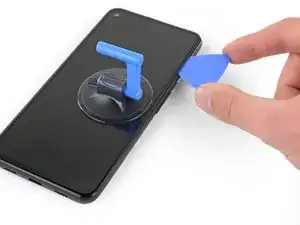
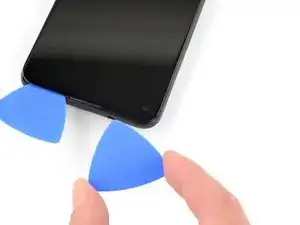
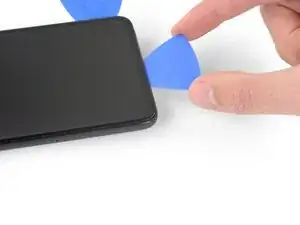
    • Faites glisser le médiator le long du bord droit de l'écran pour couper l'adhésif.

    • N'insérez pas le médiator à plus de 6 mm sinon vous risquez d'endommager la nappe d'écran.

    • Laissez le médiator dans le coin inférieur droit pour empêcher l'adhésif de se recoller.

  6. kc43OPZSOSOINTxD
    kc43OPZSOSOINTxD
    NQGH5UQSENiB6xJl
    KCRVSKDPmdIuAeAD
    • Il y a une grille recouvrant le haut-parleur sur le bord supérieur de l'écran. Si vous n'avez pas de grille de remplacement, veillez à ne pas endommager ou perdre cette pièce.

    • L'adhésif de l'écran est faible, vous ne devriez donc pas avoir besoin de réappliquer de la chaleur. Si l'adhésif de l'écran est difficile à couper, appliquez de la chaleur sur la zone difficile pendant une minute et réessayez.

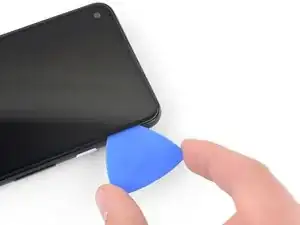
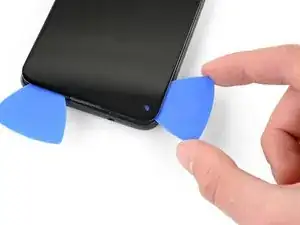
    • Insérez un autre médiator dans le bord droit du téléphone à un angle où un espace s'est déjà formé pour éviter d'endommager le panneau OLED.

    • Faites glisser le médiator le long du bord supérieur du téléphone pour couper l'adhésif.

    • Laissez le médiator inséré le long du bord supérieur pour empêcher l'adhésif de se recoller.

    The replacement screen I purchased from iFixit Oceania in Sept 2022 included a new speaker mesh, already attached to the screen.

    Chris -

    The corners seems particularly tricky with the adhesive. Make sure to reapply heat in the corners. I cracked my screen while detaching the corners.

    Patrick Nantel -

  7. yRFEhejVGu2mS5YM
    yRFEhejVGu2mS5YM
    LyPSEqvXePhN1S1X
    l2NREA1KkHMXfF24
    • Insérez un autre médiator dans le bord supérieur de votre téléphone à un angle où un espace s'est déjà formé pour éviter d'endommager le panneau OLED.

    • Utilisez le médiator pour trancher autour du coin supérieur gauche où se trouve le hublot de la caméra.

    • Si l'adhésif de l'écran est difficile à couper, appliquez de la chaleur sur la zone difficile pendant une minute et réessayez.

    • Laissez le médiator inséré le long du bord gauche de votre téléphone pour empêcher l'adhésif de se recoller.

  8. pDikbRxBHG5uQeSP
    pDikbRxBHG5uQeSP
    6MwZMZRBrFJivhZO
    T4qM4wocYcLLfWYD
    • Faites glisser le médiator pour couper l'adhésif le long du bord gauche de votre téléphone.

    • Si l'adhésif de l'écran est difficile à couper, appliquez de la chaleur sur la zone difficile pendant une minute et réessayez.

    • Gardez à l'esprit que vous coupez maintenant près de la nappe d'écran et du numériseur.

  9. rBRGU4Pt26RKVkyF
    rBRGU4Pt26RKVkyF
    XxsCXeWkHfbPsNGn
    SeXRscJBBBGL4Bvk
    • Faites glisser le médiator autour du coin inférieur gauche et le long du bas de l'écran pour couper le reste de l'adhésif.

    • Si l'adhésif de l'écran est difficile à couper, appliquez de la chaleur sur la zone difficile pendant une minute et réessayez.

    • Gardez à l'esprit que vous coupez maintenant près de la nappe d'écran et du numériseur.

  10. 6fD2WJPFoOK4akuO
    6fD2WJPFoOK4akuO
    tcSavu6p6KTwYkYv
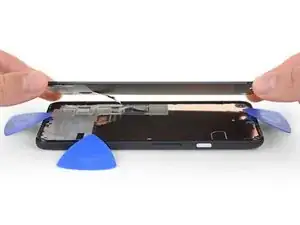
    • Lorsque vous avez coupé autour du périmètre du téléphone, soulevez délicatement le bord droit de l'écran, en ouvrant partiellement le téléphone comme un livre.

    • Ne retirez pas encore l'écran.

    • Utilisez un médiator pour couper soigneusement tout adhésif restant.

  11. aOUSRLAvkpRuPCkg
    aOUSRLAvkpRuPCkg
    4mkUQNpF1jiFBN2D
    tROQPeoMEqE2UVTu
    • Soulevez à partir du bord supérieur et faites basculer l'écran par-dessus le bord inférieur jusqu'à ce que vous puissiez le poser côté vitre vers le bas.

    • Veillez à ne pas exercer de tension sur la nappe connectée.

  12. 2LZI2wXoNHhEOebu
    2LZI2wXoNHhEOebu
    NO5L6wkKncYYGiSU
    UwcqyVs6gG1putuL
    • Utilisez votre ongle ou une pincette pour décoller délicatement l'adhésif recouvrant le connecteur d'écran.

    • S'il est en bon état, vous pouvez réutiliser cet adhésif lors du remontage. Sinon, remplacez-le par un morceau de ruban adhésif Kapton.

    The replacement screen I purchased from iFixit Oceania in Sept 2022 included a new piece of tape.

    Chris -

  13. KyEBG1F6liiXaYU2
    KyEBG1F6liiXaYU2
    MMC1UB5BKiEs4Y6L
    MSOrjLPXIuxOPqmU
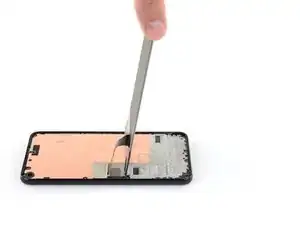
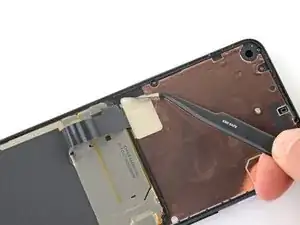
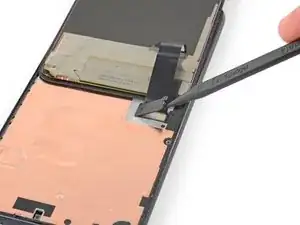
    • Insérez la pointe d'une spatule dans l'ouverture du cache en plastique fixant la nappe de l'écran.

    • Soulevez le couvercle en plastique vers le haut jusqu'à ce qu'il sorte de sa place.

    • Le couvercle en plastique peut sauter en l'air.

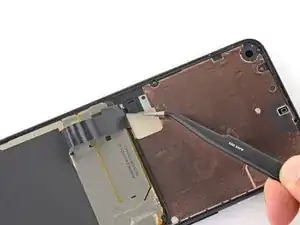
    • Retirez le couvercle en plastique.
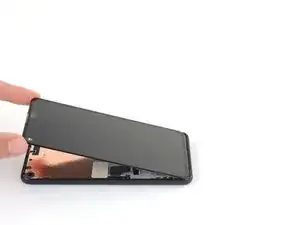
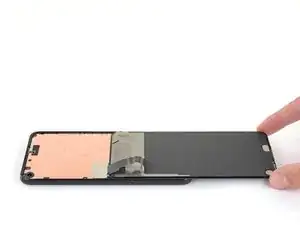
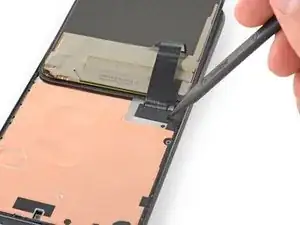
  14. 2DYGeYNekFXLSXaS
    2DYGeYNekFXLSXaS
    wDhTCYcdJViRdGb3
    • Utilisez la pointe d'une spatule pour soulever et déconnecter la nappe de l'écran.

    • Pour reconnecter les connecteurs à pression comme celui-ci, alignez soigneusement et appuyez sur un côté jusqu'à ce qu'il s'enclenche, puis répétez de l'autre côté. N'appuyez pas au milieu. Si le connecteur est mal aligné, les broches peuvent se tordre, causant des dommages permanents.

  15. DWFEe15Sga1wOdE1
    DWFEe15Sga1wOdE1
    tvMRDtG5fBofNPYN
    4PGalXujTnMKhxhI
    • Retirez l'écran.

    • Pour installer le nouvel écran :

    • Vérifiez si votre écran de remplacement dispose d'une grille pour haut-parleur et d'un adhésif préinstallé sur le bord supérieur.

    • Si c'est le cas, vous n'aurez pas besoin de l'adhésif pour le bord supérieur.

    • Si ce n'est pas le cas, retirez le grand film transparent de l'adhésif du bord supérieur et appliquez-le sur l'écran (pas sur le cadre). Veillez à ce que la découpe la plus large soit alignée avec la grille du haut-parleur.

    • Suivez ce tutoriel pour appliquer une bande adhésive découpée sur mesure.

    • Utilisez la troisième photo comme référence pour positionner vos adhésifs.

    • Au cours du processus de démarrage qui suit le remontage, l'écran passe par une séquence de calibrage. Ne touchez pas l'écran pendant ce processus, car cela pourrait entraîner un mauvais calibrage tactile et créer des problèmes sur la partie tactile.

    There are four adhesives provided in the current kit provided by ifixit. They have a blue and clear backing with a thin black strip, as shown on here. The adhesives instructions provided in this general guide are not very clear and I messed up my first one, which made the other three useless leading me to just buy a b-7000 adhesive instead. However, for anyone wanting to correctly use the ifixit adhesives, first line up the black strip on the edge of your phone where the screen will rest and peel off the first clear portion. Then peel off the blue portion and you will be left with a thin black adhesive strip. Do this for all four pieces in the configuration shown on the page linked above and then place your screen on, press down gently, then turn the phone screen down and place some books on to provide stronger contact between the adhesive and the new screen. Good luck!

    Graduate Agriculture -

    thanks a lot!

    Zurdits -

    That was so much clearer thank you!

    Jason De Dios -

    Super Anleitung. Allerdings habe ich die Kalibriersequenz leider nicht gesehen. Das Display funktioniert, aber der zweifinger Zoom arbeitet nicht. Kann man die Kalibriersequenz neu aufrufen oder was kann ich tun. In manchen Anleitungen steht, das man im Recovery Mode Display Befehle ausführen kann. Ein Werksreset des Pixel 4A 5G hat nicht geholfen.

    Beim ersten Neustart nach der Reparatur wird das Display eine Kalibriersequenz durchlaufen. Berühre das Display dabei nicht, der Touchscreen könnte nicht richtig kalibriert werden, was zu einer schlechten Funktion führen kann.

    Danke im voraus

    SteffenZimmWeimar -

    The adhesive strips do not cover the corners, and I guess there is a good chance of dust comming into the device. Had issues with the front camera after the first repair. Maybe the rounded corner strips could be included in the repair kit?

    Michael Bappert -

Conclusion

Comparez votre nouvel écran Pixel 4a 5G à la pièce d'origine. Vous devrez peut-être transférer les composants restants ou retirer les supports adhésifs de la nouvelle pièce avant l'installation.

Pour remonter votre appareil, suivez les étapes ci-dessus dans l'ordre inverse.

Apportez vos déchets électroniques dans un point de recyclage certifié.

La réparation écran Google Pixel 4a 5G ne s'est pas déroulée comme prévu ? Essayez ces diagnostics de base ou demandez de l'aide sur notre Forum.

Sam Omiotek

Membre depuis le 25/02/19

80534 Réputation

29 commentaires

Where is the best place to purchase a replacement screen?

SoYouWantMoore -

I was just wondering the same thing and it seems everywhere is sold out, only place I can find it is on eBay…

Brandon Baggett -

This was an excellent tutorial. One thing I would add here that caught me in reassembly: the proximity sensor is built into the inner lip on the top of the screen about 3mm to the right of the speaker grill (if you shine a bright light in that location, you will see a little blue dot where this is locate through the screen). If you are putting new adhesive on make sure not to block this proximity sensor with the adhesive.

BvZ -

Great tutorial. I just used the new original google pixel parts and this guide worked great! Only thing i wish was that there was a bit more clarity on how to apply the adhesives

Quan Dao -

Same! I needed to order another set of adhesive because at first time I ruined. Specifically that part where speaker goes. We need to attach it on screen. and all other on Phone case itself.

Also noticed that after some time, screen bends and we see gaps. I need to press time to time so it stick again. Not sure why this is so.

Justas Markauskas -

Took me some time to realize the adhesives should be applied to the screen, not the body -- the shape of the earphone side didn't line up on the body.

To Justas' comment, I also noticed that the adhesives tutorial says to hold firmly for 20-30 seconds. (Tip: turn phone over onto flat surface and press on the back for more even pressure than trying to do that from the front.)

I've seen other tutorials that require long holds and 24 hour set time for this type of adhesive. I have also used a silicone pipe sealer tape that adheres to itself, not the pipe, and after a month (when I did the real repair) I could not unwrap the adhesive, and it adhered well to the uneven pipe surface anyway. So I think these types of silicone based adhesives have a certain flow rate to them, and they require pressure and time for them to adhere properly. This is different from regular old tape and other more antiquated adhesives.

Kiki -

This guide is let down by next to no steps on applying the adhesive. Expected better, you give everything and then go missing on the last steps!?

Shane Crawford -

No adhesive steps. Too bad!

cbdude -

Very sad to see what appears to be 2/3rds of a guide on how to replace a screen

Seb H Miller -

al in all 8/10 guide- the process was pretty simple and along with a few youtube videos to clarify a few points, I found the repair to be pretty smooth. The only thing I would have liked to see was instyructions on the double sided tape provided with the kit but I understand how varied these might be depending on the vendor. THANK YOU IFIXIT! You've allowed me a few more years with a device that is otherwise perfect and have prevented unecessary waste and purchase of a new device. I will definitely recommend and use your service again

Seb H Miller -

Update: The adhesive strips do not cut it and the screen keeps lifting. Also the multitouch does not work on the screen- still unsure if this is a hardware or software issue. Anyone getting the full kit from ifixit would do well to also get some B-7000 to re-glue the screen as the provided adhesive strips are not enough. I would recommend supplying a small tube of this stuff instead of these custom adhesive strips.

Seb H Miller -

Great guide and really helped me to install the genuine replacement part I bought from iFixit!

My recommendation would be to line the holes on the adhesive strips up with screws and indents on the device.

Also when you're reconnecting the screen flex cable, you need to use some force - don't be too scared like I was for a while :)

Jordan Keightley -

Got my replacement screen and tools today. Getting the screen off was the easy part since it was already broken. Getting it attached was a bit of a struggle but the trick is to connect the ribbon cable then insert the plastic part. Make sure to reboot when you do.

Jesse Earl -

This guide told me the tidbits I needed to know to do this successfully. I purchased the replacement screen and tool kit for this (mostly for the "iOpener" heat tool) and it worked like a champ. I did have one small issue with the pre-cut adhesive that came with the screen: the piece for the top of the screen was "mirrored" so I had to do a bit of fiddling to cut it into a couple smaller pieces and apply it that way to avoid blocking the proximity sensor. But if you're doing a repair like this odds are this isn't going to be a big deal for you if yours comes this way too.

Brian Trump -

I noticed this too, until I suddenly realized that it works perfectly if applied to the screen and not the body of the phone -- then it is aligned perfectly. The adhesive was quite confusing as the blue template was meaningless.

Kiki -

This guide was written for removing an intact screen. If your screen is shattered there are extra steps to take. A piece of packing tape on the screen will help the suction cup work over cracks as well as help to contain the many tiny glass fragments. If it's the right side that has the most cracks then start on the left side. If your screen was badly shattered you will have to spend some time removing all the tiny pieces that remain around the edge of the phone. Avoid getting the shards into the body of the phone. I temporarily covered the larger openings with small pieces of packing tape. The packing tape is also useful for collecting all the tiny shards from the surface of your work area.

Chris -

Even if your screen is in one piece, you'll still need to remove the glue remnants from the rim of the phone so that the new screen has a perfectly flat surface to be installed onto. A bit of isopropyl alcohol will aid in loosening the glue and preparing a clean surface for the new adhesive. A piece of tape over the rear cameras housing will help protect it from being scratched by any glass fragments on your work surface as you move the phone around cleaning up the old glue.

If your screen shattered from a drop, there will inevitably be some damage to the plastic frame. Ensure that any deformation is addressed, perhaps with a razor blade, so the new screen can sit flat.

Chris -

I didn't understand how the pre-cut adhesive strips worked until I used them. It's only the black goo that is the adhesive. Once you peel off the clear side, place the strip and then peel off the coloured side, all that's left is the black goo, hopefully exactly where it needs to be. Mine could be carefully re-aligned with tweezers as necessary before setting the screen into place.

I bought a tube of glue as a previous commenter recommended, so I can repair again if the screen lifts but I have faith in the adhesive supplied on the pre-cut strips, since the surfaces were clean and flat.

Chris -

Thank you for the explanations on the adhesive strips, they helped more than the actual guide above. One thing to mention would be order of operations: it's easier to clean the sides and apply the adhesive strips BEFORE plugging in the screen and having to fiddle around with the ribbon cable. The adhesive has cutouts and you see how they match with the screws in the board. Top adhesive is already applied to the screen so you have a backup piece in case something goes wrong. Also, when lowering the screen in place over the adhesive make sure to align the bottom first otherwise you'll get an uneven set with the top part having like a small gap and forcing you to lift it again and screwing the adhesive bands. Overall I would recommend getting the B-7000 or T-7000 glue that another poster mentioned, seems like a more easy installation. The corners are also better covered with liquid glue, since the strips don't actually go there.

Adrian -

Used this guide to replace a shattered screen using the iFixit kit. Heating the adhesive thoroughly was important, especially when having to reinsert the picks because the pick wasn't able to slide smoothly across the cracks. As others have said, the instructions about where to apply the adhesives wasn't super clear, but the success of the assembly doesn't seem to have been too dependent on precise placement as long as they were in the rails.

Brian Erly -

how important is the plastic cover in step 13?

yeah it went flying, she gone

sell replacements?

lukey -

After placing the screen back on the phone if you notice it is not aligned perfectly just heat up the glue with the iOpener and move the screen into place, this worked for me.

Harry -

I agree with the adhesives comments! However, it seems like the two long strips are interchangeable.

My new screen actually came with the top adhesive already in place. The blue protective plastic peeled away with the bubble wrap when I opened it. Apart from the strip coming off sooner than I wanted, it was actually very helpful to have the adhesive in place already. Especially since the bottom adhesive strip had rubbed against the package for the alcohol swab during shipping and was stuck firmly to the paper packaging. I was able to salvage some of it and then apply the extra strip from the top onto the bottom.

The ribbon cable was really tricky to re-attach. That took longer than any other step.

Prying the old screen off was made easier by inserting the pick underneath where the glass had already broken. If you are replacing the screen (and not just opening the phone for other repairs) there's not much point in worrying about damaging the edge of the OLED since you are replacing that too!

Lead Sheep -

"To reassemble your device, follow the above steps in reverse order."

So you want me to remove the screen, disconnect the display, flip the screen over, slice through the display adhesive, insert an opening pick, and then heat the edges. Got it. Should go perfectly.

Please update with specific instructions on reassembly.

Matt -

Tutorial is incomplete, only talks about disassembly. It needs to cover the assembly and the adhesive or glue part of the screen which is the hardest part of the job...

Adrian -

So grateful for the parts and excellent tutorials! This is my second replacement. I certainly couldn't afford a whole new phone each time.

Kiki -

After changing the screen, the touch screen is not working. The display works properly but no touch is detected. with a USB mouse I made a factory reset and still no luck. I cant test with the older screen since its torn to pieces and the phone wont boot with the old screen connected. Any suggestions?

Zurdits -

Tutorial parfait, merci !

Oui il faudrait un peu plus d'infos sur le collage des adhésifs.

Guy Om -

Have had to follow the guide (again) as my youngest broke the glass a second time. Worked smooth. However, I suggest to buy with your replacement kit also the Tesa stripes for the corners as the adhesive strips included do not cover the corners of the case. That is, there is an excellent chance that dust will settle especially on the front camera--already had issues with a clear view in the front camera after the first repair.

Nevertheless, thank you all for the guide and iFixit for the repair kit!

Cheers

Michael Bappert -