Introduction

Suivez ce tutoriel pour changer ou retirer la batterie d'un Google Pixel 5a.

Pour votre sécurité, laissez la batterie se vider en dessous de 25 % avant de vous lancer. Cela réduit les risques de déclencher un incendie dangereux si jamais vous abîmez accidentellement la batterie pendant la réparation. Si votre batterie est gonflée, prenez les précautions nécessaires.

Pour une performance optimale, calibrez votre nouvelle batterie une fois la réparation terminée.

  1. fX42PHSMxaPL3GMb
    fX42PHSMxaPL3GMb
    6jVUHksrsjD6AYrP
    • Veillez à éteindre votre appareil avant de commencer la réparation.

    • Il va falloir faire levier sur l'écran pour le retirer du téléphone. Lisez attentivement les remarques suivantes avant de continuer.

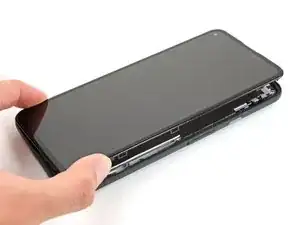
    • Notez les deux jointures sur le bord du téléphone :

    • Jointure de l'écran : cette jointure sépare l'écran du reste du téléphone. Ne faites surtout pas levier ici.

    • Jointure de la bordure : c'est là que la bordure en plastique conçue pour protéger l'écran est fixée au châssis. Elle est maintenue en place par des clips en plastique. C'est là que vous devez faire levier.

    This will be clear if you examine your replacement part first.

    bcling -

    True, but one may be disassembling the device prior to receiving their replacement 😉

    Niels Klassen -

    I'm not sure why it's recommended to pry at the bezel seam. I followed this guide but the bezel that's held in by clips, provides some additional housing for the front facing camera as well as the ear-speaker grille. I ended up separating the old screen from the bezel and putting the bezel back into the phone first, before installing the replacement screen.

    Kevin Kim -

    My replacement screen did not come with the bezel, and I had to remove it from the old screen. I didn't notice this until i attempted to replace the screen. Be sure to look at your replacement screen prior to reassembly. It will save you some heartache. All was good though and the phone is working.

    jak ll -

    1. "Be sure to turn off your device before you begin the repair". Kind of tough to do if you are replacing the screen because it is blank and you can't tell what is going on or select a "Power Off" option.

    2. To power off the phone, would be good to have instructions to disconnect the battery once the screen is disconnected from the rest of the phone.

    BlueNGray -

  2. GZIYSPIQxNHkQ6Yr
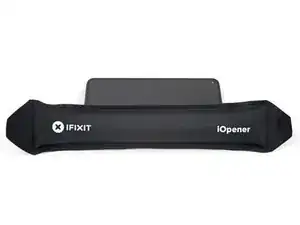
    • Posez un iOpener chauffé sur le bord droit de l'écran pendant une minute pour ramollir l'adhésif.

    • En fonction de la force de l'adhésif de votre appareil, il va falloir éventuellement appliquer l'iOpener à plusieurs reprises afin de ramollir suffisamment l'adhésif.

    • Un sèche-cheveux, un pistolet à air chaud ou une plaque chauffante peuvent également être utilisés, mais veillez à ne pas surchauffer le téléphone : l'écran et la batterie interne sont tous deux susceptibles d'être endommagés par la chaleur.

    Use the full length of the iOpener to soften the adhesive on the right edge and top or bottom. My repair required three applications of the iOpener.

    bcling -

    I needed about 4 applications of the iOpener before the adhesive was weakened enough to stick the opening pick in.

    Ibukunoluwa Amusan -

    Do you have to wait 10 minutes between each application?

    Joey -

    I heated the iopener twice for 30sec (weak microwave) then applied for a couple minutes without success. Then reheated iopener for 30 more sec. Then used the blue tool supplied in kit to help push down on bezzle and that did the trick to separate enough to get the picks in.

    Ilya Pittel -

    While I appreciate that iFixit gives you everything required for the repair in a kit, I gave up on the iOpener after 2 applications and went for the heat gun. I have a Porter Cable heat gun (PC1500HG), kept it on a medium-low heat about an inch away and was able to get around the entire screen edge more quickly. After that, I was able to use the supplied opening picks and suction cup pretty easily.

    jb_ne -

    Has anyone used a hair dryer? How long to safely apply the hair dryer?

    It Was A Dark & Stormy Phone -

    I heated the iOpener twice at 30 seconds each and let it sit on the first long edge for 10-15 minutes (while watching TV). This seemed to soften the adhesive and I was able to insert the blue picks without much trouble using the suction cup. Patience is the key. I reheated the iOpener for another 30 seconds and that was enough to soften the top and bottom edge, about 8-10 minutes on each edge. There was enough heat left in the iOpener to soften the last long edge, another 6-8 minutes.

    Chuck Pietro -

  3. 5DUi2kWQhyIOgxBE
    5DUi2kWQhyIOgxBE
    1xEVsm3hjC1fXsQZ
    • Pour retirer l'écran, il faut insérer des médiateurs entre les clips noirs qui fixent la bordure au châssis central.

    • Prenez note des points d'entrée optimaux avant de continuer.

    Use an old credit card or hotel key card to provide additional thickness and leverage to pop the bezel off.

    bcling -

    This may seem like a no-brainer but I held the new screen against my broken phone and used a pencil to mark where each blue pick would go.

    Determined, but distracted -

    They did not send the 6 opening picks with the repair kit

    hema v -

    Actually, they did send the picks, they were in the iopener. I successfully changed the screen

    hema v -

  4. GZ1fbKOGAqkxKTIf
    GZ1fbKOGAqkxKTIf
    SSCqlsTeddwiTGRV
    • Si votre écran est très fissuré, recouvrez l'écran d'une couche de ruban adhésif afin que la ventouse puisse mieux adhérer. Vous pouvez également utiliser du ruban adhésif très costaud au lieu de la ventouse. Si tout le reste échoue, vous pouvez coller la ventouse sur l'écran cassé.

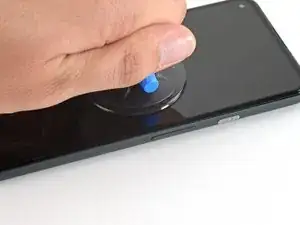
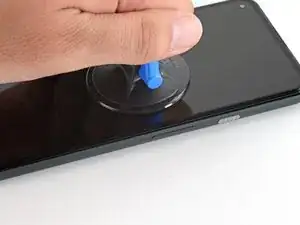
    • Positionnez une ventouse aussi près du bord droit de l'écran que possible.

    • Soulevez la ventouse de façon ferme et constante afin de créer un petit interstice entre la bordure et le châssis central.

    Do we use the suction cup before inserting the picks? After applying the I opener 3 plus times, I am having difficulty removing the broken screen. Any tips?

    William Maniss -

    This was the most difficult part. What really helped was putting a piece of packing tape on the screen. It has to be wider than the suction cup. If there is any hint of a crack where the suction cup is located, it will not stick. I had to warm the right side and the top a couple of times to get the screen to give a little bit. It will only give just a little bit and you have to to slide the pick in with more force than I was comfortable with.. It really would help to have a third hand to hold the phone, pull the suction cup and the other to slide the pick in. I had to use my ring finger to apply force to the suction cup and with the same hand slide the pick between the phone and the screen. After this step it was easy peasy!

    Dustin Ashberry -

    Agree this was the hardest part. I heated the right edge of the phone multiple times with the iOpener before the glue was soft enough to flex. My screen only had a crack, was not shattered. I had to wet the suction cup to get it to hold strong enough to pull up to open a gap to insert the pick. Once the first pick was in, heating the other edges and moving around the phone was fairly easy.

    Lisa McManis -

    The screen itself has a large lip that makes it harder to insert the picks. what worked for me was pulling up the screen just enough to insert the pick slightly. next I rotated the pick towards the phone and pushed it down (the phones chassis has a bezel that will catch the tip so you can use a bit more force). Once the pick is inserted like that you can rotate away from the phone, pulling up the screen easily.

    Mason Tate -

    Ended up using Gorilla tape on the screen, a more powerful suction cup from a windshield phone mount, moving it back 1/2 inch from the edge so the tape wouldn't peel from the edge when I pulled.

    Scott Chaney -

    You definitely need a third hand to get the pick in, have someone nearby to help if possible.

    This is the step that requires the most energy.

    Ibukunoluwa Amusan -

    This was by far the most difficult part of the repair hands down. I heated the phone several times before the adhesive softened enough to stick a pick in

    Niels Klassen -

    I was unable to use the technique shown here to lift up the edge. I used the iOpener and suction cup multiple times without being able to lift the edge even a little (might be a testament to my own physical weakness, though, haha). I ended up running a razor blade along the bezel seam until I was able to wiggle it in and then slowly wedge the picks in.

    Mary in CA -

    This took me an 1.5 hrs. Just keep re-heating and re-applying the iOpener, and using your spudger to open it up. Don't give up! You got this!

    ccc -

    My screen was beyond destroyed. I had it covered with tape and the suction cup wouldn't stick. I just let the iOpener rest on the edge nice and long and between the blue picks and my thumbnails I was able to get in there just fine. I did get a small crack in the bezel at one point but this was a spot where all the glass had come off. It didn't matter since this screen and bezel weren't going back on. If I had needed to keep the screen and bezel in good shape, I could have.

    Determined, but distracted -

  5. asHyCDKsG4yji5Fe
    asHyCDKsG4yji5Fe
    jUNOIOHOXGBaNKZl
    • La bordure est fixée au châssis central par une série de clips en plastique qu'on peut détacher en insérant un médiator à divers points le long de la jointure.

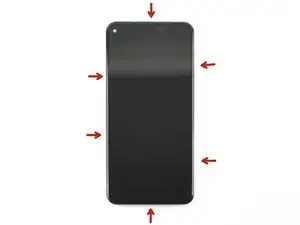
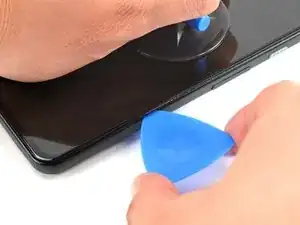
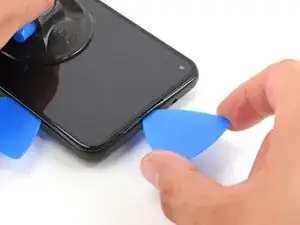
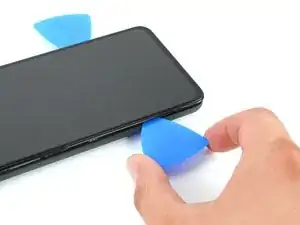
    • Insérez la pointe d'un médiator dans la jointure de la bordure à environ 4-5 cm du bas du téléphone.

    Angling the opening pick downward helped with the initial opening

    barely_diy -

    Probably easier to just use the opening tool instead of the opening picks. Also you may need to use the iopener (the bag you microwave) in the other 3 sides as well . After these tips it will be a breeze to open. Cheers!

    Froilan Rivero -

  6. mS2wgYAtWH4DdKMW
    mS2wgYAtWH4DdKMW
    fZhjnvKUSrtCg4rZ
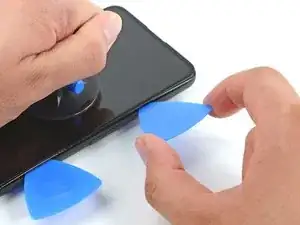
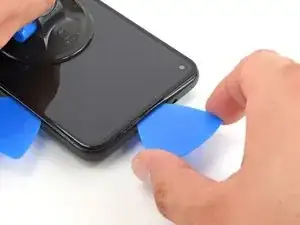
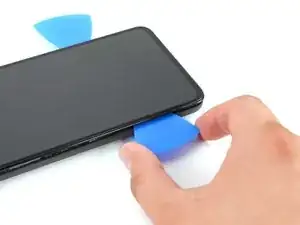
    • Insérez la pointe d'un médiator dans la jointure de la bordure à environ 3-4 cm du haut du téléphone.

  7. 3JuiDEjApfsvZMyY
    3JuiDEjApfsvZMyY
    5o3k6kB1WhiBnrUG
    • Insérez la pointe d'un médiator dans la jointure de la bordure en haut du téléphone.

    • Si cette étape s'avère difficile, faites glisser le médiator le long du coin supérieur droit du téléphone jusqu'à ce que l'interstice soit suffisamment large en haut pour le médiator.

  8. DwlHOpRXErlgGARH
    DwlHOpRXErlgGARH
    jxBHgsEXpF5lFNht
    • Insérez la pointe d'un médiator dans la jointure de la bordure en bas du téléphone.

    • Si cet étape s'avère difficile, faites glisser le médiator le long du coin inférieur droit du téléphone jusqu'à ce que l'interstice soit suffisamment large en bas pour le médiator.

  9. 16NYBGQThq6OQYWF
    16NYBGQThq6OQYWF
    uXfBAHoMTjEiJwr1
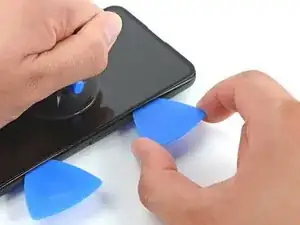
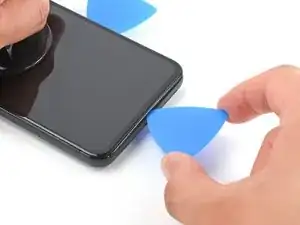
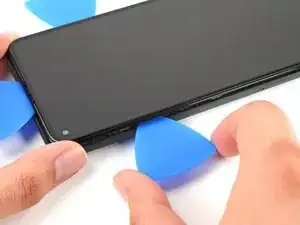
    • Insérez la pointe d'un médiator dans la jointure de la bordure du côté gauche du téléphone à environ 2 cm du bas du téléphone.

  10. XKFXWfI3ITIMXgNq
    XKFXWfI3ITIMXgNq
    qhZkNuNgUFReXQqH
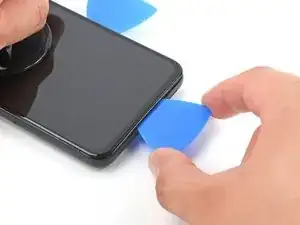
    • Insérez la pointe d'un médiator dans la jointure de la bordure à environ 3-4 cm en dessous de la caméra frontale.

  11. IwDnYZSfsesPABtr
    IwDnYZSfsesPABtr
    pABb1qrEZjBGAVUO
    IuGC2HDdXdKxPQgC
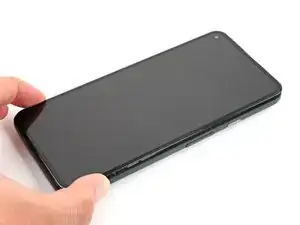
    • Veillez à défaire tous les clips. Découpez tout adhésif restant à l'aide d'un médiator.

    • Ouvrez le bord droit de l'appareil comme un livre.

  12. bn2XsPBnxwGGDFwk
    • Utilisez un tournevis Torx T3 pour retirer la vis de 4,6 mm de long qui maintient le cache du connecteur d'écran.

    • Tout au long de la réparation, gardez la trace de chaque vis et assurez-vous qu'elle retourne exactement là d'où elle vient.

    There is just this one screw.

    bcling -

    One screw - super easy in that regard!

    Determined, but distracted -

    My screw was a T4 not a T3.

    Jason Russell -

  13. EEhHcXvoBwWPeKwE
    EEhHcXvoBwWPeKwE
    rOTkyQT1VnH4eMYM
    • Ôtez le cache du connecteur d'écran à l'aide d'une pincette.

  14. XQFGXqnTUPrFtPYl
    XQFGXqnTUPrFtPYl
    VjciX1nAWKBhhJxS
    • Utilisez la pointe d'une spatule (spudger) pour faire levier et déconnecter la nappe d'écran.

    • Pour rebrancher un connecteur à emboîter comme celui-ci, alignez-le soigneusement et appuyez d'un côté jusqu'à ce qu'il s'emboîte, puis recommencez de l'autre côté. N'appuyez pas au milieu. Si le connecteur n'est pas aligné correctement, les broches risquent de se déformer et de causer des dégâts irréversibles.

    This was the most tedious part for me when reassembling. I used the gold colored corners on the board to line up the connector. Also, I recommend using your finger and not the spudger for pressing down when you reattach (even if you don't have small hands); this helps you feel the slight click when it's in place.

    Additionally, you can use the suction cup as a sort of kickstand so you have enough ribbon cable to work with (because there's not a lot.)

    Lol No -

    Just successfully completed my screen replacement & agree with the comments above. This guide would be improved if there was a close-up picture showing the gold alignment marks. Sorry, I would have posted a picture of this myself, but my phone was being operated on at the time. LoL

    CRAIG MCKAY -

    Operation success! Had some trouble when disconnecting and removing the old screen because I didn't know how much range I had when opening it up like a book. Ended up bending the connector on the old screen and bent the connector on the motherboard a little. Be very careful when opening up the screen while the screen is still attached to the frame. Only open it up like 30 degrees at first to see what the cable is doing and how much slack you have.

    This led to me trying to straighten out the pins on the motherboard connector for like 3 painstaking hours because every time I tried to insert the new connector by clicking down on one side at a time it kept popping up on the opposite end and shifting up/down a little bit. Assumed the pins were still misaligned with the screen connector and eventually got frustrated enough to just push down the connector in the middle, which explicitly contradicts the instructions. The connector still popped off with some light pressure but I just put the bracket on & it all works!

    A Husk -

    Reattaching the cable was definitely the hardest part. I've only done this once before but that time there was a much more tangible sensation when all was attached. No matter how carefully I lined things up inside the golden corners it just didn't seem to be clicking as expected. I finally thought I got it so I put the metal cover back and hoped for the best.

    Bonus fun - the "remove this last" plastic that covered the pre-cut adhesive came up with the blue plastic sheet, so I was working around exposed adhesive. I kept a piece of stiff plastic over that and tried not let the phone get glued back together and in the end it worked.

    I wish I'd got a 2nd sheet of adhesive in case once reassembled it turned out the little pins had not connected well enough - I didn't know if it would be ok to start it up again before actually pressing things together. Would that have messed with the calibration? Would be nice to know if I coud have tested the connection and then squeezed it all shut.

    Determined, but distracted -

    Yes, the attaching of the cable is the hardest part. Mine never really stayed , so I did what the determined person before me did: Put the metal part on top and hope for the best.

    I used my fingers to tell if it was on top and also made sure that the square was aligned with the gold corners on the phone.

    You definitely need a second person to hold a light and the screen while you do everything. I couldn’t have finished otherwise.

    It works!!!! I’m so happy 😀 Good luck!

    First time doing this -

    Got it connected, saw my screen for a couple of seconds clear as day, then when I went to put it back together and the screen blacked out....lightly flashing I gently brought it around the edges to snap them together and the last one by the camera had a little bit of a harder time... 😭

    Jen -

  15. QD4rdj6JKP6NgSL6
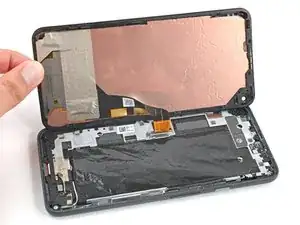
    • Retirez l'écran du téléphone.

    • Pendant le remontage :

    • Si vous avez remplacé l'écran, vérifiez que l'écran soit bien aligné avec le trou de la caméra frontale et enlevez la protection en plastique qui le recouvre.

    • N'oubliez pas de réinstaller le support de connecteur de l'écran.

    • Si vous utilisez de l'adhésif découpé sur mesure, suivez ce tutoriel pour appliquer correctement le nouvel adhésif écran.

    • Si vous utilisez du ruban adhésif Tesa pour recoller l'écran, suivez ce tutoriel.

    • Au cours du processus de démarrage après le remontage, l'écran passe par une séquence de calibrage. Ne touchez pas l'écran pendant ce processus, car cela pourrait entraîner un mauvais calibrage tactile et créer des problèmes de tactile.

    The ribbon connector is a little tricky to attach to the pcb. Just be patient with the spudger and it will connect. The precut adhesive strip is such a nice touch for finishing the project.

    Dustin Ashberry -

    I also struggled with the ribbon connector. Be patient. It is hard to see the alignment so is done by feel and some outline guides on the pcb. I plugged in the new screen, tested by powering up the phone, then unplugged the screen to install the pre-cut adhesive. There were no instructions with the pre-cut adhesive sheet. First remove EVERY trace of old adhesive. I used the spudger plus isopropyl alcohol on a lint free wipe. Once the old glue was gone, I aligned the pre-cut adhesive with the clear plastic side down, folded down about 1", confirmed my alignment, then pulled on the clear plastic and secured as I removed the clear liner. Then I removed the large blue plastic liner, then there was a very small blue pull tab that exposed the top sticky side of the adhesive. Carefully pull on that to removed. Be sure to re-install the metal latch and screw over the ribbon connector before snapping the screen back onto the phone. I forgot it and had to re-open the phone. Face-palm!

    Lisa McManis -

    Custom cut adhesive is great. No instructions.

    Do not reattach the ribbon cable before applying the adhesive.

    Check the alignment of the adhesive with the clear plastic down.

    Carefully remove the clear plastic. This can be done all at once or gradually starting at the bottom of the phone.

    Apply the adhesive starting at the bottom of the phone pressing the adhesive in place and rechecking alignment as you go.

    Once the adhesive is in place, press the adhesive down again.

    Remove the blue plastic using the tabs at the top and down each side.

    Reattach the display cable by pressing the connector down from one side and then the other. The alignment of the connector is difficult since it is not visible, but starting at one side makes alignment easier.

    Reinstall the connector retaining plate and screw.

    Remove lens and connector tape from the top of the new screen

    Reinstall the screen and press down firmly on all of the edges making sure there are no gaps around the bezel.

    Power on without touching the screen to calibrate.

    craig potts -

    Precut adhesive is installed in 3 steps:

    1. Place adhesive before attaching cable. Remove clear plastic from adhesive and align with phone. Place adhesive onto phone using camera hole as starting point. Make sure blue plastic is properly aligned with edge of phone around entire perimeter

    2. Once adhesive is aligned and fully on, remove blue plastic starting from top right corner. A rectangular tab there can be lifted and used to remove blue plastic. Thin blue plastic strip will remain on adhesive after removing blue sheet. Leave it on to prevent damaging adhesive while screen is being installed

    3. Attach screen cable and retaining clip. Remove thin blue plastic strip starting from bottom. Two tabs there can be used to get started. Align and attach screen

    When attaching cable, hold screen perpendicular to phone with screen facing bottom charging port. This will give the cable more slack to work with. Two corner outlines are printed next to the plug on the phone that can be used to help with cable alignment

    barely_diy -

    The display connector's snaps are quite weak and will come undone easily. The connector's bracket seems to be the only thing keeps it in place. Try to get the connector to snap in as best you can (as others have said it's about feel) then install the bracket to lock it down. Lastly, the ribbon cable is fragile but it can be gently bent to help with installation. I bent mine outwards around 120 degrees and had no issues.

    Mason Tate -

    Remember after the cable retainer plate but before the screen is laid down, peel the proximity sensor protective film, and the tiny red tab on the camera peephole protective film.

    Then you can start to pull a little bit on the thin blue strip tab so it hangs out, rest the screen clips in position but do not push down.

    This will leave enough gap for you to now fully pull out the thin strip. Then click the screen down.

    I had a bit of a scare, during 1st power on test screen just showed snow, super long pressed to turn it back off but there was no feedback to tell me it had done so. Un&re-plugged screen and got a bigger scare when it wouldn't turn on. Insanely super long press and it did come on to a normal boot sequence and a beautiful screen.

    Stephen Cass -

    The process went smoothly for me. The only thing I failed to realize is there is actually two pieces of protection over the camera hole. There was a piece of masking tape AND a clear red cover. I didn't like the idea of my phone taking red pictures so I had to disassemble and remove this red cover. The phone was far too easy to disassemble a second time which made me wonder if the adhesive I applied was doing it's job. I decided to heat the parameter with a hair dryer the second time I put the screen in.

    Joshua Morris -

    Thank you! This is so important! You saved me a headache.

    ccc -

    Is there any reason why a screen replacement on a pixel 5a would result in lost encryption keys? Specifically, I am curious about the Titan M security chip. I know that it will not release encryption keys if it detects certain hardware modifications. Would a new screen be one of the hardware modifications flagged by the Titan M?

    Jacob -

    Attaching the new ribbon connector was an absolute nightmare. After trying for almost an hour, I had to pay a mobile phone repairperson to fix it. Even he struggled with it and asked if I had the correct screen.

    I also want to echo what someone else said: make sure you remove the plastic with the red flap from the front facing camera lens on the new screen. There are two temp adhesives to remove for that one.

    ccc -

    Very grateful for the comments to remove both camera lens covers before assembly! Luckily the 2nd one being red made me wonder if something was wrong, but it's really not super obvious that the red part should be removed. I had to really get down in the window hole to remove it

    Determined, but distracted -

    There were instructions for the adhesive, they just have a separate link for that.

    So the outline is:

    1. Use the iopener to loosen the adhesive

    2. Using the given tools, pry on the right and remove the old screen with bezel

    3. Disconnect the old screen, save the screw and guard

    4. Remove the old adhesive

    5. Clean

    6. Place the custom adhesive ( line it up with the front cam), align and attach

    7. Remove the front part of the custom adhesive

    8. Connect the new screen ( remove any needless taping) and test.

    9. Put the guard and screw back

    10. Close project

    hema v -

    I didn't spot the protector on the camera. So now I have no selfie camera. I don't even see this step in their guides. 😟

    Brit inCali -

    All the tips here were great.

    Peeling off the old glue and cleaning was more difficult than expected. I needed to use about 7 q-tips with alcohol and scrubbing.

    No issues reconnecting the display after reading the tips here.

    One thing: when peeling off the old glue, there was a small part made of plastic that came with it. I think it is part of the phone (but maybe not?).

    Anyone know what this is: https://imgur.com/a/PxRaPwa

    repair-dude -

    I had this problem in a different way - after attaching the new screen and trying to put it in place, i found a spot where the new screen refused to get re-seated. Thankfully, I was doing things very gingerly, so I didn't crack the screen trying to force it closed. Turned out this same piece of plastic was in the way, and it just fell out. I suspect its part of one of the screen holding clips that broke while removing the damaged screen. Once I removed it, the new screen seated itself without a problem.

    Learning - be careful while seating the new screen - if something isn't going back in, don't try to force it, just check if there is a small piece of plastic in the way.

    In general - great guide for fixing the screen.

    Only caveat - the iOpener method didn't work for me. Used a hairblower instead. One side at a time - first right side, then top, then bottom (no particular reason for order of top vs bottom), then the left side.

    Vinay Pydah -

    I changed the screen, it seems like it worked for a minute or so - as the "charging battery" icon showed up on the screen upon pressing the power button.
    The screen show the icon one more time later as I was checking the charging status - then on the 3rd time looking at the screen, it turned black and started flickering a dew patterns.
    Since then, the screen not working anymore (flicker every seconds looking like it almost start up while flashing a few random pixel at the bottom).
    I reopened and double checked but everything looks fine, I tried to disconnect and re-attach, it did not help.

    It looks like a bigger issue that a dead screen on my side. I read about a similar issue (newly changed screen died almost immediately) a while back when my daughter' Pixel 5a died as well.

    Marc -

  16. NTnbTZFoIuqvFObj
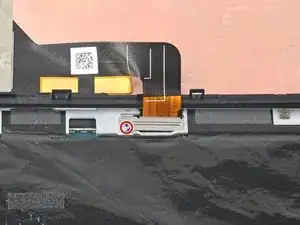
    • Utilisez un tournevis Torx T3 pour retirer six des vis qui fixent le châssis central à la carte mère :

    • Quatre vis de 4,6 mm

    • Une vis de 4 mm

    • Une vis de 2 mm

    • Puisque certaines de ces vis ont des longueurs différentes, veillez à les garder bien organisées et à les remettre à leur place d'origine.

    One of the 4.6mm screws in this step is different. The one closest to the graphite sheet has a different color head and is smaller.

    John Peterson -

  17. YhyYUaskVRhrCTmS
    YhyYUaskVRhrCTmS
    IGDtvWT2rqebrayd
    • Utilisez la pointe d'une spatule pour faire levier sur le cache en plastique noir en bas à gauche du téléphone.

  18. ZYSNZEljHWt65Oqj
    ZYSNZEljHWt65Oqj
    CqUYXKKEfJOIOwXy
    • Faites glisser la pointe de la spatule vers la gauche pour séparer complètement le cache en plastique du châssis central.

    • Enlevez le cache en plastique du châssis central.

  19. CDdW1NOAwRXD3pSZ
    CDdW1NOAwRXD3pSZ
    pQRgNbgypk2BbclE
    IFFiQPyTD2jQIDm3
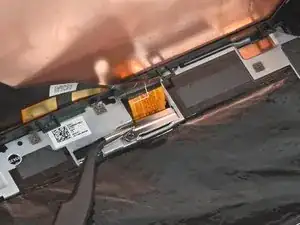
    • Utilisez une pincette pour décoller légèrement la bande adhésive qui recouvre les deux vis fixant le cache du port de charge.

  20. JHreMM3xFCJUt2ir
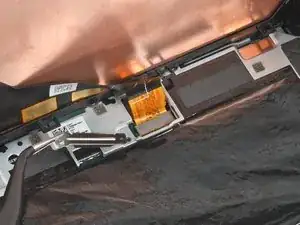
    • À l'aide d'un tournevis Torx T3, ôtez les quatre vis restantes qui fixent le châssis central à la carte mère :

    • Trois vis de 4,6 mm

    • Une vis de 4 mm

  21. fRrxj2FBCZ3E1WAX
    fRrxj2FBCZ3E1WAX
    RlDttsMMsMRWQ1EO
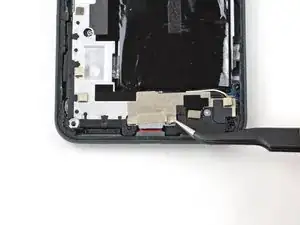
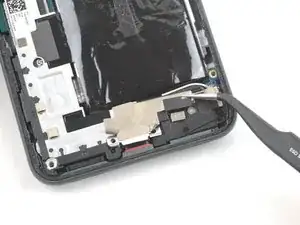
    • Utilisez une spatule ou une pincette pour décoller la bande adhésive qui fixe le cache du port de charge à l'ensemble du haut-parleur.

    • Faites très attention à ne pas percer ou tordre la batterie avec votre outil, une batterie percée ou tordue peut laisser s'échapper des produits chimiques dangereuses ou s'enflammer.

  22. I4CwtvKE5mb5rTfx
    I4CwtvKE5mb5rTfx
    61acNCAAUI5MXuOI
    bgXQYuu5V3B21Wx3
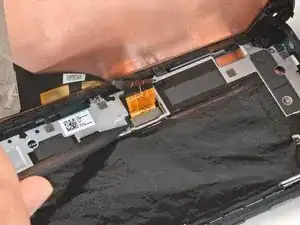
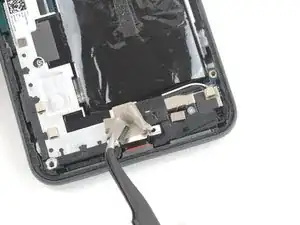
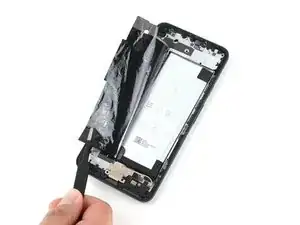
    • Décollez soigneusement la feuille de graphite qui recouvre la batterie avec une pincette arrondie ou vos doigts.

    • Veillez à ne pas percer ou endommager accidentellement la batterie lorsque vous saisissez la feuille de graphite.

  23. uSqZuIZrZqCZyPae
    uSqZuIZrZqCZyPae
    o5WMm5a1wZ2EuX6R
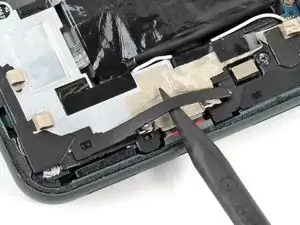
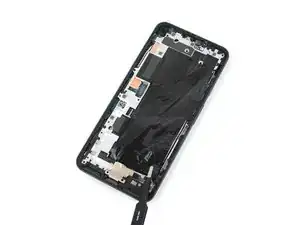
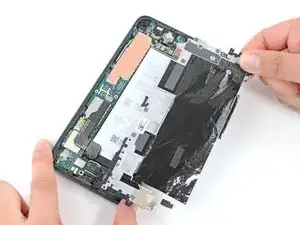
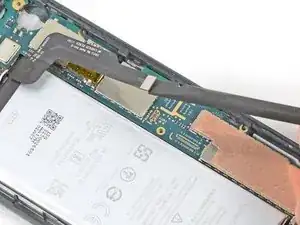
    • Insérez la pointe d'une spatule sous le coin supérieur droit du châssis central.

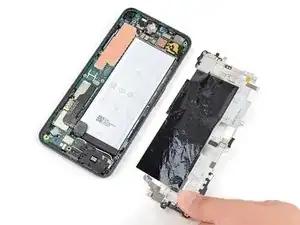
    • En haut du châssis central se trouve un clip en plastique noir qui le fixe à la partie supérieure du cadre. Utilisez la spatule pour tirer le châssis central vers le bas, puis faites levier pour le retirer.

  24. OG4Pr1QSUoRDBSW1
    OG4Pr1QSUoRDBSW1
    aH6LEGgCJfLEbPfG
    • Ôtez le châssis central.

  25. XTpSK5N4BsEOWn5P
    XTpSK5N4BsEOWn5P
    13IFS1gZgCL2ygBn
    iBWkcPWNYwQbw4hM
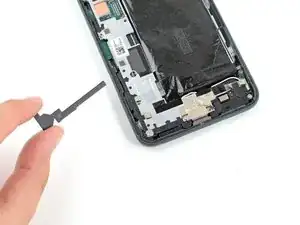
    • Il y a deux petites pièces en plastique qui aident à fixer le châssis central. Faites attention de ne pas les perdre, car sans le châssis central, rien ne les retient.

    • Veillez à les remettre dans leurs coins respectifs avant de replacer le châssis central lors du remontage de l'appareil.

    Mine has neither of these pieces. They're not lost, they were just never there.

    Sean -

  26. x2wwhKQg3Psoedgf
    x2wwhKQg3Psoedgf
    QfMKYQ22m12Xr46c
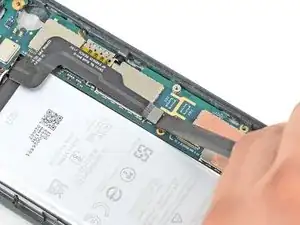
    • Utilisez l'extrémité plate d'une spatule pour soulever le connecteur de batterie en faisant levier afin de le déconnecter.

  27. EKmjmx2LRo11lcJw
    EKmjmx2LRo11lcJw
    WrFbcvPlblwTqRBg
    tEVoZYgfSImrnFaq
    • Si vous utilisez du dissolvant pour adhésif, suivez d'abord ces étapes préparatoires.

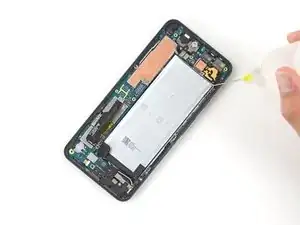
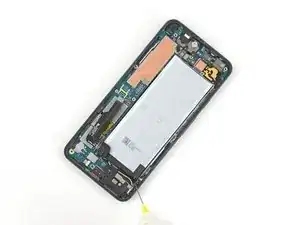
    • Appliquez 2-3 gouttes d'alcool isopropylique à haute concentration (plus de 90 %) sous chaque coin de la batterie et laissez pénétrer pendant 2-3 minutes pour ramollir l'adhésif.

  28. 44gF5FpS1EUqPGvS
    44gF5FpS1EUqPGvS
    J6XGVWYScOiGNO3Q
    EUCHRpdTLrIXW2S1
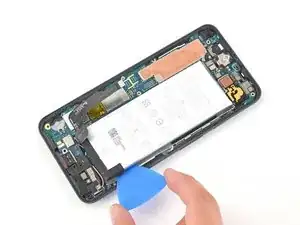
    • Insérez un médiator dans l'espace à droite de la batterie et faites glisser sa pointe sous la batterie.

    • Évitez de percer ou tordre la batterie avec votre outil, une batterie percée ou tordue peut laisser s'échapper des produits chimiques dangereuses ou s'enflammer.

    • Faites glisser le médiator le long du côté gauche de la batterie pour découper l'adhésif qui la fixe au châssis central.

    • Dès que le côté droit de la batterie commence à se détacher du châssis central, laissez un médiator dans l'interstice pour garder la batterie légèrement surélevée.

    • Appliquez quelques gouttes d'alcool isopropylique directement sur l'adhésif qui fixe la batterie au châssis central. Laissez l'alcool agir pendant 2-3 minutes.

  29. HDXfPTOGnXwR6WZk
    HDXfPTOGnXwR6WZk
    VV1dN1H5YAjHNGsS
    1ELkKuYsADIOjWiK
    • Répétez la dernière étape avec une carte en plastique pour découper l'adhésif restant sous le côté droit de la batterie.
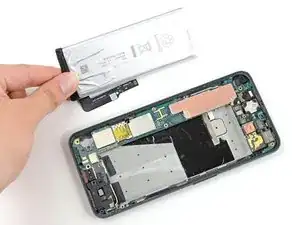
    • Ôtez la batterie.

    • Ne réutilisez pas la batterie après l'avoir retirée, cela peut être dangereux, car le retrait peut avoir causé des dommages cachés. Remplacez-la par une nouvelle batterie.

    • Pour installer une nouvelle batterie :

    • Retirez toute trace d'adhésif du téléphone et nettoyez toute la zone sous la batterie avec de l'alcool isopropylique. S'il reste de la solution alcoolisée dans le téléphone, essuyez-la soigneusement avec un chiffon non pelucheux ou laissez-la sécher à l'air libre avant d'installer votre nouvelle batterie.

    • Appliquez quelques nouvelles bandes adhésives prédécoupées ou de la bande adhésive Tesa.

    • Si vous fixez la batterie avec une bande adhésive sur mesure, suivez ce tutoriel.

    • Appuyez bien sur la batterie pour la faire adhérer.

    Make sure to align the battery close to the bottom, so that the connector is not crumpled. Once the glue takes hold, you will not be able to move the battery.

    Replacement batteries may be smaller than the original.

    Geoff Gunner -

Conclusion

Pour réassembler votre appareil, suivez les étapes ci-dessus dans l'ordre inverse.

Déposez vos déchets électroniques dans un centre de recyclage certifié.

La réparation ne s'est pas déroulée comme prévu ? Essayez des solutions de dépannage de base ou demandez de l'aide sur notre Forum.

Comparez votre nouvelle pièce de rechange à la pièce d'origine - il se peut que vous deviez transférer les composants restants ou retirer les dos adhésifs de la nouvelle pièce avant de l'installer.

Pour une performance optimale, calibrez votre nouvelle batterie une fois la réparation terminée.

Clay Kim

Membre depuis le 16/02/21

10640 Réputation

5 commentaires

Merci pour ce tutoriel mais ou trouver une batterie neuve?

mido -

Hi, would you happen to have a copy of the msds sheet for the pixel 5a battery?

Puv -

Yes Puv, I own the master msds sheet for the pixel 5a battery

NAJMA YAHYA -

My pixel 5a screen is coming apart at the screen seam instead of the bezel seam. What would happen if I take the screen off at the screen seam to apply tape so that I can fix it back on to the body?

JT H -

I ended up not needing heat or the i-opener to pry up the right side of the phone because my old battery was swelling enough it had already started pushing the right side apart. Just had to slice through the adhesive.

Careful not to apply much torque with the tiny torx bit. I used my own tool set and stripped my T3 torx bit without using much pressure at all. But maybe the torx bit that comes from iFixIt will hold up better than the one from my own toolkit.

My battery replacement was successful using this guide.

Salamander Calamander -