Introduction

Si la manette DualShock de votre PS4 rencontre le problème commun de joystick qui drifte (bouge automatiquement sans qu'on l'aie touché, se bloque une fois qu'on l'a touché), suivez ce tutoriel pour réparer ce souci sans soudure, qui peut être compliquée pour beaucoup de monde.

Il faudra démonter la manette entièrement pour pouvoir nettoyer et travailler sur le joystick gauche. Cette réparation simple requiert des connaissances minimales et devrait être facile.

PS : il n'est pas obligatoire de porter des gants pour travailler sur la manette.

  1. MQ3qGUJEBabZOfPe
    MQ3qGUJEBabZOfPe
    CR5MxSbpgWThHNdC
    G6tHW2FyPbuXJ1Or
    • Avec un tournevis cruciforme Phillips #00, retirez les quatre vis de 6,0 mm situées derrière la coque de la manette de la PS4.

  2. NVlWA32pXNqVJLfF
    NVlWA32pXNqVJLfF
    PSGOL5RmqDMMA6DZ
    5vBTvfTAyto2wOZr
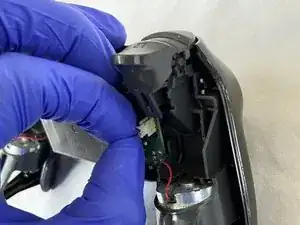
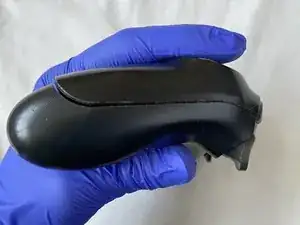
    • Détachez la coque arrière du reste du corps de la manette en vous appuyant sur la coque avant.

  3. rhftCg1cbH6lLsLo
    rhftCg1cbH6lLsLo
    ZKraUp6iTMOn15st
    GBgDAHBsPgaJP5tF
    • Soyez très doux au moment de détacher complètement la coque arrière car la nappe bleue pourrait être endommagée.

    • Tirez légèrement sur la nappe bleue pour séparer la coque arrière de la coque avant.

    • La coque avant qui contient la carte mère sera démontée plus tard.

  4. QcjerMCYKeTVboKg
    QcjerMCYKeTVboKg
    VqkkqUXFcQfXAA3v
    TatbHfc2mc2SvDGQ
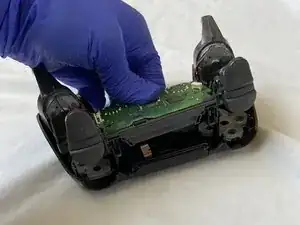
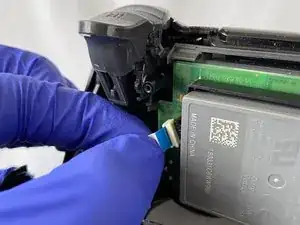
    • Retirez le connecteur de la batterie de la carte mère en appuyant sur les deux côtés et en tirant le connecteur vers le haut.

    • Attention à ne pas retirer les câbles rouge et noir du connecteur lorsque vous déconnectez ce dernier.

  5. eNMTRgUm3SuMUMdq
    eNMTRgUm3SuMUMdq
    kbrhbnjES2EOI3dG
    RAeyJdCAvrvGRBCQ
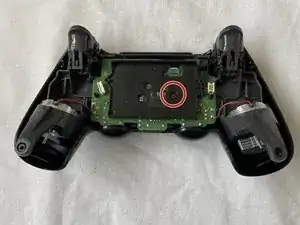
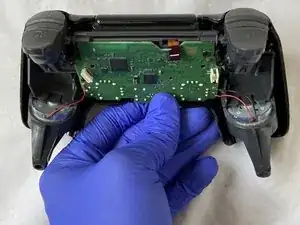
    • Retirez l'unique vis Phillips #00 attachée à la carte mère avec un tournevis cruciforme.

    • Retirer la vis libère le support de la batterie, que l'on peut alors retirer aussi en le tirant vers le haut.

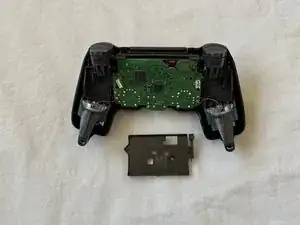
    • Retirez la nappe de la batterie.

  6. le2kZs5GrDTHYDE2
    le2kZs5GrDTHYDE2
    KjWrhErfpoiQZxid
    ndZB43RRFiVSaMJs
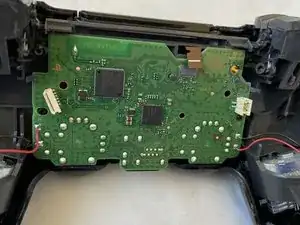
    • Détachez la nappe de la carte mère en la tirant vers le haut.

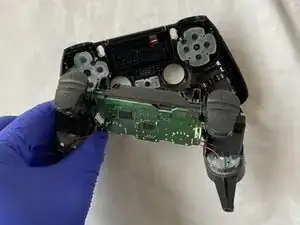
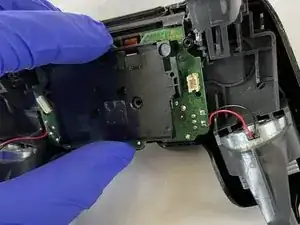
    • Tirez sur la carte mère pour la détacher de la coque avant et de tous les autres composants.

    Bis hier hin, bin ich gefolgt. Ich habe von diese Punkt an die Kontaktflächen der Druckschalter gereinigt, ( Isopropanol). Mit Wattestäbchen vorsichtig abgewischt. im abgenommenen Deckel die Silikonschablone mit den Gegenkontakten abgezogen und gereinigt (Isopropanol) und die Kunststoffknöpfe aus der Deckelhalbschale gedrückt. Danach alle Knöpfe und die Laufhülsen gereinigt ( Malzbier/Zucker entfernt) und wieder zusammengesetzt. Beim nächsten mal reinigen würde ich jetzt noch einen Stoß Teflonspray in die Hülsen geben. Nun alles rückwärts wieder zusammensetzen. Danke für die gute Beschreibung. (MaC)

    Martin Carstensen -

  7. HKWTZymHchGFTYRe
    HKWTZymHchGFTYRe
    ghTKWUNtCFyHbdri
    • Retirez le joystick gauche en tirant dessus jusqu'à ce qu'il vienne.

  8. TUMZPbNJIZRiycZQ
    TUMZPbNJIZRiycZQ
    XuwraGg1BnlNCivk
    • Sur chaque chambre verte, un espace sépare le corps argenté de la chambre verte.

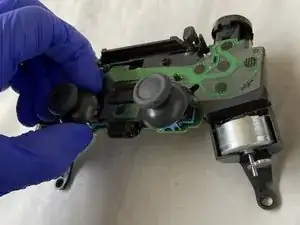
    • Faites levier avec un tournevis plat pour ouvrir les chambres vertes en insérant la pointe du tournevis dans l'espace et en poussant vers l'intérieur.

    • Faites levier très doucement pour que les chambres vertes ne cassent pas ou ne se détachent pas trop sèchement.

  9. OXRaNfQ3WRZr2PDS
    OXRaNfQ3WRZr2PDS
    KOlqqGZOJZJdHFfG
    1UpBoLbcTeVCGCLM
    • Une fois que les chambres sont ouvertes, utilisez des pincettes pour saisir et retirer le disque blanc de chacune des chambres.

    • Trempez un coton-tige dans de l'alcool isopropylique à 90 degrés.

    • Utilisez le coton-tige alcoolisé pour nettoyer complètement les chambres.

    • Laissez les chambres vertes sécher entre 5 et 10 minutes avant de commencer le remontage.

    The white disk is an intricate part. Each contains 2 semi-circular <0.5 mm thick wires which are exposed and elevated, and serve to relay proportional motion to the motherboard, Do not tug, pull, press or break any of them as that may cause that plane of motion to be permanently disabled / enabled.

    Ming L -

    I just took apart my controller to clean out the analog part because I have a bad drift in my left analog and it's making me crazy. So I have all the screws in one spot and the white disks together in another I'm organized when I do this type of stuff, but when I looked again I only had 3 disks. There are 4 chambers and I'm positive that I took 4 disks out, but now I'm trying to convince myself there were only 3 to begin with which I know is wrong. Can anyone confirm if there are 3 or 4.

    Tommy Levins -

    There are 4. One for vertical and one horizontal for each analog.

    This is why I do them one at a time. No point leaving the chambers open so that dust ir other things can collect in them while you work on the others, plus in just reduces the risk of misplacing or damaging one of the disks.

    Clean one, place disk back in, snap shut, onto the next one. And only bother doing both sticks if both have a problem, don't fix what isn't broken. You want to open these chambers as little as possible as each time you do, the solder gets weaker and weaker from bending. Do this too much and you'll end up having to replace the entire analog stick.

    darkseany223 -

    For that matter, don't even clean both chambers on one analog if it's only Drifting in one single direction.

    For example If it's drifting straight down with no diagonal tilt to it, there's no need to bother with both.

    Just remember that the chamber on the SIDE controls vertical and the chamber on the TOP controls horizontal. So in this case, clean the one on the side as it is the source of the downward drift.

    darkseany223 -

    With my Dualshock 4 controller, the drift problem was not resolved after cleaning the disks and chambers. On a second try, I switched the disks on the joystick (disk from left chamber went into top chamber and vice versa) and that resolved the drift problems for me. Or I cleaned better the second time, could also be.

    Johan -

    Always keep your busted remotes. Never know when a spare part can come in handy. Ribbon cable stop working or fried battery? Thumbstick rubber peeling off? Tried to fix a drifting mote but accidently bent the metal on one of the discs? Snag em from your old dead water damaged remote.

    Frankenstiening motes has saved me hundreds.

    darkseany223 -

  10. 6SM5lx6FQtKKsLip
    6SM5lx6FQtKKsLip
    rFWjwvRpACwWp3Ul
    JNHG6Mu3wwhqLxDo
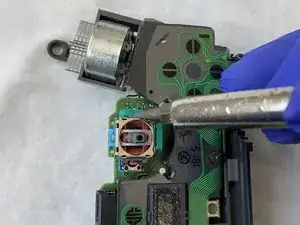
    • En reprenant vos pincettes, replacez les deux disques blancs dans les chambres vertes.

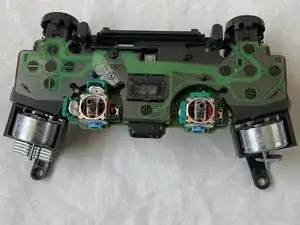
    • Refermez les deux chambres en appuyant vers la boîte argentée jusqu'à ce qu'elles cliquent en place.

    When putting those discs back in place be very careful not to bend the semi circular “springs” out of shape. If they get out of shape they will need replacing. Also, make sure that both clips on the disc pass through the hole on the plasic chamber. It may appear to “click” back into place but the chamber won’t sit right and this will affect the efficacy of the repair.

    Richard Donaghue -

    Hello, my discs were black and not white, but it must depend on the version of the controller. However, the circular spring of the disc seems to me to be in bad condition, not quite flat. Is this normal? Also, where can I get some?

    Pierre Toscane -

  11. HeUk2uAjUmZl1wUM
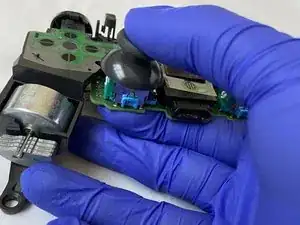
    • Prenez le joystick gauche et replacez-le jusqu'à entendre un clic qui vous confirmera que le joystick est fermement maintenu.

  12. uxDWRGcUUemNdOZy
    uxDWRGcUUemNdOZy
    AigZfCAhFIElhwIJ
    tBJAK3EPXF3DFAAE
    • Faites passer le connecteur à travers le trou de la carte mère, depuis la coque avant pour attacher les deux parties.

    • Personnellement j'ai utilisé des pincettes pour faire passer le connecteur de la coque avant à la carte mère.

    • Placez le connecteur dans sa prise et appuyez dessus pour le reconnecter.

  13. GNUkDEVhkNMImMwU
    GNUkDEVhkNMImMwU
    SPoJArJFEfeVTevO
    16FTVy32ml3CTeO1
    • Reprenez le support de la batterie et placez les pattes de mise en position dans les trous pour un bon alignement.

    • Replacez la vis de 6,0 mm sur le support de la batterie avec le tournevis Phillips #00, pour que le support de la batterie soit fermement maintenu en position avec la carte mère.

  14. HZ3umUKUYYMySqtm
    HZ3umUKUYYMySqtm
    rpIBOimKkv46CSBY
    • Placez la batterie sur son support.

    • Connectez les fils rouge et noir de la batterie dans leur prise en appuyant sur le connecteur.

  15. VqegQTxAN1waLdTK
    VqegQTxAN1waLdTK
    oldOZvi1ZQBtMZRD
    • Placez la nappe attachée à la coque arrière sur la carte mère et appuyez dessus pour rattacher les deux compartiments.

    I had a controller where an attempt was made to repair and they replaced this ribbon back to front. Needless to say it wouldn’t work at all. Just make sure the metal bits of the ribbon are on the side of the contacts.

    Richard Donaghue -

  16. JACxTJTm3pXeRmpP
    JACxTJTm3pXeRmpP
    P4Q5WlRYAWnRAqeb
    dT46s5JupL2WXyi4
    • Clipsez les deux coques (avant et arrière) ensemble.

    • Vissez les quatre vis de 6,0 mm sur la coque arrière, toujours à l'aide de votre tournevis Phillips #00.

    • Votre manette devrait être réparée !

Anubhab Rahman

Membre depuis le 17/01/21

2188 Réputation

12 commentaires

does this work with the right joystick too?

long tran -

Yes! Both sticks seems to be identical. Did my right one and it fixed the drift.

raltamimi0001 -

i fix my brothers ds4 with your tutorial. Thank you very much.

Bryan Avila -

Thank you so much for this amazingly well made guide. I just fixed my PS4 controller and it surprised me how well it works, absolutely no drift whatsoever. I should note that i’ve done the same steps on the right stick as it’s the one broken for me.

raltamimi0001 -

I just followed the guide and the drift problem is gone! A really throughout guide with all the details and warnings. Thank you for this.

Diego Costa -

This works. Thanks to the poster, bought some really cheap controllers off facebook and repaired them following this. Thank you!

Manu facturer -

dident try but man the comments look pleasing though i wont do it cuz im not ryna break it and i dont havbe 90% isopropyl alcohol but yeh look good enough

Hamza Dardar -

Would regular rubbing alcohol work instead of isopropyl?

heezkd -

Both ethanol and isopropyl are very suitable, although isopropyl will evaporate less quickly and leave less residue. Ethanol is often used to clean glass, while isopropyl is more often used in the production of electronics.

Toon Konings -

Lo hice, y me anduvo muchísimo peor, al punto que lo tuve que tirar. Algo debo haber hecho mal. La guía 10 puntos, igual. Abrazo.

Gaston Gherardi -

Thank you for this tutorial which works perfectly. I managed to make my son's Dualshocks look young again. Be careful, the part where you have to open the green covers is very complicated. Be thorough. In addition to the iso alcohol, I added a special contact product

cyril.blot -

What should I do if there is still a drift in my controller even after fixing it like you said

Umamah Shakeel -