Introduction

Les brosses à dents électriques sont alimentées par une batterie rechargeable, qui permet le mouvement alternatif de la brosse. Si votre brosse à dents électrique perd rapidement de la puissance ou ne tient pas la charge, il est fort probable que la batterie rechargeable doive être remplacée.

  1. Va2LEc6dOLVXtL5A
    Va2LEc6dOLVXtL5A
    mkasTtY2V6Ku5qOp
    OwFOREqQlKCjSf6c
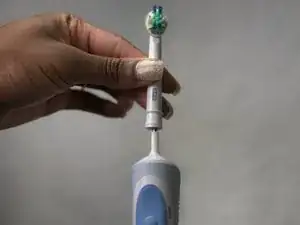
    • Retirez la tête de brossage et servez-vous d'une pince pour retirer le haut blanc de la brosse à dents.

    Ruotare per estrarre

    sergio_storato -

    You can use the hole in the bottom of the charging base (underside) that the top fits into and catches. Just twist gentilly back and forth until it loosens, then pull up with your fingers or pliers. Note, this is not like the Braun sonic care where the bottom comes off… should Have looked at the guides first as a I cracked the bottom trying to twist off the bottom like that brush.

    Aaron Giesick -

    Die weiße Kappe kann nicht einfach nur abgezogen werden. Sie muss nach links gedreht werden!

    Freubert -

    I saw on a Youtube video you can use the center hole of the charging base instead of pliers. It fits perfectly on mine.

    George Tedrick -

    Don't grab it with pliers--you will break off the narrow retainer stub. Instead use a thin blade to pry up an edge of the cap, then insert a wide flat blade to pry up the core out of the handle. Plier could be used for pulling but not for twisting. This also works for the Dentiguard version from Aldis.

    Kiev Kenny -

    I don't believe it opens like this. Pulling on the top thing like on the picture did break mine. It's alright though because I kind of knew while I was pulling and I kept on pulling knowing it would break any second. But if you need yours, you better look for some other instruction. Would be nice to update this one as well.

    Wolfgang -

  2. D1MIjxDx4OZwCWEm
    D1MIjxDx4OZwCWEm
    TmE3ynbo5wC2kpIt
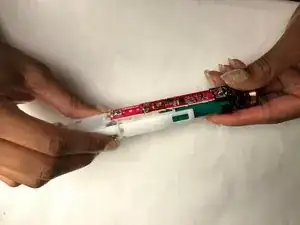
    • Dessoudez ces 4 connexions

    • Les 2 connexions du moteur

    • Le pôle positif (+) de la batterie

    • Le pôle négatif (-) de la batterie

    I am hoping the author of his guide receives theses comments. I have a Braun brush with dud battery, and am hoping to replace. I am afraid it is not at all clear from the photographs which are the points that need de-soldering. Thanks for any help.

    Peter Bull -

    Having now noticed and browsed the guide history, I see that there were indicators for where to desolder (on one photo only). I can’t understand why these clarifying marks were then removed from the final draft?!?!?!

    Peter Bull -

    IFixit technical team advised us to remove the indicators on the photo before we could publish it .

    Nicole Antoine -

    How do I contact the technical team to complain about their censoring of indicators. Bonkers!

    Unless you are extremely skilled at soldering I advise against attempting to do this battery replacement. I had two brushes with rapidly discharging batteries. After the first one failed to work with replacement battery, I tried on the second, only to discover that, by the time the solder had heated enough to liquify and remove, the fine circuits on the circuit board had fried and the brush was useless. (And I have done my fair share of soldering)

    Peter Bull -

  3. NxnTfOasiW6siFdP
    NxnTfOasiW6siFdP
    1BTBOqHS6BbrGE4D
    • Dessoudez la borne inférieure de la batterie. Repliez la borne de la batterie pour dégager le circuit imprimé.

  4. SJnhEdSFgWZMg6nU
    • Dessoudez les trois connexions situées du haut du circuit imprimé.

  5. BxQaAUeuHDhGklUN
    • Servez-vous d'un outil en plastique pour soulever le circuit. Un spudger métallique n'est à utiliser qu'en dernier recours.

    • Il y a une languette blanche qui traverse la carte, soyez prudent lorsque vous retirez le circuit imprimé.

  6. OCpaULHXEX2X3bqp
    OCpaULHXEX2X3bqp
    WfYsclSQDDdBAXDA
    • Sortez l'ensemble circuit imprimé et batterie. Puis retirez la batterie du circuit imprimé.

  7. 1pnCQ5tGNjnF2SAm
    • Lorsque vous mettez la nouvelle batterie en place, n'oubliez pas de plier la borne inférieure vers le bas. La borne négative (-) est la plus proche des fils de cuivre.

    • Assurez-vous de recharger la brosse à dents après la réparation. Même si la batterie de remplacement est déjà complètement chargée, la brosse à dents ne s'allumera pas si vous ne la rechargez pas.

    Der neue Akku sollte entweder passende Lötfahnen haben oder die alten sollten an den neuen angelötet werden.

    Tina Fabritius -

    Lötfahnen kann man nicht anlöten, das geht nur im Werk.

    VauWeh -

Conclusion

Pour le remontage, suives les étapes en sens inverse. Utilisez juste la quantité de soudure nécessaire pour ressouder la batterie.

Miles Gunty

Membre depuis le 07/11/17

540 Réputation

8 commentaires

This is very easy to do. I had no problems following your instructions.

Ian Bowker -

Thanks.

Is this a regular rechargeable AA?

Thanks again.

Stephen Shaw -

The original battery is a NiCd with tabs. I just spot welded tabs onto a standard AA NiMH battery and it worked fine.

T C -

Thanks.

I did fix an Oral B Braun PRO timer (2022) and the only part that is different is the head. It has two nail presses inside, one at the switch side and the other at the opposite side, that are very difficult to lose.

Peter M. -

I tried to open mine, but it did not work. The top thing broke. I could kind of feel it would happen while I was pulling but I wanted to know if it realy does so I kept on pulling.

I am not sure if this really is opening up the way as it's described here.

Wolfgang -

Would it be possible to put a larger battery in it?

ssssaaaa -

Also works for Oral B Vitality Pro 100. :)

ssssaaaa -