Introduction
-
-
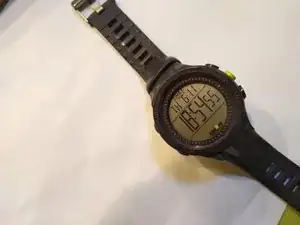
Voilà votre montre. En fait c'est la mienne. La vôtre est celle avec la batterie usagée. La mienne était morte il n'y a pas si longtemps, mais je l'ai remplacé, et maintenant vous pouvez le faire aussi!
-
Votre première tâche consiste à retirer le bracelet de la montre, qui comporte des brides qui chevauchent la plaque arrière.
-
Mais attendez ! Le bracelet de la montre n'est pas tout à fait ce qu'il semble être. Sur le côté de cette montre, il y a ce qui semble être des têtes de vis qui maintiennent le bracelet. Ce ne sont pas des têtes de vis, elles sont simplement décoratives.
-
À la place, vous devez utiliser un tournevis ou une autre lame fine pour comprimer les goupilles élastiques et retirer le bracelet.
-
-
-
Retirez la plaque arrière en dévissant les petites vis Philips situées dans les quatre coins de la plaque arrière.
-
Mettez-les dans un bol, ou dans un endroit sûr!
-
Retirez la plaque arrière métallique.
-
-
-
Ouais, vous avez réussi à l'enlever!
-
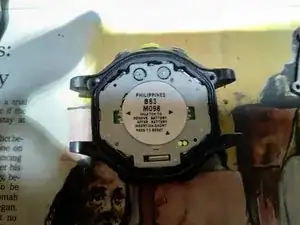
Ensuite, vous devez détacher l'opercule métallique située sous l'autocollant qui maintient la batterie. Cet opercule est fixé avec une paire de crochets en plastique de chaque côté.
-
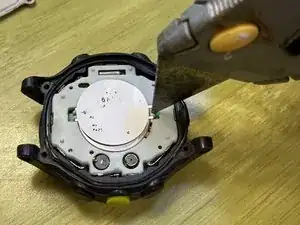
Pour libérer l'opercule, vous devrez insérer un objet étroit et pointu dans la fente entre la paire de crochets et retirer la boucle de l'opercule métallique des crochets en plastique.
-
(NB : La photo avec le couteau a été prise plusieurs années après la précédente, l'autocollant a pas mal déteint!)
-
-
-
Ouais, vous avez sorti la batterie! Remplacez-la par la nouvelle.
-
Replacez l'opercule métallique ; accrochez l'une des boucles métalliques sur un des crochets plastique, placez l'autre boucle dans la bonne position et appuyez pour enclencher la boucle métallique autour de l'autre crochet en plastique.
-
Si l'écran n'affiche rien après avoir effectué cette opération, vous devrez peut-être réinitialiser la montre en « court-circuitant les pads » vers lesquels pointe l'autocollant.
-
Sur cette photo, les « pads » auxquels il est fait référence sont les deux petits cercles métalliques visibles en bas à droite, en partie cachés par la batterie.
-
Vous pouvez les court-circuiter en les touchant tous les deux simultanément à l'aide d'un fil de cuivre ou d'un autre morceau de métal conducteur suffisamment petit pour s'insérer dans cette petite fenêtre ovale en plastique.
-


Vous êtes une personne merveilleuse.
13 commentaires
Replaced battery per above, but screen is blank. How to reset? Sticker says “short pads to reset.” What pads? Short??
Lily Tom -
Oh! golly, is that necessary? I’m trying to remember whether I did that. Okay, explanation, apologies if you already knew all of this.
1) The term “short” refers to creating an electrical connection, sometimes known as a “short-circuit”, between two points.
2) The term “pads” refers to electrical contacts.
On the sticker (in the photo above), you will see an arrow (really more of a small triangle) at the lower right of the sticker, pointing to two circular metal contacts, or “pads”. In order to reset the watch, I believe you will need to create a “short” by touching both of these pads with a conductive object. A short piece of copper wire would work, or nearly anything else that’s conductive. Let me see… Actually, if you took any unplugged appliance, you could probably use one of the prongs of a 110VAC plug to bridge these. (Reiterating: NOT WHILE IT’S PLUGGED IN.) Maybe it would be safer to use a fork, spoon, or conductive screwdriver.
I’m guessing that I did this, and neglected to mention it. Yikes!
I just replaced my battery and didn’t have to short the contacts. I inserted the battery and reassembled the two halves, and when I turned it over it was already running.
Oh! Interesting! I should update the instructions to reflect that.
My Ironman is a bit different: The battery can be removed without removing "the sandwich" - Take the sticker off, unscrew the screw near the battery which releases the retaining metal strap and the battery.
Hugh -
Wow, that sounds delightful. Is there any chance that your procedure would apply to the watch in my pictures as well?
In light of your comment, I re-evaluated my own process, and realized that there is absolutely no need to disassemble the sandwich. I've completely revised the guide. So... your comment no longer makes sense, but digital archaeologists will know that your comment used to make sense, and in fact guided me to an overhaul of this guide. Thanks!