Introduction

Consultez ce tutoriel pour remplacer l'écran fissuré ou cassé de votre Galaxy Watch.

  1. oX1ZMHLHIYw4KRAU
    • Dévissez les quatre vis Tri-point #00 (de 4,2 mm de long) du fond de la montre.

    I can't get them to budge

    Irene -

    Same here, its impossible to get the screws off. They’re almost stripped now too.

    Prabhat -

    Sorry to hear that. Here are some tips on how to get those screws off hopefully: Comment enlever une vis cassée

    Tobias Isakeit -

    Just started working on watch. Can not get the screws out. I purchased the recommended tools. Screws won't budge. I have not stripped them yet. How do I get them to loosen up?

    joyce c -

    Same here. I did buy your Electronics repair Bundle. The Y000 is too pointy, we need a flatter tool

    Robertob67 -

    Hi Ladies & Gentleman, please try as follows:

    Use a spray can of "WD 40" with a spray pipe/tube but DO NOT spray into the screw holes. Just spray shortly on a piece of paper, a drop of WD40 will remain at the end of the spray pipe. This drop I put into the screw hole position. Do this for each screw hole and leave the stuff approx. 10 minutes alone. Afterwards use the screw driver as normal to turn the screws out.

    *** After the drop is placed into the hole do not wait too long as WD40 is crawling into "even not existing gaps"

    *** just use a small drop of WD40.

    *** I intend for using 4 new screws as the head (Tri-Pont profile) seems worn out. But if I get new screws for sure I will go for a TORX profile because its the best as you don't need to apply axial force on screw driver.

    Very best regards from Harald (a German machine building engineer)

    Harald -

    Harald again to Robertob67:

    It is NOT the Tool Y000 but the Y00

    Best regards

    Harald

    Harald -

  2. lPBjwQQaeOfSOTcg
    lPBjwQQaeOfSOTcg
    nPHfqyJPI3ouvl2h
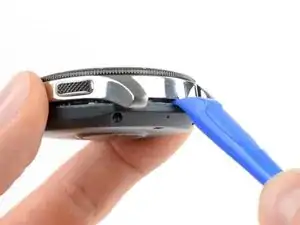
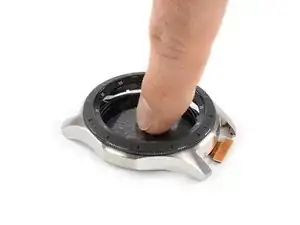
    • Insérez un outil d'ouverture entre le fond et la carrure de la montre.

    • Faites délicatement levier pour ouvrir le fond en plastique.

    • Ne retirez pas encore le fond. Une nappe le connecte au mouvement de la montre.

    You may need to use a small screwdriver or letter opener to pry the case apart. I found with two different spudgers I could not get it to budge.

    Tim Durstenfeld -

    How do I Secure the sealing, and wish material du you use?

    Ejner Bøndergaard -

    I managed to get the back cover to open with an unused pry tool on one side, however, to fully remove it I needed to use 2 iFixit opening picks from my toolkit as the one side wouldn't open with the pry tool.

    Austin Newman -

    I couldn't get the back cover off with any normal tools. However, I discovered I could slip a razor blade a short distance under the back cover. With this in place, something thicker (like a plastic spudger) could easily be pushed between the razor blade and the metal of the watch. Obviously, working with a razor blade like this is quite risky, I had mine in a little holder to protect my fingers!

    David -

  3. UMxKpnXkjwF5GcQS
    UMxKpnXkjwF5GcQS
    2NKWLQdU53qmrDhn
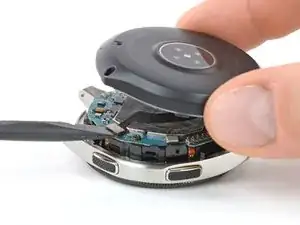
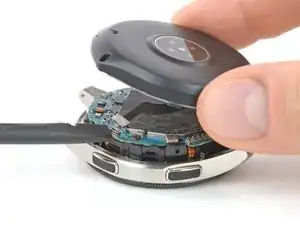
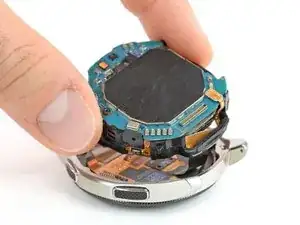
    • Posez la montre et soulevez le fond pour accéder au connecteur du capteur sur la carte mère.

  4. YYnqRGUNNCiHtx5A
    YYnqRGUNNCiHtx5A
    f12LRmjkvJO1nq4D
    • Débranchez la nappe du capteur de sa prise sur la carte mère avec une spatule (spudger).

    My 2019 Gear Sport has no flex cable it used a post where the flex cable is. This plugs into the mother board.

    Much better for disassembly.

    William Barron -

  5. xiguJEsYbbLXMC1y
    xiguJEsYbbLXMC1y
    JJ4DvvUUBsjgbQFg
    GXeRPa2QyJplrLfW
    • Ôtez le fond.

    • Quand vous refermez la montre, vérifiez si le joint en caoutchouc est en bon état. Si ce n'est pas le cas, remplacez-le.

    Has anyone seen a listing for the gasket?

    DaChew -

    anyone where can find the rubber gasket?

    Melvyn Chang -

    is the gasket the Adhesive? If not, what adhesive suggested and how do you apply it?

    batato kr -

    No, the gasket is not the adhesive. As adhesive you can use this under the battery.

    Tobias Isakeit -

    woher bekomme ich eine neue gummidichtung?

    Anja Müller-Dreßler -

    Hat jemand eine Quelle für die Dichtung der Rückabdeckung (rote Dichtung, 3. Bild Schritt 5). Hat jemand versucht die erfolgreich selber herzustellen?

    Helge Korz -

    Falls jemand die Gummidichtung im Netz findet, gerne hier posten. Wir konnten bisher noch keine finden. Selbst rounded.com hat es nicht, und die haben recht viel für (Samsung) Smartwatches.

    Tobias Isakeit -

    Same question : has anybody found a solution for the rubber gasket ? I am not confident at all in the waterproofing of the watch now ...

    Bruno F -

    If the waterproof seal is removed and you only encounter water while washing your hands, would there be any issue?

    Owen -

    Anyone know where to get a replacement gasket? I wear my watch showering and swimming, I don't want to loose the waterproofing

    Mick Brady -

    When I opened the back cover, the gasket was already muddy.

    I purchased a liquid gasket because it is difficult to obtain a dedicated gasket.

    It is for general-purpose waterproof packing used for cars and motorcycles, and is contained in a 5g tube.

    Since it is necessary to apply it to a fine place, I attached a very thin nozzle for super glue to the tip of the tube and applied it.

    I can't guarantee the waterproof performance, but I tried what I could.

    ジャッジアダックス -

  6. DsLIjXTpV6SEOLfq
    DsLIjXTpV6SEOLfq
    dJjbQPTfgs1tIWMe
    • Débranchez la nappe de l'écran de sa prise sur la carte mère à l'aide d'une spatule.

    My display flex cable is cut … is it possible to replace only cable without changing display… if yes please leave a link to buy it

    Akshat Dev -

  7. fcqqMSnq6jErw2dl
    fcqqMSnq6jErw2dl
    sQYyUALKDHUIONNR
    • Soulevez le mouvement hors de la carrure.

    • Le châssis en plastique du mouvement est emboîté dans la carrure.

    • Faites soigneusement glisser la nappe de l'écran à travers le trou dans le châssis en plastique.

    Es sind an den Ecken des Kernstücks ein paar "Plastikdreiecke" mit dem man es mit einem Spudger leichter raushebeln kann!

    Marco Marinkovic -

    Thanks @Marco Marinkovic. There are a couple holes or points, on which to leverage in order to free and lift the core unit. The core unit won't move otherwise as it is anchored there

    Robertob67 -

  8. NxwLbrSsB4RQks1u
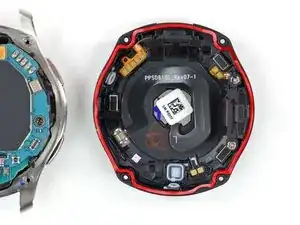
    • Si nécessaire, recouvrez l'écran de ruban adhésif pour éviter de vous blesser avec les éclats de verre.

  9. c2ANsSvTJOZuZGy5
    c2ANsSvTJOZuZGy5
    2p2FsHBSFPr3QYlK
    • Poussez l'écran vers le bas avec votre doigt pour faire céder l'adhésif.

    • Chauffer l'écran avec un sèche-cheveux ou un iOpener aide à ramollir l'adhésif.

    • Ôtez l'écran.

    Do you need new adhesive for the new display?

    Robo -

Conclusion

Pour remonter votre appareil, suivez ces instructions en sens inverse.

Déposez vos déchets électroniques dans un centre de recyclage certifié R2 ou e-Stewards.

La réparation ne s’est pas déroulée comme prévu ? Consultez nos conseils basiques de diagnostic ou notre Forum pour obtenir de l’aide.

Tobias Isakeit

Membre depuis le 31/03/14

122202 Réputation

Un commentaire

Hi does this process work with the galaxy 5 watch?

Rey Thomas Jude Ho -