Introduction

Avec ce tutoriel, retirez et remplacez l'écran de votre smartphone Huawei P10 Lite.

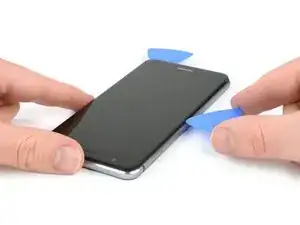
Protégez vos yeux des éclats de verre et ayez une meilleure prise pour ouvrir le téléphone en posant une couche de ruban adhésif sur l'écran.

Lors du remontage, posez une nouvelle couche d'adhésif là où c'est nécessaire.

  1. YqiUymRKMTYinZcE
    YqiUymRKMTYinZcE
    1x5qv4HPtVGSmvpD
    byJlAME6WaXCgGa2
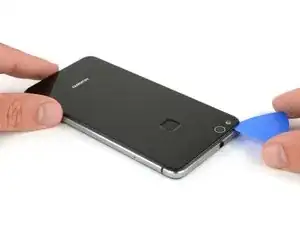
    • Insérez la pointe d'un médiator entre la coque arrière et le châssis central et faites-la glisser sur tout le tour du téléphone pour faire céder l'adhésif.

    • Si l'adhésif résiste trop, servez-vous d'un iOpener pour le faire ramollir.

    Mit dem Saugnapf die Rückseite anheben hilft ungemein…

    Matthias Eberle -

    Had to use blue wedge tool to wedge open bottom plate from the rim part in order to then use the tip of the blue opening pick under the back plate to then cut the glue. It’s like placing a pie server or knife under the plate once there’s a gap between the rim and the back plate.

    Jane -

    Be careful, there’s a cable to fingerprint sensor, very close to the edge (see pictures below)… It’s very easy to cut it through with the pick, as I just learned :)

    dambig -

  2. F5lCy2LZ2xfWDDqg
    F5lCy2LZ2xfWDDqg
    Na6gp15IRbPSW3Ll
    2xyqfXZApukGpaZe
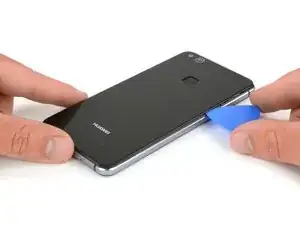
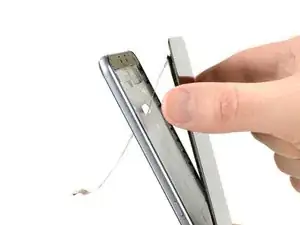
    • Une fois que vous avez fait céder l'adhésif de tous les côtés, faites pivoter votre médiator pour séparer la coque arrière du téléphone.

    • Tournez la coque arrière vers la droite du téléphone.

  3. oPLqQqGCxyiCQ6oZ
    oPLqQqGCxyiCQ6oZ
    gZgRjiB2CuBip3Xu
    • Retirez l'autocollant avec une pincette.

    • Dévissez les deux vis cruciformes #00.

    • Dévissez les quatre vis cruciformes #00 de 2,5 mm.

    Schritt 3 und 4 kann man sich komplett sparen. Wozu auch. Kann gleich mit Schritt 5 weitergemacht werden, zuvor einfach das Flachbandkabel vom Fingerabdrucksensor an der Rückabdeckung abklemmen und fertig.

    Bobby mcgee -

    There are four silver screws and two black to be removed.

    Jane -

    Translate what Bobby mcgee said:

    Step 3 and 4 can be completely ignored. What for? You can continue with step 5, just disconnect the ribbon cable from the fingerprint sensor on the back cover and you're done.

    Antonio Sun -

    However, the reason step 3 and 4 should not be skipped is Step 6 — Use an iOpener to loosen the adhesive beneath the battery. I.e., the adhesive cannot be easily removed without heat, however, that heat might damage the electric chips. Thus they’d better be removed first.

    Antonio Sun -

  4. jMQb6f2oPStGtZUm
    jMQb6f2oPStGtZUm
    QdMRkHKjOFsRwEGW
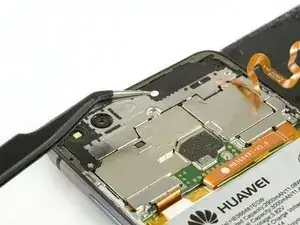
    • Ôtez la plaque de protection de la carte mère avec une pincette.

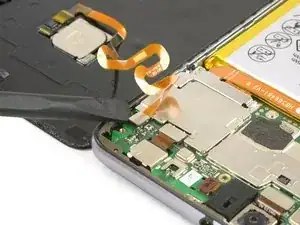
    • Servez-vous de l'extrémité plate d'une spatule (spudger) pour déconnecter la nappe du capteur d'empreintes digitales.

    • Lors du remontage, appliquez à nouveau de l'adhésif là où c'est nécessaire.

    Welchen Klebstoff soll man verwenden?

    josef navratil -

    Hallo Josef,

    sollte bei deinem Ersatzteil kein Klebstoff oder Klebeband dabei gewesen sein, kannst du dünne Streifen Doppelseitiges Klebeband verwenden. Es gibt für das Huawei P10 Lite auch schon zugeschnittene Klebestreifen zu erwerben, hierbei gilt aber je nach Händler Rezessionen zu lesen, ob die Klebestreifen auch wirklich halten.

    Dominik Schnabelrauch -

    Note that there is a copper-colored sticker to lift up near the flat cable connected from the phone the finger pad. Lift the main board plate (shield) up SLOWLY from the camera side to the other end as the plate is wedged in place.

    Jane -

    what adhesive is recommended? thanks

    darren -

    Hi darren,
    pre-cut adhesive would be the best solution if you can source it. Otherwise a two-sided adhesive tape or carefully used E6000 adhesive glue will be your friend.

    Tobias Isakeit -

  5. nTMw5AX5g1nyqUwM
    nTMw5AX5g1nyqUwM
    mAFuE2UeYPHsL42O
    qSBmSxYoBbbj6NBB
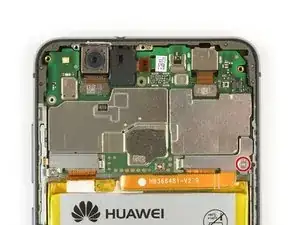
    • Dévissez la vis cruciforme qui fixe la plaque du connecteur de la batterie.

    • Retirez la plaque couvrant le connecteur de la batterie.

    • Déconnectez la nappe de la batterie avec l'extrémité plate d'une spatule.

    Very gently lift the silver connecter that was under the battery connecter plate and is at the end of the orange battery cable with the flat end of the spudger as indicated.

    Jane -

  6. bwFPUDOpYuVxVRnO
    bwFPUDOpYuVxVRnO
    UgttMVO2sVfbDZnE
    • Servez-vous d'un iOpener four faire ramollir l'adhésif sous la batterie.

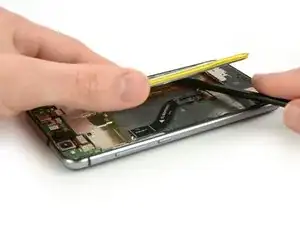
    • Insérez une spatule (spudger) entre la batterie et le châssis central pour ouvrir un espace.

    • Faites attention à pas perforer ni plier la batterie.

    • Insérez un médiator dans cet espace ou servez-vous de la spatule pour couper l'adhésif sous la batterie.

    • Plusieurs nappes se trouvent sous la batterie. Ne les endommagez pas avec vos outils.

    Ohne eine Erwärmung des Klebers ist die Entfernung des Akkus wirklich sehr hakelig und zeitintensiv!

    Marcel Tischer -

    You must heat the battery two or more times with the iOpener in order to remove it because if you don’t (and even if you do) the battery will certainly bend. So the battery removal has to be done delicately. Lift each corner a very tad bit and the sides to finally lift out as shown.

    Jane -

    This step takes at least 15-20 minutes.

    Jane -

    Battery easily torn. The kit should include a battery as it’s VERY delicate and would be saved if you have the replacement battery.

    Jane -

    Ich habe es mit Zahnseide recht gut hinbekommen! Habe die Seide oben angelegt um gut unter den Akku zu kommen und habe mit Wärme und hin- und herbewegen der Seide den Akku ohne verbiegen gelöst bekommen. Hat auch ein paar Minuten gedauert, aber hat sich gelohnt!

    Sash -

    Is it possible to soften the adhesive using isopropyl alcohol?

    Michele Matteoni -

    Hi Michele,

    yes, the use of isopropyl alcohol is a common technique when removing a battery in a smartphone. Especially when the adhesive is very strong. Try to apply the alcohol to every corner of the battery and let it penetrate the adhesive for several minutes. Start the prying procedure with the spudger afterwards. In case the adhesive isn’t loose enough you can reapply isopropyl alcohol any time during the removal. Keep in mind, that there’s a gap in the midframe for the display flex cable. It can happen that the isopropyl alcohol runs trough that gap and loosens the adhesive of the display as well. When the display adhesive gets loose you’ll need replacement adhesive for the display. To avoid that, apply as less alcohol as possible at a time and take especially care during prying to avoid damage to the flex cables underneath the battery. The adhesive of the cables will get loose as well.

    Dominik Schnabelrauch -

    The battery was very hard to remove. Please note: it is glued everywhere around the ribbon cables at the bottom. The battery is not glued with little strips like the back cover. The spudger and the blue cutting triangles were not very strong and the plastic tip bent upon removal of the battery. I eventually got the battery out with a metallic spatula. Be careful not to rip the shining lining of the battery while cutting the adhesive. I don’t know how people get the battery out without bending it, also every YT video I watched had - slightly - bent batteries. The glue is so strong snd sticky I did not need to apply new adhesive strips.

    anya__savina -

    If you are operating on aged ones:

    The Old double sided tape doesn’t really much care about the heat from the iOpener.

    Use a metal spudger (round edges) instead but use it with care. Slowly and evenly lift the battery and go around it in a circle. Stay close to the edges to not damage cables under the battery (seen in step 7). Start pushing closer towards the middle only when you can see the cables yet and are sure not to damage them.

    If this still doesn’t bring you closer to lifting the battery safely:

    Two Options:

    1. Try to use some small drops of adhesive remover . Best to use not to much is use Q-Tips or Cotton Swabs to evenly apply the remover through a little crack under the battery.

    2. Use unwaxed dental floss push it under the battery. Then gently move it upwards with a pulling-side-to-side motion. To accelerate the process you can also use ***adhesive remover***. The dental floss will soak it up (only works with unwaxed dental floss) and assure that it will only be where it’s needed.

    Doron Karaman -

  7. BbUx2kRY4kggXabN
    BbUx2kRY4kggXabN
    sUWjuiRLphyEnniS
    • Avec une spatule, coupez le reste de l'adhésif et faites levier pour sortir la batterie du téléphone.

    • Ôtez la batterie.

    • Au moment de remonter votre téléphone, remplacez l'ancien adhésif avec du ruban adhésif double-face ou des bandes adhésives pré-découpées.

    • Ne réutilisez jamais une batterie qui a été déformée ou endommagée lors de son retrait.

    Merci pour ce tuto absolument parfait.

    IKO -

  8. TrZjfypkx2bPkU3J
    TrZjfypkx2bPkU3J
    5QtEKB5XjTnANLs3
    fL53ISiWfWSGHUkC
    • Retirez la vis cruciforme qui maintient le cache métallique de la connexion d'écran.

    • Retirez le cache métallique de la connexion d'écran.

    • Avec l'extrémité plate d'une spatule, déconnectez la nappe de l'écran.

  9. B2HR3spIPra3Dow2
    B2HR3spIPra3Dow2
    EU6N4FZFgv1XHWZ5
    tFIRZJF6rBrqMvv5
    • Servez-vous d'un iOpener pour faire ramollir l'adhésif sous l'écran.

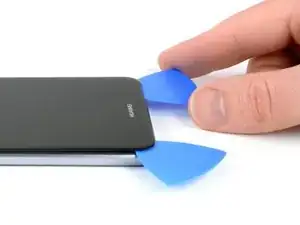
    • Insérez la pointe d'un médiator entre l'écran et le châssis.

    • Insérez un second médiator à côté du premier.

  10. bqNAxqIbMNtYCHQQ
    bqNAxqIbMNtYCHQQ
    rDTW1NbVGNbTYDtW
    WwCStPZ1RLtlgsHF
    • Faites glisser un des médiators le long du téléphone pour couper l'adhésif.

  11. hvU2MmlBouZJpIuX
    hvU2MmlBouZJpIuX
    4tGPGV3PLyF1TnYu
    gOUrYAbYJ62Sfcv3
    • Une fois que vous avez fait tout le tour du téléphone avec le médiator, faites-le pivoter en haut du téléphone pour séparer l'écran du châssis.

    • Saisissez le haut du téléphone et séparez l'écran du châssis en veillant à faire passer la nappe au travers du trou.

    • Lors du remontage de votre téléphone il faut remplacer l'ancien adhésif par une bande adhésive double-face ou bien une bande adhésive prédécoupée.

Conclusion

Pour remonter votre appareil, suivez ces instructions en sens inverse.

Dominik Schnabelrauch

Membre depuis le 23/11/16

224029 Réputation

2 commentaires

hey bam ich habe ein glück wegend euch ifixit danke dafür die anleitung hat mich zu glück gebracht dank ifixit ist mein

huawei p10 lite heile danke für alles lg der besitzer des huawei p10 lite

David Wendler -

Hallo,

soweit ich sehe, ist die Klebefolie nicht im Ersatzteil enthalten, und die vorgestanzte Klebefolie ist nicht (mehr) erhältlich. Statt dessen verweist ihr auf das doppelseitige Klebeband von tesa, das als Rolle erhältlich ist - aber in verschiedenen Breiten.

Welche Breite ist für diese Reparatur hier denn die passendste?

Und wird das phone damit wieder genauso staubdicht wie zuvor (man wird ja puzzlen müssen, und an den Übergangsstellen hat man Stöße statt durchgehende Verklebung…)?

TeeLittle -