Introduction

Ce guide décrit les instructions de remplacement d'un pare-brise cassé. L'écran tactile est le composant le plus enfoui dans l'appareil, et de nombreux câbles importants doivent être retirés pour accéder à l'écran. Si les étapes de ce guide sont suivies, aucun dommage ne devrait survenir sur l'appareil. Pour plus d'informations, consultez notre

page de dépannage.

  1. R3WrHkdaFuZjfZ3d
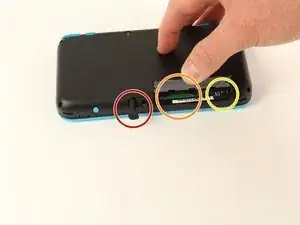
    • Avant de commencer le démontage, retirez

    • Le stylet

    • N'importe quelle cartouche de jeu

    • La carte SD

    This is a great repair instructional, but I would advise also looking at the below video link. (I used both.) Sometimes watching 2 repair guides can help when you think you think you’re stuck. For example, I had a really hard time getting the hinge off!

    https://www.youtube.com/watch?v=Zuu_T2ls...

    (HINT: Works best if you rotate it 180 degrees, so that you are repairing it from the same perspective as the technician)

    skat1140 -

  2. qInyERKyTGMKUtxf
    • Dévissez les quatre vis tri-point de 6 mm situées aux quatre coins du panneau inférieur.

    The Y0 was too big; I ended up using a Y00 and that worked fine

    Christopher Gilmer-Hill -

    Would not recommend using a Y000 like I tried to do

    Daniela Magaña-Ochoa -

    gotta use Japanese Industry Standard YOO (blunt end)- I did not, and accidentally stripped two of the screws… still trying to figure out how to remove them -_-;

    Yanko Artidiello -

    Yeah I can confirm, the y0 does not work.

    Arc Turus -

    I'm using the Y-0.6 and seems to only unscrew 2 of the screws on the right side of the handheld, the other 2 aren't moving

    Xx_Definity_J0rd4n_xX -

    screws are too tight

    Albert Einstien -

  3. FUiabbAOYVaNjG4X
    FUiabbAOYVaNjG4X
    MiHqoVbAY3mST6Ls
    • Soyez prudent lorsque vous séparez le panneau inférieur du boîtier avant pour éviter de casser les trois câbles connectés à la carte mère (deux de chaque côté et un à l'arrière).

    • A l'aide d'une spatule, séparez le panneau arrière du boîtier avant en faisant délicatement levier autour du panneau.

    • Il y a de nombreux clips le long de la charnière du boîtier, il est donc recommandé de travailler le long d'un côté court et des deux côtés longs avant de terminer le dernier côté court.

    You need to be super careful separating the top from the bottom at the rear end. I got stuck there, applied a lil more force and ripped the right shoulder button straight off the pcb!

    Dominik Leicht -

    The front headphone Jack got stuck in the bottom case and snapped when opening, didn’t notice until after replacing the battery (which is a nightmare btw) I used some floss underneath the battery to give you better leverage since the side plastic is so thin and fragile. I cannot get the headphone Jack back into position now and will have to take it to a shop for (I’m sure much more expensive) repairs. Honestly DO NOT try repair this thing, just pay someone else to repair these. Compared to the OG 2011 3DS these are a nightmare to work with. Nintendo really went out of their way to make this impossible to repair, I had an extra set of pretty capable hands too.

    radioactiverhino 04 -

    I also ripped off the headphone jack when taking the case apart. I never pulled hard. You need to be careful to give the headphone jack clearance before applying any force.

    Mikaela Orbon -

  4. hN4JmkBHkaqtRlxN
    hN4JmkBHkaqtRlxN
    sLnMpviSoWENSJQk
    CxaLwKZ2IuAS5cAV
    • A l'aide d'une pince à épiler, déconnectez les deux câbles qui relient les boutons arrière de chaque côté à la carte mère en les tirant doucement vers le haut.

    I unfortunately took off the base of one when trying to pull apart. Is there a fix or will it not be broken?

    Phoenix Typhoon -

    Did you manage to fix this at all?

    Owen McKay -

    When you are putting these cables back, make sure to check the orientation of the cable. You have to match the cable head to the entry point, so you may have to turn the cable around. I spent a bit too much time trying to connect the cables just because I didn't realize that I had to turn the cable around.

    Hongda Wang -

    Aren't these the speaker cables? I haven't taken any 2DS's apart in a while, but I'm pretty sure these cables connect to the speakers

    darth mango -

  5. 6AT5OJ1MuuBaICeA
    6AT5OJ1MuuBaICeA
    ua4Ruiu5ewlgVKlO
    • A l'aide d'une spatule, retirez la batterie.

    • Sachez qu'il y a un tampon collant qui maintient la batterie dans son plateau. Il peut être nécessaire d'utiliser plusieurs outils pour retirer délicatement la batterie du plateau et de la carte mère.

    Some might see this as an optional step. But you probably do NOT want to skip this. I did, and now I have malfunctions on the Nintendo (touch screen functionality not working, possibly as a result of shorts from skipping this step.)

    skat1140 -

    Personally, I skipped this step and everything still works fine. I wasn't able to take the battery out because the adhesive was too strong.

    Hongda Wang -

    Small square of adhesive. Pull up slowly and it’ll release after 10-20 seconds

    Jacob Cocanig -

    Any advise for dealing with CTR-003 spicy pillow? So far in this transplant operation, both my devices batteries are okay... but... I dunno, if I were to run into a spicy pillow in the future, what would be the least awful way to pull it out?

    Not sorry, when I see these repair jobs that involve the company gluing the battery into the device (or even soddering in that soon to be spicy pillow) this is just something I'm wondering about

    Katrina Payne -

    I haven't taken my 2ds apart yet, depending on how devices are built it might work to slide a solid thread (eg fishing rope, or floss but that might rip) under it, and do a sewing motion.

    Franziska (Natsu) -

  6. SSMvQDgl1DwcocIH
    SSMvQDgl1DwcocIH
    mDsPxLStvgmPJlHp
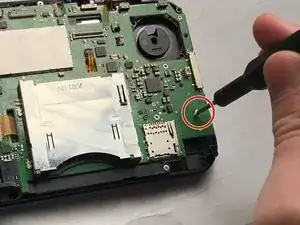
    • Il y a 8 câbles plats qui doivent être retirés comme indiqué sur l'image. Utilisez une pince à épiler pour relever les loquets et retirez le câble plat.

    • 2 des conneteurs (en vert) sont des connecteurs ZIF. Retirez-les avec precaution en tirant doucement sur le cable. N'essayez pas d'ouvrir ces connecteurs, cela les casserait

    • Pour les 6 restants (en rouge), utilisez une pince à épiler pour ouvrir les connecteurs et sortir les cables rubans.

    • Notez que la deuxième image montre un conneteur ZIF cassé à coté d'un connecteur de joystick (à la droite de la flèche rouge). N'essayez pas d'ouvrir ce connecteur comme sur l'image !

    Do not just pull up “latches”, two of these are not zif connectors and pulling the top off will break it! I now have a dead 2DS XL because I followed this guide.

    Pressing the ZL button on device turns system off.

    Dunnymeister -

    I made the same mistake. The guide is now updated.

    Mike -

    Trying to follow this guide... uh... what is a latch? That is a type of leverage based opening/closing device right? I'm not seeing anything on my board or in the images that I could call a "latch"

    I'm not able to find this locking mechanism described in the image... much less know what I am using tweezers on

    I would love to go further... but uh... there is no leverage based locking/closing/opening device in any of the images that I can see... no I can see on my board

    Katrina Payne -

    Oh right, and it doesn't take a psychic to know somebody is going to be all "ooh, why not Google it". After about a full page of ads, this is the Wikipedia entry for Latches. I do not see anything in the image, or on my board that matches that

    Katrina Payne -

    Okay update on how I got confused... turns out all the latches (except one) were already open. Apparently I tend to jostle my game device a bit on the hard side... and at some point they all (except one) came exceptionally loose. I literally could have just pulled the ribbon cables out

    On a related note... the reason my R-Button wasn't working wasn't due to stickiness... turns out I had somehow managed to push it so hard it depopulated itself from the board and was just sitting loose inside the case (well... as loose as it could be... it did not travel too much)... going to need to figure out how to repopulate the R-Button--looks like it could prolly be resoddered back in

    Prolly a good thing these repair guides exist

    But yeah... turns out all the clasps/latches whatever were completely open when I opened the case... that would prolly explain why the battery kept draining so quickly

    Katrina Payne -

    Is there any way to fix those "latches" if open?

    Mim Howell -

  7. lENbxc1owHxJd2B5
    lENbxc1owHxJd2B5
    Ty63qp3gtGSWq2Df
    • Débranchez les fils suivants de la carte mère à l'aide d'une pince à épiler.

  8. GqvOCteO2iYPDwUf
    GqvOCteO2iYPDwUf
    AfDTdwEG1IjHHCef
    • Retirez les vis suivantes à l'aide d'un embout de tournevis Phillips J00.

    • Retirez la carte mère de l'appareil.

    Step 8 motherboard screws are J00 Phillips.

    Joseph Costello -

    Thank You!!!

    Zach -

    Guide has been updated.

    Mike -

  9. ol4jyICbCZsn66yI
    ol4jyICbCZsn66yI
    yPAbCLGELWP6jNbv
    • Retirez les cinq vis cruciformes de 7,5 mm à l'aide d'un tournevis PH000.

    • À l'aide d'une pince à épiler, tirez vers le haut la plaque recouvrant le pavé tactile. Le câble plat central glissera à travers cette plaque.

  10. DoPI4JsKlabhpWYI
    DoPI4JsKlabhpWYI
    f3GSso2O5ZbIJObD
    • L'écran inférieur est collé à l'avant avec une bordure adhésive. Veillez à séparer lentement les deux. Une séparation rapide peut endommager les deux composants.

    • À l'aide d'une pince à épiler, soulevez l'écran tactile.

Conclusion

Pour remonter votre appareil, suivez ces instructions dans l'ordre inverse.

Tim Newman

Membre depuis le 25/09/17

1709 Réputation

12 commentaires

Please do top screen next, that’s what I need, but still +30 points :)

Multimegamander -

Hi Bud

Great instructions, but where do you buy 2ds xl replacement screens. I’ve looked everywhere. I only see 2ds and 3dsxl replacements for sale

Thanks

John

John S -

Where can you find the screen replacements?

Caleb Riley -

Where can you find the screen replacements? This is a great guide but I can't find the screen replacements anywhere.

Caleb Riley -

I changed the digitizer of touch screen for one new, but still not working. which can be the problem? thank you for you answer.

Juan David Giraldo -

⚠WARNING⚠

This guide has a fatal error on step 11. The latch on the connector mentioned in step 11 should NOT be lifted, doing so will break the connector.

Same goes for step 18.

John256145 -

The guide has been updated.

Mike -

This guide literally told me to do something that broke my 2DS

This guide broke my device by telling me to flip up one of the ribbon connectors that didn't flip up. Definitely a newbie trap here and not well explained. Now I need to do a motherboard swap or send it into Nintendo. Hours of my life wasted for a guide that could have explained about how the connector worked.

Justin Oliver -

The guide has been fixed.

Mike -

I found this guide very helpful repairing my grandsons console, but what a faff! I have replaced many phone screens in my time, mostly i phones, but this was the most complex stripdown I have ever done, so the help was most appreciated.

Euan Tausney -

Okay... did this repair (I actually transplanted a screen from a donor system)... apparently my n2DSXL was really banged up. As the R-button was depopulated from the board (I guess I pushed it too hard playing Mario Kart?). Several screw columns were loose inside the case and the ribbons were unlatched/unclasped... and mostly just staying in place as a suggestion

.

When I put it back together, the analog stick was all messed up. So I'll have to fix that up a bit... but I have a touch screen now. Hooray

.

It would also appear that the ZL button was loose in the donor system... so uh... guides on repopulating the L/R/ZL/ZR buttons in the future?

Katrina Payne -