Introduction

Ce tutoriel vous montrera comment remplacer la batterie de votre manette JoyCon.

Il existe quelques différences mineures entre la Joy-Con de gauche et celle de droite. Ces instructions de réparation JoyCon Switch s'appliquent aux deux.

  1. GYJsbHVfPWpAmiyt
    • Retirez les quatre vis Tri-Point Y00 du panneau arrière de la Joy-Con.

  2. FXAuJg1LRQAmhBwg
    FXAuJg1LRQAmhBwg
    P1ZuDWxeLUetpbNa
    BmCSyChoCZ5mcSll
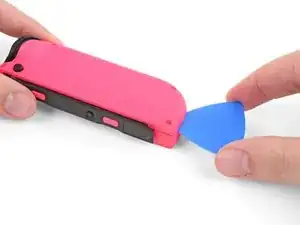
    • Insérez un médiator dans le bord inférieur du panneau arrière (du côte opposé aux boutons).

    • Faites glisser lentement un bout plat du médiator le long du côté de la JoyCon.

    • Veillez à ne pas enfoncer le médiator trop profondément à l'intérieur de la Joy-Con. Cela pourrait endommager les composants internes. Le panneau arrière se détache assez facilement, vous n'avez donc pas besoin d'appuyer beaucoup.

  3. 1LtIMl4CTjnPJO1x
    1LtIMl4CTjnPJO1x
    3lEEyNrwGwnULvQe
    • Ouvrez la JoyCon comme un livre, le rail étant face à vous.

    • Ne tentez pas encore de retirer complètement le panneau arrière. Deux nappes relient le rail de charge à la carte mère.

  4. rvUQgXmGBY3yGOjs
    rvUQgXmGBY3yGOjs
    DQbfH4JIHlCjNePi
    vwd1bV2ZJSv4uG1E
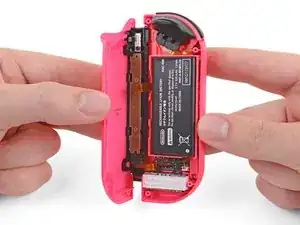
    • Utilisez une spatule (spudger) pour débrancher délicatement le connecteur de la batterie de sa prise sur la carte mère. Cela empêchera la manette de s'allumer pendant la réparation JoyCon Switch.

    • Soyez prudent lorsque vous progressez autour de la nappe du vibreur, qui passe à proximité du connecteur de la batterie. Si vous remplacez la batterie dans la Joy-Con droite, vous devez également éviter le câble d’antenne au cours de cette étape.

    Beim wiedereinstecken des Akkus hat sich für mich bewährt die Flache seite des Spudgers etwas zwischen die beiden Akkukabel zu stecken.

    Außerdem sollte man darauf achten, dass wenn man wie in den Bildern zu sehen den Akkustecker von der Platine entfernt nicht ausversehen die Bauteile von der Platine bricht die unmittelbar vor dem Stecker sind

    Sontha -

    Hallo Sontha,

    danke für die Anmerkung. Viel Spaß mit deiner Switch!

    Viele Grüße!

    Fabian Neidhardt -

  5. ixEWVEgTMfUw1THT
    ixEWVEgTMfUw1THT
    2GHEGwVu5KVyUmSH
    GvUFjnKeqEqp3V1B
    • Insérez un médiator entre la batterie et le boîtier de la JoyCon.

    • Soulevez doucement la batterie qui adhère légèrement en place.

    • Pour installer une nouvelle batterie JoyCon Switch, appuyez dessus et reconnectez-la. Si le ruban adhésif double-face fixant la batterie en place s'est détaché avec la batterie, remplacez-le avant d'installer la nouvelle batterie.

    thx for making this process ez and affordable.

    definitely saved the environment of dumping 4 perfectly reusable joy-cons.

    Noam Gonen -

    Thank you Ifixit, I changed my battery fairly easy. Your guide has been very helpful!

    Flora Flex -

    Easy-peasy. Joy-Con now works while disconnected again. Thanks, ifixit!

    barefootedmike -

    What width of tape should I buy for this? The link to the store for the double sided-tape shows four choices (1, 2, 4 or 8mm). The kit we can buy comes with a tape card, but I need to change four batteries, and buying four kits would be a waste.

    Feather Antennae -

Conclusion

Pour remonter votre appareil, suivez ces instructions dans l’ordre inverse.

Jairo

Membre depuis le 09/02/12

5198 Réputation

11 commentaires

Bonjour, après avoir suivi les étapes tout fonctionne ,SAUF la recharge … à savoir également que je me suis trompé dans la commande de la nouvelle batterie, celle-ci étant d'une capacité plus faible

Ced -

Bonjour Ced ! Nous sommes désolés de l’apprendre. Avez-vous essayé de calibrer la batterie ? Veuillez prendre contact avec notre service client (support@ifixit.com pour la boutique américaine ou eustore@ifixit.com pour la boutique européenne et française) en indiquant votre numéro de commande. Ce sera un plaisir de vous porter assistance !

Claire Miesch -

Bei mir ging beim roten Joy Con oder Akku nicht mehr, ich hab ihn jetzt auseinandergeschraubt, das Kabel vom Akku gelöst und wieder eingesteckt.

als ich alles zusammengebaut habe ging er. Es war wahrscheinlich nur das Kabel was nicht richtig drin war.

Tobias No name -

Hello, i'm unsure what to do now but I have replaced my battery but my switch still doesn't show the presence of my right joy-con. I opened up the joy-con while connected to the switch and the battery is only charging at 1.2v (without the battery the pins are the same) could it be the charging rail? Any tips would be appreciated. Thanks!

Logan Marynowich -

Mir fiel der linke Joy Con bei einer wilden Play Session auf den Boden und funktioniert nicht mehr. Dank Anleitung und iFixit Set konnte ich den Joy Con öffnen und das Kabel des Akkus wieder fest einstecken - Problem gelöst. Danke ifixit!

Mike -

What type of connector is on the battery.is jst molex dupont Jr futaba or something?can you tell me?

Ravinder Singh Negi -

close up video of your hands are hairy like a guy's

travelox -

What is the little mat with the ifixit logo on it that came with the kit? I thought it was a mini magnetic mat, but I tried to get a screw to stick to it and it didn't. It's very flexible and looks like it should be peelable, but I didn't want to attempt this on the off chance it is something else.

As far as the guide itself, it was very easy to follow and worked perfectly for me. Thank you!

Jordan -

I believe that is replacement tape or adhesive for the battery, incase yours came off of the joycon case with the battery!

Caleb Prince -

Vielen Dank! Meine zwei Joy Cons haben nun wieder frische Akkus! :)

Franz Seidl -

Hi! I recently preformed this repair successfully, but now the buttons on the rail do not work. However the rail itself still works and connects to the switch. There are no broken ribbon cables or loose connections to my knowledge. Could it be the way the ribbon cables are positions inside the casing, maybe I placed them back in wrong? Any help would work, thanks!

Caleb Prince -