Introduction

Suivez ce tutoriel pour changer la batterie de la manette DualShock 4 (modèle CUH-ZCT1U).

  1. X5wSfxicAxSko1Zg
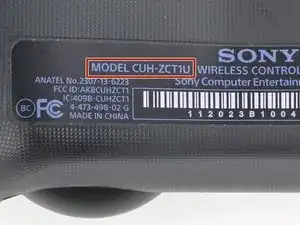
    • Vérifiez le numéro de modèle au dos de votre manette. Ce tutoriel a été rédigé avec le modèle CUH-ZCT1U. Si vous possédez un autre modèle, la procédure du tutoriel et les pièces de rechange peuvent être légèrement différentes.

    • Si vous avez la deuxième génération de DualShock 4, modèle CUH-ZCT2U, utilisez ces tutoriels.

    model:cuh-zct2e

    كيف يمكن ان افكها

    Mhmod -

  2. w1u5HLFRbQIP2d2F
    w1u5HLFRbQIP2d2F
    pJuWDOWVmAmLyI6V
    • Si vous avez besoin de stabiliser votre manette pendant cette réparation, posez-le sur une surface douce telle qu'un chiffon en microfibres.

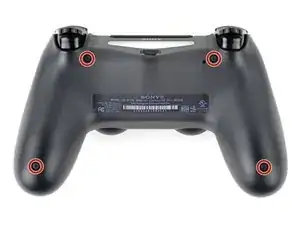
    • Utilisez un tournevis cruciforme pour retirer les quatre vis de 6,4 mm de long qui fixent le boîtier arrière.

    to re-torque these PH00 screw... i found 19Ncm to be about the max. (since 27Ncm was too much)

    Dreamcat 4 -

  3. NgnhjUOrfuwMJyov
    NgnhjUOrfuwMJyov
    cwbJVa63FyosD31P
    HvrmieUp6UwVcySs
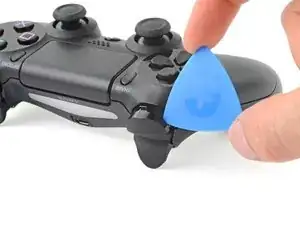
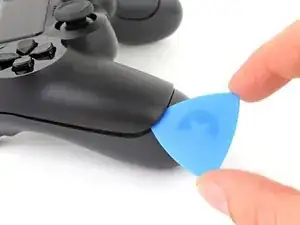
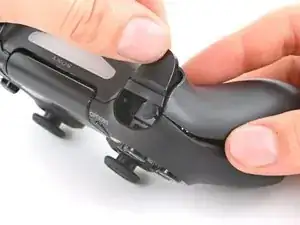
    • Utilisez un médiator pour faire levier sur chaque coin du bouton L1 du boîtier avant.

    • Retenez le bouton pour éviter qu'il ne soit éjecté hors de votre espace de travail.

    • Retirez le bouton.

  4. AJugiOXGbAhQ1BMq
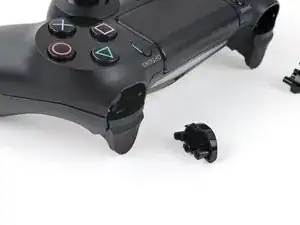
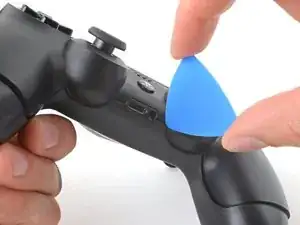
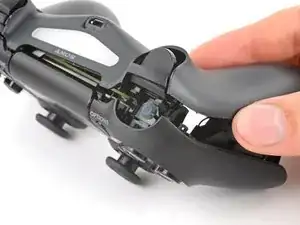
    • Utilisez votre médiator pour faire levier et retirer le bouton R1, comme vous l'avez fait pour le bouton L1.

  5. B1xF1WqHbfBoBJtF
    B1xF1WqHbfBoBJtF
    EHOhhIPKfA2DZQfI
    McHyyAQtKhIUOHJO
    • Six clips en plastique fixent le boîtier arrière au boîtier avant. Les quatre étapes suivantes montrent comment détacher ces clips avant de pouvoir ouvrir la manette.

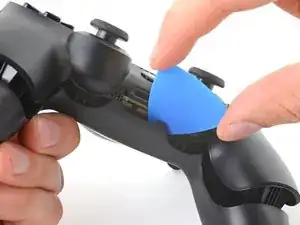
    • Insérez votre médiator incliné vers le bas, entre le boîtier avant et le boîtier arrière, à mi-chemin entre la poignée et les boutons d'action.

    • Glissez votre médiator vers la poignée et faites levier pour détacher le premier clip.

    • Répétez cette procédure de l'autre côté de la manette pour détacher le second clip.

  6. j1WZgSo6o3TaODlg
    j1WZgSo6o3TaODlg
    eRF1MNwAMFijHfw4
    ocNfVkqvnbtCNBcd
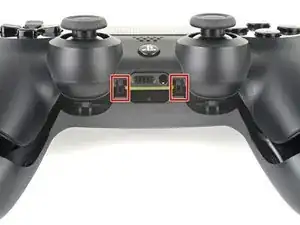
    • Deux autres clips fixent le boîtier arrière près du port d'extension et de la prise casque.

    • Insérez votre médiator entre le boîtier avant et le boîtier arrière, de part et d'autre des ports.

    • Tournez votre médiator pour déclipser cette partie du boîtier arrière du boîtier avant.

    • Si le boîtier arrière est coincé, insérez et tournez votre médiator sous différents angles.

    • N'ouvrez pas encore la manette, car elle est encore maintenue par deux clips très délicats près des gâchettes.

  7. jf5SveEdOwRIGhJq
    • Les deux derniers clips sont très délicats et doivent être détachés depuis l'intérieur de la manette. Si vous les cassez, ne vous inquiétez pas, cela n'affectera ni cette réparation ni le fonctionnement de votre manette.

    • Localisez les clips en regardant à travers l'espace au-dessus des boutons R2 ou L2.

  8. qQcyUfycauX1EUE6
    qQcyUfycauX1EUE6
    YFUPEeSZZqPY4U1E
    OHcMVCNj4VJZWyNC
    • Insérez la pointe d'une spatule (spudger) dans l'espace situé au-dessus du bouton R2 et poussez le clip de retenue vers l'extérieur.

    • Tout en poussant le clip vers l'extérieur, tirez lentement le boîtier arrière du boîtier avant jusqu'à ce que vous sentiez qu'ils se séparent.

    • N'ouvrez pas complètement la manette tant que les clips R2 et L2 n'ont pas été détachés.

    • Répétez cette procédure pour le clip situé près du bouton L2.

  9. PKcRjl2CIQogpTKp
    PKcRjl2CIQogpTKp
    fip3U51QOcVGEXVJ
    u6ZnJrwXE1clORUW
    • Appuyez sur le bouton R2 et faites glisser le boîtier arrière par-dessus.

  10. KP2vxXGWlaTfsUDK
    • Appuyez sur le bouton L2 et faites glisser le boîtier arrière par-dessus.

  11. 3hhTNdLYVWIBGeVA
    3hhTNdLYVWIBGeVA
    hfTvkNdF3uokn4Pa
    GXsRCZqUChYpLy1d
    • Faites basculer le boîtier arrière sur la manette et posez-le, en veillant à ne pas tirer sur la nappe d'interconnexion.

  12. nCng6Fw1GK6utOG1
    nCng6Fw1GK6utOG1
    SZUVqTnFbaQPaXbq
    5sWqh1SoSQhBsOFd
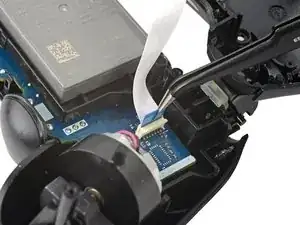
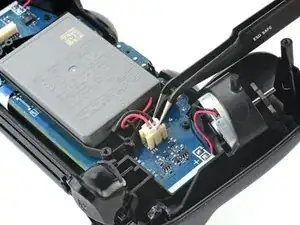
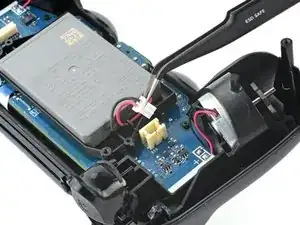
    • Utilisez une pince fine ou vos doigts pour retirer la nappe d'interconnexion, en tirant sur sa languette bleue pour la sortir de la prise.

    • Lors du remontage, reconnectez la nappe en orientant sa languette bleue vers l'extérieur de la manette.

    On the model CUH-ZCT2E the circuit board is mirrored so that the connection is on the left side. When reassembling the blue tab should be facing inwards.

    Konrad Skeri Ekblad -

  13. bTlYAQTvGVBKbfRV
    bTlYAQTvGVBKbfRV
    4QAyFxp5cWR2HTHW
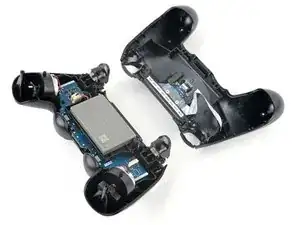
    • Avec une pincette ou vos doigts, attrapez et déconnectez le connecteur de la batterie sur la carte mère.

    • Ne tirez que sur la tête du connecteur, pas sur le câble lui-même.

  14. gp4YHL5LMwLLvcoE
    • Retirez la batterie.

Conclusion

Pour remonter votre appareil, suivez ces instructions dans l'ordre inverse.

Amenez vos déchets électroniques à un recycleur certifié.

La réparation DualShock 4 ne s'est pas déroulée comme prévu ? Essayez un diagnostic de base ou demandez de l'aide sur notre Forum.

Clay Eickemeyer

Membre depuis le 19/09/22

76560 Réputation

29 commentaires

My Dualshock 4 wont turn on after the battery replacement.

Any idea on why this happened?

Alexander -

have you tried to charge it?

Mohamed Aden -

I had a problem with my console but with your guide it is possible to solve this one I think.

Praska -

I found a replacement battery here, you have to mod the tray a little, but it works like a champ and doubles the life.

http://www.ebay.com/itm/PS4-Controller-B...

binazriel -

The x button on my controller want working properly so I ordered new rubber mounts. I followed the guide, taking my time to make sure I didn't damage anything.

With the new rubber in place I put everything back together and the controller was working fine but now I've realised it doesn't charge. The battery goes completely dead and switches off. If I then connect it with usb cable it doesn't charge but will turn on the controller for maybe 10 seconds before switching off again.

Anyone any idea what is going on? Thanks.

Kenny -

my controller is not starting today

Harry Patidar -

Did this fix to the letter, controller works now but the light bar does not and I'm unsure if it charges. It shows it's fully charged. Could it be that the micro-usb connection is frapped?

the00brotherhood -

Ok, so it shows it’s fully charged on the PS4 but the light on the controller is out if I’m reading you right. Method I would use… connect the controller to your computer with a wired cable (eliminating the PS4 from the equation).

Check Device Manager in Windows or System Report on a Mac. Does it show your controller?

Yes = USB port on controller is fine, you may have damaged the LED on it during the repair.

No = USB port may be damaged or the cable may be fried.

Your problem doesn’t seem like it would have anything to do with the USB port. If it works but with no lighting, you should be ok unless you use the controller with the PS4 camera.

Brad S -

The battery outlet got ripped off. Can it still be fixed?

nextinline3900 -

Anything can be fixed. But without knowing how severe the damage is it’s hard to say how difficult it would be, although it may involve cannibalizing another controller. At this point it may be cheaper to just purchase a new Dual Shock.

Brad S -

Hi I have two PS 4 controller that wont charged. I had checked with all the possibilities before purchasing two new 2000 Mah replacement batterries. But after replacing the old batteries, I noticed that one of them stopped charging. I thought it had reached the capacity to the full, but to my surprise it did not work, the light is just blinking when I turned it on. I reset the unit but remmained the same !!!

Could it be the charging port got damaged ??? Kindly advice

my other controller is still charging and I have not tested it.

Wushangkehan -

By the way, I plugged into the computer…the device manager did not read the presence of the PS 4 controller , could it be the USB port is damaged ???Kindly advice

Wushangkehan -

I have a simple question…..I replaced my sons PS4 battery with a replacement battery and charging cable……I plugged it all back in as shown…..Now the controller is working……But the battery level on the console/tv is showing it’s charging…..But it does work…….Any idea or reason why the new battery or controller is showing charging still without being connected to the usb? Ty

myfam73 -

Be carefull with 2000mah batteries. I’m talking about V2 Dualshock 4. The original battery : 54mm x 35mm x 8,5 mm and 24g with the hardcase. In this space, you can’t have a 2000mah. Check the size of a true 2000mah 3,7v cell, and you will see a really bigger size. So, these replacement batteries with the same look as the original one, are fake ! If they work, because many are dead and don’t work at all, you will never have 2000mah. I found a true new 3,7v li-ion cell on Ebay, that fits perfectly, but it’s a 1500mah, and without a hardcase. I had to weld the original connector, but it fits perfectly. Not any voltage problem. So, if you need a new battery, don’t bought any hardcase version, and check the dimensions and weight.

KOULLIT -

The blue plastic thingy goes away from the battery. There are letters (maybe symbols) on the ribbon opposite of the blue plastic thingy and they are pointing toward the battery

Ryan A -

so what happens if your controller requires a smaller insert (that is circular and not a square input [which is provided standard in the 2k mah? Same module number but different connectors?

mhoffmanmobile -

I had trouble with analoge, I fixed that but FPC (flat connector) on mainboard broken and I soldered new 12 pin FPC on mainboard again, but in reverse!

then I put charging cable and the dualshock did not turn on , and I sensed that the dualshock is heating up, I remove charging cable as soon as possible.

problem is this : negative and positive putted in reverse.

I don’t kwow what happen if I solder new FPC in right position .

Does it work or somethings going to out of service?

sorry formy poor English language .

regards,

Hamed

hamed1379 -

i struggled with the reassembly; its much easier if you attach the L2 and R2 buttons to the upper half of the controller.

follow these steps:

reattach first the battery, then the cable with the blue pull tab.

then assemble the L2 and R2 buttons as follows: make sure to position the springs in their appropriate slots (especially at the hinge receptecle at the upper shell, align the spring and hinges and push it into the holder.

only then assemble the two body halfes together by first guiding the L1&2 and R1&2 buttons in their correct location. finally slightly bend the long studs into the handle grips and tighten all 4 screws.

wooghee -

I can’t get the battery connector cable out of the socket. I tried to remove it for 15 minutes and it wouldn’t come out.

marcus2159 -

After replacing the battery, the controller can only be used while charging with the cable.

What is the cause of this?

RK-pkmn -

My dualshock 4 is charging but isn't turning on

Derrick Egwalusor -

How can I check which model/version is my controller? (I dont have the back sticker , it fell out a while ago)

Ariel Peteri -

Hi! From looking at the V2 guides, I found a couple distinguishing factors in each controller. The body design near the vibration motors, the shape and color of the motherboard, and the shape of the plastic around the triggers are all key features to compare between models. Use photos from our disassembly guides for each model, and compare the parts of your controller to parts sold on this site or elsewhere to identify your model.

Clay Eickemeyer -

As of March 14, 2023, this guide has been updated! Comments regarding step procedures may no longer be relevant.

Clay Eickemeyer -

Will this guide work with the cuh-zct1e PS4 controller model?

Nick Cellini -

It's likely to be physically the same. There may be a minor component missing or added between variations of these controllers. But, for a battery replacement, it will be at least close to the same opening process.

Clay Eickemeyer -

Thanks Clay! I'll give it a go and coment here if I come across any devastating differences or difficulties!

Nick Cellini -

Sure thing, I'll watch my notifications. When you do open it up, be mindful of the small shoulder clips. Everything else can be experimented on, without too much risk of breaking clips.

Clay Eickemeyer -

SWo when I pluggeged un the battery you I bought from you I bnlew up my controlner and it smelt fvery bad

gooka booka -