Introduction

Si votre batterie ne fonctionne pas, il est peut-être temps de la remplacer. Ce guide vous montrera comment remplacer la batterie.

  1. sOJUcVTNoWWtVGDR
    sOJUcVTNoWWtVGDR
    eM32UNGNWqgmFWva
    • Avec la tablette face vers le bas, retirez le cache de la fente pour carte SD.

    • À l’aide d’un tournevis Philips #000, retirez la vis de 3 mm de la fente pour carte SD.

  2. qDRkREMwYUAkwGQX
    qDRkREMwYUAkwGQX
    NT4FQU2PqhmRBfGS
    RcAxS1nRODfFM5bu
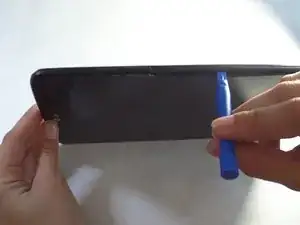
    • Insérez un outil d’ouverture en plastique dans le petit interstice situé entre l’écran et la coque.

    • Soulevez l'écran de la coque arrière.

    • Répétez cette opération sur chaque bord de l'appareil.

    • Nous avons trouvé utile de laisser plusieurs outils pour ouvrir en plastique coincés dans la crevasse afin d’empêcher sa fermeture.

    • Cela nécessite une force importante. La coque de l'appareil est fixée avec un adhésif. Si elle est trop difficile à retirer, utilisez l'iOpener.

    My old G-Pad had its screen separated from the rest of the front part and the back panel, so if you have just a slim glass come off, do not pull that off. Use a flat spudger to loosen those hooks and help the rest of the front part come out with the screen attached.

    George -

  3. ko5XAEW4Ivc3xRJN
    ko5XAEW4Ivc3xRJN
    QkkrZPVEyrauxxOt
    • Après avoir utilisé les outils pour ouvrir en plastique, ouvrez l’appareil avec vos mains.

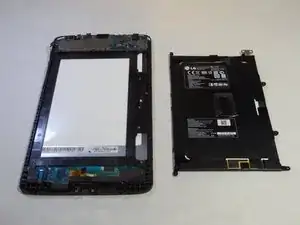
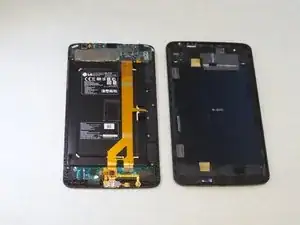
    • Retirez le panneau arrière de l'écran.

  4. spIW5UxFGfHeCAxF
    spIW5UxFGfHeCAxF
    dJySR5RjGiMR3plP
    • Retirez les quatre vis cruciformes de 3 mm qui maintiennent le haut-parleur.

    • Ces vis sont très petites alors assurez-vous de les suivre. Vous pouvez utiliser le Pro Magnetic Project Mat de iFixit pour vous aider.

    On the VK810 Model you have to watch out for the antenna wire that runs along and is attached to the speaker by the means of a metal wire clip.

    What I would recommend is detaching the antenna wire from the top of the device then gently remove it from the clip.

    Then remove the speaker.

    On a side note does anyone know where to buy the little ant wire that runs across the speaker?

    Kyle -

  5. BGWfCY3cmO5hbACX
    • Utilisez vos doigts pour retirer le haut-parleur.

    I have an LG 10

    Sandy Aabye63 Aabye63 -

  6. yfWgZtPNGyOlCYCZ
    yfWgZtPNGyOlCYCZ
    4q1PgFiOGfn3ZY1n
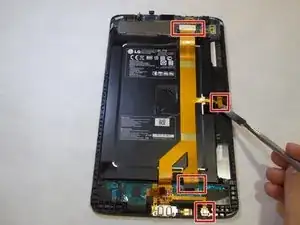
    • À l'aide d'un tournevis Philips n ° 000, dévissez les vis de 3 mm situées dans les coins de la batterie.

  7. GCBXHnYVCiuIgafT
    GCBXHnYVCiuIgafT
    EEsH6HxSfsPxHBxh
    JLPWpsBTF6ywAVpE
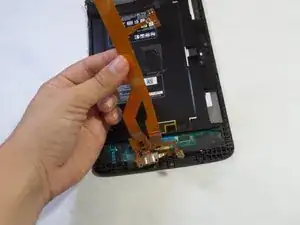
    • À l'aide d'un outil d'ouverture en plastique ou en spudger, débranchez le câble ruban du côté droit de l'appareil, où il est fixé avec un adhésif.

    • Ces images utilisent un spudger en métal, qui pourrait endommager l'appareil. Utilisez plutôt un outil d’ouverture en plastique ou un spudger standard.

  8. OxvPkLWQGLQZaEKh
    OxvPkLWQGLQZaEKh
    j23bFABhJ2hI2ZVB
    • Utilisez le tournevis Philips n ° 000 pour retirer les vis de 3 mm situées au bas de la bande.

    • Retirez la bande jaune de l'appareil.

  9. 4xKfwwucKyShcS2Q
    4xKfwwucKyShcS2Q
    m1ybvI4Vl2GdHosg
    • Décrochez la batterie de l'endroit où elle est fixée en haut de l'appareil.

    Watch out: I had to remove the mainboard first, before being able to lift the battery with its attached hook on top.

    Sven Meier -

    The screen on my device separated from the main board which is still in the back of the device. I can’t get to the under side to remove the speakers and battery.

    Chris C -

Conclusion

Pour remonter votre appareil, suivez ces instructions dans l’ordre inverse.

Mario Salguero

Membre depuis le 14/09/15

781 Réputation

9 commentaires

Every teardown I can find on this tablet has that darn screw in the sd card slot, but mine does not!! Does ANYBODY have teardown for mine? I can send pics, it's Verizon Gpad 8.3 LTE, slot holds sd and sim but NO screw. Son spilled water on it so screen is all dark and haptic stays on, I'd like to attempt the rice trick if I can open it.

Wesley Krasko -

The other models have a sponge adhesive on the back of the battery.

Completely disregard the first screw.

supramaster2099 -

Wesley - Me too. I have no idea why Android released two different models with the same freaking model name. I thought they had more common sense than that. If anyone has the teardown for the new model, holler.

Slavelike Constructs -

Same here. No screw

jon -

sorry this teardown is not for the 8.3

krackeddude -

I have the VK810, can't find instructions anywhere.

I also have no screw, but I got it open by starting on the right side and fitting a flat spudger between the frame and the screen and pressing the tool deeper towards the back. This unlocks the snap. There are 5 of these plastic snaps built into the body of the frame on the long sides and a few along the top and bottom. Once I got the right side slightly separated, I worked on the top, then the bottom (used 2 spudgers, one kept the gap open on the side while I worked the top and bottom), then continued inserting the tool along the left side until all the lock tabs were released. The internals look the same as these pics once I got it open. I need to replace the charger plug and will swap the battery as well while I'm at it.

Barrett Abney -

so, where can I get a replacement battery from?

dalemcginnis -

This is not the vk810. Its the v500. It is wifi only

Justin Jantzen -

There is a difference that was notice in my comparison between this Guide and the LG G Pad X 8.3 Guide. This guide has only three (3) screws holding the battery and much more removal of parts than the X 8.3. The X 8.3 also has four (4) screws holding it in. Is the X 8.3 shown on this site the same as the one used by Verizon ? I do Not know, if there is a difference, currently.

This looks to be a helpful Guide, but there is no help in WHERE to purchase a battery and if there could be a different battery with higher capacity and a longer life as a choice. As a Consumer, this type of information would be helpful. Can anyone assist ?

Harvey Rothenberg -