Introduction

Ce tutoriel montre aux utilisateurs de MSI GT72 2QE Dominator Pro comment remplacer une batterie défectueuse.

  1. iO21yGI6ZnIpUwkg
    iO21yGI6ZnIpUwkg
    4nSEnq2Dna6pAGZD
    • Dévissez les 7 vis cruciformes de 6mm du boîtier inférieur.

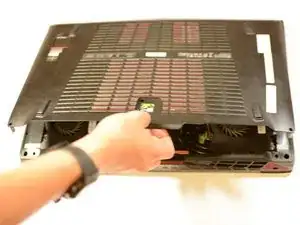
    • Retirez le boîtier inférieur en tirant sur l'encoche.

  2. XRvQjdMNLJPcmpZu
    XRvQjdMNLJPcmpZu
    ko2p4nYff1ICws3d
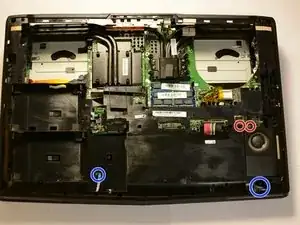
    • Retirez le vis cruciforme de 4mm et celle de 10mm, débranchez le câble jaune, noir et rouge, puis retirez le ventilateur.

    • Répétez le processus pour l'autre ventilateur.

    • La vis de 10mm du ventilateur ne quittera pas son emplacement car elle est retenue au ventilateur par une pièce en caoutchouc. La dévisser permettra toutefois de retirer le ventilateur.

    For my laptop it seems to take a lot of force to unplug the fan cables, and I am worried about snapping them. Is there a specific trick or spot you have to press on the white connector piece?

    qualityshibe -

  3. siXsuBZCopYshCTO
    • Débranchez le câble SATA et retirez le disque dur.

    • Assurez-vous de retirer le cable d'un seul coup pour s'assurer qu'il reste en bon état.

    missing steps

    FHHS-NY Friends -

  4. 2Z5YPjQXuxRhmeXl
    • Retirez les deux vis cruciformes de 6mm et retirez le SSD.

    • Assurez-vous de retirez le SSD d'un seul coup pour pas qu'il ne soit endommagé.

  5. YAPFURNJfjRv2CXL
    • Débranchez les deux câbles rouges et noirs des haut-parleurs. Tirez d'un seul coup pour pas que les connecteurs ne soient endommagés.

    • Déconnectez délicatement ces deux nappes en soulevant le clapet de retenue du connecteur ZIF et en tirant délicatement.

  6. FwfZnSII3DPDq4oM
    • Débranchez le câble de la batterie.

    • Tirez d'un seul coup pour ne pas endommager les pins.

    needs to show how to remove the snap in plastic cover and remove subwoofer cables and remove cd/dvd drive before lifting snap in cover

    FHHS-NY Friends -

  7. ncxVlYMQZbOpJTwJ
    • Retirez 15 vis cruciformes de 5 mm et retirez le boîtier intérieur

    • Le boîtier peut nécessiter une certaine force pour être retiré, mais n'appliquez pas de force excessive ou vous risquez de casser les languettes en plastique du connecteur.

    Would be nice to know where the plastic connector tabs are. Also Fails to mention the you need to gently tug the frame off the HDMI and Displayports in the back.

    warrof -

    Also fails to mention that there are 2 units that are hooked under the radiators on the outside edges.

    warrof -

    Also fails to warn of the 2 small power cables that run to the light panels on the front.

    warrof -

    Sounds like this guy had a bad time. ^^^

    extracairen -

  8. FplSV4lfA1xod24R
    • Utilisez une carte ou un autre objet plat pour retirez la batterie de l'ordinateur.

    • Faites très attention en retirant la batterie. Si vous la percez, des produits chimiques peuvent être libérés, la batterie peut également prendre feu ou exploser.

    I used a hard plastic mixing spatula and pushed It in from the left of the battery in the picture above. Be very careful to only insert it under the battery. There were two double sided sticky strips holding the battery to the case. I just used slow force to gradually separate it out.

    Adam -

  9. voXEGwCvybxqPyTZ
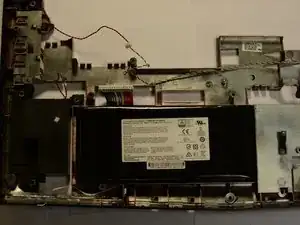
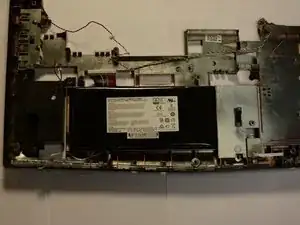
    • Remplacez la batterie 11.1v, 7500mah Li-ion battery, numéro de pièce MSI : BTY-L77, avec une batterie équivalente, utilisez un adhésif pour la maintenir.

    • Lancez le test de calibration de la batterie pour s’assurer que le firmware reconnaisse la nouvelle batterie, ainsi que les tensions de début et de fin de cycle.

Conclusion

Pour remonter votre appareil, suivez les instructions ci-dessus en sens inverse.

Kevin Shipp

Membre depuis le 18/04/17

950 Réputation

17 commentaires

Hi,

on the steep 7, you forgot a screw : just above the orange part of the heat sink.

great guide otherwise :D

Assombrance Anderson -

And another one near the bass speaker

Assombrance Anderson -

Did it but I was left with one screw. Have no idea where it goes. But hey battery works and not complaining.

Andres Estrin -

Anyone know where to find a GT72 Dominator battery?

Hunter Gronkowski -

I bought mine here: http://www.fr-batterie.com/

Thanks for this tutorial!

I used it to replace my GT72 2QD Dominator battery. It’s almost the same (yet, not a piece of cake).

Cameron -

It was a helpful tutorial but it wasn’t the best. Step 7 was one place where it went wrong. You also forgot to mention the connection to the light bars. Please update this. :(

Wasso Tasso -

Guys can u help me ??

Anyone facing a problem with the battery cable ?

I destroyed my hand to pull it but it just doesn't want to come out

Storm Shadow -

The instrucitons work and thanks to “Assombrance Anderson” comments on two additional screws.

Mine bought from https://www.laptopbattery.com.sg.

mazc hasband -

Why do i have to disconnect the speaker and fans?

analtrompete4 -

Hi,

On my GT72 2QD the heatsink must be remove, imposible to remove cap otherwhise

Then I changed thermal past (my GT72 is 5 years old)

I think It’s not so easy to change this battery and it takes more than 15 minutes !

riccolebo -

15 minutes??? Really. a am still stuck on getting the case off in step 7. I also could not find the 2 6mm Phillip screws to remove the SSD in step 4. In the same place that it shows the SSD in the tutorial there is a black plastic piece with 4 screws on it on top of the SSD card. I don’t think he is taking into consideration the differences in the difference year models.

Back to the case, why doesn’t he show anybody how to start getting it off. It is a difficult piece to get off, or even start to get off. What is the best way and the best place to begin getting that case off,

Buzzy Amos -

Thanks for the guide!!!

Computer is MSI GT72 “2QD” Dominator

The steps were easy to follow and with step 7 I used a flat head to gently remove it.

If you got the money, then have someone fix it otherwise it's real simple, just be gentle as you would with a lady.

Omar Badillo -

Anybody know whether it’s possible to simply disconnect the battery cable and have the laptop work with AC Adapter? Asking because I’m getting this Battery LED blink, and don’t mind disabling the battery entirely.

Don Pott -

My battery for MSI GT72 2qe dominator pro-211 is completely dead, Can i use it in this condition?, as it is hard for me to remove battery.

Waqas Ijaz -

Thanks a lot for this amazing guide. It took me 1 hour to open the laptop and reach the battery but it took me 4 hours to assemble it back. I got stuck at reattaching the speaker cable on the left side. When I pulled the speaker cable on left side, its pressure lid also came out and I didn't realize that that pressure lid was suppose to pull up and not pull out.
another note is that the battery was glued to the internal cover and I had to pull the battery carefully.
Everything was working nicely when I started the laptop back and ran MSI battery calibration application. Cheers to another 4 years of life to this laptop I bought in 2014, running strong in Dec 2022

Enchanted -

Instructions work for GT72VR 6RE perfectly! Took slightly longer than 15 minutes. I had to finagle the left and right speakers to work around the heat sinks during reassembly. Great guide!

Steven Bennett -

15 minutes seems way too quick on this! Took me a good deal longer. That said, without a guide like this it never would've occurred for me to do some steps at all, so still an excellent guide.

Davia D -