Introduction

La batterie de votre New Nintendo 2DS XL devra peut-être être remplacée si l'appareil ne s'allume pas lorsque vous appuyez sur le bouton d'alimentation. La batterie est directement accessible sous le panneau inférieur. Pour plus d'informations, consultez notre troubleshooting page.

  1. R3WrHkdaFuZjfZ3d
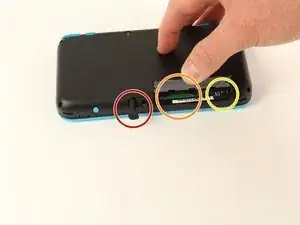
    • Avant de commencer le démontage, retirez

    • Le stylet

    • N'importe quelle cartouche de jeu

    • La carte SD

    This is a great repair instructional, but I would advise also looking at the below video link. (I used both.) Sometimes watching 2 repair guides can help when you think you think you’re stuck. For example, I had a really hard time getting the hinge off!

    https://www.youtube.com/watch?v=Zuu_T2ls...

    (HINT: Works best if you rotate it 180 degrees, so that you are repairing it from the same perspective as the technician)

    skat1140 -

  2. qInyERKyTGMKUtxf
    • Dévissez les quatre vis tri-point de 6 mm situées aux quatre coins du panneau inférieur.

    The Y0 was too big; I ended up using a Y00 and that worked fine

    Christopher Gilmer-Hill -

    Would not recommend using a Y000 like I tried to do

    Daniela Magaña-Ochoa -

    gotta use Japanese Industry Standard YOO (blunt end)- I did not, and accidentally stripped two of the screws… still trying to figure out how to remove them -_-;

    Yanko Artidiello -

    Yeah I can confirm, the y0 does not work.

    Arc Turus -

    I'm using the Y-0.6 and seems to only unscrew 2 of the screws on the right side of the handheld, the other 2 aren't moving

    Xx_Definity_J0rd4n_xX -

    screws are too tight

    Albert Einstien -

  3. FUiabbAOYVaNjG4X
    FUiabbAOYVaNjG4X
    MiHqoVbAY3mST6Ls
    • Soyez prudent lorsque vous séparez le panneau inférieur du boîtier avant pour éviter de casser les trois câbles connectés à la carte mère (deux de chaque côté et un à l'arrière).

    • A l'aide d'une spatule, séparez le panneau arrière du boîtier avant en faisant délicatement levier autour du panneau.

    • Il y a de nombreux clips le long de la charnière du boîtier, il est donc recommandé de travailler le long d'un côté court et des deux côtés longs avant de terminer le dernier côté court.

    You need to be super careful separating the top from the bottom at the rear end. I got stuck there, applied a lil more force and ripped the right shoulder button straight off the pcb!

    Dominik Leicht -

    The front headphone Jack got stuck in the bottom case and snapped when opening, didn’t notice until after replacing the battery (which is a nightmare btw) I used some floss underneath the battery to give you better leverage since the side plastic is so thin and fragile. I cannot get the headphone Jack back into position now and will have to take it to a shop for (I’m sure much more expensive) repairs. Honestly DO NOT try repair this thing, just pay someone else to repair these. Compared to the OG 2011 3DS these are a nightmare to work with. Nintendo really went out of their way to make this impossible to repair, I had an extra set of pretty capable hands too.

    radioactiverhino 04 -

    I also ripped off the headphone jack when taking the case apart. I never pulled hard. You need to be careful to give the headphone jack clearance before applying any force.

    Mikaela Orbon -

  4. hN4JmkBHkaqtRlxN
    hN4JmkBHkaqtRlxN
    sLnMpviSoWENSJQk
    CxaLwKZ2IuAS5cAV
    • A l'aide d'une pince à épiler, déconnectez les deux câbles qui relient les boutons arrière de chaque côté à la carte mère en les tirant doucement vers le haut.

    I unfortunately took off the base of one when trying to pull apart. Is there a fix or will it not be broken?

    Phoenix Typhoon -

    Did you manage to fix this at all?

    Owen McKay -

    When you are putting these cables back, make sure to check the orientation of the cable. You have to match the cable head to the entry point, so you may have to turn the cable around. I spent a bit too much time trying to connect the cables just because I didn't realize that I had to turn the cable around.

    Hongda Wang -

    Aren't these the speaker cables? I haven't taken any 2DS's apart in a while, but I'm pretty sure these cables connect to the speakers

    darth mango -

  5. 6AT5OJ1MuuBaICeA
    6AT5OJ1MuuBaICeA
    ua4Ruiu5ewlgVKlO
    • A l'aide d'une spatule, retirez la batterie.

    • Sachez qu'il y a un tampon collant qui maintient la batterie dans son plateau. Il peut être nécessaire d'utiliser plusieurs outils pour retirer délicatement la batterie du plateau et de la carte mère.

    Some might see this as an optional step. But you probably do NOT want to skip this. I did, and now I have malfunctions on the Nintendo (touch screen functionality not working, possibly as a result of shorts from skipping this step.)

    skat1140 -

    Personally, I skipped this step and everything still works fine. I wasn't able to take the battery out because the adhesive was too strong.

    Hongda Wang -

    Small square of adhesive. Pull up slowly and it’ll release after 10-20 seconds

    Jacob Cocanig -

    Any advise for dealing with CTR-003 spicy pillow? So far in this transplant operation, both my devices batteries are okay... but... I dunno, if I were to run into a spicy pillow in the future, what would be the least awful way to pull it out?

    Not sorry, when I see these repair jobs that involve the company gluing the battery into the device (or even soddering in that soon to be spicy pillow) this is just something I'm wondering about

    Katrina Payne -

    I haven't taken my 2ds apart yet, depending on how devices are built it might work to slide a solid thread (eg fishing rope, or floss but that might rip) under it, and do a sewing motion.

    Franziska (Natsu) -

Conclusion

Pour remonter votre appareil, suivez ces instructions dans l'ordre inverse.

Tim Newman

Membre depuis le 25/09/17

1709 Réputation

11 commentaires

Does the 2ds xl have the same as the new 3ds xl

Royce davenport -

no. the 2ds shares the same battery type as the Nintendo DS and the Nintendo switch pro controller.

Jason -

CTR-003 Battery

stephen cheshire -

Do I need to put a sticky pad on the new battery?

bryan sepulveda -

Got the exact screwdriver (Y00 / 1.5 x 50mm) but it doesn‘t fit. What are my options?

Maurice Willems -

Get the one that fits: y0

Nick Bazin -

I just bought a Y0 because of this comment and I ended up stripping the screwdriver.

FelisLupus -

It appears that the SPR-003 battery is no longer stocked by Nintendo, and hasn't been for at least the last ~12 months or so - I'm uncertain where we might be able to find a reputable OEM these days for them, as it's not like we can trust something like amazon reviews anymore (if ever we could).

Would be great if iFixit could work on stocking something 'near-OEM' like they do with the DS / DS Lite so we'd have a trusted place to buy them from!

BVD -

Based on the teardown, the 2DS XL uses the CTR-003 battery, not the SPR-003 in the 3DS XL.

Nick Schultz -

Be careful not to rip off the headphone jack when taking the case apart.

Mikaela Orbon -