Introduction

Consultez ce tutoriel pour remplacer la batterie de votre Samsung Galaxy S9 Plus.

Ouvrir le Samsung Galaxy S9 Plus endommagera les joints étanches de l'appareil. Si vous ne les remplacez pas, votre téléphone fonctionnera normalement, mais ne sera plus étanche.

Avant de démonter vote téléphone, déchargez la batterie en dessous de 25 %. Si votre batterie est gonflée, ne chauffez pas votre téléphone. Les batteries gonflées peuvent être très dangereuses, mettez donc des lunettes de protection et prenez vos précautions. Ou adressez-vous à un professionnel si vous ne vous êtes pas sûr de savoir comment faire.

Vous aurez besoin d'adhésif de remplacement pour rattacher les composants lors du remontage de l'appareil.

  1. SPUojd6GbtYKZRiM
    • Éteignez votre téléphone.

    • Utilisez un iOpener pour faire ramollir l'adhésif sous la coque arrière. Laissez l'iOpener agir pendant au moins deux minutes. Vous devrez peut-être répéter cette opération plusieurs fois pendant le retrait de la coque arrière.

    • La colle du Samsung Galaxy S9 Plus est très forte. Vous pouvez également vous servir d'un sèche-cheveux, d'un pistolet à air chaud ou d'une plaque chauffante, si vous n'arrivez pas à ouvrir votre appareil avec l'iOpener. Faites attention à ne pas surchauffer le téléphone : l'écran AMOLED et la batterie sont tous deux sensibles à la chaleur.

    I don't know how much longer should I use for the min heat gun.

    Hui Chen -

    Only heat it up so you can still handle the phone. That depends on your heat gun. Wearing (ESD-)gloves might give you some extra degrees.

    Tobias Isakeit -

    It is very very hard to remove the back glass due to the adesive… I don't know if it is possibile (at least for everyone) to remove it wothout broking the glass

    Luigi -

    This is nearly impossible without breaking the glass or risking overheating. I would say apply heat repetitively for 6-8 minutes. The very most adhesive is across the bottom so push the pry stick way in. I generally start on the rear side.

    Thomas Hayes -

    Whoah NO. It will damage the camera and other sensitive electronics.

    D Harlo -

    Heating the back is essential, challenging, frustrating and, for first-timers such as myself, seemingly impossble, but I will say don't give up...I'll have another comment later.

    cbclistener -

    I tried with the iopener but I gave in after three attempts. I then used a hairdryer and a pizza oven infrared thermometer, heating in increments. 60C did the trick and I was able to get the first pick in. Further heating was necessary to ease the rest of the back off, all to 60C.

    Chris Harrison -

  2. PQKIKM1KtiktSPx4
    • Au cours des étapes suivantes, vous allez trancher l'adhésif qui fixe la coque arrière.

    • L'image illustre la répartition de l'adhésif à l'intérieur de la coque arrière.

    • L'adhésif n'a pas la même épaisseur partout :

    • Larges bandes d'adhésif

    • Bandes étroites d'adhésif

    • Évitez de faire levier ou de couper dans cette zone à cause de la nappe fragile du lecteur d'empreintes digitales.

    The yellow portion labeled "Avoid prying in this area" is also pretty heavily glued. I had luck using heat to soften it, but I messed up my fingerprint sensor because the image above is mirrored - I sliced through the right side because the image says it's on the left. The fingerprint sensor cable is actually on the right (when viewing the back side of the phone) on the same side as the phone's volume control.

    Nick Tipton -

  3. vxtP6Nsx2M66cjIW
    vxtP6Nsx2M66cjIW
    VlE33pPfTcFIgD5v
    • Si la vitre arrière du téléphone est fissurée, la ventouse risque de ne pas adhérer. Essayez de la soulever avec du ruban adhésif robuste. Ou bien collez la ventouse à la vitre avec de la super glue et laissez sécher avant de continuer.

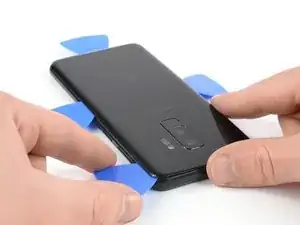
    • Posez une ventouse sur la coque arrière.

    • Soulevez le bord inférieur de la coque arrière avec votre ventouse pour ouvrir un léger espace entre la coque arrière et le châssis.

    • Vous devrez insister un peu, mais il suffit juste d'ouvrir un très léger espace avec la ventouse afin d'y insérer un médiator. Si vous avez de mal, faites chauffer une fois de plus, pour continuer à faire ramollir l'adhésif, puis recommencez. L'adhésif refroidit très vite, vous devrez donc peut-être vous y reprendre plusieurs fois.

    • Insérez un médiator dans l'espace et faites-le glisser vers le coin inférieur droit.

    This is the most challenging part. The suction cup can barely hold for the amount of force required...but here's a tip, especially for the first-timers like me. It's not obvious in this image, but the back, curved as it is as it attaches to the frame, is curved because the surface under the back is also curved. Therefore, using an angle for the pick that's a bit tilted up will help to get under the back, and get the cutting of the adhesive started.

    Don't let that give you too much confidence, though. Sufficient heating of the back, to make the adhesive soft enough to yield to the several picks, is essential. Go slow, if you go too fast, or don't have enough heat, you WILL break the glass...as I did. Replacements, fortunately, are easy to find and not too expensive.

    cbclistener -

  4. svFeofEQKnT6GS4A
    svFeofEQKnT6GS4A
    aBxYvHrhFq14ill4
    • Insérez un deuxième médiator et faites-le glisser vers le coin inférieur gauche.

    • Insérez un troisième médiator dans le bas du téléphone. Il y reste pendant toute la procédure de retrait de la coque arrière pour empêcher l'adhésif d'adhérer de nouveau.

  5. BxPqWDXMu24ddD55
    BxPqWDXMu24ddD55
    RISoupVRvj25yEIr
    • Faites glisser la pointe du médiator le long du bord gauche du S9 Plus en partant du coin inférieur gauche.

    • Arrêtez de trancher l'adhésif au milieu du côté gauche du téléphone et laissez-l'y.

    • Prenez le médiator dans le coin inférieur droit et parcourez la moitié inférieure du bord droit du châssis et laissez-l'y.

  6. 4GiKTMQKxXFCIhbm
    4GiKTMQKxXFCIhbm
    AELcqeWTvaUkbSHP
    • Insérez un quatrième médiator dans le bord droit du châssis et faites-le glisser vers le coin supérieur droit.

    • Parcourez avec un cinquième médiator le bord gauche du téléphone, jusqu'au coin supérieur gauche.

    • Servez-vous du médiator pour couper l'adhésif restant sous la partie inférieure de la vitre arrière.

    • N'ouvrez pas encore complètement le téléphone. La nappe du lecteur d'empreintes digitales est toujours reliée à la carte mère.

  7. 5VjRBIulGhpUhxQn
    5VjRBIulGhpUhxQn
    XoUpbUYyDom3N4NF
    • Soulevez délicatement le bord de la vitre arrière, du côté du bouton de volume.

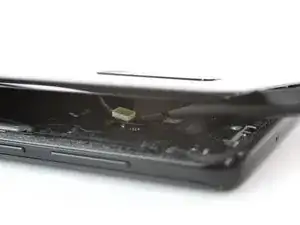
    • Prenez le bout plat d'une spatule (spudger) pour soulever et débrancher la nappe du lecteur d'empreintes digitales.

    On my G965U, the fingerprint reader remained in the phone, and instead of disconnecting the flex cable from the motherboard, it was only necessary to disconnect the flex cable from the back glass where it was glued lightly

    lyellread -

    I also have a G965U model S9+, and its fingerprint read also remained in the back glass.

    Nick Tipton -

    It's easier to pop the button up than it is to reattach it when reassembling the phone. Well, I sure hope it goes better for you than it did me. (:

    Daylen Westwood -

  8. hwKdSb1q5wbfJcQ4
    • Ôtez la coque arrière.

    • Lors du remontage, consultez ce tutoriel pour remplacer l'adhésif et réinstaller la coque arrière.

    • Si vous souhaitez remplacer votre coque arrière, consultez ce tutoriel pour transférer le joint de la caméra arrière, qui inclut le lecteur d'empreintes digitales.

    Is it necessary to replace the rear glass adhesive? I have given up on water resistance, just want it to hold in one piece.

    Zachary Shaw -

    Hi Zachary,

    in order to assure that the rear glass sticks to the rest of the phone assembly you have to replace the rear glass adhesive once you removed the rear glass. However you can use a narrow and strong double sided tape, tesa tape or our precut adhesive card. All of these will do their job however as you just mentioned you will lose the water protection of your phone. Before installing all of these it is very important to remove the old adhesive backings (for example with high isopropyl alcohol 90% or higher).

    Sadly it's not possible to replace the rear glass without new adhesive.

    Dominik Schnabelrauch -

    Is the L shaped stocker with the three holes(first pic in step 2) in it essential? It came off when i was using iso to get the adhesive off. Just wanna know before i put the phone back together.

    Thanks

    Bob

    Bob Erto -

  9. aXHuGDrKZHADlYuS
    • Dévissez les neuf vis cruciformes #00 de 4 mm.

    Don´t forget to unscrew the two screws on the left side (one near the battery, and one near the edge).

    Janny 4real -

    My s9+ NFC screws in this step are different sizes most are the same except one is shorter and coloured black and another is just shorter. The phone will not charge now, how can you find out which screws go where?

    H8redflip -

    11 screws need to be removed here. Watch the video to confirm the remaining 2.

    Nick Tipton -

    The 9 screws shown won't let the bracket up unless you finish with the 2 more screws. (near edge and bottom of the bracket).

    Daylen Westwood -

  10. QmFI2i3JivkeHcMx
    QmFI2i3JivkeHcMx
    LSMLXtpxhi5cXfNd
    vkY6vSFuo2nJGYAA
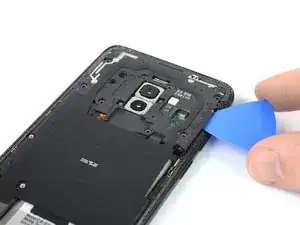
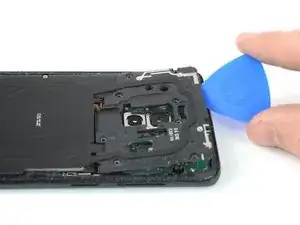
    • Insérez un médiator sous le bord droit du cache en plastique qui abrite l'antenne NFC et la bobine de recharge.

    • Faites pivoter le médiator vers le côté pour ouvrir les clips en plastique de la coque.

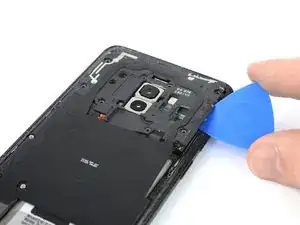
    • Progressez tout le long de la coque en plastique en faisant levier pour ouvrir les clips restants.

    I used a pointed metal spudger to pop that piece. The picks were more difficult here. There's an arrow that points the spot that needs to be opened.

    Daylen Westwood -

  11. acHgOqVFmxUkKB5G
    • Retirez la coque en plastique qui comprend l'antenne NFC et la bobine de recharge.

  12. 4vovYKM1kCqvQGBV
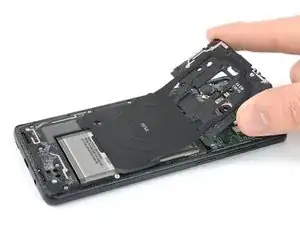
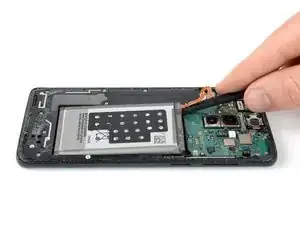
    • Prenez l'extrémité plate d'une spatule pour soulever et débrancher la nappe de la batterie.

  13. aS4FdGNOjfrIPsOC
    aS4FdGNOjfrIPsOC
    MomLbQLeEKfWRduY
    • Servez-vous d'un iOpener pour faire ramollir l'adhésif sous la batterie. Posez l'iOpener et laissez-le agir pendant au moins deux minutes.

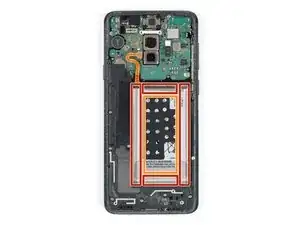
    • Au cours de l'étape suivante, faites uniquement levier avec votre spatule dans les zones indiquées en rouge, où la batterie est collée.

    • Évitez cette partie. Il y a un trou dans le châssis interne, juste en dessous de la batterie et vous risquez d'abîmer l'écran à travers ce trou.

    A hairdryer, pizza oven infrared thermometer and 60C did the trick for me.

    Chris Harrison -

  14. dGkcYHN6yCHrUohJ
    dGkcYHN6yCHrUohJ
    YKHHAHbeE2dPGtyC
    • Si vous avez du mal à soulever la batterie, il est possible que l'adhésif n'ait pas assez ramolli. Vous pouvez appliquer quelques gouttes d'alcool isopropylique sous chaque coin de la batterie et laisser pénétrer et agir pendant quelques minutes pour faire ramollir la colle.

    • Faites de votre mieux pour ne pas déformer la batterie lors de la procédure de retrait ci-dessous. Une batterie lithium-ion à carapace molle endommagée risque de laisser s'échapper des substances chimiques dangereuses, de prendre feu, voire même d'exploser. Ne forcez pas trop et ne prenez pas d'outils métalliques pour faire levier sur la batterie.

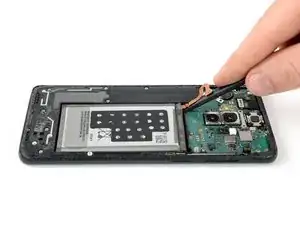
    • Insérez l'extrémité plate d'une spatule sous le coin supérieur gauche de la batterie, là où la nappe se trouve et commencez à faire levier.

    • Faites céder l'adhésif avec la spatule en progressant le long du côté gauche, vers le bas.

    Is the Oled panel have the possibility to get damaged by applying alcohol in removing the battery?

    Laurence -

    Hello Laurence,

    there is no risk that the panel gets damaged by the alcohol. The alcohol is relatively pure and will evaporate quickly.

    Dominik Schnabelrauch -

    Hello, I replace the battery but I scratched the central part where the battery was lying on. As a result, on the screen there is a bad green permanent vertical line. I could go on for a couple of months, but there is a way to replace that part as well? Is now my phone dangerous for myself?

    simnmr69 -

    Hi simnmr69,

    it seems like you damaged your screen during the battery removal. You can replace the screen as well following this guide. However a damaged screen won't be dangerous for you when using the phone but take care to use a new and undamaged battery since a punctured or bent battery may leak dangerous chemicals or cause a thermal event.

    Dominik Schnabelrauch -

    I used glue to adhere the battery, T-7000 kind from Amazon store. I didn't put it on the glass but rather the outer edge of the battery.

    Daylen Westwood -

  15. d1UCPrZqvYPrSyKE
    • Insérez la spatule sous le coin supérieur droit de la batterie et soulevez.

    It took me like 25 minutes to get my battery out. I have a heat gun that was relatively helpful here but prying seemed to work as long as the adhesive was softened.

    Daylen Westwood -

  16. sRtJ63x2ueARTIiH
    • Ôtez la batterie.

    • Ne réutilisez pas la batterie après l'avoir retirée, cela pourrait être dangereux. Remplacez-la par une nouvelle.

    • Pour monter une nouvelle batterie, suivez ce tutoriel.

    Anyone know the purpose of the black piece with the holes in it? Do I need to transfer it to the new battery?

    Joe Tobin -

    It is a foam sticker and most likely for transferring heat form the battery to the NFC antenna and to the rear case. If the new battery comes with one pre-installed–lucky you, if not, don’t worry you’ll be fine, too.

    Tobias Isakeit -

    Where is a video for placement of glue stickers??

    Juron Lobo -

    or how to remove the old glue, especially from the rear of the back case lol. Otherwise the kit is very comprehensive

    Julian Davidson -

    after replacing the battery using the Ifixit kit on my S9+ and following the correct procedure for charging the new battery, its still showing up on the Samsung Members app, Diagnostics as being weak and that it needs replacing. I have charged and used the device normally for the last few days and it still fails the test. Am not impressed.

    Julian Davidson -

Conclusion

Pour remonter votre appareil, suivez ces instructions en sens inverse.

Si possible, allumez votre téléphone et testez votre réparation avant de reposer de l'adhésif et sceller à nouveau le téléphone.

Pour des performances optimales, calibrez votre nouvelle batterie après avoir terminé ce tutoriel.

Apportez vos déchets électroniques à un recycleur certifié R2 ou e-Stewards.

La réparation ne s'est pas déroulée comme prévu ? Consultez notre forum de réponses pour obtenir de l'aide au diagnostic.

Dominik Schnabelrauch

Membre depuis le 23/11/16

224029 Réputation

6 commentaires

One of the best “do it yourself” instructions I’ve ever come accross! Very thorough!!

AK Sand -

Just be careful to remember to try phone parts (such as, battery recharging OBV, Fingerprint sensor…) before closing with the new cover.

Also remember to attach the Wireless card before doing the battery test otherwise the phone will say that can’t charge because the phone is too cold.

That’s because on the wireless charger module there is the heat sensor.

Flavio -

Missed one of the most important parts: Where and how do you install the adhesive pieces? There are a lot of them and the linked article doesn't even come close to explaining it for this phone.

Jason Landon -

Good instruction, I was successful replacing the battery however I accidentally damaged the fingerprint scanner cable because the image showed above is mirrored and I sliced too far in on the wrong side.

Also, a brief note on which adhesives can/should be removed before reassembling would be very helpful.

Nick Tipton -

Re-assembly is not as straightforward as using the reverse order as above as you need to remove all the old adhesive and re-apply the adhesive supplied with the kit. It's not obvious where the upper and lower adhesive parts go - the following ifixit youtube is very useful at working out where and how to re-apply the adhesive:

How To Re-Apply Adhesive to Your Samsung Galaxy Phone! - YouTube

Chris Harrison -

اريد شراء البطارية هل توجد عندكم

niwarko -