Introduction

Si la carte mère est endommagée, il se peut que des composants auxiliaires tombent en panne, voire que le téléphone ne s'allume plus. Si vous pensez que c'est la carte mère de votre Samsung Galaxy Note9 qui pose problème, consultez ce tutoriel pour la remplacer.

  1. WX1UUEZkqFrkcyVf
    WX1UUEZkqFrkcyVf
    nVDpbDfxJgQnLiNN
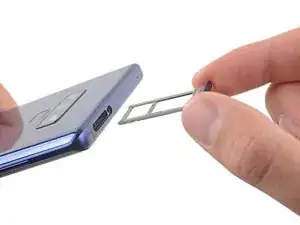
    • Insérez un outil éjecteur de carte SIM dans le trou du tiroir de carte SIM.

    • Appuyez pour éjecter le tiroir.

  2. 3KT6HsUfGSKksx2v
    • Enlevez le tiroir de carte SIM.

    • La carte SIM tombe facilement du tiroir.

  3. imr3TvrFDDQ2Smgb
    • Éteignez votre téléphone avant de commencer le démontage.

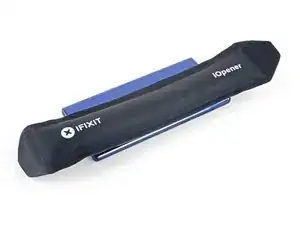
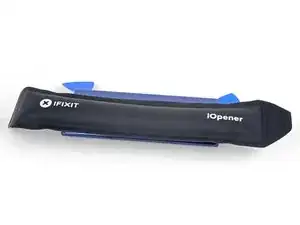
    • Utilisez un sèche-cheveux, un pistolet à air chaud ou bien préparez un iOpener et posez-le sur le bord droit de la coque arrière de votre téléphone pendant environ une minute pour ramollir l'adhésif en dessous.

    If using an iOpener it will need to be fully heated and set on for at least 5 minutes. You’ll know the phone is hot enough when its almost too hot to touch.

    Spencer Barron -

    Just came here to say exactly that. The instructions should be amended to state that: "Get it fully hot and leave it there for at least three minutes solid."

    Mister Fixer -

  4. wK5AZqwWYVFHhdpM
    wK5AZqwWYVFHhdpM
    AiS2h1pqRmiTyrnX
    ijSfEkEAirfgkjyB
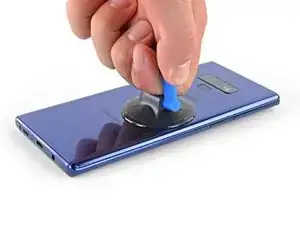
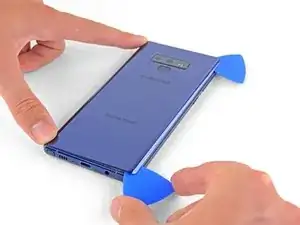
    • Posez une ventouse sur la coque arrière.

    • Tirez sur la ventouse pour ouvrir un espace entre la coque arrière et le châssis du téléphone.

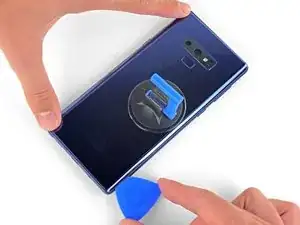
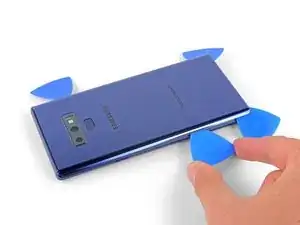
    • Insérez un médiator dans l'espace.

    • Si la vitre est méchamment fissurée, recouvrez-la de ruban adhésif transparent pour former une surface sur laquelle la ventouse peut adhérer.

    • Si l'adhésif ne cède pas, refaites chauffer, ne forcez pas. Cela risque de casser le verre.

    It takes so much heat that it is concerning that damage might be caused to the internal parts. It is difficult to heat the glue, pull the case apart and insert the pick at same time. May need some more pointers to handle these situations first, to prevent possible damage. Also what about the glue that is heated and then cooled before opening? Does it run inside and cause greater adhesion after it cools? Another thing, the handling may cause the phone to turn back on while working to separate. Don't know that that is of concern.

    Lou Smith -

    Angle the pick up very slightly so the point goes up into the curve of the glass, not down towards the workings of the phone

    Dean Lee -

  5. phWdatcXskIOnRO3
    • Notez qu'il y a plus d'adhésif le long du bord supérieur et autour de la lunette de l'appareil photo qu'autour du reste du téléphone.

    • Coupez soigneusement autour du bord gauche près du capteur d'empreintes digitales ou vous risquez d'endommager la nappe à l'intérieur.

    It's extremely easy to crack the back glass when nearing and rounding the corners. It's probably a good idea to soften the adhesive with heat as you go.

    Aaron Peterson -

    Step 5 is NOT "cut through the adhesive", that's steps 5-10. Step 5 is "Begin the careful process of cutting through the adhesive, starting at the right side where you already softened it. Proceed carefully, slowly, and warmly through the following steps."

    Aaron Peterson -

    These comments are spot-on. I never break a phone, and I cracked the back glass following the instructions without seeing these comments first. Heat the back much more than you think you need and go super, super slow.

    Mister Fixer -

    The bottom inner adhesive layer reaches higher than what you see in the diagram above, so you will have to insert the pick deeper at the bottom and the sides along the bottom to separate the inner adhesive area. Just don't force the corners of the covers upward too much to keep from cracking the glass.

    Drizzt -

  6. YpkbXvVWUIR4Afeb
    YpkbXvVWUIR4Afeb
    FaUbUKoZe6HurIby
    5vZLASPFVpEgMyLC
    • Tranchez l'adhésif le long du côté droit, de haut en bas, en commençant par le milieu.

    • N'enfoncez pas plus de la moitié du médiator quand vous êtes au niveau du lecteur d'empreintes digitales et des caméras, vous risquez d'abîmer ces composants internes.

  7. OFSZgLGgXARkwaWJ
    OFSZgLGgXARkwaWJ
    E6TEFVlXsPNDGGHi
    FFeOmLNySIi2VTct
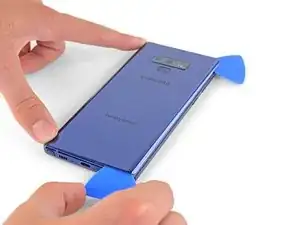
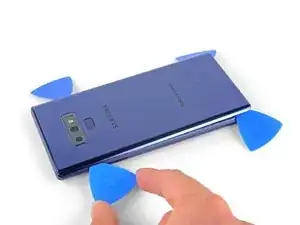
    • Laissez le médiator dans le coin supérieur droit.

    • Prenez un autre médiator pour couper l'adhésif le long du coin inférieur droit.

    • Laissez votre outil dans le téléphone.

    • Refaites chauffer avec un iOpener, un sèche-cheveux ou un pistolet à air chaud si nécessaire au cours de la procédure de découpe de l'adhésif.

    There seems to be a lot of glue at the bottom, I broke the glass as I was cutting past the charging port - not sure if it was already fractured or just not enough heat (I used Sellotape so it didn't break up into pieces!)

    I think LOTS of heat & patience is the key!

    Be very careful around the corners and bottom (probably top too, but I didn't have a problem there). Make sure you've cut in far enough down the side first (go in about 1cm) but less round the corners and work in slowly.

    Dean Lee -

  8. 2jDIRHRfM2FgHNFR
    • Utilisez un pistolet à air chaud ou un sèche-cheveux ou bien posez un iOpener chauffé sur le côté gauche de la coque arrière pendant environ une minute pour ramollir l'adhésif en dessous.

    If using an iOpener it will need to be fully heated and set on for at least 5 minutes. You’ll know the phone is hot enough when its almost too hot to touch.

    Spencer Barron -

  9. 1mtB1lSGkZWyMSrM
    1mtB1lSGkZWyMSrM
    4K246ldIYZVMViQv
    FFMXuXrVm2DpNhZ6
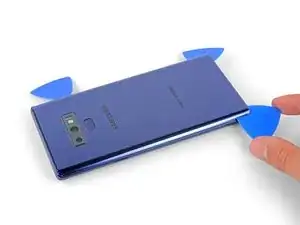
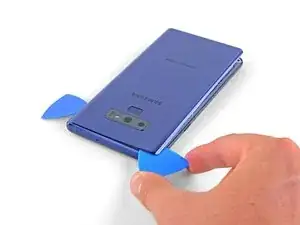
    • Insérez un médiator dans le coin inférieur gauche de la coque arrière.

    • Prenez un autre médiator pour trancher l'adhésif le long du bord gauche de la coque arrière.

    • N'enfoncez pas plus de la moitié du médiator au niveau du lecteur d'empreintes digitales, vous risquez d'endommager la nappe à l'intérieur.

    • Ce n'est pas grave si les médiators tombent au fur et à mesure que la coque se soulève.

    Aside from the left edge where the fingerprint sensor cable is, you may have to insert the pick up to 2cm on the sides and top, and a little further along the bottom, and swipe sideways to separate the inner adhesive areas. If one side doesn't separate fully, just apply heat, insert the pick deeper into the phone, and swipe sideways until the back cover detaches. There isn't a need to apply much vertical force, especially on the corners, since the cover will just pop up once all the adhesive has been sliced by the pick.

    Drizzt -

  10. nNSpwZdhgreWl3rh
    nNSpwZdhgreWl3rh
    DrwI6NpI44hU5bGQ
    6tniPN2RFyvbFgLv
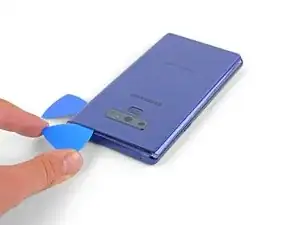
    • Avec un troisième médiator, coupez soigneusement l'adhésif du coin supérieur gauche de la coque arrière.

    • Finissez de couper l'adhésif le long du bord supérieur du téléphone.

    • Refaites chauffer avec un médiator, un sèche-cheveux ou un pistolet à air chaud si l'adhésif refroidit et durcit au cours de la procédure.

    Be VERY patient as you slide the opening picks around the periphery of the glass, and use heat very liberally. Make sure the smooth, clear aspect of the iOpener is against the glass, not the rough black portion.

    David Gitlitz -

  11. CFGPd5CUmuDGj14k
    CFGPd5CUmuDGj14k
    XadxJ3X5cMDYZdsS
    • Soulevez d'abord le côté droit de la coque arrière.

    • Faites pivoter la coque sur l'axe du bord gauche pour accéder à la nappe du lecteur d'empreintes digitales.

    • Ne retirez pas encore la nappe du lecteur d'empreintes digitales.

    Thought I'd done something wrong here as there wasn't a cable attached to the back - the fingerprint reader hadn't come away with the back, but had stayed with the phone.

    Dean Lee -

    Exactly the same experience. Made life a little easier.

    Mister Fixer -

    Happened to me as well.

    David Gitlitz -

  12. EOB5BnuPwLiWhRJy
    EOB5BnuPwLiWhRJy
    pvUG6RHyuIevnBsT
    • Faites levier avec la pointe d'une spatule (spudger) sur la nappe du lecteur d'empreintes digitales pour la débrancher de sa prise.

    On my phone the fingerprint sensor did not come off with the back cover but stayed on the phone!

    Dean Lee -

  13. fxtTpIwKVs1XBASZ
    • Ôtez la coque arrière.

    • Pour la remonter :

    • Décollez les résidus d'adhésif du châssis du téléphone avec une pincette. Puis nettoyez les zones d'adhérence avec de l'alcool isopropylique à haute concentration (au moins 90 %) et un chiffon non pelucheux afin de préparer la surface pour le nouvel adhésif.

    • Allumez votre téléphone et testez votre réparation avant d’installer un nouvel adhésif et de refermer le téléphone.

    • Appliquez soigneusement l'adhésif sur la coque arrière, puis alignez un bord de la vitre contre le châssis du téléphone et appuyez fermement dessus pour les encastrer.

    • Vous pouvez également réinstaller la coque arrière sans remplacer l'adhésif. Enlevez les gros morceaux d'adhésif qui pourraient empêcher la coque d'adhérer correctement. Après le remontage, chauffez la coque et appuyez dessus pour qu'elle adhère. Ce ne sera pas étanche, mais la colle devrait suffire pour maintenir le tout en place.

    I am installing a new backplate (this is my first repair; I was CERTAIN that I would crack the back glass, and I was NOT wrong) but I’m not sure how tweezers are meant to remove gooey adhesive! I simply used the blue plastic pry tool as a scraper and gently rolled up the goo. Maybe the glue is different because I have a refurbished phone? That may also explain why I had so much trouble with Step 1. Hope that this helps!

    Christopher Yarlott -

    Use tweezers remove any inner adhesive strips that may have started peeling off when the back cover is removed, or adhesive clumps. If an adhesive starts to peel off, use tweezers to pull the strip off completely, and then replace only that removed adhesive strip. Actually, the iFixIt inner adhesive strips don't seem to have the white non-stick areas that are on the original adhesive strips. Thus, it seems ok to keep the original inner adhesive strips if still attached to the phone.

    The outer adhesive border is like a good, not a strip, and should be replaced. Using isopropyl alcohol to rub off only the edge adhesive on the phone and back cover works well.

    After adding a new outer adhesive and reattaching the back cover, you have one try to align and replace the cover. The cover might not attach flush onto the phone with no side gaps, due to the outer adhesive strip placement. It is probably sufficient if the outer adhesive seals all the way around the back cover border.

    Drizzt -

    While testing the phone after battery replacement, but before reattaching the back cover, if a thermal warning (triangular thermometer icon) appears during charging that prevents charging over 50%, remove the charging cable and use a lightly warmed iOpener or heat gun on the battery to warm it slightly. Once the battery is warmed up a little, reattach the charging cable, and the error should go away. Battery charging can be resumed. This assumes no hardware was damaged during battery replacement.

    Drizzt -

  14. NpvMRUlwISOMrGih
    NpvMRUlwISOMrGih
    xEFdupFYZIyOQham
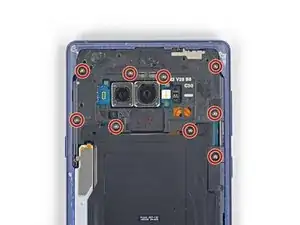
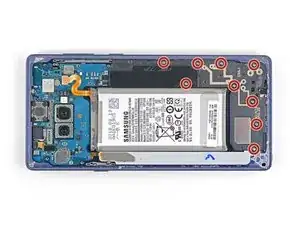
    • Prenez un tournevis cruciforme pour ôter les neuf vis de 4 mm qui fixent le châssis central supérieur.

    There are two more screws on the bottom right corner of the little side frame that the Qi plate is glued to. I took those out as it put less stress on it.

    John Stone -

    It helps to hold the fine tweezers with your non-dominant hand to support the screw heads and ensure they come straight out; you can also gently lift as you unscrew.

    David Gitlitz -

  15. TtRQbpjOgwgKyCeU
    TtRQbpjOgwgKyCeU
    qnfyfoRPVUgOHdxi
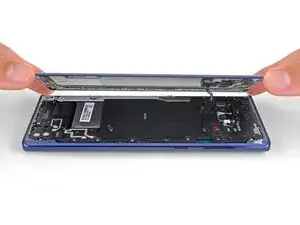
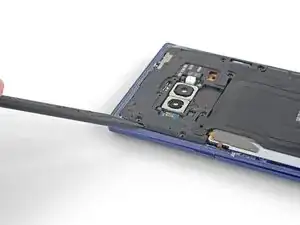
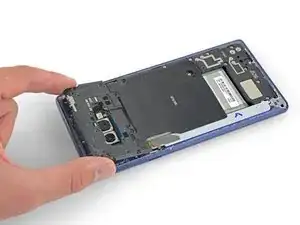
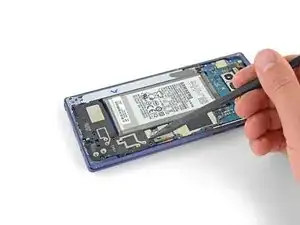
    • Insérez la pointe d'une spatule dans le coin supérieur gauche du châssis.

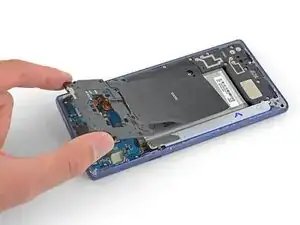
    • Faites ensuite levier pour soulever le châssis hors du téléphone.

    • Le châssis s'emboîte et se déboîte.

  16. WPl3OTEYUWaQk4lw
    WPl3OTEYUWaQk4lw
    OtIWY55KKKuAKdUL
    pRScXCbeMtNfmfgF
    • Décollez la bobine de charge sans fil de la batterie en commençant du côté gauche.

    • L'adhésif n'est pas tenace, mais pouvez vous aider d'un médiator si nécessaire.

    • Lors du remontage, commencez par emboîter le châssis central avant de recoller la bobine.

    Be careful not to tear it as it comes off - especially the side bits that stick out a bit

    Dean Lee -

    You can actually leave the right side of the coil attached to the phone so that it is easier to align and reattach afterward.

    Drizzt -

  17. MDPfHEnbaBBwN5DS
    MDPfHEnbaBBwN5DS
    3SnhFaqu3LXtjZNv
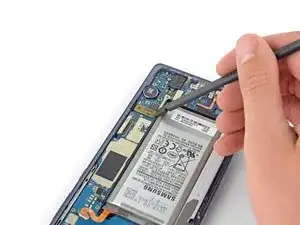
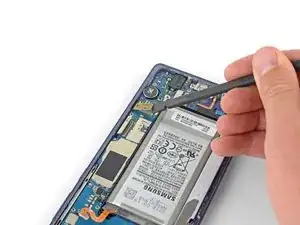
    • Prenez la pointe d'une spatule pour débrancher la nappe orange qui connecte la batterie à la carte mère.

  18. GIEOQCkaq2ssMnNP
    GIEOQCkaq2ssMnNP
    b3B3LhmeIptyAZTV
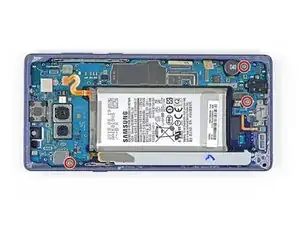
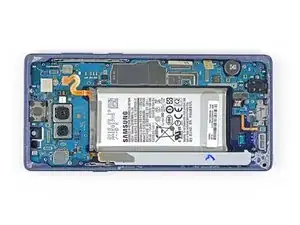
    • Dévissez les neuf vis cruciformes de 4 mm qui fixent le cache en plastique à côté de la batterie.

  19. VXVo3wSUB3IJUWEu
    • Ôtez le cache en plastique à côté de la batterie.

  20. 5QlYhKgVE5OP2ukX
    5QlYhKgVE5OP2ukX
    huJEMLiBUEjobIgG
    CfJJURuidtGIxGKW
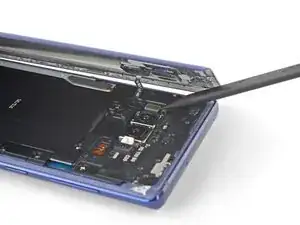
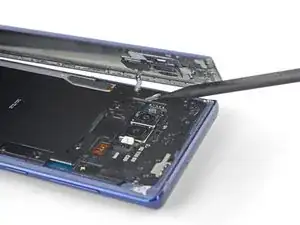
    • Insérez la pointe d'une spatule en haut du châssis central inférieur.

    • Faites ensuite levier pour ôter le châssis du téléphone.

    • Le châssis s'emboîte et se déboîte.

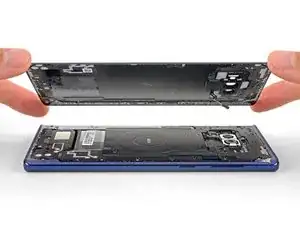
    • Retirez le châssis central inférieur.

  21. YmgeJOmh32rWGZQP
    YmgeJOmh32rWGZQP
    mYUOnVXlM1OmlsVI
    W6RTphFsIxwXrNwo
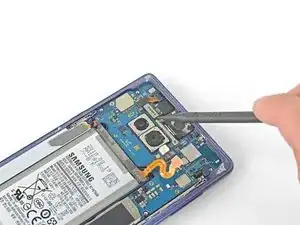
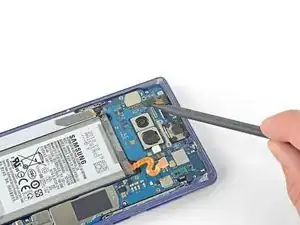
    • Faites levier avec la pointe d'une spatule sur le connecteur de la caméra frontale pour le soulever et le débrancher de sa prise.

    • Ôtez la caméra frontale avec une pincette.

  22. gGXaKTjBwqXqIrDu
    gGXaKTjBwqXqIrDu
    KEeHA6iBqKgaGRBj
    STApeHUtwk1Wi5MA
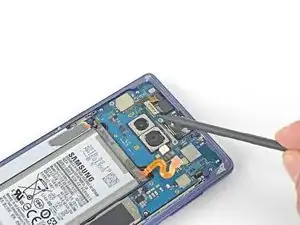
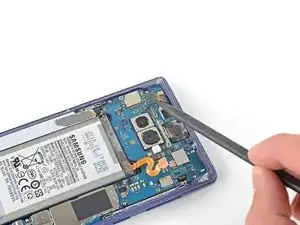
    • Prenez la pointe de la spatule pour débrancher le scanner d'iris de la carte mère.

    • Enlevez le scanner avec la pincette.

  23. TEPfQM2pUKxMZjyn
    TEPfQM2pUKxMZjyn
    T5AygZIO1dKbF6M1
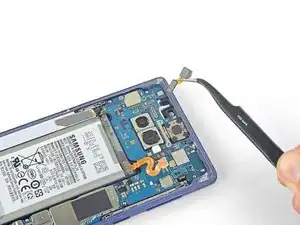
    • Faites levier avec l'extrémité plate de la spatule sur le connecteur des capteurs frontaux pour le débrancher de sa prise.

  24. JAVgH6GKVcktGsDN
    JAVgH6GKVcktGsDN
    OS2sMRIBaMCRRyRG
    • Gardez l'extrémité plate de la spatule pour déconnecter la nappe d'écran de la carte mère.

  25. FqksMRN1WMWmOFm4
    FqksMRN1WMWmOFm4
    CKLiCNWNS6pvFTFd
    • Débranchez la nappe de la vitre tactile de sa prise sur la carte mère avec le bout plat de la spatule.

  26. lmjRQDFPIXsREwxx
    lmjRQDFPIXsREwxx
    UJ44fKWmaKhNP4li
    • Toujours avec le bout plat de la spatule, déconnectez le module de charge de la carte mère.

    These screws are supposed to be 3.2 mm because when I took out these screws, they were shorter than the ones you take out first

    Lizmaris Morales -

  27. XjeGwpUWiAsFYFjN
    XjeGwpUWiAsFYFjN
    SsewRVXKSa21JpQD
    • Dévissez les trois vis cruciformes de 4 mm qui fixent la carte mère.

    • Les triangles à côté de trous de vis indiquent l'emplacement des vis de la carte mère.

  28. UJRbDi4PVRDEQsMa
    UJRbDi4PVRDEQsMa
    4uQmkLjXVjrjcDJH
    4fZwgYRoBKBgTgIY
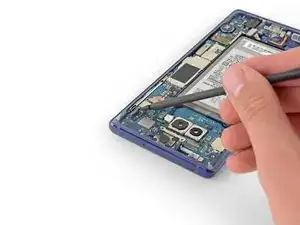
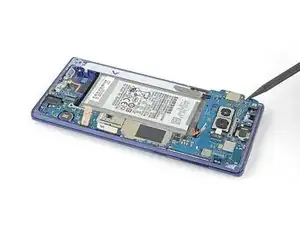
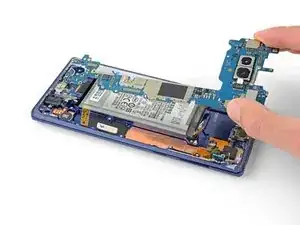
    • Avec une spatule, soulevez délicatement le coin supérieur gauche de la carte mère.

    • Ôtez soigneusement la carte mère.

    • Repliez les nappes de côté autant que possible. N'essayez pas d'enlever la carte mère si elle est prise dans les nappes.

Conclusion

Pour remonter votre appareil, suivez les étapes ci-dessus en sens inverse.

Déposez vos déchets électroniques dans un centre de recyclage certifié R2 ou e-Stewards.

La réparation ne s’est pas déroulée comme prévu ? Consultez notre Forum pour obtenir de l’aide au diagnostic.

Comparez votre pièce de remplacement à la pièce d'origine. Il vous faudra peut-être transférer d'éventuels composants restants ou retirer des films adhésifs de la nouvelle pièce avant de commencer le remontage.

Sam Omiotek

Membre depuis le 25/02/19

80534 Réputation

6 commentaires

Thats a really great instruction. I also have a question. Can I replace the internal memory in a new Note 9 phone from an old Note 9 Phone? If yes, will it work and does it have to be same storage size?

Thank you

talhamahmud zim -

Thank you! Unfortunately this is not possible because the memory is soldered to the motherboard. What you can do is swap the entire motherboard from an old phone into the new one but I haven’t tested this myself so I can’t guarantee that everything will work properly. I expect it to work though—including for larger storage sizes—because I do not know of any parts that are paired to the motherboard on those phones.

Sam Omiotek -

Hi, can i replace a dual sim Note 9 with a single sim Motherboard?

soler.debbiemay -

Hello can i put a motherboard from an international model into an us frame?

khoi cao -

Hi

I need to find the CPU and hard direction for resold and reball the those ic

Wizardzx -

I can't use the wifi

The phone turn off after i activate it

Do you have any idea to fix the problem?

khefifi mohamed -