Introduction

Il est assez facile de remplacer une ampoule de phare grillée sur votre Volkswagen New Beetle, même si la manière de procéder n'est pas toujours évidente. Au lieu d'amener la voiture chez un concessionnaire, économisez du temps et de l'argent en le faisant vous-même. L'ampoule de remplacement utilisée est une ampoule halogène H7 de 55 watts pour les feux de croisement ou de route ; l'ampoule du feu de position est une ampoule de 5 watts de type 2825 (également connue sous le nom de W5W).

  1. mFAFoXv32B2RDQZE
    mFAFoXv32B2RDQZE
    mxYMXE1STIJHmfdh
    e4QwmMjY6bUlYwXy
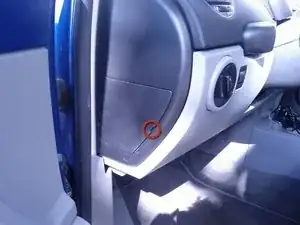
    • Avant de décider de changer une ampoule grillée, assurez-vous que ce n'est pas le fusible qui est à l'origine de votre panne. Vous devez ouvrir le couvercle du bloc de fusibles situé sur le côté gauche du tableau de bord. Utiliser un objet fin et plat, tel qu'un tournevis à tête plate ou une clé, pour ouvrir le couvercle.

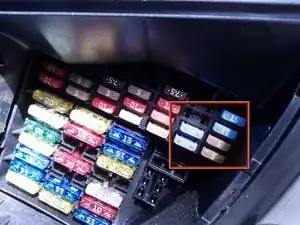
    • Sous le couvercle, vous verrez un certain nombre de fusibles multicolores.

    • Utiliser le tableau de référence et la pincette en plastique blanc fixée à l'arrière du couvercle pour localiser et retirer les fusibles correspondants. Les fusibles 18 et 19 sont pour les feux de route ; 20 et 21 - pour les feux de croisement ; 22 et 23 - pour les feux de position. Retirer les fusibles un par un afin de ne pas les mélanger.

    • Le corps du fusible est semi-transparent. Regardez-le de côté pour voir si le fusible est encore bon.

    I don't see any 21 fuses for the low beams. Should I? Don't see them in your picture either.

    John Malcolmson -

  2. POnK3hOHMSftLMjS
    POnK3hOHMSftLMjS
    WxI6QNLYEFHGwlAJ
    CKx2VPmnZWsSi55J
    • Si vous avez vérifié que tous les fusibles sont en bon état, c'est l'ampoule qui a grillé. Pour remplacer une ampoule, vous devez retirer l'ensemble du phare en le faisant glisser hors de son logement dans l'aile.

    • Tout d'abord, déverrouiller le capot en tirant sur la poignée située sur le côté gauche du repose-pieds du conducteur.

    • Ouvrez ensuite le capot en tirant la languette en plastique vers vous et en soulevant le capot.

    • L'ensemble phare du côté passager est facile à trouver, tandis que du côté conducteur, il se cache sous la batterie. Il peut être utile de retirer le couvercle de la batterie, ce qui permet de mieux voir et faciliter les manipulations.

  3. dAZ4DAZ4JlLDYESv
    dAZ4DAZ4JlLDYESv
    yZpqJVHjnCAL3WZA
    3lkUjCnYlsdGUrlF
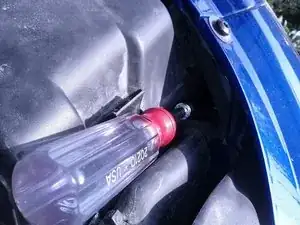
    • Pour retirer l'ensemble phare, utiliser d'abord le tourne-écrou de 5 mm pour tourner l'écrou de blocage de 1/4* de tour dans la direction indiquée. Du côté passager, l'écrou est clairement visible ; tournez-le dans le sens des aiguilles d'une montre.

    • Du côté conducteur, vous devrez passer la main entre la batterie et la carrosserie, à l'aide d'un tourne-écrou à long manche, pour tourner l'écrou dans le sens inverse des aiguilles d'une montre.

    • * Essayez de ne pas tourner l'écrou de verrouillage de plus d'un quart de tour. Cela risquerait de le remettre en position de blocage.

  4. YJn63c2voDc3aUds
    YJn63c2voDc3aUds
    j4sjGvbogwvkXvRJ
    COOjWVNaujWJTnfd
    • Une fois l'ensemble phare déverrouillé, appuyer sur le levier de verrouillage brillant - il est visible en regardant directement vers le bas depuis le dessus du phare.

    • Du côté conducteur, seule une partie du levier de verrouillage est visible entre la batterie et la boîte à air, mais vous pouvez toujours l'atteindre avec un tournevis à long manche.

    • Tout en appuyant sur le levier de verrouillage, pousser le phare vers l'avant et hors de son logement. Attention, il se peut que la poussée doive être forte et que l'ensemble sorte brusquement.

  5. KsqveBVO5UyEVkNm
    KsqveBVO5UyEVkNm
    XBAHrLm1tjv1sm5J
    • Localiser le couvercle de l'ampoule à l'arrière de l'ensemble. Déclipser et ouvrir le couvercle pour découvrir les ampoules.

    • Retirer le connecteur électrique et extraire l'ampoule à remplacer. L'ampoule des feux de croisement est maintenue en place par un clip. Les autres ampoules sont maintenues par friction ; utiliser une pince pour les extraire délicatement.

    • Mettre en place l'ampoule de remplacement et refixer le connecteur. Ne touchez pas le verre de l'ampoule à mains nues : l'huile de vos doigts restera sur le verre et le fissurera lorsqu'il chauffera après avoir allumé les feux.

    • Remettre en place le couvercle de l'ampoule.

    The low beam has the clip.

    Be Green -

    My problem was that the socket was burned out. So be sure to check that. It was easy to replace. They had the socket at the autoparts store and we just spliced the wires together.

    Rashel Mereness -

    Excellent guide. Thanks!

    Brian -

    Confirming what Be Green said: the low beam bulb is the one with a clip.

    Jamieson C -

    I replaced the bulb but now all lights aren't working! Can anyone help?

    Thelma -

    Thelma, it is possible that the headlight assembly did not make solid contact with the connector when you slid it back in. The result will be that none of the lights will come on for that side. Try sliding out the assembly and slide it back in. For the driver side assembly, at least, you can also access the back side of the connector to try pressing it in tight after the assembly is seated.

    Jamieson C -

    Okay, so I took my Beetle to the dealer to have them replace the bulb, and I asked them to let me watch the mechanic as he replaced the bulb, which they did. He showed me how to do it, and the first thing that I noticed was that you DON'T turn the 5mm nut 1/4 turn, you turn it until it stops turning. That's why I wasn't able to get the headlight assembly out of the car. He even let me turn the nut with his ratchet, to see where it stopped turning.

    ssnmyer -

  6. oJBZWo2OBWSURL3x
    oJBZWo2OBWSURL3x
    H1YDfppSOKtOOKsu
    QLwQLhptUeJ1MhXv
    • Lorsque vous remettez l'ensemble du phare dans la carrosserie, assurez-vous que les guides de repérage de la carrosserie s'insèrent dans les loquets situés de part et d'autre de l'ensemble.

    • Pousser l'ensemble dans la carrosserie jusqu'à ce qu'il s'enclenche.

    • Utiliser à nouveau le tourne-écrou de 5 mm pour tourner l'écrou de blocage qui verrouille l'assemblage dans son logement.

    • Mettre le contact et vérifier que la nouvelle ampoule fonctionne. Fermez le capot.

    Danke, Danke, Danke war sehr gut beschrieben!!!

    Michael Schneider -

    Is this a 2011+ guide or does it apply to the 2001-2010 beetle too?

    John Robinson -

    That particular car was a 2007, but I expect it to be applicable to all New Beetles

    nickivanov -

Conclusion

Après le remontage, veillez à tourner le mécanisme de verrouillage dans le sens indiqué pour verrouiller tout le dispositif de phare en place, sinon le contact électrique risque d'être médiocre et les feux risquent de ne pas fonctionner.

Nick Ivanov

Membre depuis le 09/10/11

2338 Réputation

32 commentaires

Thanks so much for that photo of the lever itself. Wish I'd seen your photo first -- would have saved 30 minutes of cursing :)

mp4surf -

First part of step 6 is ESSENTIAL. Be warned that the assembly will slip easily into position without the locator guides being inside the catches on the unit, and the locking lever will click into place, but the locking nut will not tighten it into position. Don't ask me how many times I repeated this before I did it properly because I will lie!

Fred Flintstone -

I never heard a "click"; however, I lock the hex nut ok. So the light works but seems like the car hits a bump and the light jumps out of the connector enough to stop working. Any thoughts?

juliejanus -

Extremely helpful. NOBODY would ever figure this out on their own!! Thanks!!

David -

Seriously! Im an engineer and I was fighting with the headlight wondering why I couldn't loosen the latch to get it out. I apparently turned it more than 1/4. I feel like this was a bad design...

Marcy -

Thanks for the guide, this was super easy to perform and took less than 10 minutes.

I had to squeeze the headlight assembly and holder together really hard to get the connector to seat properly - at first nothing worked when I put it back together...

Pitt Monqui -

Thank you, Nick, for creating this manual! My daughter has an '06 Beetle. I've had to replace the driver side headlight three times. I recently had to replace the whole assembly because when I replaced the light bulb, I evidently did not properly lock the assembly, and it vibrated loose in traffic, and disappeared. As for the click, I have never heard it click. Even with the new headlight installed, still no high or low beam. Not sure what's going on. All comments have been helpful, though. Thank you, iFixit!

Jim -

I am far from handy when it comes to cars, but I was not going to pay $200 to fix a headlight ! It took about 1.5 hours of reading this site, looking under the hood and some trial and error...but it all makes sense if you follow this closely. Be sure to look closely at what they show in the red boxes above. The main problem was finding a nut driver long enough to reach the Driver's side lock for the headlight. I found one that was a 3/16 inches and it worked fine. Depressing the lever to release the assembly and pull at the same time also was tough to figure out the first time. All total I got it done for $24 bucks (new bulb, nut driver) and 90 minutes of work (will only take 30 minutes next time....) Thanks to you for putting this together.

Robert -

Followed the instructions and it took less than an hour to replace the bulb. Would have cost us at least $80 to have it done for us. Thanks for the info!

taniles13 -

Can anyone help troubleshoot lights not working after putting assembly back together? I've tried 5 times already and still nothing! All lights worked fine when I first replaced it but I'm thinking maybe I didn't lock it correctly and vibrates loose? Any tips would be greatly appreciated!

Thelma -

Have you looked at the copper leads? Do they look like they might have been burned? Volkswagens are notorious for electrical issues and they can short circuit. There should be three copper coated wires in the assembly, and if even one is burned it will cause the light to only work sometimes. You can check that. If they all look fine, make sure the connections are touching fully and going to the right places. It is also easy to put the metal clip part on backwards! Don't do that, I did that, it only goes one way. Hope I helped. There should be another guide on this. Maybe I will make one.

Marcy -

I am a 40 years old woman, who never did anything like this before, and I completed my task with not trouble because of these guide! so just want to say THANK YOU.

Ella -

Something you don't explain is that, on the driver's side light, once you've turned the nut 1/4 turn, and as you are pushing down on the lever, how do you get the headlight assembly out? There is nothing to grab hold of from the front of the headlight, and you can't get your hands on the back of the assembly, so how do you get it out? I tried putting the handle of a pipe wrench between the back of the headlight assembly and the air filter housing and pushing as hard as I could while pushing down on the lever, and the headlight assembly wouldn't come out. After an hour, I gave up and took it to the dealer.....a 15 minute job my rear end!

ssnmyer -

Thank you so much! Finished it in 10 minutes!

Susie -

I thought my bulb replacement would be a 15minute job also...... no such luck. After the bulb was replaced, I pushed the headlight assembly back into the housing until I heard it click. I did not lock the assembly down using the hex nut. I then turned on the ignition and headlights to see if it was operational. None of the bulbs would light. I diagnosed the problem and found that the electrical connector was not fully seated. Once I locked the light down with the hex nut, the electrical connector snugged into place and everything was working fine. Hopes this helps someone with the same dilemna.

Wild Bill -

Thanks Nick. This was very helpful. My wife called the dealership and they were going to charge upward of $150 to complete the job. The bulb cost me $12.00...I had the tools. Took all of 15-20 minutes. I sincerely appreciate it!

Dmart -

I replaced the bulbs. It fixed the driver side low beam but the passenger side still doesn't work. Fuses are good. Any suggestions?

Nancy Sthram -

Where is the lever for the passenger side to release the light

reesesluver10 -

After putting in new headlights my high Beam light in the dash is on when you turn headlights and it will not go between low and high beams. Any idea what could be up?

Judy -

Replaced both headlights now when you turn them on the high beam light on my dash stays on and it won't switch between low beam and high beam? Any idea why?

Judy -

Better than YouTube!!! Excellent work. Thank you so much!

Gary White -

Thank you so much for taking the time to share this information. Previous instructions had major removal of other components to complete this repair. The only issues that I had were not getting a good electrical connection. One was caused by not turning the locking screw tight enough. The second was not having the lamp housing seated correctly. I completed replacement of both head lamps in under 1/2 hour.

hotandcold7395 -

I replaced all 4 bulbs on my 2000 beetle and dims wouldn't work found out that each bulb has it own fuse replaced low beam fuses and lights came on ur head light fuses are top left corner of box 15 amp between 19 and 23 number fuse for headlights

James a Banks sr -

Sorry it's top

James a Banks sr -

I’m 67 years old and a woman last time I took my car to VW dealership costed 200.00 for a 10.00 bulb so I got on you tube and the man said use this nut with a long handle and then push this gold level down but he didn’t show how or what size nut but this is step by step with pictures on how to did it love it save a lot of money thank you

Johnnie mae edmonds -

I have a 99 better, the high beams work fine. Only one of the low beams work. I checked the fuse and replaced the headlights,and the low beams on one side still don't work. I'm homeless right now a trying to save what money I have. My question is if I switch the high and low beam connectors around will that screw up everything.

John M Horton -

I had to replace bulb in wife’s 2006 bug but it didn’t work. After searching these sites I and seeing what others were doing I tried drilling a hole and putting a short 3/4 shim with screw between the plastic that holds the headlight socket and the inner fender. This helped keep the socket from flexing when the headlight assembly was reinserted. Also, and this is important, after all was together, from inside engine compartment I pushed the socket even harder with a large screwdriver and heard a ‘click’. I knew all was right with the world then.

Jeff -

Great guide, there is no way I would have figured this out on my own. Sadly, it didn't fix my driver side light. Neither the hi or low beams work, the fuses are all good, replaced the low beam as a test and put the headlight back in even heard the click but still no lights. Any suggestions what else to check, is there a way to test that power is going to the pins?

kent_e -

What happens when you find that the lever (passenger side) was broken by te former owner and badly glued back?

John Morrison -

This how-to was great. I removed both headlight assemblies, replaced the bulbs, and re-installed the assemblies in about 10 minutes. Great job of describing the procedure.

anonymous 8047 -

Very generous of you to share your knowledge. Your awesome

barbara Butler -

Is there a bulb for high beam and a bulb low beam? Or are the bulbs the same?

Stephanie Bryant Williams -