Introduction

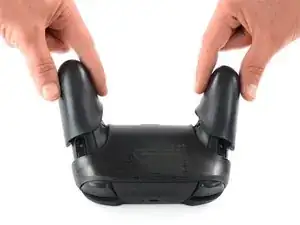
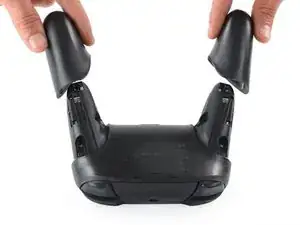
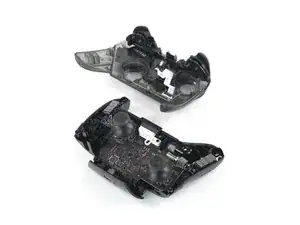
Après avoir utilisé la manette Nintendo Switch Pro (modèle HAC-001), il est courant que le capuchon du joystick soit fissuré ou cassé. Bien que les capuchons ne fassent pas partie intégrante de la fonctionnalité du contrôleur, les capuchons offrent confort et facilité d'utilisation des joysticks. Ce guide vous aide uniquement à remplacer les capuchons du joystick, pas le joystick lui-même.

  1. iaKRfcPV2HNC5yUK
    • Retournez la manette de sorte que les autocollants soient face au plafond.

    • Utilisez un tournevis JIS 00 pour retirer les deux vis noires de 8,4 mm qui fixent les poignées, situées aux extrémités des poignées.

    Be carefull, these screws are super easy to strip even with the right tools.

    Lukas Eberharter -

    I tried editing these instructions after I had trouble with stripping screws, but it doesn't seem to take. The issue is that these are JIS and not Phillips screws. They are VERY similar looking but a Phillips head screwdriver will strip the screws.

    Isaac Webb -

    I tried using a Philips #00 screwdriver but it didn’t work

    vincent ingrassia -

  2. pFHHOlTyvlQ43DOC
    pFHHOlTyvlQ43DOC
    KCE54LsPyGnuWTkW
    UNYZtREEKVfHallZ
    • Ôtez soigneusement la coque des poignées.

  3. 3OnYDcOU1gVR2fEG
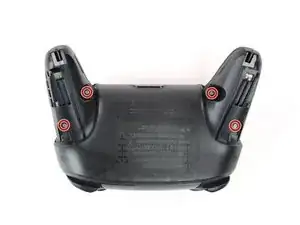
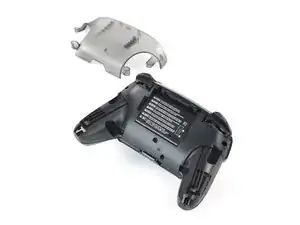
    • Utilisez un tournevis JIS 00 pour retirer les quatre vis argentées de 6,8 mm de long qui fixent la coque arrière en plastique transparent.

  4. Zb3Ool4Evh63KKVd
    Zb3Ool4Evh63KKVd
    E4qBEgOibCQbXlIJ
    jihxJQfDSqclVJnF
    • Soulevez délicatement la coque plastique transparente à l'aide de votre ongle.

  5. p4bHAkTpIvuBFIfc
    • Retirer la coque arrière transparente

  6. yUbMYllrTC6sSOGL
    yUbMYllrTC6sSOGL
    6pxWhyQpxoXGbs22
    vEF6WXIGCHUebiZO
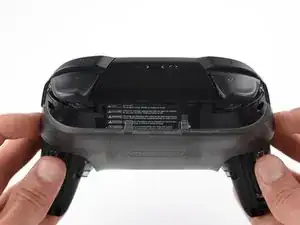
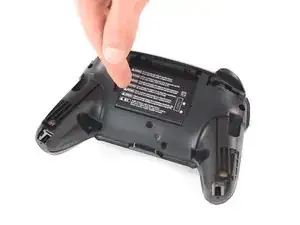
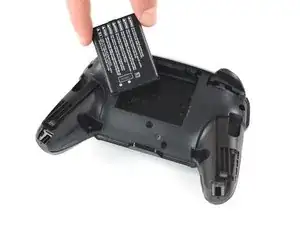
    • Retirer la batterie lithium-ion en soulevant son côté gauche avec un ongle ou un outil d'ouverture en plastique.

    • Il n'est pas nécessaire d'appuyer fort.

  7. V5kF4MuHympJyAFM
    V5kF4MuHympJyAFM
    WJ4LvGQlKLhlREns
    IhtOVVcrnx5IBHgJ
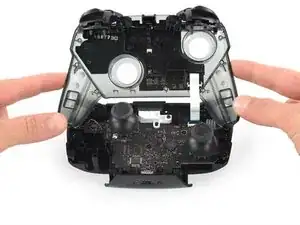
    • À l'aide d'un tournevis cruciforme, retirez les cinq vis de 5 mm à l'arrière du contrôleur.

    • Les deux vis du boîtier situées au-dessus des poignées et l'unique vis du boîtier située sous la baie de la batterie ont un logement peu profond. Ces trois vis peuvent être facilement retirées.

    • Les deux vis du boîtier adjacentes aux boutons de déclenchement ZR et ZL ont un logement profond. Utilisez une rallonge ou un tournevis cruciforme avec une tige plus longue pour atteindre ces vis.

    the 2 screws up at the top are unreachable with the standard fixit kit just a heads up

    drew -

    Seconded. the screws are located too deep below the plastic slot, and the bit holding bulge is too wide for the small aperture (similarly with the flexible extension). the bit length is too shallow to reach.

    An alternative driver with a much narrower & longer shaft is required, which will likely not come with interchangeable bits.

    Douglas Selby -

    I would say it is possible to reach the top left screw, just not the top right - there is a gap in the top left that allows you to slightly bend the standard driver outward to turn it while still making adequate contact.

    El_Mechacontext -

    An update: I was actually able to remove the top right one in a really hacky way - inserting the Phillips #0 bit into the #4 hex bit, and then using that in the standard driver. This added just enough length to successfully reach and make full contact with the screw!

    El_Mechacontext -

    Using the #4 hex bit as an extension was the exact "hack" I needed to get rid of the drift finally. Thank you. You're a lifesaver.

    Das #4 Hex Bit als Verlängerung für das Kreuzschlitz Bit zu nutzen ist zwar etwas eng, aber es erspart einem wirklich einen zusätzlichen Schraubendreher.

    Techn0magier -

  8. PnIrdtdY4KCyxuKK
    PnIrdtdY4KCyxuKK
    ZBKtxPXnhQuBTaDN
    OZcevYGCPPARFaRx
    • Retirez délicatement le couvercle en plastique du contrôleur.

    • Ne retirez pas encore complètement le capot avant, car il est toujours attaché à la carte mère via un câble plat blanc.

    Didn't realize there is adhesive holding the front cover onto the unit. It's located inside of the handles. Just a bit of force there helped, just be careful of the cable.

    Roger Perez -

    this step is really hard

    XDchlapec -

    You can use a pry tool to pry the part of the top shell covering the handles off the adhesive in order to make this step less like pulling teeth.

    Charlie -

  9. NpVhXDsYSWmW4tBT
    NpVhXDsYSWmW4tBT
    QXe1DlCMuCXbrveX
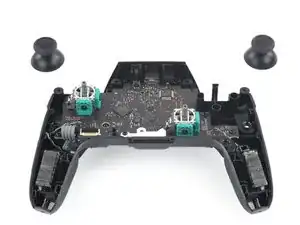
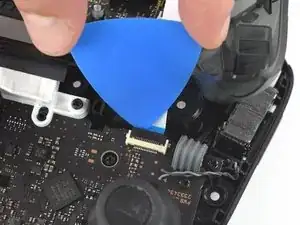
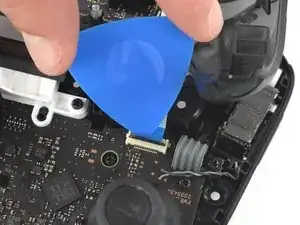
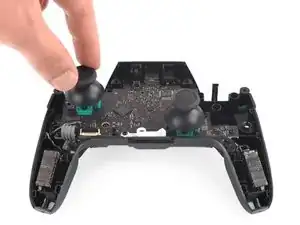
    • Utilisez la pointe d'un médiator pour ouvrir le volet noir du connecteur ZIF en le poussant vers le haut.

    Having just completed this repair, I noted that this ribbon cable can disconnect on either side. It is easier to disconnect and reconnect from the other side than what is shown in my experience.

    acestronautical -

    @acestronautical is right! much easier to remove the ribbon cable from the button board, connect to the base board and then connect back to the button board. Thank you @acestronautical

    Joe Rickerby -

  10. 3qj6VtFJtKAHHm6I
    3qj6VtFJtKAHHm6I
    YJvaLXngDhvHF1Gr
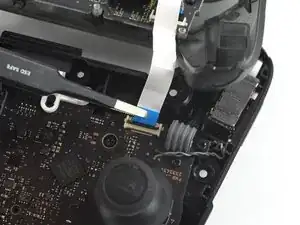
    • Utilisez vos doigts ou une pince à bec émoussé pour déconnecter le câble d'interconnexion de son connecteur.

    You don't need to disconnect this as long as you are fine with keeping it close by so as not to rip the ribbon cable.

    Caden Helm -

  11. OpC2vBHXBB35uAQ4
    • Retirez le boîtier avant

  12. fmhalkYPurcsCRYL
    fmhalkYPurcsCRYL
    elaYKLLtkDSyGABw
    rEIOPXEXhFo3sEO1
    • Avec une force légère, retirez les deux capuchons des joysticks du contrôleur.

Conclusion

Pour remonter votre appareil, suivez ces instructions dans l'ordre inverse.

Christian Rudnick

Membre depuis le 10/10/19

473 Réputation

3 commentaires

Where can I get the replacement caps?

Locke Valentine -

do you know where to find a replacement cap? If so can you give me link, thanks!

Jesus Acosta -

You really don't need to disconnect the ZIF to replace the caps. It might make things a tiny bit easier, but is best not to mess with it AT ALL if you're only replacing the caps. As messing it up, or not connecting it properly when you're putting it back together can lead to ALL your face buttons and D-pad not working.

master2873 -