Introduction

  1. MreUuGc1ebaARHj5
    MreUuGc1ebaARHj5
    NhJRD2iXGMAhM6HH
    AITKEfSUpcRnfihL
    • Dévissez toutes les vis sous l’ordinateur et débranchez la batterie.

    • Retournez l’ordinateur et à l’aide d’un outil pour faire levier, détachez le cache au-dessus du clavier.

    • Retirez les deux vis qui maintiennent le clavier, soulevez-le, débranchez-le et mettez-le de côté.

  2. QhyAYbc4YR3uXVeR
    QhyAYbc4YR3uXVeR
    rZGmgHAo1xAwOetL
    VomTQygulLA3CjI2
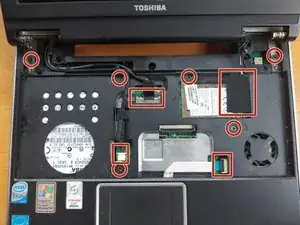
    • Débranchez délicatement les câbles et retirez les vis qui maintiennent la partie supérieure du boîtier.

    • Retirez l’écran.

  3. XJpKqWC2TJn1F5CE
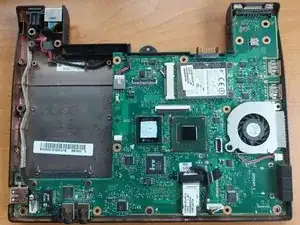
    • Soulevez la partie supérieure du boîtier et remplacez les pads thermiques. Assurez-vous qu’ils ont la bonne épaisseur.

    • Vous pouvez également débrancher le ventilateur pour le nettoyer.

    I've read the tut, and looked to me like a copy-paste of others, but with important parts missing. What's worst is that not only it lacks of very important steps, like removing the video cable (that is a little nightmare. BTW: YOU MUST PULL straight up to do it, and do it hard because it seem to be soldered.) but the tut also (surprisingly) warn us to use "the right thickness without providing us with the right size for the thermal pads, leaving us asking" OK, Mr... WHAT THICKNESS?" Thickness is 1mm, if you ask (17x17x1mm)... And if you are afraid of ruining something, use 0,5mm pads instead; but I use 1mm with no problems, just in case you wonder if I btoke the CPU and GPU chips.

    Angel -

Conclusion

Pour remonter votre appareil, suivez ces instructions dans l’ordre inverse.

Simeon Brankov

Membre depuis le 08/11/20

7058 Réputation

0 commentaires