Introduction

Ce tutoriel décrit comment remplacer les patins sur les MacBook et MacBook Pro de 2009-2012. Pour un tutoriel complet incluant comment enlever le boîtier inférieur, reportez-vous à la page spécifique du modèle.

  1. LMJvTZiOXSGn3tTS
    LMJvTZiOXSGn3tTS
    63PwLrffwQT3m2ac
    JMX2fPIoAsf4EmfF
    • Retirez tous les patins endommagés ou cassés.

    • Retirez tous les morceaux de patins qui sont restés dans le trou.

    • Retirez avec une pincette les morceaux de ruban adhésif qui adhèrent encore.

  2. GuuAtNdCMeSnGFs2
    • Frottez le support de patin avec un dissolvant pour enlever toute trace d'adhésif.

    On my mid-2009 unibody MacBook Pro, there were thin, circular, black cloth pieces inside the case, covering the holes where the feet came through. I had to remove this tape, in order to push the feet through.

    Edward Horner -

  3. kC6ytQkgxiWO4UqO
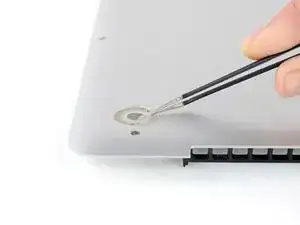
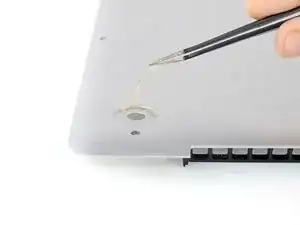
    • Essuyez le support du patin avec une lingette imbibée d'alcool pour éliminer tout résidu laissé par le dissolvant.

  4. VlE16CROH5hnGjAQ
    • Détachez le patin de remplacement de son support en plastique.

  5. 61BiwhBquQl2APmp
    61BiwhBquQl2APmp
    vnEQrCWXPjGNAVjE
    wnYnBavhXLSYvKc5
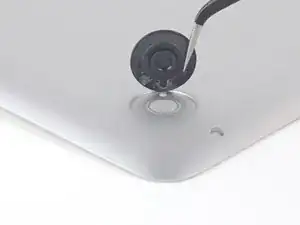
    • Alignez le nouveau patin à l'intérieur de son support.

    • Veillez à aligner le détrompeur dans le petit trou situé à proximité du support du patin.

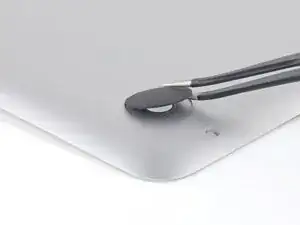
    • Posez le patin tout en le maintenant correctement aligné.

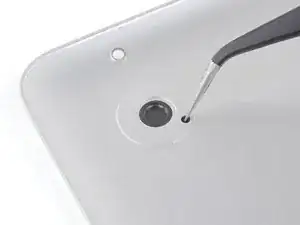
    • Vérifiez que l'alignement est correct depuis l'intérieur du boîtier inférieur. Utilisez une pincette pour déplacer le détrompeur jusqu'à ce qu'il soit bien aligné avec le trou.

  6. jxRDQPwxYdagNPHo
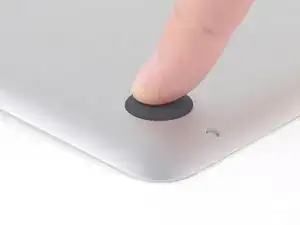
    • Appuyez fermement sur le nouveau patin avec votre doigt et maintenez la pression pendant 30 secondes pour fixer l'adhésif. Soutenez l'autre côté du boîtier pendant que vous appuyez sur le patin.

    • Répétez les six dernières étapes pour tous les patins cassés ou endommagés.

    Support the rear feet from inside with your other hand before pressing down on new foot. Failure to do so may damage the plastic air grille inside the rear of the lower case. See the photos in step 3 above.

    hterlecki -

    My A1278 hasn't got holes in the backplate?

    The feet just seem to be stuck on with adhesive.

    Do I still have to unscrew the back?

    Regards,

    Rob.

    Rob Haygarth -

    Hi Rob,

    If the backplate doesn’t have the holes, you can still use the feet by just glueing them on. You would not have to open the backplate.

    Arthur Shi -

    I have been told that if you are using adhesive, you should follow these steps and remove the bottom.

    This way, adhesive doesn’t get inside the machine.

    Larry D Turner -

    Hi Larry,

    That is definitely true, if you are adding liquid adhesives. The feet we sell come with adhesive pre-installed on the feet. All you have to do is peel and stick!

    Arthur Shi -

Conclusion

Pour remonter votre appareil, suivez les instructions dans l'ordre inverse.

Arthur Shi

Membre depuis le 03/01/18

271465 Réputation

0 commentaires