Introduction

Ce guide vous aidera à remplacer un joint torique qui fuit causé par une exposition aux éléments ou des dommages lors du démontage. Tout ce dont vous aurez besoin pour y accéder sont des choix d'ouverture iFixit. Il est recommandé de le remplacer à chaque fois que l'appareil est ouvert car il peut être pincé ou déchiré lors du retrait de la plaque frontale ou du boîtier de l'appareil.

  1. 4OhVXWLRmT2mwNrZ
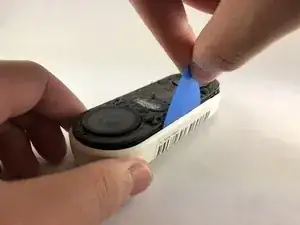
    • Insérez le médiator entre la façade noire et le boîtier blanc du Nest Hello.

    • Retirez la façade de l'appareil avec le médiator.

    • Si vous n'avez jamais ouvert le Nest Hello auparavant, il y aura un filet de protection en mousse collé au revêtement en plastique et à l'intérieur du filet, utilisez un médiator pour couper le plus possible le filet.

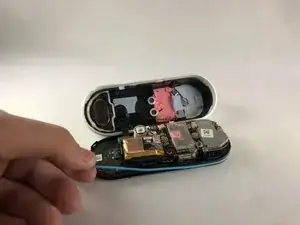
    • Retirez complètement la façade de l'appareil, n'ayez pas peur de tirer fort.

    I had to use a metal spudger tool to start and then used guitar picks.

    Joel Lundi -

    Be afraid to pull hard. The faceplate will break in two.

    B Bremer -

    I did the JerryRigEverything method and slipped a razor under the faceplate to separate it carefully from the body. Worked perfectly and nothing was damaged

    There I Fixed It -

    Be careful with the wiring and the heater element. I must have shorted something together when it put it back together and now it will no longer power up. It is probably best to cut the wires to the heater and deal with the consequences in the cold temperatures.

    Joe I. Fabritz -

    The secret I think is slicing through the adhesive. I shoved multiple picks in and worked my way around. You want to cut the adhesive. Prying is likely to break the faceplate. The big hint is the next picture in the step, seeing where the adhesive is.

    Arnold de Leon -

  2. iOunefeVg4DKHhOu
    iOunefeVg4DKHhOu
    bitW2l5mCQoWhyiQ
    • Décollez les autocollants du couvercle et utilisez le tournevis cruciforme n ° 000 pour retirer les quatre vis.

    There is a small circle sticker over each screw, about the size of the red circles in the image above. It wasn't clear from the directions what the "cover stickers" were. A small exacto knife was helpful to pry up the edge of each sticker.

    Tim Scott -

  3. HtCWfAHNKEYHltQb
    HtCWfAHNKEYHltQb
    Ik6niEiyH3bvD1nX
    JnHFQwOrSANXfEaJ
    • Insérez le médiator entre le boîtier blanc et le circuit interne noir et faites-le levier.

    • Il y a un câble ruban reliant le boîtier blanc aux cartes de circuits imprimés. Veillez à ne pas déchirer le câble en séparant le boîtier des cartes de circuits imprimés.

    Where can you get a replacement faceplate from?

    nick -

    I ended up doing the headlight lens restoration method - I scraped away any plastic that was flaking off and then I used progressively finer sandpaper (start with 400-600 grit and go up from there). I finished it with rubbing compound and polish. Looks decent.

    There I Fixed It -

    Also - be careful not to cut or displace the rubber gasket that runs around the outside of the main body that has the circuitry - you'll risk losing the waterproofing

    There I Fixed It -

    What is the replacement battery type please?

    Dave Pawson -

    BUSFUIVA Replacement Battery for Nest 1ICP7/17/26, Hello, NC5100US, C1241290, Vido Doorbell Wired. 3.7V 280MAH https://a.co/d/38BD8qY

    Brandon H -

    The top end has some kind of mild adhesive (the blue stuff). The bottom end came out more easily for me, and then I ended up bending my board slightly by trying to pry out the top end. May be better to start on the top end if you can get something under the edge of the board to get leverage.

    somebody -

    The black ribbon cable was instantly sheared in half the moment I got the two halves apart, which took more force than I was hoping to need. Turns out the ribbon cable is attached to a sharp metal piece and it will easily tear through it. No longer worth it to replace the battery for me, sadly.

    Ryan Littlefield -

    What a stupid design by Nest. If they know that battery will fail they should at least make it user accessible when removed from mount. Replaced mine. It’s a pain getting to the battery and it’s easy to crack the faceplate when prying it off. Also the plastic tools included with kit will fail before you’re into the device.

    If you can manage to get to the battery without destroying the Nest Doorbell it’s worth it to get a few more years of use.

    C Whitcher -

  4. 6nIlrl4wxiZqxlQG
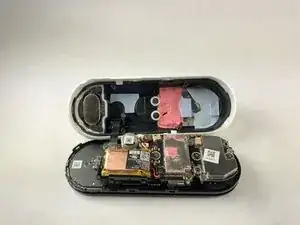
    • Retirez le joint torique (de couleur bleue) de l'appareil. Il est placé sur le bord de la carte mère.

    where can I get a new o-ring? I cant’t find it anywhere

    Curica -

Conclusion

Pour remonter votre appareil, suivez ces instructions dans l'ordre inverse.

Jason Valencia

Membre depuis le 14/01/20

345 Réputation

2 commentaires

Is there a link available for spare replacement parts? I can’t seem to find anything other than replacement internal batteries . Thanks!

Andres Chavez -

Also looking for this replacement part. Googling did not produce results.

KB_KB -