Introduction

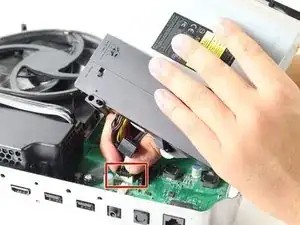
Le connecteur du bloc d'alimentation sur la carte mère est difficile à retirer à la main. Tant que c'est possible, nous vous recommandons de retirer la carte mère du châssis argenté pour pouvoir accéder au connecteur du bloc d'alimentation.

  1. AQtIBB1ZGqHTvNg4
    • Retournez la Xbox One S pour que le dessous soit au-dessus.

  2. cI432T5plYCpwsEg
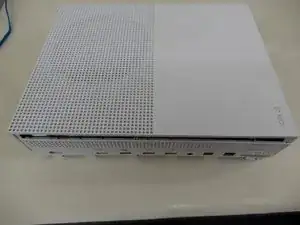
    • Commencez par travailler sur l'arrière du boîtier, là où est situé le sticker de garantie. Insérez un outil d'ouverture en plastique dans l'espace entre le bas du boîtier et le côté supérieur avec la grille. Puis trouvez les clips entre les deux qui maintiennent le boîtier en place.

    • Avec l'outil d'ouverture en plastique, désenclenchez les clips. La meilleure méthode est de faire levier sur le boîtier noir, vers le haut.

    • Vous entendrez des clics à mesure que vous ouvrirez le boîtier. Il peut être assez ardu de retirer la partie basse du boîtier.

    • Il est possible que les clips cassent lorsque vous retirerez la partie inférieur du boîtier.

    • Nous recommandons de commencer par le derrière, à l'endroit du sticker de garantie. Faites levier le long du bord de derrière jusqu'à libérer tous les clips. De là, faites chaque côté. Lorsque 3 côtés sont libres, commencez devant à l'opposé du bouton de synchronisation. Faites attention et prenez votre temps, et tout devrait se séparer sans casse.

    Be careful not to damage the pairing button on this part

    David -

    Important!!

    You've to start from the back corner where is the information label, because there is a main clip behind a warranty sticker

    Cristian Ramirez -

    They should add this to the guide! I didnt know that, and did some minor damage to the bottom piece where that main clip is.

    I dont mind because it's my own Xbox, but what if it belonged to a customer?

    Charles Jackson -

    They should add this to the guide! I didnt know that, and did some minor damage to the bottom piece where that main clip is.

    I dont mind because it's my own Xbox, but what if it belonged to a customer?

    💯% same opinion!

    profnussecke42o -

    This was hard! I tried using plastic pry tools, but they did not work. A metal tool did, but make sure to watch a video or two, to see what you actually are dealing with. After the videos it went quite smoothly.

    Peterdk -

    I legitimately cannot open the case where the warranty sticker is, ive tried everything, im resorting to a fork to try and open this

    Sohail ツShah -

    nothing is moving... not sure what I am doing wrong but I can't feel any clips anywhere. I'm genuinely scared to break something.

    bumpsy -

    undid all the clips on the back and nothing moves more than a few millimeters... is there actually a good guide out there that doesn't promote breaking plastic?

    bumpsy -

  3. DGFtVxEdoZKRdLMd
    • Une fois que tous les clips sont ouverts, enlevez la partie inférieure du boîtier.

  4. GeIOPswgPOYsuGeJ
    GeIOPswgPOYsuGeJ
    uITOYPJDbxUgf4Lc
    • Avec un tournevis Torx T10, retirez les six vis vertes de 50 mm de long du boîtier métallique, numérotées de F1 à F6.

    My F3 isn't coming out. The screwdriver isn't sitting tight like it is for the other ones. Any idea on how to fix that?

    ben mccord -

  5. 3AbSAfsoTxUrMeTi
    3AbSAfsoTxUrMeTi
    wudY36aHJeyT6WjV
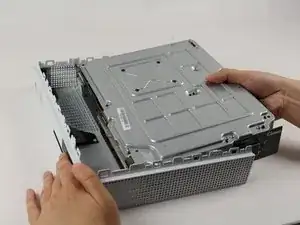
    • Séparez doucement le boîtier intérieur du boîtier blanc en utilisant la méthode appropriée.

    • Soulevez les côtés en plastique blanc à l'arrière en les écartant vers l'extérieur afin de les détacher du blindage E/S en plastique.

    Essential tip: be sure to slide the metal housing backward, away from the from of the case as pictured above, rather than upward. If not, you can easily break off the teeny momentary switches on the IR blaster board!

    Mark Ross -

    “appropriate method is not descriptive like Mr. Ross’s comment. The original poster should edit the description to ensure people do in fact remove the box from the case appropriately. I would also add arrows to the picture.

    Ryan A -

    ____________⬆️

    ↖️Yes! I see it the same way!↗️

    ⬅️Arrows are always a good thing!➡️

    ↙️Can't do anything wrong with them! ↘️

    ____________⬇️

    😅😅

    profnussecke42o -

    I didn't realize that metal ribbon was connecting the case to the console and I yanked it w out realizing it was there. How o I get a replacement?

    Jerianna Mike -

  6. EFLSsRhhXsAEZnYh
    EFLSsRhhXsAEZnYh
    OjVWJsD26pdrus24
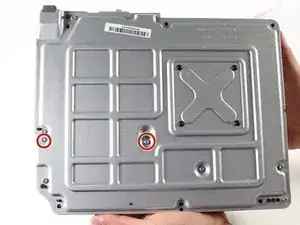
    • Pour remplacer le disque dur, retournez la console et retirez les deux vis torx T10 de 10 mm, numérotées C3 et C4, depuis l'arrière de la Xbox One S.

    • Certains modèles requièrent éventuellement le C4 et C5.

    • Cette opération va détacher le boîtier plastique qui entoure le disque dur du reste de la console.

    Some of my silver were gold screws, so just letting people know to look out for that!

    jovialkitten -

    The Torx screw circled on the left is actually C5

    Jaryn Wickman -

    I found the same. On my Xbox One S, it's C3 and C5 that hold in the hard drive caddy. C4 holds in the optical disk caddy.

    jamesr -

    Yeah, C3 and C5 on my console too.

    Jahn Roux -

    Funny thing on my console rev t t3 built feb 2018 it’s C4 and C5

    KingofRome -

    The instructions fail to mention that the top metal cover can be lifted off at this point without undoing any more screws.

    CityZ -

  7. X2IJJg3NqtsnAcbY
    X2IJJg3NqtsnAcbY
    NAHJXCj1SgvQNjOx
    3fEHBmUuTGRL3omb
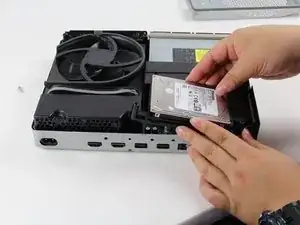
    • Déconnectez doucement le disque dur de la carte mère au niveau des deux connecteurs en plastique.

    Do not disconnect the connector in the second image! There are tiny prongs that bend easily and if bent just a tad bit they will break off. I had first hand experience with this and I ended up breaking my Xbox because I could not put that cable back on.

    [deleted] -

    Do not remove the cable!!!! You can change while the cables are plugged. It took 2 hours trying to put mm precisely all the little pins because of the removal of the cables.

    Please update the post, I could easily end up as the Aaron, breaking the XBOX completly.

    Botond Kopacz -

    Yes, this has also happened to me the connectors had broken and the pins bent and snapped off.

    Samuel Garbutt -

  8. VxZkFMZbQAxM2dKL
    • Pour retirer le lecteur de disque optique, retirez la vis Torx T-10 argentée de 10 mm étiquetée « C4 ».

    The image shows screw 'C4' witch is the correct screw. 'C5' is for the HDD.

    GoJoel -

  9. IL5gf22gGXMcJsTw
    • Retirez légèrement le disque de la carte mère et débranchez les connecteurs en plastique de la carte mère.

  10. LDNGpA5mc6kvJlfK
    • Pour remplacer la carte mère, vous devez retirer les trois vis Torx T-10 argentées de 10 mm étiquetées « C1 », « C2 » et « C6 ».

    • Retirez les quatre vis Torx T-8 noires de 8 mm étiquetées « A1 », « A2 », « A3 » et « A4 ».

    The Black screws are T-8 Torx, not T-9!

    Jakub Krzyskow -

    I didnt see this before, so thankfully I was able to use T9 without stripping the screws!

    Charles Jackson -

    IMPORTANT! You also need to remove the two T10 screws labeled B1 and B2 in order to remove the motherboard! I had to figure this out on my own.

    Charles Jackson -

    I hust had to remove the red ones and than i was able to lift the powersupply of the mainboard

    Dennis M -

    I had to remove B1 and B2 as well.

    Seen Bee -

  11. VYVC1GvNKhPpRiky
    • Placez la pince rectangulaire argentée sur le coin opposé du bloc d'alimentation.

    • Retirez le cache noir situé près du ventilateur.

    Remember to remove the black bracket by the fan!

    Martin Samuelsson -

  12. HTtOORoftr1aaQ2q
    • Saisissez la bride à l'aide de la pincette. Tirez la pince vers le haut, en l'éloignant du boîtier argenté. Agitez-la d'avant en arrière comme une dent si nécessaire.

    • Il n'y a pas de mal à exercer un peu de force pour détacher la pince du boîtier métallique argenté. Le métal est pliable et peut être replié/raccroché.

  13. vHit45sPMfFVLkIo
    • Retirez les quatre vis Torx T-9 noires de 8 mm marquées « E1 », « E2 », « E3 » et « E4 ».

  14. HkRCjZl1Gmbk6Z3D
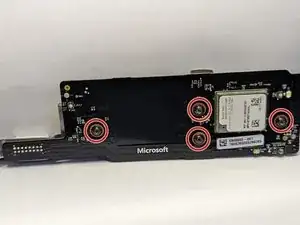
    • Retirez les trois vis Torx noires de 8 mm marquées « D1 », « D2 » et « D3 » pour retirer la carte Mediatek.

    What bit couldninuse tontake D1-3 screws off

    Amanda Zapata -

  15. agFplIWSUCuRiA26
    • Maintenant que le bridage est retiré, soulevez délicatement la carte mère par ses bords pour la dégager du boîtier métallique. La carte mère devrait sortir facilement.

    How do you open it?

    johnluxford07@gmail.com -

    They forget, I think, to tell that first you need to take off screw B1 and B2

    Gabriel Varela -

  16. 4vbHjKUvvQNKBOty
    • Levez délicatement le bloc d'alimentation de la carte mère

  17. yRls6CVoDTQxJPNH
    • Localisez le connecteur noir qui relie le bloc d'alimentation à la carte mère.

    • L'excroissance rectangulaire du connecteur plastique en orange est un clips.

  18. HEPEtWkLJyXotBbp
    • Prenez le connecteur comme illustré, pincez le petit clips noir et tirez gentiment vers le haut pour détacher le bloc d'alimentation de la carte mère.

Conclusion

Pour réassembler la console, veuillez suivre les étapes dans l'ordre inverse.

Erik Ramazzini

Membre depuis le 26/04/17

2881 Réputation

20 commentaires

So my Xbox One S isn’t turning on at all. No light, nothing. I went to take it apart and I plugged it in just to see if it would boot out of the blue. I turned it on and nothing happened but I can hear a faint clicking sound from the power supply. Does that mean, the power supply has gone bad, and I’ll need to replace it?

Cyology.IO -

yes because this xbox one s internal power supply is a fail.. look at there newer model the “xbox one x “ the internal powersupply of it has air ventilation coming from the upgraded version of the fan.

meaning the xbox one s power supply has no proper ventilation no air that blow the exhaust the heat will stuck up inside .. thats why it will not last longer .

the worst is that its design it self .. imagine when you accidentaly pour a water into the fan .. the water will go directly to the cpu and mobo.

that is why they upgrade the “xbox one x“ they copied the design from the ps4 that the air ventilation is on the side panels..

Michael Creech -

My xbox one s stopped working after a power surge from a string of storms. It wont respond, make any noise at all. I figured i would replace the power supply and see if that’s the fix. While i’m waiting for the part to arrive, i’m wondering if there is any other damage that could’ve been done by the surge. Or does the power supply prevent that?

quintalnick -

did you ever get that storm Xbox to work? I just lost mine to a storm last night :(

Adam Portugali -

my one s is working fine all apps are good my network connection is goood its cleaned and maintenanced properly all is working well until i try doing the one thing i bought it for playing games doesnt matter if its disc or downloaded soon as it loads and im ready to play the console crashes to no signal and shuts off

spanky8623 -

So I replaced my Xbox's power supply, but it still won't power on… it still as dead as before I did the repair. It was damaged by a power surge I do believe. Could it be the cable? It shows no sign of damage. What else do I do?

Jorge Ambriz -

Change the mosfets

reymen_dvd -

Same thing is happening with mine. Were you able to fix it?

h4rdym4n -

My One S died after a storm, I directly thought about the power block, bought it for nothing on eBay. Just replaced today, problem solved perfectly working !

quentinremy -

So my xbox one s is having the no power to mobo.. But when i take it out and plug it in and use my volt meter it says 12.00 v on more then 4 prongs on the wired end that would plug into the mobo.. So I assume hope not mobo fried but there's no sighn of burning or any other electrical abuse? Any ideas would be great

Jeremi Eaton -

This worked for me! Getting that black case off is difficult but dont be afraid of the noises it makes..you really aren’t completely destroying it, it just sounds like you are.

jovialkitten -

After taking apart my Xbox one s and replacing its power supply with a new one it still shows no signs of life. Both power supplies show no lights when trying to turn it on, also no sound. Is there any other way I could fix this or can I declare this xbox as being dead?

m.m.afman -

So I followed the guide, replacing the power supply, but I ended up breaking off the power switch from the RF/IR board putting it back together. Have to wait for that part to come now. The guide has the reader remove the optical and hard drives from the device, and loosening the motherboard. To be honest, I found that to be unnecessary, as you can just use a pair of tweezers to pinch the power connector in order to disconnect it from the motherboard. At worst you’ll want to just move the hard drive out of the way to lift the power supply out. By the way, if you are going to loosen the motherboard, you’ll probably need to remove screws B1 and B2 as well as remove the WiFi board and RF/IR board, none of which is mentioned in this guide.

Aaron -

So my Xbox one s will come on for less than five seconds then turn off. I’ve done everything execpt replace the power block. It’s kinda expensive for me and I don’t want to spend 40-60$ Just for it to continue to not work so before I buy it does anyone know if this Actually helps or not?

Maria -

i replaced the power supply in my xboxone s, but it still will not come on

lee_64_99 -

My Xbox got slammed and when I turn it on the fan moves for a second and then immediately stops im hearing its the power supply but im not sure it wasn’t slammed too hard where multiple things would be destroyed

Chrisbee -

My Xbox one s will power on then shut off within couple seconds, idk when it started bc I hadn’t touched it for month maybe and then it started powering off after couple seconds and I’ve cleaned it so idk what it could be

Mike -

My Xbox one s get wet on the top not a lot of water. I took it apart and I couldn't see any on motherboard etc. But.... It won't power on and there is a faint high pitch beeping noise I hear. I checked the power supply with multimeter and it says 11.97 volts what could he the issue

Michelle Bowes -

Every time I play big games like Apex, MW2 or Fortnite, my Xbox one s freezes and shuts off. Could that be the power supply being bad because of the bad ventilation? I can’t play Farming Sim and Roblox just fine, but if I load any of the big games it crashes. I can watch YouTube or HBO and it would work fine. Should I just buy a new power supply and fix it myself or is there another thing to do that would fix the problem, I factory reset it twice to see if that would do anything and I even took the power supply out to see if it was dusty and it was fine but it still freezes.

Just want to know if I should buy a new power supply or not??

Wyatt Mills -

How do you get the internal power supply apart after you get it out of the Xbox? I see one clip. But can't find a second one. no screws I see. just a black mesh and wires. When I unclip the one side it moves but the other side isn't moving. This thing is so dirty blowing it out is not going to get all the dust out. And 2 I want to see if I can repair it before I buy a new one. But don't want to brake it to pieces. Just in case I can repair it.

Bobby Cook -