Introduction

Ce tutoriel vous montrera comment retirer complètement un clavier qui ne fonctionne plus afin d’en installer un nouveau retirant le cache arrière de l’ordinateur puis en retirant le clavier du châssis.

  1. NaCAmauXGqvYUJjg
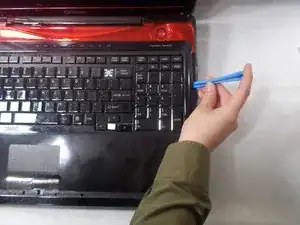
    • Trouvez un bord de la bande rouge le long des bords de l’ordinateur et faites levier à l’aide d’un spudger.

    Not sure if this is relevant to this exact model, but the Q701 variant doesn’t require spudging these plastic features off and will can’t be done without snapping plastic rivets. Instead just remove the plastic bar above the keyboard and remove the four screws there. the three screws revealed below allow the entire veneer to come up as a whole (no rivet snapping required!)

    Nick Wozniak -

  2. Fbp4cKFUinBntIWk
    Fbp4cKFUinBntIWk
    gbviVMJuu1tkNDyA
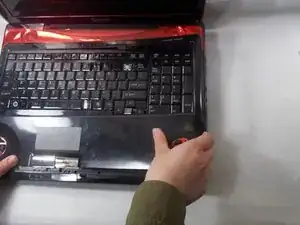
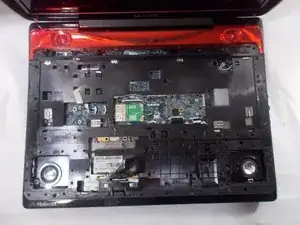
    • Choisissez un bord de la partie supérieure du boîtier noir autour du clavier et faites levier avec un spudger.

    To avoid damaging the keyboard also remove the black strip of plastic at the top of the keyboard under which find screws securing it and remove them a magnetic screwdrivers and care will save you from dropping them inside and forcing you to possibly do a full teardown to recover them.

    Juan Garcia -

  3. N35dhvEV3KBwYVSR
    N35dhvEV3KBwYVSR
    OXNSaVwYlJu1EE2Z
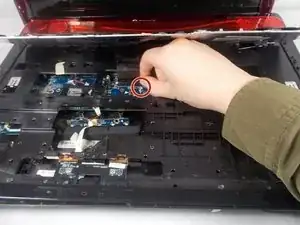
    • Soulevez le clavier et débranchez la nappe de connexion qui relie le clavier à l’ordinateur.

    Exercise care here not to lift the keybord too far you can tear the ribbon connector if you are too forcefull or inattentive. Downside would be now you need a new keybord (repair is possible but very difficult). Upside, you can replace it with an illuminated one... duck duck go is your buddy.

    Juan Garcia -

  4. 435RUFrAcaR1nQod
    435RUFrAcaR1nQod
    EH3ilMXqVhRNWJSV
    VMCT5QdqpLPTG5lH
    • Retirez le clavier de l’ordinateur portable.

    Release the lock on the connector by carefully prying the white ends up then disconnect the ribbon cable first.

    Juan Garcia -

Conclusion

Pour remonter votre appareil, suivez ces instructions dans l’ordre inverse.

VivianPham0719

Membre depuis le 18/03/19

361 Réputation

0 commentaires