Introduction

MISE À JOUR 06/06/18 Quelqu'un fabrique une pièce de rechange ! Masica, merci pour le tuyau! Cherchez sur eBay "arbre DS-560" et il est venu tout de suite du vendeur g_loc.

Pour la solution de contournement, vous n'avez besoin que d'une agrafe, pliée droite ou d'une épingle droite. Pour la réparation avec un trombone, vous aurez besoin de deux très petits tournevis à tête plate pour faire levier et d'un tournevis à tête Philips normal et d'une paire de pinces ou deux. Vous allez retirer les coques extérieures des deux pièces du corps principal, retirer un petit arbre et plier un trombone autour de l'arbre pour le remettre fermement en place.

LE PROBLÈME : Dans la section avant que vous tirez sur le levier gris pour permettre de pivoter d'environ 30 degrés -- c'est la section qui indique Epson à l'avant et qui a les lumières -- une pièce s'est détériorée là-dedans. Voici l'essentiel : pour tirer une seule feuille à la fois, les rouleaux du panneau avant ne doivent pas bouger jusqu'à la dernière feuille ; ils créent une friction lorsque le scanner tire les feuilles en dessous. Ce qui s'est passé, c'est qu'une pièce censée empêcher le rouleau de bouger a échoué et le rouleau roule maintenant et donc toute la pile passe. Un petit arbre en plastique a des languettes qui se sont évasées à une extrémité et ne maintiendront pas les rouleaux en place.

Il devrait être facilement remplaçable - presque sans démontage, mais les schémas de pièces Epson ne montrent pas cette pièce séparément, donc je n'ai pas trouvé d'endroit pour en acheter une nouvelle.

  1. 5ysrdDrBToNFQ5og
    • Cette première étape est une solution de contournement, le guide de réparation commence à l'étape QUATRE. Utilisez-le si vous êtes désespéré et en avez absolument besoin pour numériser des centaines de pages MAINTENANT. Ouvrez le panneau avant en tirant le levier gris comme indiqué.

    • REMARQUE : Une personne a indiqué que cela fonctionnait pour eux sans que cela se bloque et qu'il s'agit donc de leur solution permanente, alors essayez ceci en premier.

    • Allez directement aux rouleaux et retirez-les, puis suivez le retrait de l'arbre tronqué pour votre réparation. L'assemblage a nécessité que le DS-510 soit placé sur le côté regardant vers le bas dans le trou d'accès et assurez-vous que l'arbre intérieur est là pour s'engager et terminer l'assemblage et réinstaller les rouleaux."

    This fixed it for me. TYVM. Saved me 200.00, and did not even need to add a blank page.

    Jim A -

  2. OHoQUEsJCHgnkMHc
    OHoQUEsJCHgnkMHc
    XUMstl4iDNQavAoK
    • À l'intérieur, au dos du panneau que vous venez d'ouvrir, vous verrez deux rouleaux en mousse identiques. Collez une agrafe redressée ou une épingle droite à travers la mousse afin qu'ils ne puissent plus rouler une fois que l'épingle touche la barre entre eux. REMARQUE : Une personne a indiqué que cela fonctionnait pour eux sans que cela se bloque

    Hi, ur help is awesome. Just one clip didnt worked for me, jammed every 6 pages, then i used 1 paperclip in each foam and it works amazing. )) thank u very much.

    Andreas Wessel -

    Is it possible to add a picture of this step? I’m so confused!

    Tarzana Operator -

    I inserted a straight pin into the right side of the right foam roller, then pushed it to the left until it came all the way through the roller to the space between the two foam rollers. This worked for one set of documents. As mentioned by the author, the last page would not go but that’s ok. However, this only worked one time. The next set of documents would not feed at all. I removed the pin and tried again and it worked, but only one time. I guess if I have a very large set of documents this would be good, but I don’t think this roller will last long if I keep putting a pin in it each time I use it.

    Someone please tell me if this is the way the original user did it. If not, please explain. I would appreciate an email so I don’t need to keep checking back here for an update. debbieboucher48@gmail.com. Thank you!

    Debbie Boucher APN, CNM -

    Does it have to go through the squishy rollers, or can it go behind it?

    I haven’t much success with this workaround, but I think with some trial and error I can get it to work.

    bluehazard -

    It was wonderful trick, I used straightened paper clip as advised in step 2 and scanner was wow !

    Hari Lamichhane -

    Did you guys put them literally through the foam or under the foam ?

    lukam5132 -

    Guaranteed way to break your scanner. Who is this @%^$$@$ that posts such "solutions"?

    tosarys -

    Just work perfect for me, I used a 5 cm needle through the foam. No jammed. I only have only 33K copy on my scanner...

    Pommard -

    • Lorsque vous allez numériser de cette façon, vous devrez mettre une feuille supplémentaire à la fin de votre pile qui se "bloquera" une fois qu'elle essaiera de numériser, car les rouleaux ne la lâcheront pas, mais vous au moins numériser le reste des papiers.

  3. IBp2L4iUJrdlAKrS
    • LA RÉPARATION : Il y a 4 vis sur le couvercle du panneau avant que nous devons retirer, mais elles ne sont pas accessibles tant que vous n'avez pas retiré tout ce panneau du corps principal du scanner. Les vis les plus proches de l'endroit où il s'articule sont celles qui sont difficiles à retirer.

    • Si vous avez un cliquet à profil très bas, vous pourrez peut-être accéder aux quatre sans avoir à retirer le panneau avant. Si c'est le cas, passez directement à l'étape 7.

  4. VubYfx6VdPCUcrJO
    VubYfx6VdPCUcrJO
    xFbgoBXhoMeIEbZq
    • Les trois vis au bas du corps principal - vous devrez étendre complètement le plateau pour accéder à l'une d'entre elles. Ensuite, il y a trois autres vis au-dessus, sur la face principale du scanner, où vous placez les feuilles à numériser. L'un se trouve sous le rouleau remplaçable, les deux derrière les curseurs de largeur de papier gris

    There are also screws underneath the pull out tray that you will need to remove/full extend to get to. There are three of them. Make sure you remove these screws before trying to pry this unit open (or suffer the consequences I did)

    Bob John -

    Thank you Bob John … you saved me from such consequences. :)

    Alfonse Grace

    moneywithgrace -

    Didn’t see this comment and spent like an extra half hour swearing at the shell for not coming off. The worst part was I found and removed the first two - I missed the last one which you can only see if you fully extend the tray.

    Ben Bleecker -

  5. GXPdTxUvSU5Bn2Nr
    GXPdTxUvSU5Bn2Nr
    OCOGXbCCcMl1O5IX
    G5nviscklnVDYcDw
    • Il y a une troisième vis à l'avant de la base qui est difficile à atteindre même avec le plateau poussé à fond vers l'avant.

    • Vous pouvez retirer complètement la base en la faisant glisser vers l'avant et en soulevant les deux grands clips de chaque côté.

    • Cela facilite l'accès à la troisième vis à l'avant de la base.

  6. UjlHjyE2GNgeQwqh
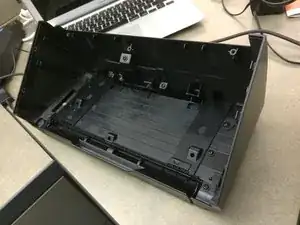
    • Tirez le corps principal du scanner hors de sa coque enveloppante, en utilisant un petit outil de levier pour aider à faire sortir la coque sur les bords. C'est du plastique résistant, donc vous ne casserez rien, et c'est surtout creux aussi, alors ne vous inquiétez pas de l'endroit où le tournevis va à l'intérieur pendant que vous faites levier.

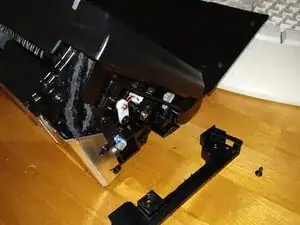
    • On voit ici la coquille une fois que les "tripes" en sont sorties.

    WAIT!!!! There is screws underneath the pull out tray that you will need to remove/full extend to get to. There are three of them. Make sure you remove these screws before trying to pry this unit open (or suffer the consequences I did)

    Bob John -

  7. ewSdpWlGY6K3QV2R
    ewSdpWlGY6K3QV2R
    lSNXwCDZ4irERfpk
    • vous devrez retirer une vis de chaque côté pour les charnières du panneau avant et ils ont tous les deux de petits couvercles à enlever aussi.

  8. Qv3AwpAsqqClxrOs
    Qv3AwpAsqqClxrOs
    fLqyNI5TrYSnWDWG
    UmLYUy3TbSEEShln
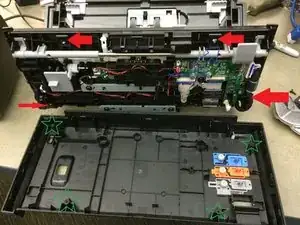
    • Le panneau latéral emprisonne le faisceau électrique et interfère avec le glissement du panneau avant hors de ses charnières.

    • Le retrait du panneau latéral facilite grandement le glissement du panneau avant hors de ses charnières.

    • Cela laisse beaucoup de harnais lâche pour poser le panneau avant face vers le bas à côté de la base.

  9. iqLoehVwP5uwadNH
    iqLoehVwP5uwadNH
    2G2TrWZKyxOrcNJk
    • Soulevez le panneau avant à environ 45 degrés ou jusqu'à ce que vous puissiez le faire glisser complètement vers la gauche.

    • Cela vous permet de soulever la charnière droite hors de l'encoche de la charnière, comme indiqué sur l'image.

    • Vous pouvez ensuite faire glisser l'ensemble du panneau vers la droite et il le fera glisser hors de la charnière gauche.

    I found by taking off the panel to the right side, has two screws holding it in place, that it was much easier to finagle the front board off of the hinge points. Again thanks for your help in doing this repair

    Eric Hargis -

    Agree with Eric. Removing that side bezel make taking the panel off a breeze. should be added to the full instructions.

    Bill Stathakos -

    Just another guy echoing Eric’s comment….remove that little panel first.

    Cameron Scott -

    Yes, a good point, but more descriptively: Removing the silver back panel (held by 4 screws) which covers the thick bundled cable with the core RF filter, frees up the cable, and then allows you to shift the front panel far enough toward the right to release the longer left hinge boss from its hinge socket. Then you can lay it flat. Finagle is a lovely word, sounds a bit Irish, but it’s a bit too vague to be of much help.

    Mark -

  10. eqKW3T2ePsQgc5iF
    eqKW3T2ePsQgc5iF
    aKO6Sk1dyfDhJyV1
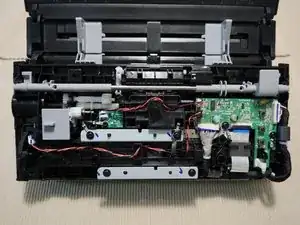
    • Retirez les quatre vis et utilisez un petit outil plat pour faire sortir le couvercle du panneau. La barre grise qui court à l'intérieur, qui comporte le levier pour ouvrir le panneau - à cause de ses ressorts, vous devez la maintenir attachée au panneau et NON au couvercle.

    The front cover is a bit obstinate until you find the tiny pry slots that reveal where the tabs are that hold it in place. 3 on the left side (including one in the back hinged corner) and 3 more on the right, plus a hidden one, dead center on the top edge midway between the “A6” marks. This is where a thin slot screwdriver or very thin spudger is handy.

    Mark -

  11. TdGvnK6nhVucHFCe
    TdGvnK6nhVucHFCe
    kZmMhf6WcEvZwTOD
    4RgYlRYMXNsXUBqw
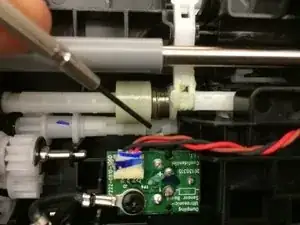
    • Retirez les rouleaux du côté intérieur du panneau (ceux qui sont recouverts de mousse, ils touchent le papier une fois le panneau fermé) et coincez un petit tournevis plat derrière l'extrémité du mauvais axe que vous pouvez voir de ce côté.

  12. 1EWcIurgIu2kZ6Bn
    1EWcIurgIu2kZ6Bn
    XY2XDljkudh2JeLc
    • Gardez le tournevis en place pendant que vous appuyez simultanément sur le support dans lequel se trouvaient les rouleaux. Cela fera sortir le mauvais arbre de sa rainure. Cependant, vous ne pouvez le faire que lorsque l'arbre est tourné dans un sens particulier; sinon, il a des languettes qui le rendent trop large pour sortir de la rainure.

  13. aY6pAkZNZ4lVmwfC
    aY6pAkZNZ4lVmwfC
    iwBItBEFZL2VTSsm
    • J'ai utilisé des pièces du vendeur eBay "g_loc". Ils sont interchangeables avec les pièces Epson. Ma solution a l'arbre intérieur Epson d'origine et l'arbre extérieur g_loc.

    • Vous pouvez également fixer la pièce Epson à l'aide de diverses méthodes : un trombone, une gaine thermorétractable, un petit ressort (comme celui d'un stylo), du ruban adhésif en aluminium, un mince ruban de fibre de verre imprégné de JB Weld, laisser sécher pendant la nuit, une courte longueur de tuyau en cuivre ou une paille en plastique.

    • Pour la fixation du trombone, à l'aide de pinces, enroulez fermement un trombone autour de l'arbre que vous avez retiré. Enveloppez-le près de l'extrémité qui n'est PAS évasée, puis tirez-le jusqu'à l'extrémité qui EST mauvaise, lorsque vous le déplacez vers le haut, il comprimera les extrémités évasées en place.

    • Soyez prudent si vous utilisez le fix de gaine thermorétractable. Je l'ai essayé et j'ai fait fondre la tige interne d'Epson en quelques secondes. La solution à ressort du stylo semble beaucoup plus sûre.

    I have always saved things for future projects. One thing was a container of springs. I had just the right size spring that worked great. Thanks for the spring idea. It went over both parts with the needed flexibility to allow the part to flex. Thanks again for this page to help fix a problem. I too had mine break right after it went out of warranty.

    Eric Hargis -

    same here! Spring worked great! Also note for others at least on my model there are two of these attached to each other so watch out when you’re taking it out.

    Alexander Mohr -

    I myself used electrical tape. Not sure how long it will last but it gives it enough fallibility if needed. Works like new.

    Bill Stathakos -

    I have repaired two DS-510s using the 3D-printed replacement part manufactured and sold on eBay by Erick Perez. They are printed from ABS plastic and are much tougher than the original parts. I am confident they will outlast the rest of the scanner. They are very inexpensive — less than $10 each. They fit perfectly and snap into place when the slot and tab of the two parts are aligned toward the repairer’s face, i.e., so that you can see through the slot, The slot is reinforced and the pair of shafts are very well designed.

    Mark -

    I used steel cap (that covers rubber) from the micropen Pentel 209 instead of wire or silicone tube. I cut the end and slide it over the broken/weakened nylon part. It fits perfectly. Also, it is steel tube so it will not get loose in a future. The wall thickness is just over 0.2mm so it doesn’t add any volume.

    Peter PPP -

    Just made the repair myself using the steel cap of a micropen. In this case a Pentel 205 so I guess any micropen will do. Also saw on thingiverse that somebody posted the design to print the replacement part yourself.

    Christiaan Pouw -

  14. OloEUTYx1X1hO4T6
    OloEUTYx1X1hO4T6
    tn523UPuFpTRUOEY
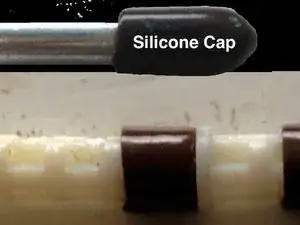
    • J'ai utilisé des capuchons en silicone (pour des punaises d'étagère de 5 mm de diamètre) comme celui présenté ici. Coupez l'extrémité fermée pour obtenir un capuchon de longueur ~ 0,75 cm et insérez-les sur les pièces en plastique au niveau des deux articulations. C'était un ajustement serré et sûr.

    • Insérez les longs composants en plastique du côté indiqué sur la deuxième image et fixez-les d'abord dans sa fente de l'autre côté avant de le pousser avec un tournevis plat et de l'insérer dans sa fente de ce côté indiqué sur l'image. Tout s'est bien passé après le correctif. Reste à savoir combien de temps cela va durer.

    • Un autre utilisateur, Eric Hargis, recommande comme autre alternative de mettre un vieux ressort dessus

    • Un autre utilisateur, lszablya, a recommandé une variante différente : "J'ai utilisé une gaine thermorétractable à double paroi. On dirait qu'elle a bien aspiré autour des broches."

    Forget paper clips and plastic tubes. A solid, mechanically superior replacement shaft set has been manufactured out of ABS using 3D printing by Erick Perez, who sells scads of them on eBay. He can be reached directly through his website: http://epsonscannerrepair.com/replacemen.... I have used these shafts in professionally repairing the DS-510 and they are far stronger than the flimsy originals. (I suspect the Epson engineers responsible for this part designed it on a Friday afternoon. ;-) Kudos to Erick!

    Mark -

    • L'affiche originale sur Amazon qui m'a inspiré à essayer cette solution (et si je pouvais trouver son nom, je lui donnerais crédit) recommandait de resserrer la pièce défectueuse avec une ficelle étroitement enroulée autour d'elle, puis de la calfeutrer pour empêcher la ficelle d'obtenir pris dans les choses, mais je doute qu'il tienne à long terme

    lszablya recommended a different twist: "I used double wall heat shrink tubing. Looks like it sucked in around the prongs just fine."

    steve -

    • Si vous êtes comme moi, vous vous demandez peut-être pourquoi ne pas simplement le coller sur l'arbre suivant en ligne. Eh bien, il doit en fait rencontrer cet arbre suivant à un angle en constante évolution, donc cela ne fonctionnera pas.

    Thank you for taking the time to post these instructions. I struggled a bit with some of the steps but in the end my scanner was working again. Just seemed like an awful lot of work to put the same flawed part back in. Sure would have been great to replace both shafts for peace of mind, but like the author I too could not find any info on ordering new parts. Thanks again!

    Domenic Aquino -

    Gracias me ha sido de una gran ayuda. he utilizado el metodo del alambre utilizando para ello un clip, he tenido que levantar la plaquita del sensor para tener un mejor acceso,

    Un saludo

    juanfragarciaaguilera -

    Thank you so much for this fix. It took a while but it worked. I was a bit confused as there were two white shafts. I put paperclips on both for good measure. Hope it will be fine.

    Suzanne Priddle-Luck -

Conclusion

Pour remonter votre appareil, suivez ces instructions dans l'ordre inverse.

steve

Membre depuis le 01/08/16

1385 Réputation

83 commentaires

I'm surprised no one else commented on this. Awesome article - worked perfectly. It's a bit tricky and I wouldn't recommend this for a rookie with tools, but it saved me. I couldn't find the part for this thing nor could I find a repair shop to work on it. It's funny how it started clicking 3 weeks out of warranty! THANKS FOR THE POST! and the effort. awesome!

wowonwheels -

Thank you so much for the detailed instructions. I found a replacement part on Amazon and together with that you've saved me hundreds of dollars.

phil something -

thank you very much for posting this. was scratching my head for an hour, after reading your post, took 5 minutes to fix and get it going. what a relief. technical phone support was useless, troubleshooting was useless. scanner would have probably ended up in the trash if not for you. thank you!!!

debbie many -

Excellent advice - the safety pin worked a treat and doesn't even get stuck on the last page now- thank you so much! Strange how the first three comments on this are within a week apart - Our machine is just over two years - limited life span - but lives to scan another day now!

Catherine -

Excellent post! Thank you so much for great instructions. I was able to fix 2 scanners in about an hour. Saved me hundreds of dollars because otherwise I would have had to replace the scanners, now they are as good as new.

Sledder -

This comment is for the next guy that Googles DS-560 disassembly. Thanks for the article!

gregvaughan -

Got mine disassembled, and looking at the part pretty wimpy design. when this breaks again I guess it time to buy FUJITSU. Sorry Epson, you failed.

baichler -

Ok, I didn't like the paper clip idea, so I went to the hardware store and bought a package of springs, labeled as extension springs, size 9/32" x 2-1/4" x 0.026". I cut one spring to 1/4" in length and it slips over the shaft perfectly with some tension to hold it together.

baichler -

I knew it was this little part that needed repair and have been trying to find something to confirm and tell me how to fix it. Between my work and fixing this it took longer than it probably should have but I am satisfied with the results. I can actually use the machine again and didn't have to pay someone else to fix it. Thank you for posting this solution. It saved me a lot of money and irritation!

reneamueller -

Great tutorial. Thanks for taking the time to post it. Would you happen to know the part number and if the average Joe can purchase it?

stvly -

Sorry, from the intro: "It should be easily replaceable -- almost without disassembly, but the Epson parts diagrams don't show this piece separately so I haven't found a place to buy a new one."

steve -

can i buy the replacement shafts...looks like mine are cracking and would love to be able to just replace them...

Elizabeth Vigneux -

You and me both! As above though, "It should be easily replaceable -- almost without disassembly, but the Epson parts diagrams don't show this piece separately so I haven't found a place to buy a new one."

steve -

Thank you! Tried getting Epson Canada to repair this on my DS-560 but they claim that it's not a common problem :-( They offered a 15% discount on a new product (I'm out of warranty), but it's hard to justify buying another one though since it'll probably have the same defect :-(

In any case thank you for this--hopefully it'll give me a couple more years with this scanner.

rusty -

I'm so glad this was worth the time it took to document it!

It looks like there are a number of similar models that this repair would be good for:

The GT-S50 isn't outwardly identical like the rest, but the DS-510 and the DS-760 and DS-860 at least look outwardly similar.

steve -

Great job diagnosing and documenting. I found that the fix could be done without disassembling any of the covers. Go directly to the rollers and remove, then follow removal of the stub shaft for your repair. Assembly required that the DS-510 be put on its side looking down into the access hole and ensure that the interior shaft is there to engage and complete assembly and reinstall rollers. Thanks Steve, now if we only can find replacement parts, this scanner could be superior. May have to fab one out of metal.

Saul

Saul Rosenthal -

Nice, Saul. I thought it might be possible that way. That would save a lot of time

steve -

This wouldn’t have worked for me…the white pieces had broken, fallen out of place and were loose, inside the cover.

Cameron Scott -

Any one have any tips on how to get the part with the paperclip to snap back into the piece where the rollers go? i have been trying for an hour to put it back together.....

pstdon -

IIRC, the piece with the clip on it has a tab so it will only go back into the roller area if it's turned a particular way. Either turn it or the rollers and it will work. See step 11 for what I mean.

steve -

Great documentation. My problem was the next shaft after the one you had highlighted as the broken one. Nevertheless, your documentation helped me to understand and fix my specific problem. If anyone finds a place to purchase replacement parts, please post here. I'll do the same if I find a source.

allen -

Does anyone have a suggestion for when rather than being splayed, one of the ends snaps off? Thanks.

Jeff -

Terrific post, BUT. Boy, is that last screw hard to get out. I took an extra phillips bit, and ground it down. Then grabbed it with a needle nose pliers. The fun is getting the drive back in. I lightly pried away the roller holder.

It's fun fixing things, but this took about two and a half hours. Very simple in concept.

lennypop -

Great fix, but shame on Epson for not selling replacement part. I'll never buy Epson again. Shouldn't have to buy a new $350.00 scanner when .50 cent part is why it doesn't work. I did this fix about two months ago and now I'm spending 1/2 an hour re-doing it. Of course, a piece of wire isn't going to stay put forever. I suspect eventually it will fail again.

JZZZ -

Good tip: If you raise the grey switch on the front panel that has the booklet and stacked paper icons to up/booklet, you'll release the gear which controls the shaft you're repairing. This will make it much easier to line up when you're making the final re-insertion as per step 11 revisited.

JZZZ -

I've done this fix a couple of times and it didn't last. Rather than use wire, I'm using some strong nylon string. You can get it much tighter than the wire. Go on Youtube and find a basic fly fishing knot tying video and you'll be set.

JZZZ -

This is absolutely brilliant! Thank you so much for documenting. Nice job!

My office has dozens of these DS-510's, and we've been just replacing them when this happens because it seemed like it was a broken internal gear or something. Today the one on my desk started pulling the same trick. Only has 30k on the odometer. Shame on Epson for making such a weak part that's so hard to access, while also failing to offer a replacement. Seems they could make it easier to replace, since it's right there with the replaceable rollers.

Indeed, as mentioned in an earlier post...might be time to seek a better product brand.

Singh Duhd -

After very little work in terms of number of sheets, mine got the now familiar "clicking" sound when I tried multiple sheet scanning via the manual switch on the lid, and failed to do the multiple sheet task. It continued to work as a single sheet scanner. The software worked fine. I paid $450 AUD for this DS 510 by Epson, but only got 12 months warranty, so a quote to replace the whole lid was $100. But why spend the money on something designed to fail? No, it must be said Epson make an excellent single sheet scanner, which thinks it is a multi-sheet scanner. The name "workhorse" is used to describe this failed device, so it seems a cynical attempt to rope in people who have quite a lot sheets in their project, knowing full well they will have to buy something else. My new scanner will be a brand other than Epson, and I will not focus too much on scanning speed, but rather reliability.

phillip colquitt -

Hi Jeff

I also had one end completely broken off and was not able to find any glue to hold it in place (before doing the above steps). I ended up bending (slightly) the paperclip so that it technically replaced the bit of plastic that had broken off and it is now working like a charm.

If Epson doesn't want to sell the small components, I am sure someone out there has a 3D scanner and a 3D printer, we could make our own :).

Great article, saved me time and money.

D Train -

Thanks so much for taking the time to share this; worked like a charm! Don't know that I'd say the difficulty level was "Easy"; getting the shafts back in place was very difficult for me, but finally succeeded. Don't attempt to do this DIY project if you're already frustrated or in a bad mode:)

kyle -

Thanks for this! Fixed one this morning using this guide! Took roughly 30 minutes.

erickpz1984 -

Thanks for this solution.. I have one to try to repair.. Wish we could buy the part!

George Starr -

Thanks for the tip. I found it remarkably easy to do this fix. Popped right out and right back in without taking the machine apart. I think the 3-D printer idea is the way to go but I am sure Epson would sue anyone selling the part for patent infringement. Hopefully this will last a while.

edpapa -

Thanks again for the making the time to post the detail repair and photos. Using your instructions along with an Amazon review that used a straw to sleeve over the splayed shaft. However, instead of using a disposable straw and metal tape reinforcement as the Amazon reviewer did, I found a thicker walled hard plastic washable straw with the same ID. I used this for the ends of both shafts that connect to that roller. I think this may hold up as well or better than the paper clip, and was (to me) much easier to slice off a half inch off a hard walled straw than to wrap a clip tightly around the shaft. Would not have tried to tackle without your detailed instructions, kudos.

Bill Beddow -

note, ID = inner diameter

steve -

I am working for an IT department and one of our business users Epson DS-510 scanner had the clicking, skipping on the second-page issue. I took a leap of faith in this guide and got working on it. After a lot of finagling and carefully pulling things around I have completed the guide. It works like a charm now and I totally support the steps. It is technical and a little bit of bravery is required.

Turker Ayar -

Thanks! Worked perfectly. The hardest part was getting the shaft back in place.

Cameron -

awesome thanks man!!

Will Reed -

Sure enough the straightened staple through one of the foam rollers worked. I don't need to add and extra sheet at the end either. Thank you!

kelly.phil -

I bought three of these scanners maybe 10 months ago. The first one showed the problem after about 4 months. Thanks to this walkthru, I was able to get it working again and it's been feeding/scanning as it should ever since. Today, however, a second one started showing the issue. I found this walkthu much quicker this time! I followed the steps verbatim, but could not, for the life of me, get the problem piece back into its place! I tried JZZZ's suggestion about the front panel grey switch to free the gear, but still nope. Does the similar (non-splayed) piece go into place first, and then the "fixed" piece go in last? The only way I can fit the "fixed" piece in (step11) is if I slide it in from the side, which obviously doesn't leave enough room in the line for the first piece. Much thanks to the original creator of this walkthru. Anyone with specific advice on getting the "fixed" piece back in?

thatguy888 -

I just couldn't leave it alone and had to try again... I can't let Epson beat me!!!

This time, I used aluminium duct tape to wrap the prongs several times, as the paper clip was too frustrating and painful to wrap tight enough. Most importantly, I found that the grey roller cover and white tray underneath it (1st pics in Step 10 and 11, respectively) can be [carefully] pried out, which makes putting the two plastic pieces back in SooooOoooOoooo much easier!!

I'm proud to say I was able to get this scanner back to 'normal' functionality. Kudos to this walk-thru and all the helpful comments. Regardless, I'm never buying this scanner again.

thatguy888 -

Alright! Way to go. Thank you for posting your resolution, too.

steve -

Wow, coolest fix ever! Took me almost 35 minutes (went the paperclip route and super glued it so it will stay in place) to complete and is working great again. Can't believe Epson wont send a replacement part for that little plastic piece. What garbage they make these days. Otherwise, I've had this unit for two years and scan almost every day and this scanner is otherwise quite remarkable. Thanks for the steps OP!

David Skowronek -

Excellent Article, Thanks.

I did a little twist. We will see how it works out.

I used double wall heat shrink tubing. Looks like it sucked in around the prongs just fine.

I have only used the DS-510 a few times but so far so good. If I have any problems I will give an update.

lszablya -

I downloaded your page and with my scanner in full view, threatened it with your remedy and it began to scan correctly. We will see how long it lasts.

sasems -

Looks like Epson has addressed this issue and has reinforced the rod in new generations of this scanner.

I've got the problem described in this repair, but when I stripped it apart I found that the end of the rod in question is thicker and seems to be less prone to splaying.

This rod connects directly to the Mode Selection switch (allowing you to toggle between sheet and booklet scanning.) When I engage the toggle switch for standard sheet scanning and try to force the rollers to move, I found the clicking happens at the cog connecting the rollers to what appears to be another cog designed not to move in order to stop the rollers. It seems these cogs are slipping while rolling instead of holding in place.

The only way I've found to stop this is to press down on the toggle switch to engage the gears more tightly. Not sure if there is a way to do it otherwise.

Chris Krahn -

So it looks like the DS-560 uses slightly different shafts. They have a bulge in the area where these shafts normally splay whereas the “bad” ones do not.

erickpz1984 -

Brilliant fix! Thorough step-by-step instructions. I might up the difficulty rating a bit, but the 45 minute time seemed about right.

Stanley Majka -

worked great, I used paper clip.

Got it nice and tight then slid it over end. 45 min to 1 hr time.

make sure you set it to single page to uninstall and install repaired part…

Thanks for the knowledge.

Matt

Matt Harding -

Great solution, took some time to get it apart, but the instructions were right on. Problem I had after reassembly the yellow light was flashing…disassembled again and found the torque on the cover getting the hinges on and off pulled on the wires which pulled the plug on one of the circuit boards…it took 3 dis-assemblies to get it to stay plugged in, and finally the yellow light wasnt flashing. Mine isnt clicking anymore, but apparently there is another problem with it…as I can only scan one doc at a time. I load 2 and it jambs (no clicking)…and gives me an error…UGH.

Wile E -

I have an the DS-560 that has seen relatively light use. About a month ago I got the dreadful “clicking” and paper jam situation.

My approach to fix it is more or less the same. Instead of using a paper clip or silicone caps I opted to use 1/4” copper pipe. The challenge is getting the copper pipe to fit over the shafts. What I did is “stretch” out the copper pipe using the back end of a drill bit. Rotating the copper pipe using a drill and holding progressively larger drill bits in the other hand enabled me to stretch the copper pipe snug around the shafts. My DS-560 is working perfectly now!

Nathan Smardenka -

thank you! my DS-150 is working perfectly again! I used a spring which just happened to be the right size :)

Alexander Mohr -

Steve: Thanks for the info it was really helpful. I tried the work-around with a pin and it worked except for the last page which as expected jammed causing my computer to reject the scan. As a result, I took the scanner apart and removed the splayed drive shaft. Then, I compressed the splay back to form and wrapped it with thin fiber-glass tape impregnated with J-B Weld and let it dry overnight. It will never splay again. Re-assembled the scanner and it works like new. Again Thanks,

Lou

Louis Castelli -

Hi,

Even with my poor english, I found this awesome and I’m happy not to have thrown my scanner away.

However, the paperclip story did work for … 6 pages and this f… scanner clicked again.

I finally used heat shrinkable tubes for electronics which once cooled become hard enough to support some stress. Just pay attention not to get the little plastic pieces melted by heat.

I performed a test by scanning 3 times 54 pages. It worked perfectly till now.

Many thanks for the initial post without which I would never have dared to open the machine so deeply.

Cheers,

Philippe

Philippe de Longree -

Perfecto!! Mucho thanks to the author and all contributors. I used heat shrink tubing with a spring threaded over to make the repair and did both shafts as the second one was a bit splayed as well. Took about an hour so my hourly rate comes out to about $750. Not bad at all.

Shoulda paid more attention to the cable routing on dis-assembly and it took a while to figure it out going back the other way.

Documentation %#*@ near perfect - very well done! thanks again -

Bob McCoy Jr -

Thank you so much for the article with photos. I did find an eBay seller who sells the part(s). My Epson DS-560 is running smoother than ever! If I could do it, chances are good you can do it. The part was $10, shipping was $5. The cost of a new scanner and waiting for it to break was at least $350. I hope everyone with a 3D printer can start capitalizing on manufacturer's flimsy parts. Happy Scanning Everyone!

Masica Monroe -

Masica, thank you for the tip! I looked on eBay for “DS-560 shaft” and it came up right away from seller g_loc.

steve -

You are a lifesaver. Inserting the straight pin from outside the flip cover (so that it hits beneath the rollers) didn’t work for me. It DID work without jamming, however, when I removed the rollers to insert a straight pin. The pin at that point was stopped inside the flip cover (at the top) and that ultimately did the trick.

photographerleia -

Thank you, thank you, thank you! With this guide I was able to take of the clicking noise. Wasn’t completely broke and was able to cycle through scans, but the clicking was driving me CRAZY!! I used the double heat shrink method without a hitch…so far.

Ken Kishihara -

Thanks for the very useful information. One thing that is important to point out is that there are two of the plastic pieces (as seen in the image in Step 12) joined together in tandem. Both have the same fragile slotted fitting. In my scanner both were fractured. In trying the quicker fix from the outside I managed to dislodge the inner one so I had to dismantle the scanner to retrieve the dislodged piece. The two pieces are very similar to each other except that the one that is on the inside lacks the wider-diameter collar. As in the image under Step 13, both of the fragile joints should be secured. I managed to use the paperclip solution on both pieces. If only the outer joint is secured the inner one will probably fail eventually.

As an aside, I would bet that it would be possible to model and 3D-print both of the pieces.

mmaduro -

Good deal!

And someone does make a replacement piece now! Masica, thank you for the tip! Look on eBay for “DS-560 shaft” and it should come up right away from seller g_loc.

steve -

Thanks for the guide, very useful, this is the second time I need it, as BOTH shafts have now become defective. My two cents: do not replace those two screws at the bottom of the front panel, the case shuts itself nicely without them, and if you need to go back to fixing the shafts, you can go straight to step seven.

Clodoveu Davis -

Excellent! It worked perfectly! I ordered the replacement pieces. The repair works perfectly in the mean time, using the paper clip idea. I left the 2 lower screws out of the front fold down cover so I can remove the cover and replace the small pieces when they show up without having to take the whole thing apart. Again, thank you for taking the time to show us how to fix this “stupid” problem!

Brad -

Thanks for your post. I fixed my ds-510 in an hour..^^

This is comment for korean.

스텝1부터 따라하실 필요는 없습니다. 스텝9에서 전면패널을 탈착하시고(강하게 잡아당겨야 빠집니다.) 안쪽의 롤러를 제거하신 후 스텝11 처럼 셔프트를 끄집어냅니다. 본 포스트에서는 꺼낸 샤프트에 실리콘캡이나 클립을 사용했는데, 집에서 놀고 있는 샤프의 뒤 뚜껑을 니퍼나 줄톱으로 반 자르면 샤프트에 딱 맞게 들어가며, 넣을때는 탈착한 전면쪽으로 밀어넣고 남아있는 샤프트와 연결시키면 됩니다. 다만 샤프펜슬 뚜껑이 이음새를 꽉 잡아주는 관계로 바깥쪽와 안쪽에 양쪽에서 밀어 두 개의 샤프트를 꽉 연결하면 됩니다.

1년 사용 후 딸깍소리와 종일 걸림문제가 발생해 검색하다 본 포스트를 보고 수리하는데 한 시간 정도 걸린 것 같습니다. 전면패널 제거하는데 쓸데 없이 시간이 많이 걸렸네요. 혹시 걸림쇠같은게 부러질까..

SungKuk Kim -

Thank you for this fantastic article!! I used the outer sheath of a flexible cable that was a tight fit around the splayed ends. Works perfectly.

Michael Glen -

I bought the epson scanner DS-510 at a mall in Hong Kong 2014. The internal parts, roller, looks entirely different from the above photo. My roller is plastic material in white colour. Yours is metallic and black silver . Why? I took a YouTube , https://youtu.be/rgHdH4iAk7w.

welcome u to teach me how to fix the feeding problem.thk.

calvincityu -

Thank you so much for this. I used pen springs that i wound on successive sizes of Allen keys to just below the diameter then wound them on the shafts

wyatt400 -

Thanks for the instructions! I experienced the same failure of my Epson DS-510 and was contemplating replacing the rollers, but didn’t think that was the issue. Then I found this page and began tearing my scanner apart. Sure enough that very drive shaft on my scanner was splayed open too. I began down the path of using a spring from a pen to wrap around the open end, but after putting it on it didn’t quite seem robust enough. So I then went looking for heat shrink tubing, which I’m sure I have but couldn’t find. In the process I noticed a set of allen keys that come with the springs on the end to hold the set together. They’re much beefier springs than the one from the pen, so I proceeded to install one of those, once I trimmed it a bit shorter. That worked flawlessly!!! The scanner moves paper through effortlessly again with not a single sound of gear teeth ratcheting or the like. Yippee! My scanner is around 7 years old and otherwise works great!! Didn’t want to replace it; and now I don’t have to!

Drew Shelley -

Thanks a Million Steve! missed a few screws but 95% acurate! For me the heat shrink worked perfect! no clancking noise and can scan as many pages as I want (tried wtih 30 page document! perfect ans silent!!! Kudos!!!!!

Keep up the good work!

Software Office Solutions -

Thank you for this guide. It saved one scanner here. I managed to find another method how to fix that nylon component without using the paperclip wire or silicone. I used the metal cap from the micropen Pentel P209 which has matching diameter. It is one perfectly fitting steel tube. I cut the end and slid it over the broken part. Works perfectly and will not loosen over the time.

Peter PPP -

Thanks Steve for this tutorial, I had difficulty finding the part on the web, I asked a friend who has a 3D printer to find a blueprint to make my parts and he found a blueprint with a search with the words Epson D510, it was a snap for him to make the part. My scanner is like new.

Thanks again

Pierre

PierreH -

I think Epson needs to realize that this type of obsolescence loses customers. They had a similar weak assembly in their $1000+ Stylus Pro 3800 pigment inkjet printer with incredibly flimsy paper holder plastic pins that snap off, leaving the entire output assembly dangling. Still !#^&@! me off years later.

Vidad Flowers -

This article is very much appreciated. However, I opened the scanner and fixed the broken plastic part with a paper clip but now that it’s back together, the paper jam light comes on immediately. Is there something obvious I am missing?

Bob Allen -

No idea. Maybe something is bound up?

steve -

Wow! I am not very tech savvy at all and I managed to get through this fix with no problem. My scanner works PERFECT! Thank you so much for posting this fix and making it so easy to follow!!

Angy Blailock -

Technumus is the most informative and knowledge increasing website. please visit follow and support us.<a href="https://technumus.com/rolling-tray-ideas...>WHAT ARE ROLLING TRAY IDEAS? IS IT WORTH IT? WHAT CAN IT USE FOR

</a>

Johan william -

With the pictures and script I was able to change out the feed tray. I purchased a for parts only DS 510 Epson and took the feed tray off of that one and put it on to the one that is fully working so now I have a complete unit again. Because I disassemble the four parts only unit first I learned that I wouldn't even have to take the case off of the unit. There's a cover over the hinged area on the back of the feed tray. Using a small screwdriver I tried the ends open and they popped off of the unit. I found that there were two screws holding the feed tray in one on each side. I remove the screws took the feed tray off the four parts only unit. I then took the broken part off of my good one. Replaced it with the one off the for parts only unit put the screws back in pop the cover over the back of it and it's like new. Pointers in this download helped me. Thank you

EWL2 -

Thank you! Thank you! Thank you! This is a great solution to an apparently very common problem. It took about an hour to fix my scanner. Work’s great now. I used a paperclip on one of the connections and some shrink tubing on the other. As long as you are cautious with the heat shrink tubing it will not melt the plastic part.

mereyecare -

I was able to fix our ds-560 using this guide. I didn't have a low profile screwdriver but was able to fit a small screwdriver on one side. Used a bit and my fingers to manage the other loose. I'm going to lose sleep over trying to figure out why I couldn't have just removed the whole feeder assembly before attempting those screws. I did not put them back when I was done because they are useless. The hinges were invented by the devil. I used electrical tape, cut in half lengthwise, wrapped tightly around the faulty shaft to hold the mouth tight. It worked like a charm. If it doesn't last, I'll order the knock off replacement part of find a 3D print shop.

James Thompson -

Thanks a ton for this guide. manged to fix mine in about an hour with the paper clip fix. Although I did put a paper clip on both pieces of the shaft. One was almost broken, the other was obviously expanding so I didn't see any reason to wait until it failed.

Steve -

Hi, was anyone able to find these on Amazon.ca? Thx

gar -

Super awesome! I found one of these units at a thrift store and took a chance for $6.99. Had to buy a power supply, $14.99. Darn thing wouldn't process more than one sheet of paper and made that clicking sound, which just didn't sound right. I found this post and came up with another solution.

In my case, the end of the white plastic part attached to the drive gear stripped. Both of those plastic parts are identical and are made to provide slip with different thicknesses of paper in the input tray. I put marine shrink wrap around the ends of both of them, separately, and heated them up until I could easily control bending the little curved flaps back to straight. Let them cool and cut out the notches. As expected, when cutting shrink tube in this way you lose circular structural strength. But, things are safely straight now so I reinforced them with two layers of paper towel impregnated with super glue and trimmed the notches again. They are solid now and the scanner works PERFECT! THANK YOU!

TRAVO -

For those who are still needing to fix their scanners, there are a couple of different STL files out there if you have a 3D printer that work even better than the methods here and are one solid piece. This guide is still great for showing you how to open up the scanner though! Thanks!

Jacob -