Introduction

Ce tutoriel de réparation provient de l'équipe iFixit et n'a pas été soumis à l'approbation de Google. Pour en savoir plus sur nos tutoriels de réparation, c'est par ici.

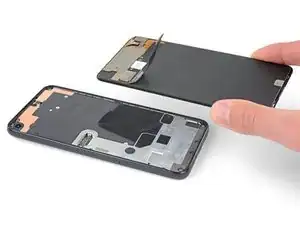
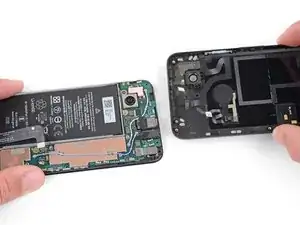
Suivez ce tutoriel pour remplacer la coque arrière d'un Google Pixel 4a.

L'écran du Google Pixel 4a n'est pas renforcé, et il est fragile. Ayez une attention particulière aux avertissements dans la procédure d'ouverture si vous réutilisez l'écran.

  1. JLpOVyZrGLQNNFMq
    JLpOVyZrGLQNNFMq
    AXWTuOs4GKMF3EbL
    BKZZg1MeVIbDRlH2
    • Insérez un outil ou embout éjecteur de carte SIM, ou bien un trombone redressé, dans l’orifice du tiroir SIM.

    • Appuyez directement dans le trou pour éjecter le tiroir de carte SIM.

    • Retirez le tiroir de carte SIM.

    I'm using Pixel 4a but my Sim side is not working

    Boakye John Owusu -

    The pliers (came with the kit) end worked for this step

    Gabriel Basilio Brito -

  2. GAtKSCpq6nOLFhJN
    GAtKSCpq6nOLFhJN
    yYyPALgQYGnCFA4X
    qbLJ5OYSRVHREJWu
    • Vous aurez besoin de remonter l'écran vers le haut pour le retirer du reste du téléphone. Suivez les informations suivantes attentivement avant de commencer.

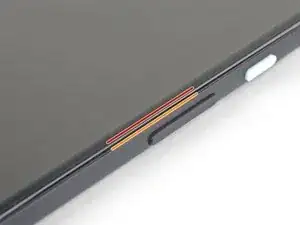
    • Distinguez bien les deux jointures sur le bord du téléphone :

    • Jointure de l'écran : cette jointure sépare l'écran du reste du téléphone. C'est là qu'il faudra faire levier.

    • Jointure du châssis : c'est là que se rejoignent le châssis en plastique et la coque arrière du téléphone. Ne vous appuyez pas sur cette jointure pour faire levier.

    • Avant de démarrer, remarquez les zones suivantes sur l'écran :

    • Nappe de l'écran : n'introduisez pas le médiator plus loin qu'indiqué, vous risqueriez d'endommager cette nappe.

    • Prenez note de la nappe orange sous le coin inférieur droit de l'écran, qui est susceptible de s'abîmer si votre médiator appuie dessus. Insérez votre outil aussi peu que nécessaire pour décoller l'adhésif de l'écran.

    • Périmètre adhésif : faire levier au-delà de ce périmètre étroit sans incliner le médiator endommagera le panneau OLED.

    Coll down guys and gals.

    1) go below the Display and not between the backcover/middle (see the other comments)

    2) just take care about the flex/display cable position (which is iirc about on the middle i.e. 2nd 3rd from the bottom ON THE LEFT side dear OP)

    Everything else is just separting the glued on Display from the Phone.

    See the other comments

    Aleksandar Dejanovic -

    Cool down guys and gals.

    1) go below the Display and not between the backcover/middle (see the other comments)

    2) just take care about the flex/display cable position (which is iirc about on the middle i.e. 2nd 3rd from the bottom ON THE LEFT side dear OP)

    Everything else is just separting the glued on Display from the Phone.

    See the other comments

    Aleksandar Dejanovic -

    I've measured it: The cable starts arround 1.4-1.6 cm from the lower half from the bottom on the left side.

    So You can cut the bottom left corner and of course the upper left one but for safety's sake, watch out for the camera.

    You can go up to 5cm down from the upper left side till You're near the cable.

    Aleksandar Dejanovic -

    When you say left side, is this your left when the phone screen is facing you?

    jaunie -

    The third image her shows the back of the screen, not the body of the phone

    blueslondon -

  3. q2iVFP1DNesqap1L
    • Appliquez un iOpener chaud sur le côté droit du téléphone pendant une minute pour ramollir l'adhésif.

    • Un sèche-cheveux, un pistolet à air chaud ou une plaque chauffante peuvent faire l'affaire, mais faites attention à ne pas surchauffer le téléphone : l'écran et la batterie interne sont tous les deux sensibles à la chaleur et peuvent être endommagés.

    I did the boiling water method. 3 min in water worked fine. I applied to right side and left side for 90 seconds

    Gabriel Basilio Brito -

  4. EJEIf4Z1AEo3AMWC
    EJEIf4Z1AEo3AMWC
    ScoSymvuqCnKNDcG
    QDwEliHCNFRvCaNt
    • Si votre écran est méchamment fissuré, couvrez-le avec du scotch transparent pour que la ventouse adhère mieux. Du gros scotch peut être utilisé comme alternative à la ventouse. En dernier recours, vous pouvez coller la ventouse à l'écran cassé avec de la super glue.

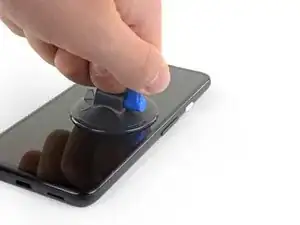
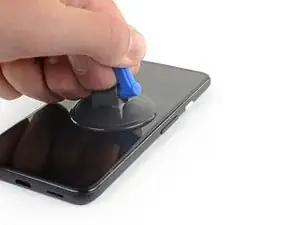
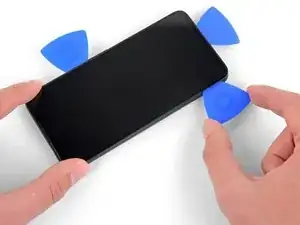
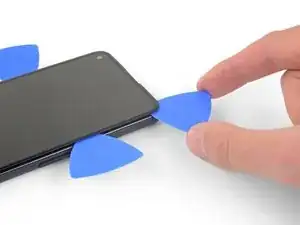
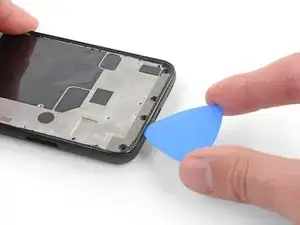
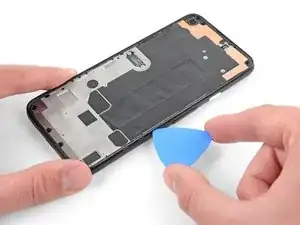
    • Positionnez la ventouse aussi près que possible du bord droit de l'écran.

    • Soulevez la ventouse de manière ferme et constante.

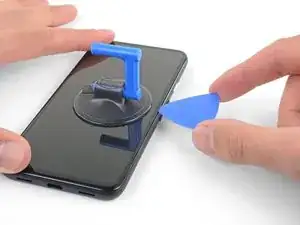
    • Insérez la pointe d'un médiator dans la jointure de l'écran sur moins d'un millimètre.

    It's pretty easy. Insert it just below the screen between the Display and the Display “holder” or mold.

    Aleksandar Dejanovic -

    I highly recommend not using the mediator that is too thick and too rigid, as the screen is super fragile. Instead, I used a piece of X-ray film. It's thinner, more flexible, and sharper, making it easier to cut through the adhesive along the screen.

    Virak Nou -

    You definitely DO NOT want to insert the opening pick any further than 1mm. Measure 1mm on the pick and mark it. Put some sort of clamp if you have to to prevent going any deeper than that 1mm.

    Kevin -

  5. xDkhtvTPHTrBtHR6
    xDkhtvTPHTrBtHR6
    AgsUneGcTGB3PV2M
    sPMrxeVQOoANkv3i
    • Cette étape montre comment insérer le médiator sans abîmer le panneau OLED. Faites cela avant de commencer à découper l'adhésif.

    • Avec votre médiator enfoncé d'un millimètre dans le trou, faites-le pivoter vers le haut pour former un angle raide.

    • Lorsque l'angle est raide, poussez doucement le médiator dans la fente d'environ 6 mm (1/4 pouce). Le médiator devrait se glisser sous le panneau OLED.

    • Arrêtez si vous sentez la pointe du médiator buter sur un obstacle. Le médiator pourrait appuyer sur le bord du panneau OLED. Rehaussez le médiator et réessayez.

    This took me a while, I ended up sharpening the tip of the pick with a razor so I could push it through the seam and slicing a few times, heat->sharpen-> slice until I finally got it to move, and once it slid under carefully heated up areas and sliced with ~2mm of the pick.

    Alan Carlson -

    Thanks for this tip, I also shaved down my initial pick and that (plus several rounds of reheating and re-trying) eventually got me there!

    Toby MacNutt -

    This sounds also harder than it is. Push it in 1mm and just lift the other end in a wider angle like 70° degree from the horinzontal position. There “shouldn't” be much you can do wrong. Because except for the Data cable (flex) at a certain position, I can't remeber anything important but isolating tapes that I have scratched.

    It's just the Screen glued to the mold. That's it.

    Aleksandar Dejanovic -

    Oh, and I wonder here where do You all get such thins plectrums? I have also the flat plastic version and the thin plastic cards but none of them were thin enough for this!!

    I ended up using the backside i.e. the dull side of a Razorblade. I didn't saw any alternatives to this. Did You hear this OP?

    Any!!

    Aleksandar Dejanovic -

    the display flex is directly on the bottom of the phone. BE VERY CAREFUL when going around the bottom to not hit the display flex!!!

    FixItAgain -

    Be very, VERY careful when inserting the pick or whatever you're using. That OLED panel is super fragile. When I was replacing the battery, I damaged my screen and had to replace it, as well. The new screen worked, thankfully. I tried to be very careful but somehow still damaged the screen. I couldn't detect any damage to the screen except there was a very small fleck of the iridescent material. That's the only thing I could tell.

    FYI: The phone would boot up into SOME kind of mode. I could feel it vibrate when I held down the power button or used the fingerprint sensor. If you're in that position, it's a good chance a new screen will get your phone up and running. At least, that was the case for me.

    Kevin -

  6. J4QMAiSkZffCSgBV
    J4QMAiSkZffCSgBV
    rCRAZWFOTKgxQUYs
    LeRcwOFGsOG2JHfX
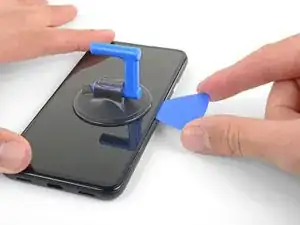
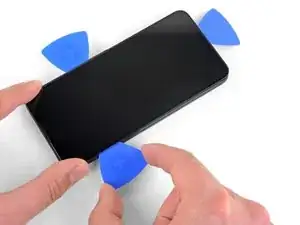
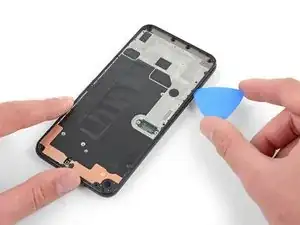
    • Faites glisser le médiator le long du bord droit de l'écran pour couper l'adhésif.

    • N'insérez pas le médiator de plus de 6 mm (1/4 pouce) au risque d'abîmer la nappe de l'écran.

    • Laissez le médiator en place dans le coin en haut à droite pour empêcher l'adhésif de se recoller.

    The display flex is directly on the bottom of the phone. Be very careful when goign around the bottom to not hit the display flex!!!

    FixItAgain -

  7. D42ibC2SikIjDNWv
    D42ibC2SikIjDNWv
    1UDYbsxrgPALt626
    JhcXfCMQ1xAfK4aK
    • L'adhésif de l'écran est vraiment faible donc vous ne devriez pas avoir besoin de le chauffer une seconde fois. Cependant si l'adhésif semble difficile à couper à certain endroits, vous pouvez chauffer la zone concernée pendant une minute et recommencer.

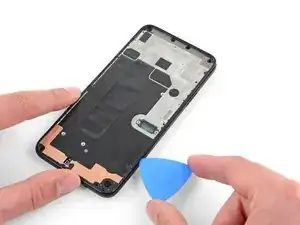
    • Insérez un autre médiator dans le bord droit du téléphone, dans un angle déjà ouvert, pour éviter d'abîmer le panneau OLED.

    • Faites glisser le médiator le long de la partie inférieure du téléphone pour couper l'adhésif.

    • Il y a un câble fragile sous le coin inférieur droit de l'écran. Si vous sentez que votre médiator reste accroché à quelque chose, retirez-le et réessayez. Assurez-vous que votre médiator est incliné vers le bas et inséré aussi peu que nécessaire pour séparer l'adhésif (pas plus de 2 mm de profondeur).

    • Laissez le deuxième médiator en place pour éviter que l'adhésif ne se recolle.

    Top and bottom edge adhesive were much stronger than this suggests. Corners were very hard to detach. I killed my screen b/c I cracked it at the top. Worked better with heating around whole perimeter like an iPhone.

    Erik Sorensen -

    WARNING: Be very careful prying the bottom left and right corners! In fact do not insert anything there because there is only a 0.8mm clearance between the screen and the edge, and there's a 0.5mm space between the screen and front glass where if you insert a pick between the screen will crack and break! I had to replace the screen after only doing a battery repair...

    bloc -

    Unfortunately I did not properly read the comments here. So for the unafraid people like me:

    DO NOT insert something into the bottom right! Especially not like it is shown in the image at this location!

    Instead I suggest start releasing the screen from right, then left side, then top and as the last step release the bottom, but start with the left corner. Do not pry too much and use a bit more heat as suggested.

    There is a small image of this critical right corner in Step 16 (the part at the top is the display and the left corner at the top is the critical right corner here). You'll see the orange cable in the corner which is easy to damage...

    Peter -

    N’allez pas en bas au début faite le haut d’abord j’ai tuer m’on écran

    Jironi -

    I can second the warnings - especially at the lower corners the OLED screen is extremely sensitive to breaking - as has happened in my attempt when inserting the pick 2 mm.

    Patrick Bohn -

    The display flex is directly on the bottom of the phone. Be very careful when goign around the bottom to not hit the display flex!!!

    FixItAgain -

    Unfortunately despite being very delicate on the bottom right corner I ripped off a tiny bit of the digitizer cable and that resulted in a not working screen... went from spending 50€ for a battery replacement to a 150€ total expense battery + screen... :-( My advice is to not even pry the bottom corner, pry all around, then apply heat carefully until the screen is detaching.

    Andrea -

    Don't listen to the advice that you don't need to reheat. The bottom corners are very strong and you absolutely don't want to go in more than 1 mm to avoid cutting the display flex. Proceed as follows:

    1. Heat and get a pick into the right side (more than 1 mm is never needed, in my case the picks all stayed angled upwards while I did the cutting)

    2. Put another pick in right away in the same spot

    3. Immediately heat the top corner

    4. Move one of the picks towards the top corner cutting all adhesive and let it rest there

    5. Heat the bottom right corner

    6. Move the other pick to the bottom right corner cutting adhesive (not more than 1 mm, make sure to angle the pick sideways!!)

    7. Put another pick in on the right side and move it to the bottom too

    8. Heat the bottom and bottom-left corner

    9. Very carefully move the first bottom pick around the corner and cut everything on the bottom side

    10. Don't insert any new picks on the bottom, always go around the corners with an existing pick

    11. Go around the bottom-left corner

    12. Insert a new pick on the left side once there is a gap and cut the rest

    dragonbane -

    Do not even try to insert anything on the right corner. I pulled screen upwards fine without touching that corner. Just heat both sides and insert picks everywhere but that corner. Although be extra careful with 5 cm from top to bottom on the left side, there is also a cable there, although not that easy to brake as the one on the right bottom corner. I managed to replace battery successfully like that

    Gabriel Basilio Brito -

  8. iEnPlXUXUHTZJnpL
    iEnPlXUXUHTZJnpL
    UNTnxRjUZoDHXT4R
    YScDDT4gpOFJOE6j
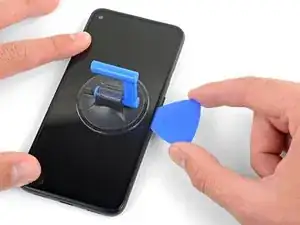
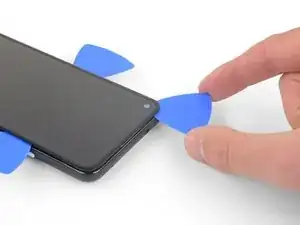
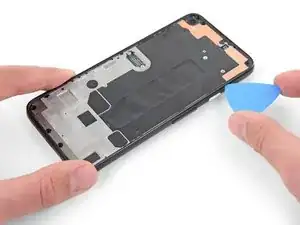
    • Insérez un troisième médiator à un angle inférieur déjà ouvert pour éviter d'endommager le panneau OLED.

    • Utilisez-le pour couper l'adhésif du bord gauche de votre téléphone.

    • Si l'adhésif semble résister, chauffez-le pendant une minute et réessayez.

    • Laissez le médiator inséré le long du bord gauche de l'écran pour éviter que l'adhésif ne se recolle.

    The display flex is directly on the bottom of the phone. Be very careful when goign around the bottom to not hit the display flex!!!

    FixItAgain -

  9. GXSjo5fueaLsoYd5
    GXSjo5fueaLsoYd5
    4mouCGVN3ej3XoXQ
    wLsO4lDvkSNucC6V
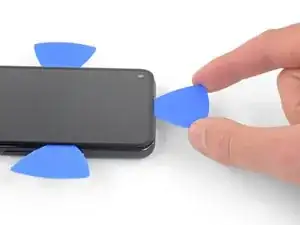
    • Une petite grille couvre le haut-parleur interne en haut de l'écran. Si vous n'avez pas de grille de remplacement, attention à ne pas abîmer ou perdre ce composant.

    • Insérez un quatrième médiator le long du bord gauche du téléphone, dans un angle déjà ouvert pour éviter d'endommager le panneau OLED.

    • Faites-le glisser le long du bord supérieur du téléphone pour couper l'adhésif.

    • Si l'adhésif est dur à couper, chauffez le haut de l'écran pendant une minute et recommencez.

    The display flex is directly on the bottom of the phone. Be very careful when goign around the bottom to not hit the display flex!!!

    FixItAgain -

  10. BPFrToKqDD62NEeM
    BPFrToKqDD62NEeM
    GlHaHCFlb2AFZhlL
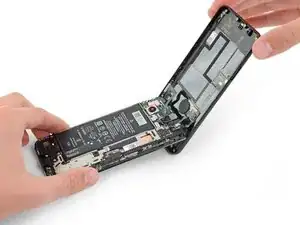
    • Une fois que vous avez découpé l'adhésif sur tout le pourtour du téléphone, soulevez délicatement le bord droit de l'écran, en ouvrant le téléphone comme un livre.

    • N'enlevez pas l'écran pour le moment.

    • Utilisez un médiator pour couper les restes éventuels d'adhésif.

    When I was doing this I found the corners especially the bottom right corner was very glued on!! There are very sensitive cables here and I found part of the old screen's cables (it might not matter if you're replacing the entire screen anyways) were glued onto the phone frame. I came really close to tearing mine, but I saw another review about reapplying heat to get this part loose.

    Matt Staff -

  11. oUNIGJd3OLSZrEwr
    oUNIGJd3OLSZrEwr
    mlcnfSNcaxRYbOAl
    5IuM1hZd6gUKkGSC
    • Soulevez le haut de l'écran et basculez-le par-dessus le bord inférieur jusqu'à pouvoir le poser face vitrée sur la table.

    • Attention à ne pas tirer sur la nappe encore attachée à l'écran.

    FR : Précision : La nappe a un bout d'adhésif sur la structure du téléphone, il faut bien faire attention de le décoller. Je viens de tuer la nappe de mon écran qui était fonctionnel...

    EN : Advice : The ribbon cable is fixed to the structure with a small piece of adhesive. It should be remove prior to anything else. I just killed the ribbon cable of my perfectly used to work screen...

    Arnaud Parrot -

    On reassembly: this is where you peel off the colored part of the adhesive strips, and make sure to put your speaker mesh (if it's not attached to the screen) back in place. It should rest flat-side-down on the frame over the two horizontal indents in the frame edge, at least it should if I did it right ;)

    Toby MacNutt -

    If you are afraid of putting stress on the cable by laying the screen down you can just proceed to next steps while grabbing the screen. I did it like that

    Gabriel Basilio Brito -

  12. QDuLoSjuQaZgqGZP
    • Utilisez une pincette pour délicatement décoller le ruban adhésif noir qui recouvre le cache du connecteur.

    • S'il est en bon état, vous pourrez le réutiliser au réassemblage. Sinon, remplacez-le par un morceau de ruban adhésif isolant.

    How critical is the tape that covers this connector? I realized upon sealing back up my device that I forgot to re-install it. I imagine it mostly is there to prevent dust and moisture ingress?

    Alex Cook -

    Interestingly this tape was missing in my phone. Maybe that explains some of the display issues I occasionally had, like a thin green line on the right side of the screen which could be "pushed" away.

    Fabian Seyfried -

    I think I ripped off the cable because it is undistinguishable from the tape! How screwed am I?

    Marius Schummer -

    Don't bother trying to save the tape. More hassle than it is worth. Just replace with electrical tape

    dragonbane -

  13. 6x5ufTbvB5Q5XCb1
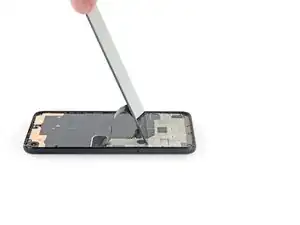
    • Utilisez un tournevis Torx T3 pour retirer les deux vis de 2,1 mm qui tiennent le cache du connecteur.
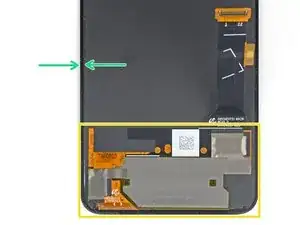
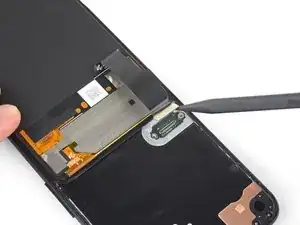
    • Tout au long de la réparation, gardez la trace de chaque vis et assurez-vous que chacune d'elles revienne à son emplacement d'origine.

    A T4 driver worked for me here.

    Gabe Maayan -

    It is definitely a T4.

    Jarl Friis -

    Funny ... For me, it was T3. The screws must vary across different phones

    Helmut Sporgersi -

    T3 worked for me also

    dragonbane -

  14. V1CYECKe4EvEHu1J
    • Utilisez des pincettes pour retirer le cache du connecteur de l'écran.

    • Mettez ce composant de côté pour le réinstaller au remontage.

  15. eSlgWVRJgapeowxZ
    eSlgWVRJgapeowxZ
    LtTmQU1tTfjruuhd
    • Utilisez la pointe d'une spatule (spudger) pour déconnecter la nappe de l'écran.

    • Pour reconnecter les connecteurs pop comme celui-ci, alignez soigneusement le connecteur sur sa prise et appuyez avec le bout du doigt – d'abord d'un côté, puis de l'autre – jusqu'à ce qu'il s'enclenche.

    • N'appuyez pas au milieu du connecteur tant qu'il n'est pas complètement en place. S'il est mal aligné, le connecteur risque de se plier et d'être endommagé de façon irréversible.

    No, why the tip? Use the other flat side that doesn't concetrate all the power on one point and Youre doing a propper job.

    Aleksandar Dejanovic -

    Only the tip is needed to lift a bit one of the sides and it will pop out. No pressure/power!

    Steve Stavropoulos -

  16. tOeTcJhTXCIkF2Q6
    tOeTcJhTXCIkF2Q6
    TIKvK6PBwOD5fTsM
    IALFopZMpCkuI1AD
    • Retirez l'écran.

    • Pour installer le nouvel écran :

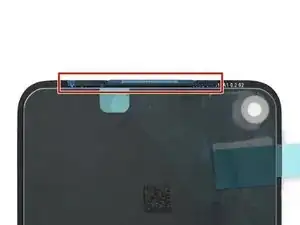
    • Vérifiez si votre écran de remplacement est doté d'une grille de haut-parleur et d'un adhésif en haut préinstallés.

    • Si c'est le cas, vous n'aurez pas besoin de l'adhésif du haut.

    • Si ce n'est pas le cas, retirez le grand film protecteur de l'adhésif du haut et appliquez-le sur l'écran (pas sur le châssis). Assurez-vous que la plus grande découpe est alignée avec la grille du haut-parleur.

    • Suivez ce tutoriel si vous utilisez des bandes adhésives découpées sur mesure.

    • Utilisez la troisième photo comme référence pour positionner vos adhésifs.

    • Pendant le premier démarrage après le remontage, l'écran passera par une phase de calibrage. Ne touchez pas l'écran pendant ce processus, car cela pourrait perturber le calibrage et poser des problèmes de tactile.

    This step seems to imply that a screen replacement is necessary when replacing the charging port. Is the charging port replaceable without replacing the screen? I understand great care must be taken not to damage the original screen in the procedure, but can it be reinstalled?

    David-Alexandre Tremblay -

    Yes, it can be reinstalled.

    Sam Omiotek -

    How long does the calibration process typically take? What does this process look like?

    phelpsbc -

    Just a heads up: If you are like me and you have accidentally turned on your Pixel 4a at some point while trying to pry the screen, don't worry too much. I was able to just connect my display with the device on. Nothing will happen until you reboot, and then the screen will initialize.

    Alex Cook -

    It would help to add that the new screen is reattached after adding glue to phone body, not the screen. With the iFixit screen adhesive pieces, a guide to which piece goes where would help also. For that I used this picture: Google Pixel 4a Display Adhesive - Genuine. Yet that is not enough as there is a cover for (speaker?) which is not clear how to apply that.

    markjville -

    The repair kit comes with Google Pixel 4a Display Adhesive - Genuine but there is no guide on how to apply that adhesive. I sent an email, but Ifixit won't make an instruction page for this.

    Mark -

    To explain how the adhesive sold by iFixit works, the actual adhesive is the black strip which is held between two pieces of plastic. Line up the pieces with the clear plastic side down. Note that some pieces may be stuck in the box they came in, the plastic is staticky. I recommend that before attaching the new screen you put each piece in place. Remove the clear plastic and place the pieces in place with the colored plastic facing up. The goal is to have the black adhesive strip on the little ledge between the edge and the depression inside the phone. It's the place where you hopefully spent time cleaning out the original adhesive. Place the corners first, then the edges. Press them into place carefully. Before removing the colored plastic attach the phone screen cable and secure it. REMEMBER TO PLACE THE ELECTRICAL TAPE OVER THE CONNECTOR (I forgot to). Then remove the colored plastic, leaving behind the adhesive, and push the screen into place.

    Karzyn -

    Of note: the seal peace at the top goes under the speaker screen, and the seal looks at first like it is reversed. To install that one accurately adhere it to the Screen itself not the body of the phone. align it where there is a see through circle along the seam and a hole in the adhesive. the sealant should run below the speaker screen. When readhering the screen to the body, remove the plastic guides around the body, then last the seal on the screen and align and install.

    USAF MX -

    Super, c'est vraiment à la portée de tout le monde, il faut juste un peu de patience et d'audace.

    Je viens de réussir le remplacement de mon écran et c'est impec !

    Il n'y a que sur la première partie, où il faut insérer le médiateur, que ça a été compliqué pour moi. Impossible de l'insérer du côté des boutons (à droite donc), par contre quand je me suis décidée à tester en passant par l'autre côté, c'est venu tout seul.

    Aussi il m'a fallu un certain temps pour comprendre que sur les adhésifs, seul le trait noir colle, et c'est donc à lui qu'il faut faire attention.

    Pensez à vérifier que l'écran est fonctionnel avant de le recoller, à mon premier essai la nappe n'était pas bien insérée et j'ai du recommencer l'insertion. Voila, prendre son temps et vérifier que tout va bien à chaque étape et c'est très facile. J'ai mis un peu moins d'une heure.

    Caroline Leleu -

    I have no idea what to do with the speaker cover mesh. It is on the display I ordered from fix it, but there is blue plastic tape over it, too, so in order for a speaker to work I'd expect the blue sticky tape needs to be removed, but it nowhere says anything about it.

    deadrom -

    After I clipped the screen in place, I realized that I had forgotten to reattach the screen bracket from step 14. Do you think this is dangerous? Can anyone assess this? In any case, the smartphone turns on and actually makes a good impression.

    Many thanks in advance for your assessment!

    Kind regards

    Tom

    Timon Roosen -

    Just some advice before you install the screen regarding the earphone grille/mesh at the top.

    Something I experienced, was that the speaker grille did not end up being seated quite right when the phone display was stuck down. It is slightly bent, and the top edge is stuck out at a slight angle - it is quite sharp and does not take much to catch a finger on it, when the phone is out of a protective case.

    I think this was because I laid the screen in, starting from the top and with it up at quite a steep angle, then working from top to bottom. I would suggest that when setting the new display within the device, that you align the bottom edge first instead.

    I am not going to risk lifting the new display to try and re-seat this grille properly, the display cost me a bloody fortune (around 58% of the phone's original price) and I am not risking breaking it over something as minor as that.

    nb. I definitely removed all the coloured plastic protective pieces before installing the new screen into the phone.

    Andrew -

    Just put everything together near perfectly re-using the existing screen so I want to share my experience:

    1. This picture shows the correct lineup of the adhesive pieces. Every piece is unique including the corners: https://guide-images.cdn.ifixit.com/igi/...

    2. I tried to save the speaker mesh, but it fell off so I had to use the new part

    3. After removing the plastic cover from the mesh piece you have a slightly sticky surface. Make sure to attach the mesh in that direction on the INSIDE side of the screen. Line it up properly and it should stick nicely over the cutout

    4. Immediately after attach the top adhesive piece from the picture to secure the mesh. Remove the big plastic cover first and stick it onto the screen and the mesh piece in that direction. Note the lineup from this picture: https://guide-images.cdn.ifixit.com/igi/... (the cutout on the adhesive has a perfect match on the display frame)

    5. Attach everything else to the phone frame and not the display

    Continued

    dragonbane -

    Continued

    6. Make sure to line up all the pieces first based on the picture. Every piece is unique, e.g. each corner has a unique hole and cutout pattern. This is important to get right or you will have the sides overlapping with the corners later. Also the left side piece has the big cutout to allow you to work the display connector without having to remove the adhesive cover too early

    7. Always remember that the actual adhesive is the black part and you want it as perfect on the frame as possible. Always attach with the clear side down leaving the strong colored side up

    8. Use the tweezers and get the adhesive on from one end to the other carefully. Touching the black adhesive will create a mess fast as does having to retry

    9. Reattach the display fully and do a dry test before removing the adhesive covers

    10. Gently hold the display up and use the tweezers to remove all adhesive covers

    11. Flip the screen around and first attach on the bottom before doing the top

    12. Let it rest over night putting some books on

    dragonbane -

    Three other notes:

    1. If you just replace the display it will already come with the mesh and the top adhesive piece pre-installed so you can skip that part. Just don't forget to remove the adhesive cover before sticking the screen on

    2. It's EXTREMELY important to properly clean the display and frame first. A lot of adhesive especially remains on the display if you re-use it. Only use plastic tools and be very careful with pressure. Use 90%+ alcohol with some Q-tips to finish the job, but not too much. No alcohol should ever come into contact with a camera lense

    3. Use the flat side of the spudger to go over the black adhesive pieces after first attaching them to make sure they are properly sticking to the surface

    dragonbane -

    The adhesive kit is terrible. Now looking for where to buy some liquid glue to finish this job. Screen and kit are fine, it's just the adhesive strips that are terrible.

    sandalwoodsh -

    Just buy B-7000 from Amazon. Don't waste time with the adhesive kit

    Gabriel Basilio Brito -

    important note: don't pull the colored covers off the adhesive immediately! You want to get the ribbon cable and its cover reattached first. Then hold the screen hovering over the base with one hand and gently ease the tabs/covers off your adhesive with the other.

    Toby MacNutt -

  17. MUThkCHXP1YOjvTO
    MUThkCHXP1YOjvTO
    sqkNnIBQYWorWeJJ
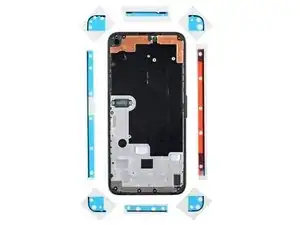
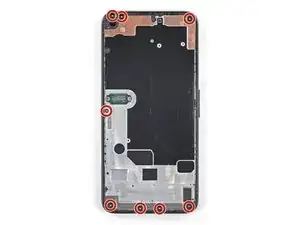
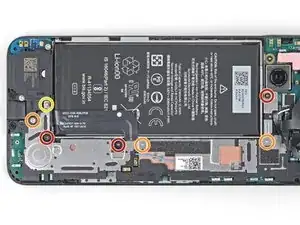
    • Avec un tournevis torx T3, retirez les huit vis de 4,3 mm qui fixent la coque arrière sur le châssis central.

  18. WlP2DuWIIuwaviZC
    WlP2DuWIIuwaviZC
    ANVOUjTrn1dWyUdi
    • Insérez un médiator dans le joint entre le châssis central et la coque arrière.

    • Faites glisser le médiator le long du bord inférieur du téléphone, pour détacher les clips en plastique qui fixent la coque arrière au châssis central.

    It wasn't clear to me from the picture, but don't try to pry the midframe piece up from the back cover. Pry the vertical edge of the back cover just a little out from the edge of the midframe. This releases the clip rather than fighting the clip, and the midframe will pop up from the back cover.

    GeorgeR -

  19. PVWCcCnXgIsp4JJa
    PVWCcCnXgIsp4JJa
    GCfIwDIjE6BjWYoe
    • Faites glisser le médiator le long du bord gauche du téléphone, afin de détacher les clips en plastique qui fixent la coque arrière sur le châssis central.

  20. mU4CLMhfFknuPl5n
    mU4CLMhfFknuPl5n
    RTIMpbsbyoSe2Asy
    fWvmYQjydvs5PYN5
    • Faites glisser le médiator le long des bords supérieur et droit du téléphone, pour défaire les clips restants.

  21. MdboONmZoQ2iEelX
    MdboONmZoQ2iEelX
    g6BT63mabF3ZYWF1
    p1BgRe1I2kektn43
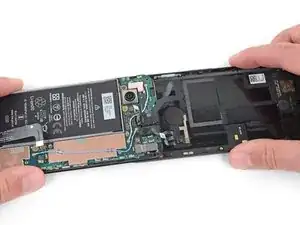
    • Faites soigneusement basculer la coque arrière depuis le bas du téléphone par-dessus le haut de celui-ci, jusqu'à placer la coque dans le dos du téléphone.

    • Placez la coque arrière sur votre plan de travail et faites reposer le châssis central sur la coque arrière, en faisant attention à ne pas tirer sur les nappes encore attachées.

  22. f2OM6kEyPrhaWyuj
    f2OM6kEyPrhaWyuj
    NASStAIlBwtiLIcK
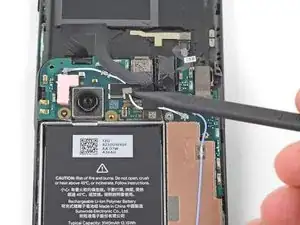
    • Avec un tournevis torx T3, retirez les sept vis qui maintiennent le cache de la carte mère :

    • Trois vis noires de 2,9 mm de long

    • Trois vis de 2 mm de long

    • Une vis de 4,1 mm de long

  23. DegASyYRvxWHvR4I
    DegASyYRvxWHvR4I
    uLZFNBvv3Wah3QHw
    C3ytMmW5sIktGCKx
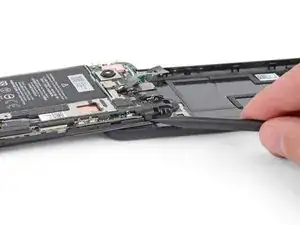
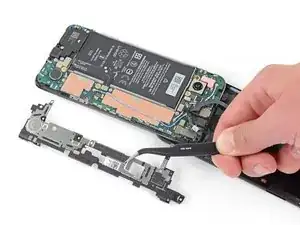
    • Avec la pointe d'une spatule, déclipsez le cache de la carte mère depuis les coins droits inférieur et supérieur de la carte mère.

    on mine, the fingerprint sensor cable was lightly adherent to the bracket and I almost tore it when the bracket popped up. may want to add something about freeing this up before removing the bracket.

    Erik Sorensen -

    Similar to Erik, my fingerprint sensor cable was adhered to the bracket and mine did tear. I didn't use the fingerprint sensor, so hopefully this doesn't affect anything else with the phone. Now I know to read the comments! X_X

    Jason Birchard -

    I found the clip at the top of the bracket very hard to unclip, so much so that it was bending the end of my spudger. In the end I was successful with a spare SIM removal tool instead of a spudger, but in the same manner as pictured in the first 2 photos.

    Adam G -

    I had the same issues: The cable was attached to the bracket and I had to be very careful in pushing the bracket to the side and reach under it with the spudger to detach the fingerprint cable. And I also found the top clip of the bracket hard to unclip. It worked when I started with the lower one and then pushed the bracket to the side a bit. It seemed to be glued on the top corner.

    Fabian Seyfried -

    My fingerprint sensor cable was also glued to the bracket, but it seems like a sturdy cable so was not easily damaged

    blueslondon -

    Ok this was really bad for me I did not understand how the clip was oriented and tried to pull it up lightly first and then strongly, it finally came off but I bent and broke the bridge just a bit, and most importantly the RFID or fingerprint sensor cable (the circle in the back). I don't use it and nothing more was harmed managed to put everything back in place but

    Beware of the clips, you have to pull them TOWARDS you, then the bridge will pop-up, don't apply strength upwards before unclicking the 2 clicks towards you (horizontal plane)

    rkj -

    This cable also ripped for me as the motherboard bracket popped up! It was remarkably fragile

    IFuxedIt -

    this is the most frustrating step in the entire guide. i used tweezers and pushed to the left of the upper bracket to free it. no upward force is required to free it. be careful

    Logan Tristan -

    My spudger tip was bending trying to release the bracket - I used a 1mm flathead screwdriver instead, from just below the clip, and it popped up beautifully and with no force. Cables all intact!

    Toby MacNutt -

    The fingerprint sensor cable is the smaller one and it is indeed glued to the top of the motherboard bracket. First free it with the spudger before proceeding.

    Always remove the bottom-left clip first as it reduces force.

    I should also note that if you hate re-attaching ribbon cables like me and want to ensure the fingerprint sensor cable won't break then it is enough to only remove the bottom-left clip, gently lift the motherboard up and to the side and use the spudger to detach the battery cable. Steps 26 and 27 can be skipped and you simply keep the back frame attached. Do Steps 28-30 before unscrewing the mid frame for easier pulling on the battery adhesives. After the battery cable is free flip the back cover again, then drop the IPA in if needed to free the battery fully.

    Just be careful with pressure. After installing the new battery lift the motherboard up again and re-attach the battery cable which isn't too bad. Then clip the motherboard back into place and proceed.

    Fingerprint sensor cable saved!

    dragonbane -

    Free the smaller cable first. If you do this there is no risk of breaking fingerprint sensor. You will know what to do when you see it. After freeing cable you can pull the metal stuff upwards safely with any force you want. The risk is gone

    Gabriel Basilio Brito -

  24. I42ZwXCYPXHynfaW
    I42ZwXCYPXHynfaW
    qnwPLChOx3ADH6Nx
    vFJtFHFQmbfCFAgU
    • Avec une pincette, retirez le cache de la carte mère.

    The cable for fingerprint sensor was slightly glued which I gently removed by using the flat side of the spudger

    Nove -

  25. xWvhsg16pjLhCOr3
    xWvhsg16pjLhCOr3
    Ac2MJU2Ts1AinPlR
    • Avec le bout plat d'une spatule, soulevez et déconnectez la nappe de la batterie.

  26. FZCfLU2ekp6a4HDg
    FZCfLU2ekp6a4HDg
    JxHVsxWLi5yjolHa
    oNkWrdsydTCtCwuE
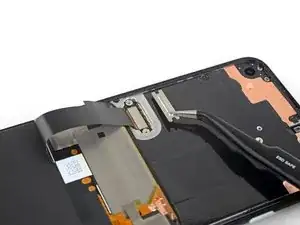
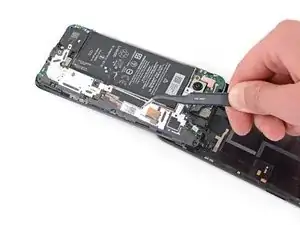
    • Utilisez la pointe d'une spatule pour déconnecter les deux nappes qui connectent les boutons et le lecteur d'empreintes digitales à la carte mère.

    The advice for re-attaching press connectors for re-assembly given in step 15 should be repeated here, since the reader will be moving from the bottom when re-assembling.

    GeorgeR -

  27. oXJHddDDPSyW5R4T
    oXJHddDDPSyW5R4T
    D4pvawZMLXxCQTRh
    • Retirez la coque arrière.

Conclusion

Comparez votre pièce de remplacement avec l'originale. Il se peut qu'il faille transférer des composants de la nouvelle pièce avant de l'installer.

Pour remonter votre appareil, suivez les étapes ci-dessus dans l'ordre inverse.

Déposez vos déchets électroniques dans un point de recyclage certifié.

La réparation ne s'est pas déroulée comme prévu ? Essayez un diagnostic de base, ou demandez de l'aide sur notre Forum.

Sam Omiotek

Membre depuis le 25/02/19

80534 Réputation

3 commentaires

T3 driver is too small. T4 driver fits all screws perfectly.

leehall -

(T3 worked for me)

The back cover I bought didn't include the sensors (fingerprint and camera flash) and a grommet thing over one of the speaker holes, that are attached to the back cover. So I had to transfer those pieces myself. I needed to use heat from the iOpener to soften glue that was holding them on to the old back. The replacement back seemed to have replacement glue in place under peel tape. I didn't replace the glue holding the screen, instead heated everything up with the iOpener when replacing the screen in the hope that the old glue will still work, fingers crossed.

I suggest following this other guide instead, to replace the fingerprint sensor, is the same with two extra steps (but still need to swap the flash and ‘speaker grommet thingy' as well as the fingerprint sensor):

Google Pixel 4a Fingerprint Sensor Replacement

Don Barthel -

How remove that tape with the metal frame from the camera? Next to a fingerprit. I need remove and place to new back cover

Maciej Kozicki -