Introduction

Ce tutoriel de réparation a été rédigé par l'équipe d'iFixit et n'a pas été approuvé par Google. En savoir plus sur nos tutoriels de réparation ici.

Utilisez ce tutoriel pour appliquer un nouvel adhésif suite à une réparation Google Pixel 6. L'écran de votre Pixel doit être retiré avant de suivre cette procédure. Suivez ce tutoriel pour retirer l'écran Google Pixel 6 si vous ne l'avez pas encore fait.

  1. FMMmDS4NHPcCEGXX
    FMMmDS4NHPcCEGXX
    nFSaENRYloNc4iHd
    IUliStATsQWJIuQq
    • Tout résidu d'adhésif ou débris empêchera l'étanchéité de l'écran.

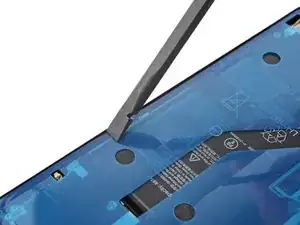
    • Utilisez l'extrémité de votre spatule (spudger) pour gratter autant de colle que possible.

    • Faites attention à ne pas endommager les connecteurs à ressort situés près du périmètre du châssis.

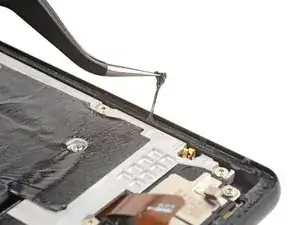
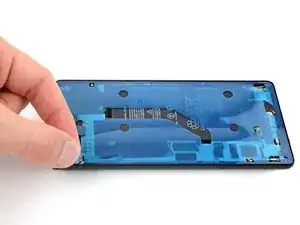
    • Utilisez une pincette ou vos doigts pour décoller et enlever les restes d'adhésif.

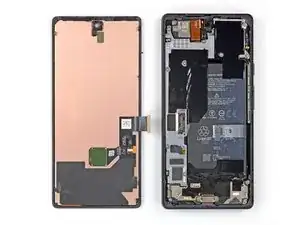
    • Nettoyez le périmètre du châssis avec une petite quantité d'alcool isopropylique très concentré (plus de 90 %) et un chiffon non pelucheux ou un chiffon en microfibres.

  2. D15AeZfLxoVLV5PP
    D15AeZfLxoVLV5PP
    DIrKwqUbWdslDbbH
    4gtZbBSWZyGQaE6H
    • Si vous réutilisez votre écran, nettoyez-le comme vous l'avez fait pour le châssis.

  3. wbWQ1WYIoqAHHASP
    wbWQ1WYIoqAHHASP
    OtToUXWCcX1MfkwA
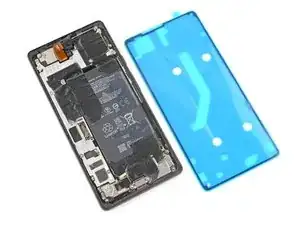
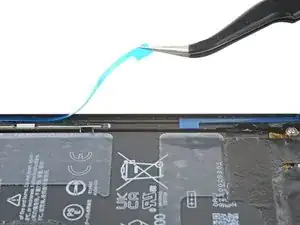
    • Avant d'appliquer le nouvel adhésif, posez-le sur le châssis pour trouver son orientation correcte.

    • Utilisez les caractéristiques telles que l'encoche du haut-parleur supérieur, le trou inférieur gauche et le trou supérieur droit pour orienter l'adhésif.

  4. SRVbG2u2lnSM6ZE6
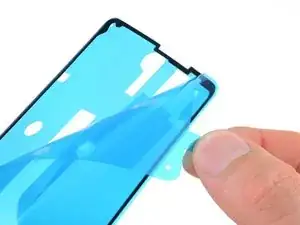
    • Utilisez la languette située sur la partie supérieure de l'adhésif pour retirer la pellicule protectrice.

    • Cela permet d'exposer l'adhésif qui colle au châssis.

  5. EqVBPhJRsPOS2rYx
    EqVBPhJRsPOS2rYx
    n3JGbjmfgFoPhbX5
    D2lPi1vk4XJXFTwG
    • Soyez très prudent lors de cette étape ! L'adhésif est très collant et ne peut pas être repositionné une fois qu'il est collé. Un mauvais alignement de l'adhésif peut entraîner une mauvaise étanchéité.

    • Posez l'adhésif sur le châssis, en commençant par le bord inférieur ou supérieur. Effectuez de petites corrections au fur et à mesure.

    • Des trous sont prévus dans les coins inférieur gauche et supérieur droit pour faciliter l'alignement de l'adhésif.

  6. JIssKlOsKVaUXYbG
    JIssKlOsKVaUXYbG
    b2EcjNiejPrC1THR
    QZWmnK3We1HxXhjq
    • Utilisez votre spatule ou vos doigts pour appuyer fermement sur le périmètre de l'adhésif et le faire adhérer au châssis.

    • Veillez à ne pas endommager les connecteurs à ressort situés près du périmètre du châssis.

  7. p6g4f2aoXmohTL3D
    p6g4f2aoXmohTL3D
    YCTnyydoSQdgID14
    vVlCP2ulLi5TkbwW
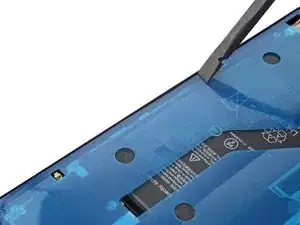
    • Saisissez la languette située en haut à gauche du châssis et détachez le film protecteur principal.

    Don't remove the final skinny liner around the outer adhesive - only remove the big liner. Leave the skinny blue liner in place until step 10 after the bracket has been attached.

    Amanda B -

  8. RPedlaFw6kbOLMBy
    • Si vous avez remplacé l'écran, vérifiez le trou de la caméra frontale et l'encoche du capteur sur le nouvel écran et retirez tout film protecteur restant.

  9. H2CqVG2UNhwye1hM
    • Retournez au tutoriel de votre réparation téléphone et continuez le remontage.

    • N'oubliez pas de réinstaller le cache du connecteur d'écran.

    • Terminez ce tutoriel lorsque l'écran est installé et que vous êtes prêt à sceller le téléphone.

    My new screen came with a tab on the selfie camera opening. Remove before sealing!

    Alex Thengvall -

    Guide fails to add step or note to reinstall the metal bracket and screw sitting on top of the display cable connector. I followed guide and resealed my phone only to realize this was not mentioned and now my phone is sealed without the bracket..

    Derek -

    Hi Derek, we're sorry that an instruction was missed! In this case, which guide did you follow to continue reassembly?

    Clay Eickemeyer -

    Would be good to add some tips on re connecting the display cable connector - took a bit of fiddling.

    bogdan dobrin -

  10. VJbNash5eiqUZ2nA
    VJbNash5eiqUZ2nA
    kH4ewXTUg4ut5Uqr
    lKv6OushZQpTIKKX
    • Veillez à ne pas percer la batterie avec votre pincette : une batterie percée peut laisser échapper des produits chimiques dangereux ou provoquer un incendie.

    • Saisissez la languette située en bas à droite du châssis et décollez le film protecteur qui recouvre le périmètre.

    • Veillez à ce que l'adhésif ne se décolle pas du film.

    Add an image of the screen already connected with the display cable. It should eliminate any confusions (it's way easier to fiddle connecting the display cable when you don't have to worry about touching the adhesive (like I did).

    bogdan dobrin -

  11. TkAkRLEQkKbKhBsk
    TkAkRLEQkKbKhBsk
    p2TE4fwBsRQVfLBH
    • Retournez l'écran et posez-le sur le châssis.

    • Appuyez sur le périmètre de l'écran pour le fixer.

    I wish there was a warning here not to close the screen without testing it if reinstalling one. I thankfully was able to separate my newly installed screen and discover my display cable connection wasn't fully attached, but I am not sure if I compromised the seal or not. We will see!

    Edward Rowe -

  12. NwAtTv6AriWRfDrA
    NwAtTv6AriWRfDrA
    3ZgBh3qGSwjGnKJZ
    c5oA2BK5vIbKFHo6
    • Pour compresser uniformément votre Pixel et renforcer l'adhérence de l'écran au châssis, vous devez tenir compte de la barre de la caméra.

    • Si vous disposez d'étaux pour écran, vous pouvez contourner la barre de la caméra. Fixez les étaux sur le périmètre de l'appareil.

    • Appliquez du ruban adhésif sur le périmètre de votre vitre arrière pour protéger sa finition.

    • Placez des pièces de monnaie ou des objets d'épaisseur similaire le long des bords de la vitre arrière. Assurez-vous qu'ils sont aussi épais ou plus épais que la barre de la caméra.

    • Empilez plusieurs livres ou autres objets lourds sur votre téléphone. Laissez-les en place pendant trente minutes ou plus. Idéalement, laissez-les empilés toute la nuit.

    Would be useful to list these coins (spacers) as a requirement for the installation. Not everyone has coins or similar spacers around.

    bogdan dobrin -

    Excellent guide. I recommend reading through it a couple times before starting, but really good instruction.

    msqualls -

Clay Eickemeyer

Membre depuis le 19/09/22

76560 Réputation

15 commentaires

Clear and to the point guide, which worked perfectly from the first go, kudos!

Ken Lammrtyn -

Why not align the adhesive with the liner covers on?

-Remove the display side of the adhesive then attach display to phone. Then adhesive should be lined up on the display and you should only need to remove the phone body adhesive cover and press the phone and display together.

Beau Ellerson -

Hi Beau! This is a clever idea. We've taken this approach with some simpler adhesives before. While I can't say exactly why it wouldn't work, I can assume that applying the adhesive the screen-side-first will make it more difficult to visually check that the adhesive lined up properly on the screen. It doesn't seem impossible for any reason, though.

Clay Eickemeyer -

where is the guide for reassembly?

Caspar Redgrave -

The exact guide depends on which phone you have. Click here for the list of Google Pixel 6 guides, pick the guide you were working on, and find where you left off!

Clay Eickemeyer -

This is an excellent guide, thanks for the effort.

For others who attempt this; getting rid of the old adhesive is really time consuming, it took me a good hour or so to get it all off the body and screen.

Oli -

Absolutely, while some of the other steps during disassembly were stressful and difficult, removing the old adhesive was far far more time consuming.

Leo Huang -

Hello, i have purchased a screen repair kit for a pixel 6, after reassembly I noticed the proximity sensor is not working, any help would be appreciated.

Alexandru Mitrea -

I'm sorry to hear that your proximity sensor isn't working! This might be best handled by our customer service. Check out https://help.ifixit.com/ to get in contact with us, or see some troubleshooting steps.

Clay Eickemeyer -

Hi guys, just bought a kit after my screen came loose after a few knocks. What are the spring connectors on the Pixel 6, and what is their purpose? My screen works as of right now, but has no sensitivity on the upper third of the screen, and typing only picks up half the letters. I imagine it has to do with a broken digitalizer and not with these connectors, right?

Dani Cornes -

It could be due to an improper calibration. Try running your fingerprint calibration software again and, after making sure nothing has touched the screen during the process, reboot the phone manually after the process is all done. Problems with the calibration or not allowing the phone to reboot this additional time can cause touch issues with your new part.

Clay Eickemeyer -

When do you Plug the screen in and replace the little metal holder?

Melissa M. Miko -

Hi Melissa!

In this guide, this step is the point in which you'll return to your original replacement guide and continue reassembling your phone. This is where you'll reconnect the screen and install the metal bracket. Then, follow the rest of the steps to finish sealing up the screen.

Clay Eickemeyer -

Hi. The phone is now 2mm thicker than it was with the genuine screen, is that a normal thing?

Cyril -

Please add to manual to double check if proximity sensor seal wasnt removed with previous screen. Do not repeat my mistakes!

Vitalii Zhyrun -