Introduction

Tutoriel prérequis pour ouvrir un iPhone X, permettant d'accéder à ses composants internes pour les réparer ou les remplacer.

  1. Whblnhy2uvYmFjIL
    Whblnhy2uvYmFjIL
    4URQtwUtqSQUKdHH
    NgjPkqJtEMhTXkd3
    • Si votre écran iPhone X est fissuré, empêchez les fissures de s'aggraver et les éclats de vous blesser en le recouvrant de ruban adhésif.

    • Recouvrez l'écran de bandes de ruban adhésif, qui se chevauchent, jusqu'à ce que toute la surface soit couverte.

    • Portez des lunettes de sécurité pour vous protéger les yeux des éclats de verre tout au long de la réparation iPhone.

    • Si la ventouse n'adhère pas au cours des étapes suivantes, pliez un morceau de ruban adhésif épais (du ruban adhésif toilé p.e.) pour former une poignée et soulevez l'écran de cette façon.

    • Si tout cela échoue, vous pouvez coller la ventouse à l'écran avec de la superglue.

  2. aaO4KYlBJShASHjk
    aaO4KYlBJShASHjk
    1r6VLlUjodppndSN
    BMhMJ35CLUOmyNqB
    • Les trois étapes suivantes sont consacrées à la procédure avec l'Anti-Clamp, un outil facilitant les procédures d'ouverture. Si vous n'avez pas d'Anti-Clamp, passez à la procédure alternative trois étapes plus loin.

    • Pour des instructions complètes sur comment utiliser l'Anti-Clamp, jetez un œil à ce tutoriel.

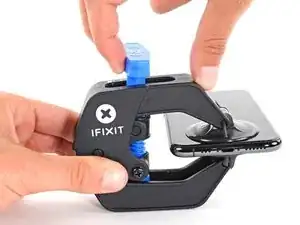
    • Tirez la poignée bleue vers l'arrière pour débloquer les bras de l'Anti-Clamp.

    • Insérez le côté droit ou gauche de votre iPhone entre les bras.

    • Positionnez les ventouses en bas de l'iPhone, une sur le dessus, l'autre en dessous.

    • Appuyez sur les deux ventouses pour qu'elles adhèrent bien.

    • Si vous trouvez que la surface de votre appareil est trop glissante pour que l'Anti-Clamp puisse adhérer, vous pouvez utiliser du ruban adhésif pour créer une surface plus adhérente.

  3. fm1Txb6ZWoZVRccg
    fm1Txb6ZWoZVRccg
    ASYBeEfJh2IqKXlL
    qYIoimNJqUrEuJAT
    • Tirez la poignée vers l'avant pour bloquer les bras.

    • Tournez la poignée dans le sens des aiguilles d'une montre, de 360 degrés ou jusqu'à ce que les ventouses commencent à s'étirer.

    • Vérifiez que les ventouses restent bien alignées entre elles. Si elles commencent à se décaler, détachez-les pour les réaligner.

  4. fqtITHlwZLOFLmTY
    fqtITHlwZLOFLmTY
    321YFxdKNFRFVwk3
    YctteqQxMcE3kxyP
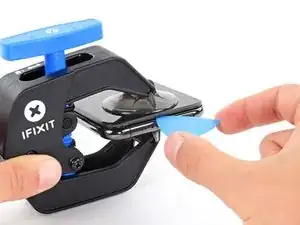
    • Chauffez un iOpener et faites-le passer à travers les bras de l'Anti-Clamp.

    • Vous pouvez également utiliser un sèche-cheveux, un pistolet à air chaud ou une plaque chauffante. Mais gare à la surchauffe, l'écran et la batterie sont sensibles à la chaleur. Faites donc bien attention.

    • Pliez l'iOpener de façon qu'il repose sur le bord inférieur de l'iPhone.

    • Attendez une minute que l'adhésif se ramollisse et qu'un espace s'ouvre.

    • Insérez un médiator sous l'écran et le joint en plastique, et non dans l'écran.

    • Si l'Anti-Clamp n'a pas créé un écart suffisamment large, appliquez plus de chaleur sur la surface et tournez la poignée d'un demi-tour de plus.

    • Ne tournez pas plus d'un demi-tour à la fois, et attendez une minute entre chaque rotation. Laissez l'Anti-Clamp et le temps faire le travail pour vous.

    • Passez les trois étapes suivantes.

    DO NOT separate the glass from the plastic bumper or rim around it. These instructions don't clarify that the pick has to be inserted between the plastic rim and the metal body. It is likely that the glass will lift slightly off the plastic surround before the plastic will lift out of the metal body. I had success sliding a card or pick back and forth along the bottom edge of the plastic rim while pulling on the suction cup. Eventually there was a space large enough for the pick to go under the plastic rim.

    Anessa -

    Thanks for pointing this out! I'll revise this step to clarify this point.

    Arthur Shi -

  5. JYhTvDYuGLQw3jiI
    • Chauffer le bord inférieur de l'iPhone va aider à ramollir l'adhésif qui fixe l'écran, et donc faciliter l'ouverture.

    • Utilisez un sèche-cheveux ou un pistolet à air chaud ou préparez un iOpener et appliquez-le sur le bord inférieur de l'iPhone pendant environ une minute afin de ramollir l'adhésif qui se trouve en dessous.

    • Si vous utilisez un sèche-cheveux ou un pistolet à air chaud, ne chauffez pas trop, car vous risqueriez de détériorer l'écran.

    General tip regarding heating necessary to remove adhesive:

    consider using a heated tip of a small screwdriver or metal spudger (not the one made of plastic, provided in kit), rather than to heat the device itself.

    Uri -

    You then need to be careful about the temp of the tool which if hot enough can melt plastic components or harm them. Keeping the heat source (heat gun) far enough away from the object that you’ll eventually melt the glue but would be much harder to melt components. I try to keep 4” or 5” gap between the source & object

    Sandman619 -

    Thanks for the info. Could a air convector do the job

    dominique.br -

    When opening a device that has previously been worked on, and on which the adhesive might not have been replaced, be extremely carful when opening the phone. It will open much more easily than expected. If you’re not careful you might rip a cable.

    jonpol -

    Is this tool required or can I just use the Anti-Clamp by itself.

    Mikail -

    If you have a 3d printer, heat the bed to 80c and put the phone screen side down on it for 30 secs

    philip.joseph123 -

    thaks for this advise, I was looking for this as I dont have a heat gun haha, nice hack

    Andres Chaparro -

  6. qXGGZ2MpZIYeQjKI
    qXGGZ2MpZIYeQjKI
    tGDwxj5neYkh3MDh
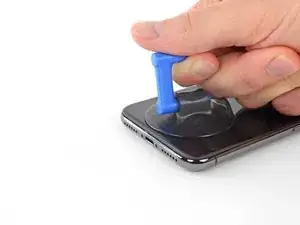
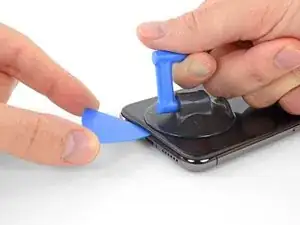
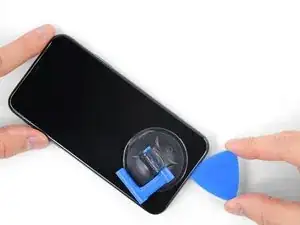
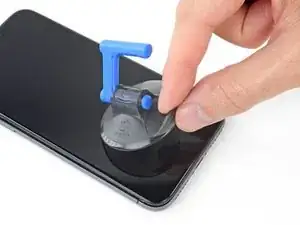
    • Si vous utilisez une ventouse simple, posez-la au niveau du bord inférieur du téléphone tout en évitant la partie incurvée du verre.

    If you were using some form of screen protector, it may come off first as soon as you pull on the suction cup. Do not be alarmed. That is normal behavior.

    Alain-Daniel Wa-Baguma -

    3m VSB double stick tape will stick to the screen when the suction cups fail (see my comment on step 1)

    Tawan Khamapirad -

  7. uTXCGQFa5j4E5T3Y
    uTXCGQFa5j4E5T3Y
    DWfsuj4RCooAtKRa
    Zw4PcEZSTKHaLcqq
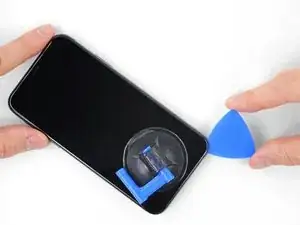
    • Tirez fermement sur la poignée de la ventouse en appliquant une pression constante, pour ouvrir une petite fente entre l'écran et le châssis.

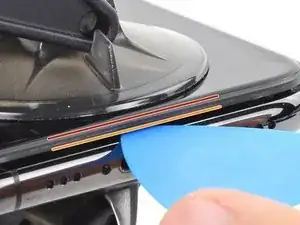
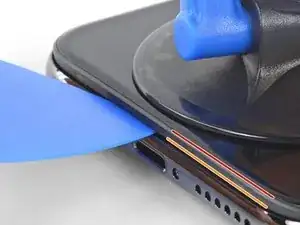
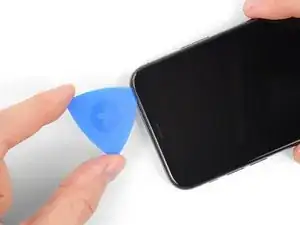
    • Insérez un médiator dans l'espace sous le joint en plastique de l'écran, pas dans l'écran lui-même.

    • L'adhésif étanche qui maintient l'écran est très solide ; ouvrir cette première fente nécessite beaucoup de force. Si vous avez du mal à le faire, chauffez le tout encore une fois. Puis faites doucement basculer l'écran de haut en bas pour faire céder l'adhésif, jusqu'à que vous ayez ouvert une fente suffisamment large pour y insérer le médiator.

    In addition to safety goggles, I would recommend you also wear good gloves to avoid getting cut with the glass as you try to pry it open.

    Alain-Daniel Wa-Baguma -

    The top about applying more heat and gently rocking the screen up and down to weaken the adhesive did the trick for me. Thank you!

    Monil Shah -

    There needs to be more clarity on where to shove the opening pick into. There is actually two openings that the pry tool can be forced into: one below the black plastic bezel, and one above the black plastic bezel. When I heated my screen with a warming pad and pulled up the suction cup, it actually pried apart above the black plastic bezel which removed the touch screen from the display panel. With this being the first newer iPhone I'd opened since the 3GS, I didn't realize that I was opening the wrong opening as the directions only mentioned one opening and did not warn of this. I was pretty disappointed in the lack of mentioning this, as I was taking my time and following it to the tee. As a result, it destroyed my original iPhone screen.

    Caleb Davison -

    DO NOT separate the glass from the plastic bumper or rim around it. As someone else noted, these instructions don't clarify that the pick has to be inserted between the plastic rim and the metal body of the phone. When pulling upwards with the suction cup, it is likely that the glass will lift slightly off the plastic surround before the plastic will lift out of the metal body. I had success sliding a card or pick back and forth along the bottom edge of the plastic rim while pulling on the suction cup. Eventually there was a space large enough for the pick to go under the plastic rim.

    Anessa -

    Thank you for pointing this out! I've updated the step to reflect this.

    Arthur Shi -

    The suction cup doesn't work at all... The minimum force I apply to lift it up, it comes off completely. This is very frustrating!!!

    Mario Silva -

  8. QE4lOUoglbyWQUwm
    QE4lOUoglbyWQUwm
    cHHBBJPBr4bVv24U
    agDTTsHWFYyI2WBC
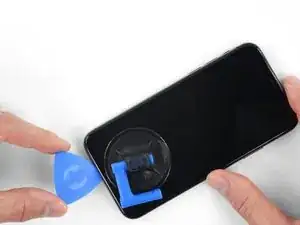
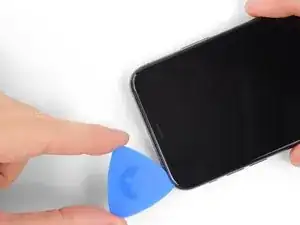
    • Faites glisser le médiator le long du coin inférieur gauche de l'iPhone, ce qui va trancher l'adhésif qui maintient l'écran en place.

    • N'insérez pas le médiator de plus de 3 mm, vous risqueriez d'endommager des composants internes.

  9. mkLvBfvMoYsfQbGS
    • Il y a des nappes très fragiles sur le côté droit de votre iPhone. N'y insérez pas le médiator ! Vous risqueriez de les endommager.

    Wouldn’t it be better to put this part BEFORE the step where you have to pry open the phone?

    Jan D. Höllwarth -

  10. OEUEsoSAmOAWxAMR
    OEUEsoSAmOAWxAMR
    YOhTValkxrevLipu
    aSZ2MAdtw4ZImiCD
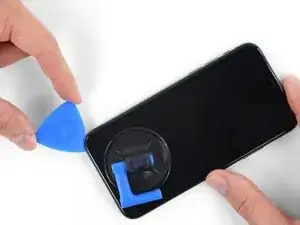
    • Ré-insérez votre médiator dans le bord inférieur de l'iPhone, et faites-le glisser jusqu'au côté droit pour continuer à séparer l'adhésif.

    • N'insérez pas votre outil de plus de 3 mm, vous endommageriez les nappes de l'écran.

    If you have flat feeler gauges (for adjusting engine valve tappet clearance, ignition points … old school) the .003” thick gauge goes right in. Work your way up in thickness until you can get the pic or supplied pry tool in. Don’t insert metal feeler gauge in too far, just enough to hold crack open. I didn’t need to use the suction cup. I used a hot/cold gel pack heated in microwave to heat edges to soften glue a bit. Made sure it wasn’t so hot I couldn’t stand it on my skin.

    William Olstad -

  11. WfcjjEBfMZqEySEf
    WfcjjEBfMZqEySEf
    PCXKpWMWg6GWEViY
    McqYslJ4vV1SOOnm
    • Le bord supérieur de l'écran est retenu par de la colle et des clips.

    • Glissez le médiator sous le coin supérieur de l'écran tout en faisant délicatement jouer l'écran vers le bas, en direction du port Lightning.

    • Les clips peuvent se casser si vous forcez trop. Progressez avec prudence et restez patient.

    • N'insérez pas votre outil de plus de 3 mm. Vous risqueriez d'endommager la rangée des capteurs du panneau frontal.

    • Glissez le médiator sous le côté opposé pour faire céder l'adhésif restant.

    These are the best instructions I’ve ever read for anything.! Thank you!

    Peter Andrew -

  12. GnieimxVeXdJJobM
    • Tirez sur la petite bosse de la ventouse pour la décoller du panneau frontal.

  13. XFu5RLJA6ncMAhxo
    XFu5RLJA6ncMAhxo
    nCGOAuVQLFmYsrOd
    XjQSuyqDe1k51mua
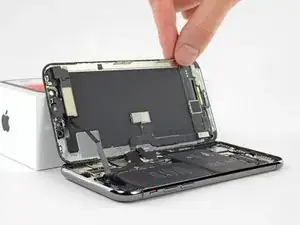
    • Ouvrez l'iPhone en tournant l'écran depuis le côté gauche, comme s'il s'agissait de la couverture au dos d'un livre.

    • N'essayez pas encore d'enlever complètement l'écran, car plusieurs nappes fragiles le relient toujours à la carte mère de l'iPhone.

    • Comme sur la photo, assurez-vous que le châssis se détache avec l'écran et ne reste pas coincé dans l'appareil.

    • Appuyez l'écran contre un objet pour le maintenir à la verticale pendant que vous travaillez sur le téléphone.

    • Lors du remontage, posez l'écran iPhone X à sa place, alignez les clips le long du bord supérieur. Puis appuyez délicatement sur le bord supérieur avant de refermer le reste de l'écran. S'il ne s'enclenche pas facilement, vérifiez l'état des clips sur le pourtour de l'écran et vérifiez qu'ils ne sont pas déformés.

    My phone came apart in a different way and looks not right the little box at the top of the display as actually bolted to the top of the frame body I think something went really wrong when I opened it.

    Mike Kostersitz -

    It opens like a book but be careful not to open it all the way — only as far as shown in the photo. Otherwise it will strain the thin cable that connects the sensor module and then no more FaceID for you (or, as it turns out me). This could have been made more explicit in the instructions.

    Richard Tucker -

    It opens like a book but be careful not to open it all the way  … the small stainless steel tabs that hold the screen around the metal frame, that are on the bend place (right side of the phone)… are tend to bend, you can straighten them back to 90 deg. but the plastic base that they are on? very fragile- watch out not to break the plastic bezel … it may come apart of the glass.

    dabur872 -

    Advice for re-assembly: Before closing up the phone with the seal, check if phone is powering up again and speaker, mic and sensors are still working. If done this check even before installing the board connector bracket in Step 13.

    Alexander Nowak -

Conclusion

Pour remonter votre appareil, suivez les étapes dans l'ordre inverse.

Jeff Suovanen

Membre depuis le 06/08/13

435982 Réputation

0 commentaires