Introduction

Suivez les étapes de ce tutoriel pour retirer, transférer et/ou remplacer l'ensemble haut-parleur interne et capteurs avant de votre iPhone XR. Cet ensemble inclut le haut-parleur interne, le microphone, le capteur de luminosité ambiante, l'illuminateur infrarouge et le capteur de proximité.

Chaque ensemble est couplé en usine avec son iPhone, vous devez donc le transférer depuis votre ancien écran sur le nouveau à chaque remplacement d'écran.

L'illuminateur infrarouge fait partie du système de reconnaissance biométrique Face ID. Celui-ci ne fonctionnera plus si le composant d'origine est abîmé ou mal installé. En le remplaçant avec une nouvelle pièce, vous perdrez la fonction Face ID. Faites très attention en effectuant une réparation à ne pas endommager ces composants. En tel cas, seul Apple pourra restaurer la fonction Face ID.

  1. aGeYRP3gUuAwIhn6
    aGeYRP3gUuAwIhn6
    n6aSREpvVP6h1IbH
    • Avant de commencer, déchargez la batterie de votre iPhone en dessous de 25 %. Une batterie lithium-ion chargée peut prendre feu et/ou exploser si elle est perforée accidentellement.

    • Éteignez votre iPhone avant de commencer le démontage.

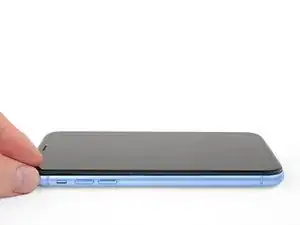
    • Dévissez les deux vis Pentalobe de 6,7 mm au bord inférieur de l'iPhone.

    • Ouvrir l'iPhone endommagera ses joints étanches. Procurez-vous des joints de remplacement avant de passer à l'étape suivante ou faites attention à ne pas exposer votre iPhone aux liquides si vous le remontez sans remplacer les joints.

    • Juste en dessous de chaque vis Pentalobe se trouve un joint noir. Pour une protection maximale contre les liquides et la poussière, vérifiez l'état des joints ou remplacez les vis lors du remontage.

    One of my gaskets was as shown in your second photo, the other had been worked into the threads (as if smeared) probably from the factory and was completely unusable.

    In place of replacements (unsure of where to purchase) I just used a clear silicone caulking on both screws upon reassembly to offer at least some water seal. I wish these gaskets were included with the gasket waterproofing sealant kit!

    Erica -

    Is there any place to buy these screw gaskets? I haven’t seen it mentioned anywhere but one of mine was pretty much chewed up. Silicone should work but I’d prefer the oem solution.

    Chilinh Nguyen -

    I found a place on Amazon that sells them. It's cheapest to get a full set of screws than to get just these. $5-$6 USD.

    J Olin -

    Can it be dead?

    Lulu navarro -

    If I transfer the data from the old to the new battery with an icopy, don't I get an error message?

    David Julian Krause -

    how am i supposed to know if the battery is below 25% if the screen won't turn on?

    Beth Jackson -

    Spoiler alert! I just followed all the steps and if you bought the anti-clamp you might save a lot of time and some unreversible steps.

    I recommend that you read all the steps before beginning and follow the steps up to the point where the guide removes the screen (step 23). After that read again the precautions of step 41 and try the next thing:

    - Using something like the iOpener hot bag, heat up the back side of the phone where the battery is glued to for some minutes

    - Alternatively use a 3d printer heat bed at 60 degrees Celsius

    - Once the back of the phone is hot to the touch, enough to make it uncomfortable to the touch, find a portion of the battery with a smooth surface and attach the anti-clamp to it and the back of the phone

    - Follow the steps 4 and 5 to detach the battery from the frame

    If this procedure works you will not have to remove some elements such as:

    - lower speaker black tape (step 28)

    - lower speaker water proof gasket (step 33)

    I hope that someone find this helpful. Happy fixing!!

    Julio Beltran -

  2. 6UPwoloGBO4tmVoS
    6UPwoloGBO4tmVoS
    BmSYPJmOy6dbHipF
    3EOdQPAGOmiuhoKU
    • S'il est inséré trop loin, un médiator risque d'endommager votre appareil. Suivez cette étape pour tracer un repère sur votre médiator et éviter que l'appareil ne soit endommagé.

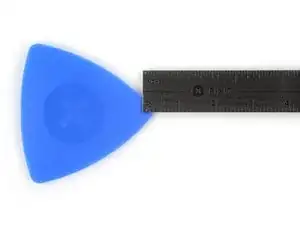
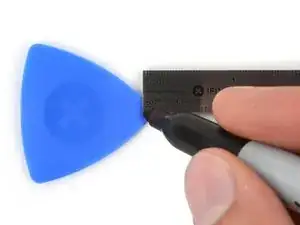
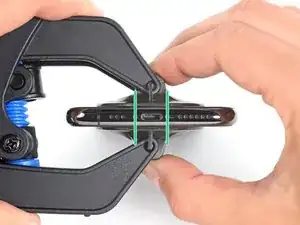
    • Mesurez 3 mm à partir de la pointe et tracez une ligne sur le médiator avec un marqueur permanent.

    • Vous pouvez également marquer les autres coins du médiator avec des mesures différentes.

    • Une autre solution consiste à scotcher une pièce de monnaie sur votre médiator, à 3 mm de la pointe.

    Got to step 2 and realized the fix kit doesn't include an opening pick! Looks like a guitar pick, and I have those lying around. Is that expected? Looks like the pick is used in many steps below. There's a little blue crowbar that isn't mentioned in the instructions. Perhaps that replaces the opening pick?

    Sloan Looney -

    Hi! I can't see which guide you were using when writing this comment. Can you reply here with which guide and fix kit you used?

    Clay Eickemeyer -

    I see you posted this in Meta. I hope it's resolved soon! In the meantime, a guitar pick may work well enough for your repair.

    Clay Eickemeyer -

    what fix kit?

    Meow Purr -

    My fix kit didn't include an opening pick either

    WILLIAM HARRIS -

    Make sure you check inside the black boxes after emptying them. My pick was stuck inside one of the boxes.

    AndyF -

    My AliExpress refurbished screen came with a pick that has a coin-like circle that pops out, so no modification was necessary

    Gijs Leegwater -

    the picture shows 3 cm but the description says 3 mm's. Which one is it?

    John Pena -

    That is a misunderstanding. It is a ruler with a scale for cm, it shows 0.3 cm, i.e. 3 mm.

    VauWeh -

    Oh, come ON!

    Big Ed -

    It will ALWAYS be millimeters on a phone, but this step is ridiculous, skip it!

    Leif DeWolf -

    It's not an Ifixit KIT if it doesn't include everything. You'll need to order the opening pic separately. Or head to Walmart like myself and look for guitar pics. Hopefully, this will work just as well.

    Jaleeljb97@icloud.com -

    No pick in mine as well. It’s really not clear that you have to order this separately when ordering an IPhone SE 202/2022 screen repair kit. Is this the case?

    Jackson Castiglione -

    Frustrated, I ordered a compact package where everything was encapsulated. Useless suction tools could not separate the screen. If it is unable to decouple the screen, then why sucking suction tools you have provided.

    Shourob Datta -

    For my kit the triangle pick was stuck inside the box with the screen not with the other tools maybe it's also there for you

    Henry Scheibehenne -

    Y’all are getting far, FAR too detailed with some of this stuff…. Measuring and marking the pick that you won’t actually use to open the device?!? lol that’s kinda funny. Just heat it up, grab a spudger, and the back just pops right off! The iFixit tech need to stick to the KISS method more often, you know KEEP IT SIMPLE STUPID!!! Like l, for reals, I’ve been doing this stuff for YEARS and using iFixit guides regularly and this is just ridiculous at this point!

    Leif DeWolf -

  3. C3NHJXiiQMPmRmH1
    C3NHJXiiQMPmRmH1
    AvZqCHCmwCqavQEa
    ElEZlRVXFlXaE11y
    • Si votre écran iPhone XR est fissuré, empêchez les fissures de s'aggraver et les éclats de vous blesser en le recouvrant de ruban adhésif.

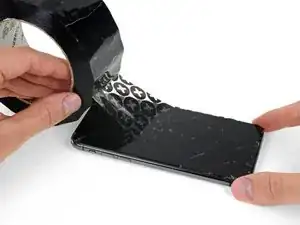
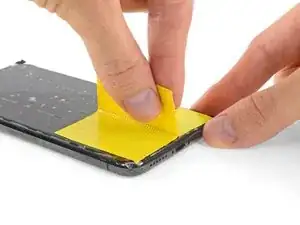
    • Recouvrez l'écran de bandes de ruban adhésif, qui se chevauchent, jusqu'à ce que toute la surface soit couverte.

    • Portez des lunettes de sécurité pour vous protéger les yeux des éclats de verre tout au long de la réparation iPhone.

    • Si la ventouse n'adhère pas au cours des étapes suivantes, pliez un morceau de ruban adhésif épais (du ruban adhésif toilé p.e.) pour former une poignée et soulevez l'écran de cette façon.

    • Si tout cela échoue, vous pouvez coller la ventouse à l'écran avec de la superglue.

    This looks like a repeat of Step 3.

    GenjideGaulle -

  4. lXwQA2bBknBmaYMk
    lXwQA2bBknBmaYMk
    FHSJhUkdlCcsOYQb
    eEJeUWVQi3pZT5nt
    • Les trois étapes suivantes sont consacrées à la présentation de l'Anti-Clamp, un outil que nous avons conçu afin de faciliter la procédure d'ouverture. Si vous n'avez pas d'Anti-Clamp, passez à la procédure alternative trois étapes plus loin.

    • Un tutoriel complet pour utiliser l'Anti-Clamp est disponible à cette adresse.

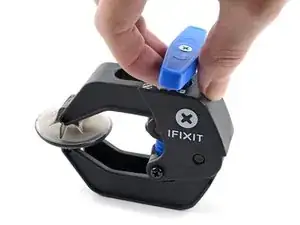
    • Tirez la poignée bleue vers l'arrière pour débloquer les bras de l'Anti-Clamp.

    • Insérez le côté droit ou gauche de votre iPhone entre les bras.

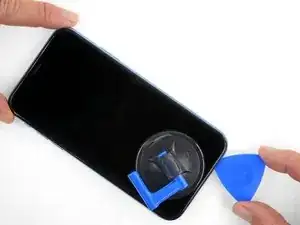
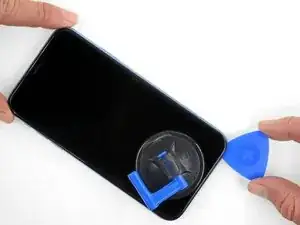
    • Positionnez les ventouses en bas de l’iPhone. Une à l'avant et l'autre à l'arrière.

    • Appuyez sur les ventouses afin d'appliquer la pression à l'endroit désiré.

    • Si vous trouvez que la surface de votre iPhone est trop glissante pour que l'Anti-Clamp puisse adhérer, vous pouvez utiliser du ruban adhésif pour créer une surface plus adhérente.

  5. EOrAXSnhbDqUEfeq
    EOrAXSnhbDqUEfeq
    IZBIIwSmgie3pKNV
    AX2lQWb4EBr6rFML
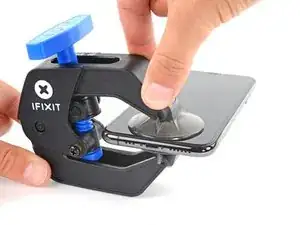
    • Tirez la poignée bleue vers l'avant pour bloquer les bras.

    • Tournez la poignée dans le sens horaire, de 360 degrés ou jusqu'à ce que les ventouses commencent à s'étirer.

    • Vérifiez que les ventouses restent bien alignées entre elles. Si elles commencent à se décaler, détachez-les pour les réaligner.

  6. rIFHrN5JZhosBVDF
    rIFHrN5JZhosBVDF
    RHq3otgHGgSRUaHQ
    MyajHuYx1EYm4LAd
    • Chauffez un iOpener et faites-le passer à travers les bras de l'Anti-Clamp.

    • Vous pouvez également utiliser un sèche-cheveux, un pistolet à air chaud ou une plaque chauffante. Mais gare à la surchauffe, l'écran et la batterie sont sensibles à la chaleur. Faites donc bien attention.

    • Pliez l'iOpener de façon qu'il repose sur le bord inférieur de l'iPhone.

    • Attendez une minute que l'adhésif se ramollisse et qu'un espace s'ouvre.

    • Insérez un médiator sous l'écran et le joint en plastique, et non dans l'écran.

    • Si l'Anti-Clamp n'a pas créé un écart suffisamment large, appliquez plus de chaleur sur la surface et tournez la poignée d'un demi-tour de plus.

    • Ne tournez pas plus d'un demi-tour à la fois, et attendez une minute entre chaque rotation. Laissez l'Anti-Clamp et le temps faire le travail pour vous.

    • Passez les trois étapes suivantes.

    Please UPDATE THIS STEP to say 'insert the opening pick underneath the PLASTIC FRAME OF THE SCREEN' and not the screen. Way too many people are taking this as the way to do it then posting their screen looks different when it's open when they've actually removed the screen leaving the frame in place. It's not rocket science.

    [deleted] -

    Thanks for the suggestion! We updated this step to clarify that.

    Arthur Shi -

  7. CvqPuR6YujN6uWQ6
    • Faire chauffer la partie inférieure de l'iPhone aide à ramollir l'adhésif qui fixe l'écran et facilite la procédure d'ouverture.

    • Prenez un sèche-cheveux ou un pistolet à air chaud, ou bien préparez un iOpener et posez-le en bas de l'iPhone pendant environ une minute afin de ramollir l'adhésif qui se trouve en dessous.

    An alternative to the Iopener or heat gun is to heat water to EXACTLY 80 degrees F (cooking thermometer is great for this) and pour into a reinforced ziplock type bag. Leave the bag on the screen, but be sure that none of the hot water rests on the zipper portion, as the water is hot enough to soften that seal and leak out on to your device! This meat had is my personal favorite as the heat is distributed very equally and precisely as compared to a heat gun, but is more accessible than the Iopener.

    Colin Wylie -

    When using an iOpener, rest the glossy (transparent) side on the phone so it contacts the phone and conducts heat easily

    Afiq -

  8. P5PouqftuOuIAKpF
    P5PouqftuOuIAKpF
    IhTlLHCH2DAmlimO
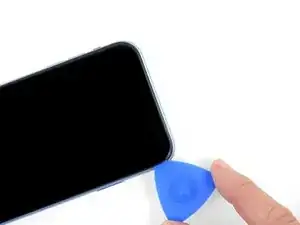
    • Si vous utilisez une seule ventouse, posez-la sur le bord inférieur du téléphone en évitant la partie incurvée du verre.

  9. nmV3em2q4QXYS1al
    nmV3em2q4QXYS1al
    ade6PZ4Lt42pSQnj
    3fHmwqIgAuXYKGFA
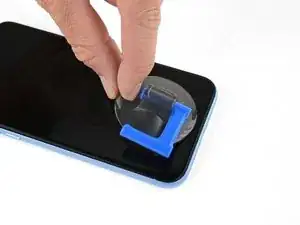
    • Tirez sur la ventouse de façon ferme et constante pour ouvrir un léger interstice entre le panneau frontal et la coque arrière.

    • Insérez un médiator dans l'interstice sous l'écran et le joint en plastique, pas dans l'écran lui-même.

    • L'adhésif étanche maintenant l'écran en place est très résistant, créer ce premier interstice demande donc de la force. Si vous avez du mal à le faire, refaites chauffer l'iPhone et bougez délicatement l'écran de bas en haut pour faire céder l'adhésif, jusqu'à ce que vous réussissiez à insérer votre outil.

  10. mTLhKZ2OFBeZ2Tdm
    mTLhKZ2OFBeZ2Tdm
    Y45KLZQdRY3bn32a
    frfW3Vhso4IPv1nR
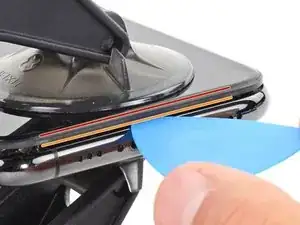
    • Faites glisser le médiator le long du coin inférieur gauche de l'iPhone pour trancher l'adhésif qui maintient l'écran en place.

    • N'insérez pas le médiator de plus de 3 mm, vous risqueriez d'endommager des composants internes.

    I think it's important to note that depending on how a screen was damaged, make sure to insert the pic under the black bezel directly under the actual screen. This bezel is a frame around the digitizer. I unknowingly inserted the pic between the bezel and the screen, and separated them both. I did this all the way around the phone. So I basically had to struggle to keep together two different sections of the display assembly because of this mishap, until I removed all the ribbon connectors. It made things much more difficult.

    Dave -

    An edit to my above comment: by digitzer, I mean the LCD shield. My apologies.

    Dave -

    Yeah it’s helpful to just look at the screen they sent you. You’ll have a better idea of where to pry or stick your razor blade under!

    ryandlent -

  11. RiRjcYKAFFOeKIcv
    • Il y a des nappes très fragiles sur le côté droit de votre iPhone. N'insérez pas le médiator au niveau des endroits indiqués, vous risqueriez de les endommager.

  12. ciFaLRnrmwyZDMOS
    ciFaLRnrmwyZDMOS
    H5TqnANpvmXIGpQe
    SRHh1OkaYV5x5XkG
    • Réinsérez votre médiator dans le bord inférieur de l'iPhone et faites-le glisser vers le côté droit pour continuer à faire céder l'adhésif.

    • N'insérez pas votre outil de plus de 3 mm, car vous endommageriez les nappes de l'écran.

    My replacement screen for the XR has a black rim but it looks pink. Is that normal?

    Irwin Cantor -

    You can use some Isopropyl alcohol in a syringe with a thin needle to soften even more the adhesive around the screen. But be careful so as not to overdo it. Just a few drops. It will become more easier to remove the screen.

    Dan Brock -

    Step 11 says not to insert your pick around the right side to avoid damaging cables, then Step 12 says to insert it on the right side. Help, I'm confused!

    ingwis -

    Hi there!

    Thank you for the feedback! The wording in step 11 was definitely ambiguous, so we have changed it! You only need to avoid the marked spots rather than the right edge.

    Alex Diaz-Kokaisl -

  13. qJy3qiZlDfvYHwCQ
    qJy3qiZlDfvYHwCQ
    XxFonXKXmI3M5iSN
    1uZnbxjnhtQFtsUm
    • Le bord supérieur de l'écran est fixé à la fois par de la colle et des clips.

    • Faites glisser le médiator le long du coin supérieur de l'écran tout en remuant délicatement l'écran vers le bas, dans la direction du port de charge Lightning.

    • Les clips risquent de se casser si vous forcez trop. Progressez soigneusement et soyez patient.

    • N'insérez pas votre outil de plus de 3 mm – ou vous risquez d'endommager la rangée de capteurs du panneau avant.

    • Faites glisser le médiator vers le côté opposé et tranchez l'adhésif qui fixe encore l'écran.

  14. OHLZ3rYnPU6OUxI2
    • Tirez sur la petite bosse de la ventouse pour la détacher du panneau avant.

  15. gvaAabBGpp5PNyMF
    gvaAabBGpp5PNyMF
    aLbYdtq5MLGGwHqi
    41YpqEeGtyYn5Wxq
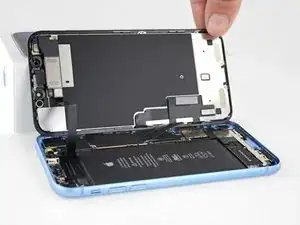
    • Ouvrez l'Phone en faisant pivoter l'écran vers la droite, comme la couverture arrière d'un livre.

    • N'essayez pas encore de séparer complètement l'écran, car plusieurs nappes fragiles sont toujours reliées à la carte mère de l'iPhone.

    • Posez l'écran iPhone contre un objet pour qu'il soit maintenu à la verticale pendant que vous poursuivez votre réparation iPhone XR.

    • Lors du remontage, positionnez l'écran iPhone XR, alignez les clips le long du bord supérieur, puis appuyez soigneusement sur le bord supérieur avant d'emboîter le reste de l'écran. S'il n'y a pas de clic, vérifiez l'état des clips sur le périmètre de l'écran et assurez-vous qu'ils ne sont pas déformés.

    sure looks like the "hinge" is on the right hand side to me.. not left...!

    Doug Trout -

    If you leave the suction cup attached to the screen during the “hinging” process, it makes for a very handy holder for the screen until it’s completely detached.

    Richard Deubler -

    What about the sticky black adhesive clinging to the inside of the case?

    Ronald -

  16. Pm3XuCwO4BcYdoNT
    Pm3XuCwO4BcYdoNT
    dbH2ibTJKmdNSytC
    • Dévissez les trois vis Y000 de 1,2 mm qui fixent le cache du connecteur de la batterie.

    • Ôtez le cache.

    • Tout au cours de la réparation, gardez la trace de chaque vis et assurez-vous de les revisser toutes là où elles étaient afin d'éviter d'endommager votre iPhone.

    • Lors du remontage, voilà venu le bon moment pour allumer votre iPhone et tester toutes les fonctions avant de sceller l'écran en place. Assurez-vous d'éteindre à nouveau votre iPhone avant de continuer à travailler.

    Definitely make sure all three lobes of your tool are aligned before use (it’s a little harder to tell with this style of bit) and apply even and adequate pressure to ensure it grabs as you spin the driver to prevent disfiguring the lobes/slot of the screw head.

    Unfortunately my Y000 tool was perhaps not the best fit (tolerance a bit off) in these screws and I ended up stripping out the heads of all three of these. I started to panic but after I sanded the tip of my Y000 bit down a little with super fine grit (1000CW-C) sand paper to flatten the domed tip (visible with macro lens) and give it a bit more bite I was able to remove and reinstall without issue—in fact I had to remove and install them twice since I forgot my adhesive tape during reassembly, so the screws survived and the sanded bit worked.

    Erica -

    +1 to above comment. I bought a cheap kit from Amazon and the Y000 screw driver is not good for this job. I’m concerned that I may have disfigured the heads and i type this comment in the midst of my fix :D Be gentle and assess if you can remove at least one screw with your driver before rummaging through all three and other similar screws holding display connector as well.

    Shan Potti -

    Update to above comment. I got hold of a Y0.8 screw driver bit (lucky to find an ORIA screw driver kit in my office) and it works like wonders :) Now back to work…

    Shan Potti -

  17. wTxgGtY4ALPOaL6M
    wTxgGtY4ALPOaL6M
    oLrG4CKHkHQWnl5b
    • Faites levier avec la pointe d'une spatule (spudger) pour soulever le connecteur tout droit hors de sa prise.

    • Essayez de ne pas abîmer les joints en silicone noir qui entourent cette connexion et d'autres. Ces joints sont une protection supplémentaire contre l'intrusion d'eau et de poussières.

    • Écartez légèrement le connecteur de la carte mère pour l'empêcher de faire accidentellement contact avec la prise et d'alimenter le téléphone pendant que vous effectuez votre réparation.

  18. ycOPoUnmEuOGtRXs
    ycOPoUnmEuOGtRXs
    AiuRYCepIGVGVEUA
    • Dévissez les deux vis Y000 de 1,2 mm qui fixent le cache du connecteur de l'écran.

    • Enlevez le cache.

    What if the screw is damaged and you can’t get one out?

    Kashawn Benjamin -

    Same issue here. These screws are a lot thighter than the others. Maybe add a caution notice to be patience with these ones.

    What you can try is superglue to make it attached to the screw.

    Lennard -

  19. CFAlA4IEWSGKiQBn
    CFAlA4IEWSGKiQBn
    NAhKByGJ4iRqHGvE
    • Prenez la pointe d'une spatule pour soulever et déconnecter la nappe de la vitre tactile.

    • Pour refermer un tel connecteur à pression, appuyez d'un côté jusqu'à ce que vous entendiez un clic, puis faites pareil de l'autre côté. N'appuyez pas au milieu. Si le connecteur est légèrement mal aligné, les broches risquent de se tordre et de causer des dommages irréversibles.

    • Si une partie de l'écran ne réagit pas au toucher après votre réparation, déconnectez la batterie et repositionnez ce connecteur en veillant à ce qu'il s'emboîte entièrement et qu'il n'y ait ni poussières ni autres corps étrangers dans la prise.

  20. EF5KUKKN1562jycp
    EF5KUKKN1562jycp
    hqHtSbHNDEqk2pPD
    • Prenez la pointe d'une spatule pour débrancher le connecteur de la nappe de l'écran.

    The new display cable isn’t snapping in but I was just able to snap in the old one. Did I break the new one somehow?

    Andrew Pierson -

    Same it is really frustrating, just keeps slipping up and its bound to get damaged

    Daniel Maldonado -

  21. erV5SYvpSFqRXnWJ
    erV5SYvpSFqRXnWJ
    C5NmtarPVEAnBWBm
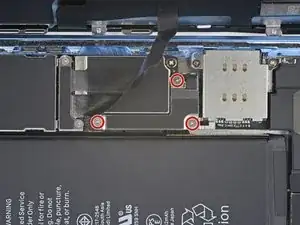
    • Dévissez les cinq vis qui fixent le cache du connecteur de la carte mère à la coque arrière :

    • Une vis cruciforme #000 de 1,3 mm

    • Une vis cruciforme #000 de 1,5 mm

    • Trois vis Y000 de 1,2 mm

    • Retirez le cache.

    • Veillez à ne pas perdre la petite fixation attachée au cache du connecteur. Elle est fixée par un petit clip et un petit choc a vite fait de la faire tomber du cache.

    Phillips screw 1.3 mm on last step is not working. The small clipped bracket has been damaged. This screw perhaps should be the first, before 1.2 Y000. - To be confirmed by others.

    Dmitri -

    I’m not sure it makes much if any difference, but we went ahead and swapped the order for you guys. Thanks for your comments!

    Jeff Suovanen -

    I just repaired another XR, and you are right! It doesn’t make any differnerce in the order these screws come out. I still damaged this fragile piece. As I work on more of these, I’ll figure out a way to remove this screw without damaging the clip. For now everyone, just use extra caution when removing the 1.3mm phillips screw! Thanks Jeff

    fabianowens -

    I’ve now done at least 6 of these so far and I have fairly consistent good results by taking the 2 Philips head screws out first, then doing the Y screws.

    Stow -

    Is this piece important for the repair if broken? I have broken it on a home repair. What is it used for? Is it a grounding connection or is it completely unimportant. More information needed please

    Squishy Horses -

    I’m wondering that too. Is this piece important?

    Phillip Gross -

    My clip broke too! on iphone XR. Any word on necessity?

    Beth Buer -

    I can confirm that taking out the 1.3 mm screw first then the 1.5 mm screw works the best. If done correctly, you should be able to to remove the rest of the screws and pull the panel off with the clip still attached to the panel. For reassembly, start with the 1.5 mm screw then the 1.3 mm screw.

    Carlos Oulman -

    I don’t remove the small screw at all. I just slide out the metal cover plate and slide back in to reassemble.

    Kyaw-Zin Win -

    this is what i have done as well. Care is still needed to avoid damaging this part. However, it is seemingly far less prone to damage or loss and thus less risky for this repair process.

    Justin Parsons -

    I too broke this shield. In looking over this problem I believe it’s best to loosen, but not remove, either screw first then the other. To be clear, loosen the red or yellow screw but only just to break it free, then the second screw. Then remove both and the others and the shield should remain in one piece. I put it back with the broken part (on the red screw) and made sure the two are in contact so there’s conductivity as these shields serve a purpose other than just holding in connectors. My phone works fine with this fix.

    pgrobin -

    Is this small bracket important if broken??

    Phillip Gross -

    Mine is broken

    Easy Repair -

    Mine is broken and my apple pay doesn’t work. Something to do with NFC antenna this little clip??

    Marcos Fernández -

    I'm guessing so. I replaced a screen on a phone I bought from a friend. I noticed this bracket was broken when I disassembled the phone but didn't think much of it. When I reassembled it my NFC also does not work. Bummer. A lot of people in these comments have asked if it is crucial that this bracket be connected. Can someone from iFixit or other please reply to those comments?

    Larry Jorgenson -

    On the 1.3 mm screw I actually chose not to remove it. I broke it loose then used the tip of the spudger to simply twist the bracket out of the way, with the screw still attached. Then I could remove the larger bracket.

    mpalma -

    Kyaw-Zin is right because the shield contains of two tin parts. But there is another option:

    1. Unscrew the yellow and orange screws first.

    2. Lift the shield gently that it can turn about 20° anticlockwise.

    3. Open the red screw and let the shield turn with it the first degrees.

    Daniel Brehm -

    The first time I did this repair, I didn’t see the comments ahead of time and broke the bracket, even removing the 1.3mm screws first. The second time I did the repair, I was prepared and being extra careful, but the simple act of turning the 1.3mm screw head was enough to break it. If I ever have to do this repair again, I’ll just leave the screw in and try to slide the plate out with the screw (and bracket, hopefully) still in tact, as per Kyaw-Zin Win.

    Debbie Thompson -

    None of the screw driver bits I got fits the 1.3mm and 1.5mm screws. How do I remove them?

    Jonatious Joseph Jawahar -

    Same issue as above. The bits provided in the kit do not work with the 1.3mm and 1.5mm screws

    Graham Hammell -

    Further to above comment about bit not working. Had to go and purchase another PH000 from Home Depot and that worked

    Graham Hammell -

    I’ve broken that little bracket attached to the red screw. Is it important and can I get a replacement????? Thanks all

    steve.arfa -

    Broken the clip. Is this important??

    kyledrumtutor -

    Yikes, broke mine too. Oh god. Think perhaps the delicate 1.3mm should come out first when everything else is secure...

    Ronald -

    Don't remove the 1.3 Phillips screw! Twisting this screw will break the smaller bracket that is clipped to the larger. Remove all the other screws. Block the smaller bracket from moving as you gently slide the larger bracket horizontally toward the battery until free. The smaller bracket can stay in place while the screen is replaced. When reassembling, support the small bracket by backing with a spudger or similar tool.

    doug68242 -

    I just broke the smaller bracket also :( I didn´t notice these comments until now :(

    It looks like part of the antenna for NFC, as all except NFC works on my iPhone now.

    It should be repairable using some wire wrap wire, either twisted around the two screws that connected that part of the bracket (or soldered in place). I will try and report back if it works.

    Richard Croyle -

    Success!! I managed to re-construct the small arm of the bracket by screwing the 1.3mm screw back in with some 0.3mm enamel wire soldered into what was left of the small bracket arm on the screw, then the other end of the enamel wire I wrapped under the 1.5 wire screw's head (enamel exposed to bare metal), then screwed both screws down. also I lifted up the small metal arm with a screw driver (to make sure it reconnects with the display grounding square) ..and NFC worked again (slightly different antenna pattern mind (need to place cards slightly higher up the rear of the phone). Anyway works again :)

    Richard Croyle -

    do you think it would be possible to repair without the use of microsoldering?

    i brought a new bracket set for the xr and replaced the old one but even with that nfc/apple pay still doesn't work. i'm questioning if i put a wrong size screw or something else

    prolificgmabit -

  22. ZKgyTMB3J2eBa6Se
    ZKgyTMB3J2eBa6Se
    RGEOVxym6PmnJXjF
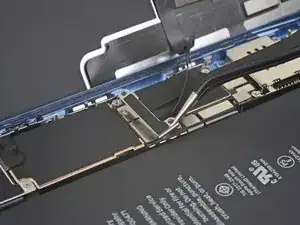
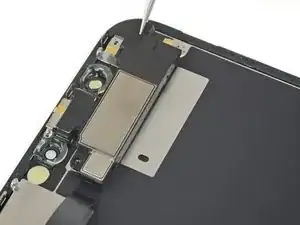
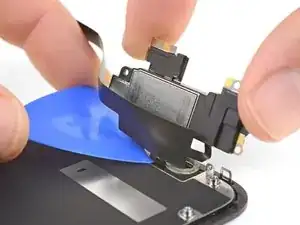
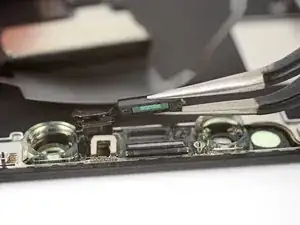
    • Avec la pointe de la spatule, soulevez le connecteur de l'ensemble capteurs avant hors de sa prise.

    During testing, make sure your proximity sensor is not on upside down, as it’s easy to connect upside down. Your phone will boot loop if it’s on incorrectly.

    Tristan England -

  23. GIZLarh6sZTr4iYM

    unclear if this is where screen removal ends

    Daniel Maldonado -

    I had the same question, but the answer is yes. Steps 21-30 are removing parts from the original screen that need to be reattached onto the new screen. You are no longer working inside the frame, but on the back of the screen itself.

    amclean78 -

    I apologize for missing these comments initially, but yes that’s correct, the screen is removed now and the rest of the guide goes on to other parts, either in the phone or on the back of the screen. Good luck with the repair!

    Adam O'Camb -

    The alternate method of removing the battery should be highlighted as a standard option. There is so much more work and potential to damage the parts than if you left them in place and carefully with plenty of heat remove the battery. I so wish I had seen this before!

    Martin Kappeyne -

  24. qHD6RTEPKNyYoYZG
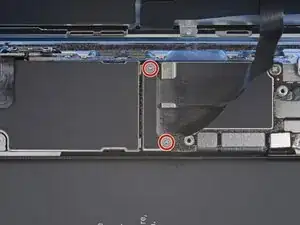
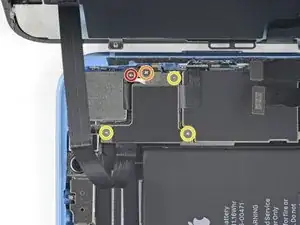
    • Dévissez les quatre vis qui fixent l'ensemble haut-parleur/capteurs à l'arrière de l'écran :

    • Deux vis cruciformes de 1,6 mm

    • Une vis cruciforme de 2,3 mm

    • Une vis Y00 de 1,2 mm

    Do you really need to do step 21-30, because it says to replace, do it in reverse. Which means you are taking the components off and putting them back on without touching the screen? sorry if this is a dumb question, i’ve never done this before.

    ExplodingRage -

    Good question! It depends on which guide you are completing. If you are replacing the screen, you do need to complete steps 21-30, in order to remove the front assembly and transfer it to your replacement screen. The front assembly contains the Face ID hardware, which is biometrically linked to the logic board.

    Now, if you are completing other guides, you may not need to remove the front assembly. Guides should have the steps slotted in only if they are pertinent to the procedure.

    Arthur Shi -

    I had the same question, but the answer is yes. Steps 21-30 are removing parts from the original screen that need to be reattached onto the new screen. You are no longer working inside the frame, but on the back of the screen itself.

    amclean78 -

    Im reassembling and notice there are no threaded screw holes to secure the speaker/sensor assembly on the new display. no way to secure it at all. Do i not need to secure it?

    Ashley Fitzgerald -

    Hi Ashley,

    There should definitely be screw holes to secure the assembly to the new display. If you purchased the part from iFixit, please contact our customer support, and we will sort things out for you!

    Arthur Shi -

    Same. No screw holes. Now what?

    M Schmidt -

    Please contact our customer support and we will get the issue resolved!

    Arthur Shi -

  25. kGEGOnFcpINUsltv
    kGEGOnFcpINUsltv
    P6mWfcSMimOsbqY4
    • Avec une pincette, repliez délicatement l'ensemble haut-parleur pour l'éloigner du bord supérieur de l'écran.

    • Le haut-parleur est toujours relié à une très fine nappe. Faites attention à ni forcer ni endommager la nappe.

    I don’t understand. It clearly appears that one should stop disassembling after this step. Peeling off the tape here should provide access to the solder connections. Why remove a bunch of other adhered parts? ESD concerns?

    Of course, taking care not to transmit heat to the screen assembly below would be prudent. But it’s unlikely much if any heat would conduct even without using any sort of insulating spacer, assuming one’s soldering technique is acceptable. With a thermal mass that small, overheating the connection is the big concern. Especially since it is lead-free solder.

    (It has a high melting point. If you didn’t already know that, this is definitely not the best project to develop your soldering skills! You can still do it, but should def practice on similar connections until you feel proficient. Lifting a pad or overheating a nearby component are both dangers. Yet, the cost of the part is low enough you could buy two (just in case) and still come out ahead of Apple’s fee. Use flux or you’ll struggle!)

    Ryan Lewis -

    Hey Ryan,

    You are right in that after this step, you could de-solder and replace the earpiece individually, if you choose to do some careful de-soldering and soldering. Alas, not everyone has the background and skill to do so! By instructing users to replace the complete assembly, we bypass the need to solder, and allow a wider audience to successfully complete the repair.

    Arthur Shi -

    When reassembling or placing the whole sensor module on a replacement screen, make sure to gently rock the speaker back into place. There is a rubber gasket lip around the speaker that must be seated all of the way against the screen and speaker grill to function properly. You should feel a gentle click when is goes in. If is not seated correctly it still easily can be screwed in making it difficult to tell if the speaker is in correctly.

    Colin Wylie -

    Hey, I actually ended up accidentally ripping that ribbon off the speaker. What happens now?

    lanize -

  26. PEIZbjIcMKKHg23D
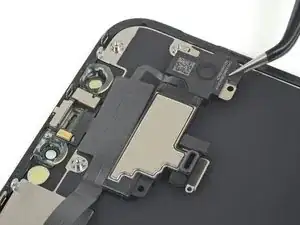
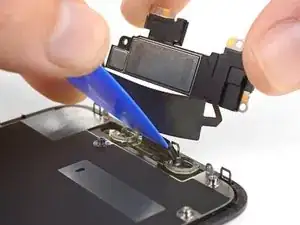
    • Utilisez un sèche-cheveux, un pistolet à air chaud ou un iOpener chaud appliqué à la partie supérieure pendant environ une minute pour faire ramollir l'adhésif qui colle les capteurs.

    Review steps 24-29 prior to doing this. Step 27 shows removing ambient sensor. It is attached….barely…to the rest of this assembly. I thought I was being overly cautions, and it still broke. Don’t be afraid to use heat. Do not force. Any resistance, do not force it.. Heat it up and then try. Other than that, sound and camera works fine, and it appears that FaceID works. Not my phone, so I can’t test that part without unlocking customer’s phone. No error messages appeared, so Im assuming all is good. With the touch home button on older models, if touch wouldn’t work, you’d receive a message as soon as you booted the phone up. OK.. That’s enough. Just be careful over the next 5 steps..

    Shawn Bailey -

  27. 42IwK2EfOHLwxpRU
    42IwK2EfOHLwxpRU
    wPrWI5ouRYnHjSRl
    IDYRQPxbHgHrMKoN
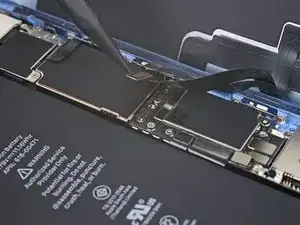
    • Faites délicatement glisser l'extrémité plate d'une spatule sous la nappe, en dessous du microphone.

    • Faites-la délicatement pivoter pour séparer le microphone en faisant attention à ni forcer ni endommager la nappe.

    • Si nécessaire, prenez la pointe de la spatule pour finir de détacher le microphone de son encoche dans le panneau frontal. Si vous avez de mal, faites chauffer encore une fois.

  28. AMYOmIAqsVJjD52P
    AMYOmIAqsVJjD52P
    Jkw51QtNpDpxArlK
    WmlMveEBG2MW1pbN
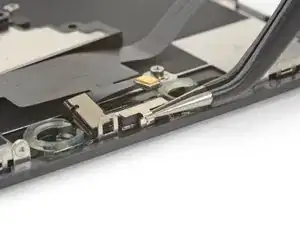
    • En progressant de gauche à droite, faites glisser un médiator sous la nappe, en dessous du module capteur de proximité + illuminateur infrarouge.

    • Remuez et soulevez délicatement le module pour le séparer de son encoche dans le panneau frontal.

    • Il est utile de soulever et d'écarter le haut-parleur pour bien y accéder. Veillez juste à ne pas tirer sur la nappe fine pendant que vous travaillez.

    what happens if the metal plate from the sensor separates from the flood illuminator module?

    Yeison rodriguez -

    At this point I thought looking at the image that I was lifting the speaker away and tore off the thin cable completely unaware. Please read and view the next two instruction stages before doing this one and then come back and ensure you keep the speaker very close to the screen as you do it.

    Sally-ann -

  29. A2KNvyVuTGWsvWnB
    A2KNvyVuTGWsvWnB
    sZctEsnflRRkTSUY
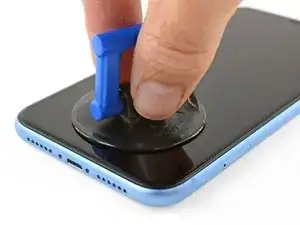
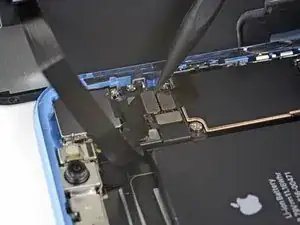
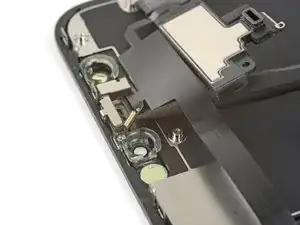
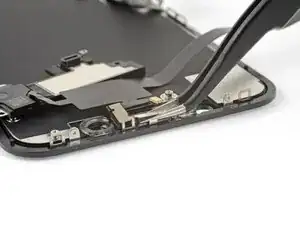
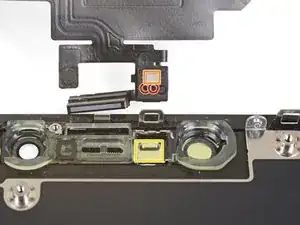
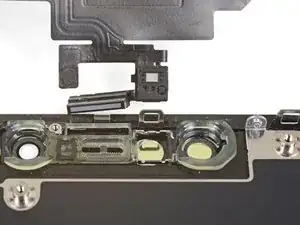
    • Prenez une pincette pour faire glisser le petit cache tout droit vers le haut et l'enlever du capteur de luminosité ambiante.

    I tore the ribbon cable that connects to the light sensor, what do I do? will the phone work even if the sensor doesn’t?

    wittyahole - -

    When you are putting this clip on, you can practice without putting the light sensor on it. It takes some practice. I also may not stay on tightly but it's not a big deal.

    J Olin -

    This clip is a nightmare to get back on!

    Ronald -

    I gave up trying to get the clip back on. Appears to function properly without it.

    Paul Chipelo -

    Definitely one for the tweezers in order to get the brackets little sleeve to fit back over the backet/post sticking up

    Jono Official -

  30. HeWLpnVGbVSEnZvv
    HeWLpnVGbVSEnZvv
    pNXCnbhkT2WPLvMM
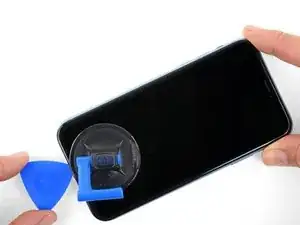
    • Remuez le capteur de luminosité ambiante et soulevez-le hors de son encoche dans l'écran à l'aide d'une pincette.

    • Si le capteur ne se détache pas au bout de quelques secondes, faites-le encore chauffer et recommencez.

    • Le capteur est toujours attaché au reste de l'ensemble capteurs avec une nappe très fine. Faites attention à ni forcer ni endommager cette nappe.

    On picture two, the thin transparent thread between the sensor and the display is not the “very thin flex cable” they are talking about but just some glue remains. In my case this thread of glue was sticking onto the sensor in the exact same way which made me suspicious at first.

    Konstantin -

    The top part of the ambient light sensor easily breaks off from the bottom part. In that case do not despair. Pry the stuck part from the old display and transfer it to the new display. Put the assembly back together without glue. It should hold together just fine. Usually the auto brightness feature will still work.

    Heiko Quant -

    I broke the flex cable from the light sensor that connects to the rest. Anything I can do?

    Matias Bedoya -

  31. BSLlHjKQuoWpIdm1
    BSLlHjKQuoWpIdm1
    toTqIeEIxWRSiNKo
    ArGPbS2ELhX6ZHi6
    • Si vous avez réussi à retirer le capteur de luminosité ambiante comme montré sur la première image, alors passez à l'étape suivante.

    • Si la bande blanche du diffuseur s'est détachée et est restée coincée dans l'écran, comme montré sur la deuxième photo, vous allez devoir faire précautionneusement faire levier en prenant appui sur le bord supérieur à l'aide d'une lame fine ou d'un outil à levier. Réappliquer d'abord de la chaleur peut simplifier cette tâche.

    • Durant le remontage, installez en premier le diffuseur dans l'écran, en vérifiant qu'il soit orienté dans la bonne direction (le côté avant est montré sur la première image, et le côté arrière sur la troisième).

    • Ensuite, installez le capteur de luminosité ambiante sur le diffuseur. Vous aurez besoin de tenir le capteur en position pendant que vous revisserez les vis qui fixent l'ensemble haut-parleur interne/capteurs. Une fois que les vis sont serrées, le capteur restera en place et fonctionnera normalement.

    so I was able to wiggle the part out and everything came out except the white strip, like a sticker coming off the bottom so my situation isn't displayed in the diagrams is that white strip important? should I remove it and try to adhere it to the bottom of the ambient light sensor?

    Shadowind98 -

  32. FOWFlEvF4mJLpDhC
    FOWFlEvF4mJLpDhC
    fvewlLaGEDVQwZbp
    2Nvy2UQvZTHBNrNo
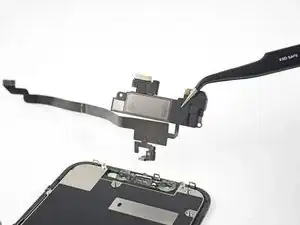
    • Retirez l'ensemble haut-parleur interne et capteurs avant.

    • Lors du remontage, vérifiez la position du module en plastique noir qui comprend ces composants :

    • Capteur de proximité

    • Illuminateur infrarouge

    • Il faut positionner ce module de sorte que ces composants ne soient pas encombrés d'adhésif.

    To replace just the earspeaker, you will have to re-use the the flex assembly which is soldered to the earspeaker…….

    the 2 solder connection are hidden under a tiny piece of thin black tape, on the underside of the speaker.

    Alan Sears -

    forgot to mention to take the clear plastic mold off from the old screen!!

    BKimc -

    Before attaching the sensor module to your replacement screen, ensure there is nothing blocking the earpiece screen on the new screen part. Mine had a mfg defect or something where there was a black foam like film on the outside of the speaker grill that I couldn’t remove with tape or sticky putty. I had to blow through the back of the grill with a computer duster compressed air can. Otherwise the call volume via the earpiece is extremely low, even when turned to max volume.

    Colin Wylie -

    Hey there, if I have an iPhone bit damage and I remove the top speaker and sensor and put it on my other iPhone XR. Will it work? It is original iPhone XR and please let me know

    Nash G Krish -

    The Face ID hardware is paired to the logic board and will not work if you transfer the front sensor assembly. Everything else should work.

    Arthur Shi -

    Are you suposeted to do it backwards when your done

    hewi fewi -

    super gemacht , danke der olli

    schlüppi punkstrumpf -

    The iPhone XR Screen Replacement Kit comes with an adhesive replacement on a blue plastic sheet. I didn’t know what this was and thought it was just protection for the screen during shipping.

    Don’t throw it out - At this step 29 remove the old adhesive using this guide -> Remplacement des bandes adhésives fixant l'écran d'un iPhone

    Don’t be dumb like me.

    Toby BC -

    I would definitely add a step at the end –
    30) Replace the adhesive seal -> iPhone Display Adhesive Replacement.

    Steve Koontz -

    How do I configure True Tone on the new screen?

    Armando -

    You need to use an EEPROM programmer. This will read code from the old screen to the new screen (assuming the replacement screen is of decent quality and supports True Tone programming). Check out YouTube and you will find plenty of information on how to do this. It really should be mentioned in screen replacement guides/videos, that if you just replace the screen without this specialist equipment, the True Tone function is not available. This is the same for all iPhones that have True Tone.

    Mark Affleck -

    i just saw recently where the ear hole in the new display was occluded - needed to drill it out. can see with a microscope - may want to check this before reassembly.

    greg -

    Add a comment: remove blue protective covers from back of screen when installing

    Martin Kappeyne -

    Thanks! I left them on until I got everything hooked up…..so frustrating lol

    ryandlent -

    Removed the big blue one but couldn’t get the little one with what looked like a QR code on it. It goes literally between the 2 cables.

    ryandlent -

    Thanks for the excellent guide! My replacement screen came with no sensor bracket, so I had to remove that from the old screen and remove the earpiece grill from the new screen (because the old grill remained attached to the bracket).

    Goda Choi -

Conclusion

Comparez votre nouvelle pièce de rechange à la pièce d'origine, car vous devrez peut-être transférer les composants restants ou enlever les films adhésif au dos de la nouvelle pièce avant de l'installer.

Pour ré-assembler votre appareil, suivez les étapes ci-dessus dans l'ordre inverse.

Apportez vos déchets électroniques à un recycleur R2 ou de déchets électroniques certifié.

La réparation ne s'est pas déroulée comme prévu ? Consultez notre forum de réponses pour obtenir de l'aide au diagnostic.

Adam O'Camb

Membre depuis le 11/04/15

205524 Réputation

7 commentaires

how can I separate the proximity sensor flat from the ear speaker? it is microsoldering?

mario rossi -

yes 2 solder connection are hidden under a tiny piece of thin black tape, on the underside of the speaker.

Alan Sears -

How to microsolder?

Sarosh Sepai -

How do I pair a new flood illuminator to the phone

Richard Eyre -

What temperature do you use on adhesive?

callsimon55 -

Merci. C'est très gentil merci beaucoup c'est très gentil

Rıdvan KAYAHAN -

Sem dúvida essa peça me deu muita dor de cabeça para remover no começo. Eu danifiquei algumas, hoje, tenho mais atenção e cuidado ao remove-lá.

Daan.ll -