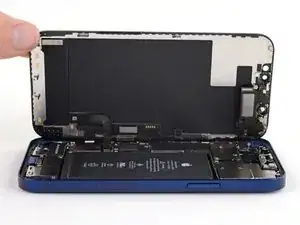
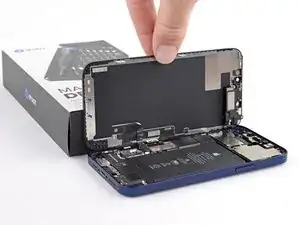
Introduction

Consultez ce tutoriel pour retirer et remplacer le module de la caméra frontale (c.à.d. la camera selfie) d'un iPhone 12. Remarquez que si vous remplacez cette pièce, Face ID ne marchera plus. Cette réparation vous rendra votre caméra selfie, mais seul Apple ou un technicien "agréé" par Apple pourra restaurer Face ID.

  1. oBBxtkV2gJcIPKkK
    • Avant de commencer, déchargez la batterie de votre iPhone en dessous de 25 %. Une batterie lithium-ion chargée peut prendre feu et/ou exploser si elle est accidentellement percée.

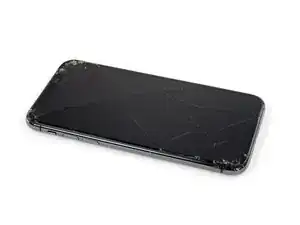
    • Éteignez votre iPhone avant de commencer le démontage.

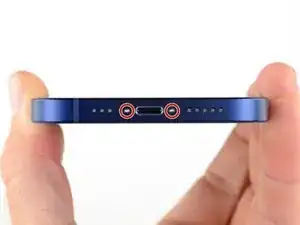
    • Retirez les deux vis Pentalobe P2 de 6,75 mm de long sur le bord inférieur de l'iPhone.

    • L'ouverture de l'écran de l'iPhone compromettra ses joints d'étanchéité. Procurez-vous des joints de remplacement avant de vous lancer, ou prenez soin d'éviter toute exposition aux liquides si vous réassemblez votre iPhone sans remplacer les joints.

    Do you sell the waterproof seals separately or are they included in the kit?

    Heather Furnas -

    Do you sell the waterproof seals separately or are they included in the kit? (I would like to know this as well.)

    CaliforniaGunner -

  2. 6UPwoloGBO4tmVoS
    6UPwoloGBO4tmVoS
    BmSYPJmOy6dbHipF
    3EOdQPAGOmiuhoKU
    • S'il est inséré trop loin, un médiator risque d'endommager votre appareil. Suivez cette étape pour tracer un repère sur votre médiator et éviter que l'appareil ne soit endommagé.

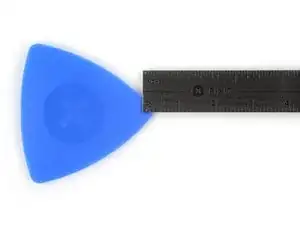
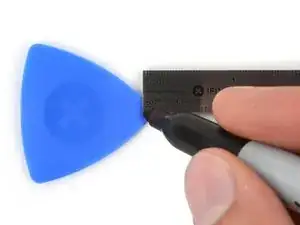
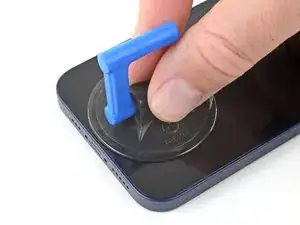
    • Mesurez 3 mm à partir de la pointe et tracez une ligne sur le médiator avec un marqueur permanent.

    • Vous pouvez également marquer les autres coins du médiator avec des mesures différentes.

    • Une autre solution consiste à scotcher une pièce de monnaie sur votre médiator, à 3 mm de la pointe.

    Got to step 2 and realized the fix kit doesn't include an opening pick! Looks like a guitar pick, and I have those lying around. Is that expected? Looks like the pick is used in many steps below. There's a little blue crowbar that isn't mentioned in the instructions. Perhaps that replaces the opening pick?

    Sloan Looney -

    Hi! I can't see which guide you were using when writing this comment. Can you reply here with which guide and fix kit you used?

    Clay Eickemeyer -

    I see you posted this in Meta. I hope it's resolved soon! In the meantime, a guitar pick may work well enough for your repair.

    Clay Eickemeyer -

    what fix kit?

    Meow Purr -

    My fix kit didn't include an opening pick either

    WILLIAM HARRIS -

    Make sure you check inside the black boxes after emptying them. My pick was stuck inside one of the boxes.

    AndyF -

    My AliExpress refurbished screen came with a pick that has a coin-like circle that pops out, so no modification was necessary

    Gijs Leegwater -

    the picture shows 3 cm but the description says 3 mm's. Which one is it?

    John Pena -

    That is a misunderstanding. It is a ruler with a scale for cm, it shows 0.3 cm, i.e. 3 mm.

    VauWeh -

    Oh, come ON!

    Big Ed -

    It will ALWAYS be millimeters on a phone, but this step is ridiculous, skip it!

    Leif DeWolf -

    It's not an Ifixit KIT if it doesn't include everything. You'll need to order the opening pic separately. Or head to Walmart like myself and look for guitar pics. Hopefully, this will work just as well.

    Jaleeljb97@icloud.com -

    No pick in mine as well. It’s really not clear that you have to order this separately when ordering an IPhone SE 202/2022 screen repair kit. Is this the case?

    Jackson Castiglione -

    Frustrated, I ordered a compact package where everything was encapsulated. Useless suction tools could not separate the screen. If it is unable to decouple the screen, then why sucking suction tools you have provided.

    Shourob Datta -

    For my kit the triangle pick was stuck inside the box with the screen not with the other tools maybe it's also there for you

    Henry Scheibehenne -

    Y’all are getting far, FAR too detailed with some of this stuff…. Measuring and marking the pick that you won’t actually use to open the device?!? lol that’s kinda funny. Just heat it up, grab a spudger, and the back just pops right off! The iFixit tech need to stick to the KISS method more often, you know KEEP IT SIMPLE STUPID!!! Like l, for reals, I’ve been doing this stuff for YEARS and using iFixit guides regularly and this is just ridiculous at this point!

    Leif DeWolf -

  3. U6uMaQ2w3xOXGqZt
    U6uMaQ2w3xOXGqZt
    CPoII2uYnsjeyboh
    UYpZQjIJZTscr1dr
    • Si votre écran iPhone 12 est fissuré, empêchez les fissures de s'aggraver et les éclats de vous blesser en le recouvrant de ruban adhésif.

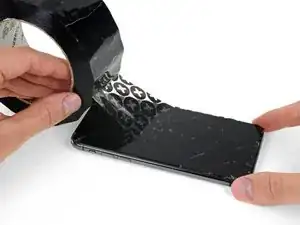
    • Recouvrez l'écran de bandes de ruban adhésif, qui se chevauchent, jusqu'à ce que toute la surface soit couverte.

    • Portez des lunettes de sécurité pour vous protéger les yeux des éclats de verre tout au long de la réparation iPhone.

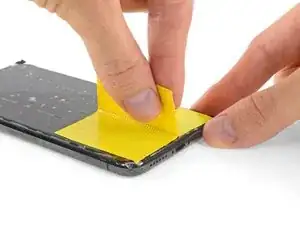
    • Si la ventouse n'adhère pas au cours des étapes suivantes, pliez un morceau de ruban adhésif épais (du ruban adhésif toilé p.e.) pour former une poignée et soulevez l'écran de cette façon.

    • Si tout cela échoue, vous pouvez coller la ventouse à l'écran avec de la superglue.

  4. B3jjMp2cvD5Rjabx
    B3jjMp2cvD5Rjabx
    QXAiF3sdtAYXQTQt
    FMOPQmVFrA1qxL1R
    • Les trois étapes suivantes sont consacrées à la présentation de l'Anti Clamp, un outil que nous avons conçu afin de faciliter la procédure d'ouverture. Si vous n'avez pas d'Anti Clamp, passez à la procédure alternative trois étapes plus loin.

    • Un tutoriel complet pour utiliser l'Anti Clamp est disponible à cette adresse.

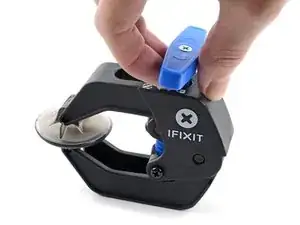
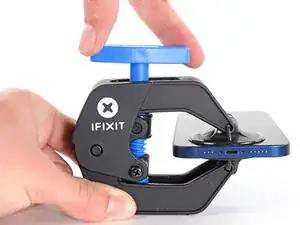
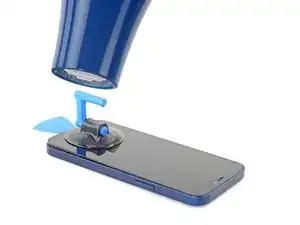
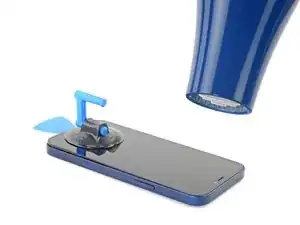
    • Tirez la poignée bleue vers la charnière pour débloquer les bras de l'Anti-Clamp.

    • Insérez le côté droit ou gauche de votre iPhone entre les bras.

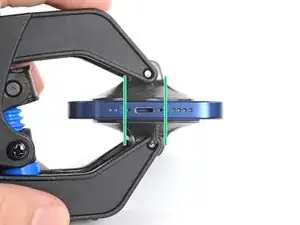
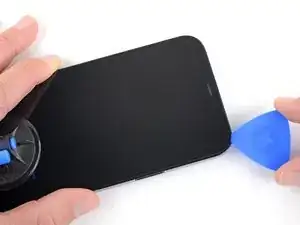
    • Positionnez les ventouses en bas de l’écran de l'iPhone : une dessus et l'autre dessous.

    • Appuyez sur les ventouses afin d'ouvrir votre iPhone à l'endroit désiré.

    • Si la surface de votre écran est trop glissante pour que l'Anti Clamp puisse y adhérer, vous pouvez utiliser du ruban adhésif afin d'obtenir une meilleure surface d'accroche.

  5. oVcZhyKbh6AqAYBD
    oVcZhyKbh6AqAYBD
    bPLD3rBQF23DDmGa
    mpAqXAZbRjfBNAkL
    • Poussez la poignée bleue vers l'avant pour bloquer les bras de l'Anti-Clamp.

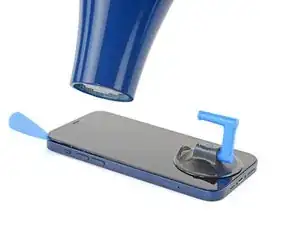
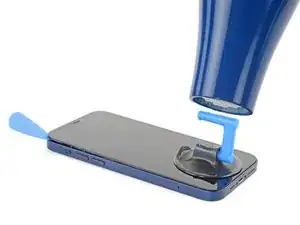
    • Tournez la poignée dans le sens horaire de 360 degrés ou jusqu’à voir les ventouses s'étirer.

    • Vérifiez que les ventouses restent bien alignées entre elles. Si elles commencent à se décaler, détachez-les pour les réaligner.

  6. u1p2GSBABb4i1qXl
    u1p2GSBABb4i1qXl
    TEVkJ3VWQ5bWEZ2G
    LMDHoJDdVkP56a4a
    • Posez votre iPhone sur quelque chose de solide comme un livre à couverture rigide, pour qu'il tienne tout seul à l'horizontale. Ainsi, il sera plus facile de procéder aux étapes suivantes.

    • Servez-vous d'un sèche-cheveux pour faire chauffer le bord inférieur de l'iPhone. L'écran doit être légèrement trop chaud au toucher.

    • Pour des instructions complètes sur l'utilisation d'un sèche-cheveux, consultez ce tutoriel.

    • Attendez une minute pour donner à l'adhésif le temps de se détendre et d'ouvrir un interstice.

    • Insérez un médiator sous le joint en plastique de l'écran, dès que l'Anti-Clamp a ouvert un interstice suffisant.

    • Si l'interstice ne suffit pas, faites encore chauffer la zone et tournez la poignée d'un quart de tour.

    • Ne tournez jamais de plus d'un quart de tour et attendez une minute à chaque fois. Laissez l'Anti-Clamp et le temps faire le travail à votre place.

    • Passez les trois étapes suivantes.

  7. OXZKWsxxXqG3arZh
    • Utilisez un sèche-cheveux ou un pistolet à air chaud pour chauffer le bord de l'iPhone pendant 90 secondes ou jusqu'à ce que l'écran soit légèrement trop chaud au toucher.

    • Ne pointez jamais votre sèche-cheveux au même endroit pendant un temps prolongé.

  8. ASLAa2AJO4E5GYT1
    ASLAa2AJO4E5GYT1
    EMmHxm3YOfOoLkEG
    • Si vous utilisez une simple ventouse, posez-la sur la section inférieure du téléphone, en évitant de trop vous approcher du bord.

  9. QdfiItrQQ6MhHWbj
    QdfiItrQQ6MhHWbj
    4nKuwPf1B6TyCssL
    eU1UEGuDjKnyIdUg
    • Tirez fermement et constamment sur la ventouse pour ouvrir un léger espace entre l'écran et le châssis.

    • Insérez un médiator dans l'espace sous le joint en plastique de l'écran.

    • L'adhésif étanche qui fixe l'écran est très tenace. Ouvrir ce petit espace nécessitera de forcer quelque peu. Si vous avez du mal, chauffez plus et faites jouer l'écran de haut en bas pour faire céder l'adhésif et créer l'espace destiné à votre outil.

    This seems impossible. I've been trying for an hour with heat and rocking, and the screen doesn't budge. :(

    Aubi Abramowitz -

    this is impossible, will take years

    Evan Z -

    Don’t give up! Use more heat and a tad more force. I know you may fear breaking it more, but as long as you don’t stick the prying tool too far or tug too hard, you can do it! I have faith that you can do it!

    Rachel Kelley -

    I'm in the same boat, this isn't coming off. I've tried the hair dryer as well as the heating pad from ifixit. Any other ideas?

    The suction cup comes off before the screen will

    Brian Melcher -

    Is there a better tool for this? Just saw a video on YouTube where a kid pryed it open with no heating/etc. in 5 seconds.

    Brian Melcher -

    I've changed the batteries in probably a half dozen iphones of different models. But 25 minutes of heating and pulling had no effect on iPhone 12

    Ryan Thornburg -

    Welp. I finally ended up breaking the screen attempting this. DO NOT ATTEMPT THIS REPAIR! Not worth the broken screen and losing the cost of shipping both ways when you return the battery.

    Ryan Thornburg -

    thx, I ll go to an apple repair center

    Ronald Geerligs -

    Back (and bad...) experience ! Even if you heat a lot, the screen is hardly sticked. Take care, before sliding the mediator under the screen, this one should be moved up, at least 2 mm. On my side i have slided around 1 mm and .... inserted the mediator between the glass screen and the screen structure ring.... result : glass break and screen to change (my initial exercise was the battery removal !). I feel that next time i will visit a repair center...

    Gilbert -

    Pro tip for anyone having trouble with this. You have to use multiple rounds of heat and pulling. Use a hair dryer and not the iOpener that comes with the fix kit and get it just too hot to touch then quickly start pulling and wiggling it up and down. Once it cools down grab the hair dryer again and repeat it a couple times until you start to get a big enough gap.

    I just did this yesterday and it took around 5 rounds of heating and pulling to get it to seperate enough from the body.

    Oliver Pressello -

    It's important to insert the pick under the bezel. I just delaminated my screen. The screen was probably fine, but it was glitching, so I wanted to check for a bad connection. Anyway, now I get a new screen.

    Under the bezel, eh.

    Chris Green -

    After reading this almost a year later to the day I last commented on it, I now know that the best way I have found to remove a screen, from pretty much any phone, not just this one, is heat (I use a heating pad on 80 degrees celsius) and before putting the phone on the heating pad, I use 91% isopropyl alcohol around the edges that you will be sliding your pry tools in, and I leave it on for 10 min. I then take it off, add more alcohol, and then put it back on the pad for another 5 min. Also, while I am sliding my tools around the screen, I continuously add more alcohol, and if it takes a really long time, then more heat as well. Heat, alcohol, and patience, lots of patience, and you should be good. Hope this helps, good luck!

    Rachel Kelley -

    Can confirm, this does indeed work. Just keep warming it up, lifting up and down, and repeat when phone goes cold. After around 10 rounds it would move enough to where I could see inside the phone when lifted. You can then insert pick

    Tip: You can also try to apply heat and lift the other corner, just enough to make it move slightly. This will ease pressure needed to separate the glue on the other side as-well.

    Thomas -

    No worries guys! it’s completely doable! You just need to be patient and keep trying multiple times

    Giordano Urettini -

    I don't doubt that you folks eventually got this open, but how on earth do you not lose your mind with the suction cup popping off every 5 seconds? Agree with Ryan above, have replaced batteries on several other iPhone generations with nowhere near this much effort. Still working on it going on 1 hr, about 10 rounds of hair dryer heat. Did Apple use a stronger adhesive for the 12?

    davidum -

    Success. iOpener doesn't get the phone nearly hot enough. Multiple rounds of hair dryer + isopropyl alcohol dribbled in b/w case and screen while pulling up on suction cup. For me, the bottom left hand corner (volume rocker side) seemed to lift up first, so I moved the suction cup to that corner while doing the heat + alcohol.

    davidum -

    When I changed the battery on a 7+ instead of the suction cup/heat method I used an Cacto blade inserted horizontally along the bottom edge to break the seal. Would this work on the 12?

    mikefunkpa_c -

  10. TLFrov6MrYfe6MLs
    TLFrov6MrYfe6MLs
    DDIYLM3VDKPF1sdb
    • Utilisez un sèche-cheveux pour chauffer le bord droit de l'iPhone (celui avec le bouton de marche) pendant 90 secondes ou jusqu'à ce que l'écran soit légèrement trop chaud au toucher.

  11. rGMaUZMOwp6jDZup
    rGMaUZMOwp6jDZup
    sBgqGmTWBfaWInJQ
    rxBEr5BO3bFbLaRG
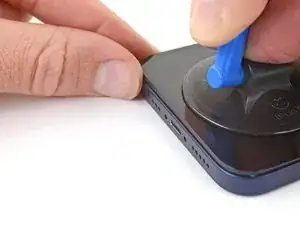
    • Faites glisser le médiator autour du coin inférieur droit de l'iPhone afin de décoller l'adhésif.

    • Parcourez ensuite le bord droit de l'iPhone, jusqu'au coin supérieur droit.

    • N'enfoncez pas le médiator de plus de 3 mm dans l'iPhone, vous risqueriez d'endommager des composants internes.

    • Laissez le médiator dans le coin supérieur droit avant de continuer.

  12. EEAWPuNCXwOopd5j
    • Utilisez un sèche-cheveux pour chauffer le bord supérieur de l'iPhone pendant 90 secondes ou jusqu'à ce que l'écran soit légèrement trop chaud au toucher.

  13. jjDP5cRJDxygaS4e
    jjDP5cRJDxygaS4e
    wfpdoWB6GTpFmSWF
    hRbFaNyEBNemtUjd
    • Faites glisser le médiator autour du coin supérieur droit de votre iPhone pour décoller le bord supérieur.

    • N'enfoncez pas le médiator de plus de 3 mm ou vous risquez d'endommager les capteurs supérieurs.

    • Laissez le médiator dans le coin supérieur gauche avant de continuer.

  14. 1iVQp4WpwoHLdBEJ
    1iVQp4WpwoHLdBEJ
    oTaCH2yFmSQBq4A5
    • Utilisez un sèche-cheveux pour chauffer le bord gauche de l'iPhone pendant 90 secondes ou jusqu'à ce que l'écran soit légèrement trop chaud au toucher.

  15. 1EkaRCPsl1hLCcO5
    • On trouve des nappes fragiles le long du bord gauche de votre iPhone. N'y insérez pas votre médiator, car vous risquez de les endommager.

  16. U32XuDLs5g4YdpJX
    U32XuDLs5g4YdpJX
    P1QKu5D5XkUVQHhB
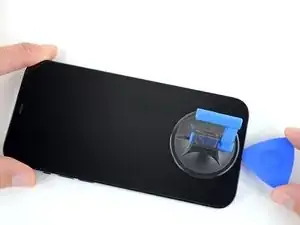
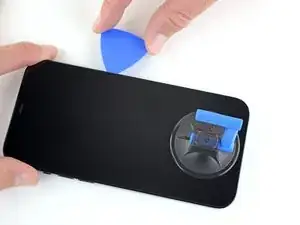
    • Insérez un second médiator dans le coin inférieur gauche de l'iPhone.

    • Faites pivoter les deux médiators en même temps, jusqu'à ce que les clips du bord gauche se détachent.

    • Faites pivoter en augmentant graduellement la force.

    • Si vous avez de mal, refaites chauffer le bord gauche.

  17. IWXGOEkVZMt431sG
    IWXGOEkVZMt431sG
    Qxj6lbMWEEfMw45M
    NoVbSlrJHyCMaaFN
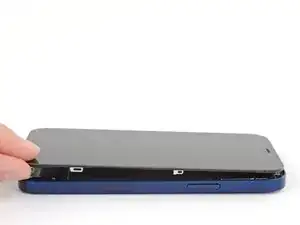
    • Tournez votre iPhone de façon que son bord droit est en face de vous.

    • Ouvrez l'iPhone en soulevant le côté droit de l'écran comme on ouvre la couverture avant d'un livre.

    • N'essayez pas encore d'enlever complètement l'écran, car il est toujours relié à la carte mère de l'iPhone par plusieurs nappes fragiles.

    • Calez l'écran contre un objet pour qu'il reste ouvert pendant que vous travaillez sur votre téléphone.

    • Lors du remontage, posez l'écran à sa place, alignez les clips le long du bord supérieur et commencez par insérer soigneusement ce bord avant de refermer tout l'écran. Si ce dernier ne s'enclenche pas facilement, vérifiez que les clips sur son périmètre n'ont pas été déformés.

    i did this and the shroud with the earpiece speaker still stuck with the phone so its just wedged in there i cant get it out

    lil teslas -

  18. fVLd1ujMC23kPMBM
    • Ôtez les deux vis Y000 de 1,1 mm qui fixent le cache des connecteurs de la batterie et de l'écran.

    • Tout au long de cette réparation, gardez la trace de chacune des vis et veillez à les revisser toutes là où elles étaient auparavant pour éviter d'endommager votre appareil.

    • Lors du remontage, voici venu le bon moment pour allumer votre iPhone et tester si tout fonctionne avant de sceller à nouveau l'écran. Pensez à rééteindre complètement votre iPhone avant de reprendre le remontage.

    Ouch, I see a broken flat here…

    Alessandro Sordelli -

    Can I use a y 0.6 if I don’t have y000

    kellciou cr -

    Yep! The measurements for Y000 are 0.6 mm.

    Alex Diaz-Kokaisl -

  19. nCqmqLuRyNhUsecI
    • Enlevez le cache.

    Hi

    On my original display on an iPhone 12, there is no metal hinge as shown here and therefore no place for it when closing the phone. Have double-checked model and the original display - and it is just not there. Is there another model based on serial number?

    Hinge marked: https://www.dropbox.com/scl/fi/asztgi60g...

    Best regards,

    Carsten

    Carsten Feltman -

  20. q1GE6ij6DBGAtVUa
    q1GE6ij6DBGAtVUa
    UFeAbkthIglN1PdG
    • Prenez une spatule (spudger) ou un ongle propre pour soulever le connecteur de la batterie de sa prise sur la carte mère.

    • Essayez de ne pas abîmer les joints en silicone noir qui entourent cette connexion et d'autres sur la carte mère. Ils assurent une protection supplémentaire contre l'intrusion d'eau et de poussière.

    • Repliez légèrement le connecteur par rapport à la carte mère pour l'empêcher de faire accidentellement contact avec la prise et d'alimenter le téléphone pendant que vous effectuez votre réparation.

  21. JWGf11bubrJIQJqt
    JWGf11bubrJIQJqt
    JnsnSmZNtLSbSfID
    • Servez-vous d'une spatule ou d'un ongle pour débrancher le connecteur de la nappe de l'écran.

    • Pour rattacher un connecteur à emboîter comme celui-ci, alignez-le soigneusement et appuyez d'un côté jusqu'à ce qu'il s'emboîte, puis recommencez de l'autre côté. N'appuyez pas au milieu. Si le connecteur n'est pas aligné correctement, les broches risquent de se déformer et de causer des dégâts irréversibles.

  22. FtXJDFkUoD1lyBai
    FtXJDFkUoD1lyBai
    lnDDQGdsvpfnyRjt
    • Servez-vous d'une spatule ou d'un ongle pour débrancher le connecteur de la nappe de la vitre tactile.

    • Si une partie de votre écran ne réagit plus après votre réparation, déconnectez la batterie et rebranchez ce connecteur, en vous assurant qu'il s'enclenche bien et que la prise n'est pas bouchée par de la poussière ou toute autre saleté.

  23. vanQfZqXPQGekhh1
    • Utilisez un tournevis Y000 pour dévisser les quatre vis qui fixent le cache du connecteur de l'ensemble capteurs frontaux :

    • Trois vis de 1,1 mm

    • Une vis de 1,4 mm

  24. KJnJAuPTwlxnICBD
    KJnJAuPTwlxnICBD
    MHdESpgJCsSSZaMy
    1qodeTMyy56DyGRv
    • Faites pivoter le bord gauche du cache vers le haut jusqu'à ce que le petit clip sur la droite se détache.

    • Enlevez le cache.

    • Lors du remontage, insérez d'abord le clip de droite dans son encoche, puis posez le cache à plat.

  25. LC4oSHWw4nEIZ3H5
    LC4oSHWw4nEIZ3H5
    5PkRCF6AJnj1hYTc
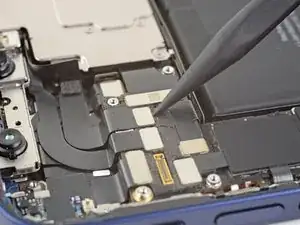
    • Prenez la pointe d'une spatule ou un ongle propre pour débrancher la nappe de l'ensemble capteurs frontaux.

  26. XrIRhPcqOHJyMV1q
  27. HXFL4AbtI266mBf5
    • Avec un tournevis Y000, dévissez la vis de 1 mm qui fixe le module caméras frontales.

  28. ZsGHLghjyW46QuQ2
    • Soulevez et retirez le cache du module caméras frontales.

  29. eAWrUQEOLUQ5qDJh
    eAWrUQEOLUQ5qDJh
    EyDuiEHjOiXkLX2u
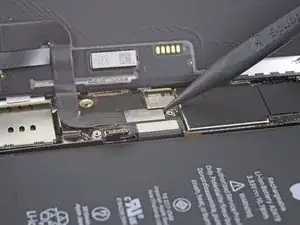
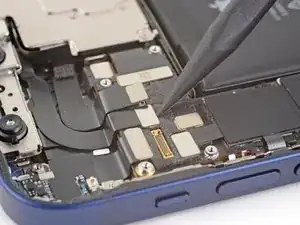
    • Utilisez une spatule ou un ongle pour débrancher la nappe de l'illuminateur Face ID de sa prise sur la carte mère.

  30. VBwEcBc64myLXI2L
    VBwEcBc64myLXI2L
    AVEDLnAFySH5f6uj
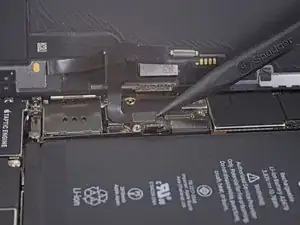
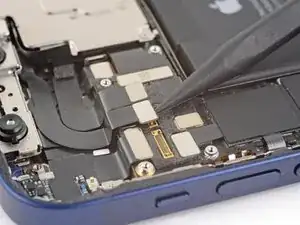
    • Utilisez une spatule ou un ongle pour débrancher la nappe du capteur Face ID de sa prise sur la carte mère.

  31. bwQwqasKYtGdUaeN
    bwQwqasKYtGdUaeN
    YOjCYsLpXH3C5V4L
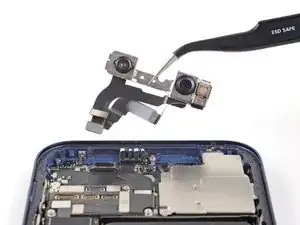
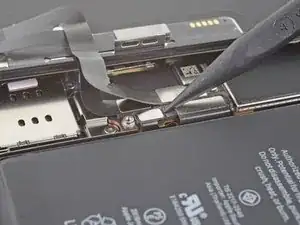
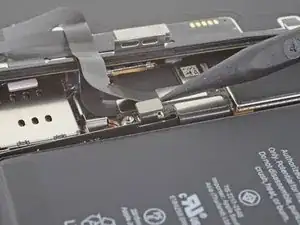
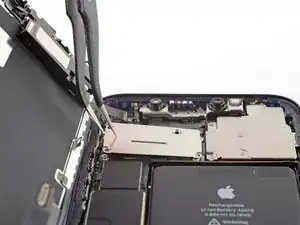
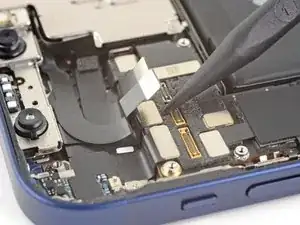
    • Éloignez délicatement les connecteurs des nappes Face ID de la carte mère pour accéder à la prise de la caméra selfie en dessous.

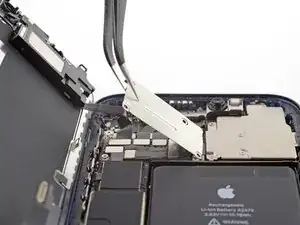
    • Débranchez la caméra selfie en soulevant le connecteur tout droit vers le haut.

  32. jaoISbvN43bRbQnD
    • Retirez le module caméras frontales.

Conclusion

Comparez votre nouvelle pièce de rechange à la pièce d'origine, il se peut que vous ayez besoin de transférer des composants restants ou de retirer des films adhésifs de la nouvelle pièce avant de commencer le remontage.

Pour remonter votre appareil, suivez les étapes ci-dessus dans l'ordre inverse.

Déposez vos déchets électroniques dans un centre de recyclage certifié.

La réparation ne s'est pas déroulée comme prévu ? Consultez nos conseils basiques de diagnostic ou la section iPhone 12 de notre Forum pour obtenir de l'aide.

Adam O'Camb

Membre depuis le 11/04/15

205524 Réputation

Un commentaire

Tausch hat gut funktioniert, nur muss Face ID von Apple noch konfiguriert werden, das machen sie aber nicht wenn sie die frontkamera nicht selbst ausgetauscht haben. War das letzte applegerät.

Markus kro -