Introduction

Si le haut-parleur de votre Moto Z2 ne marche plus correctement, consultez ce tutoriel pour le remplacer.

Pour votre sécurité, déchargez votre batterie en dessous de 25% avant de démonter votre téléphone Motorola Moto Z2 Force. Cela réduit le risque d'incendie si la batterie est accidentellement endommagée pendant la réparation. Si votre batterie est gonflée, prenez les précautions nécessaires.

Avertissement : la partie écran est composée d'un châssis central rigide et d'un écran en plastique flexible, qui peuvent se séparer pendant le démontage. Un excès de chaleur sur l'écran peut provoquer une déformation ou l'apparition de bulles dont il sera difficile de se débarrasser. Si vous envisagez de réutiliser l'écran, respectez scrupuleusement tous les avertissements et ne chauffez pas l'écran.

  1. RWWTwfWpal2FBIkR
    RWWTwfWpal2FBIkR
    IR1c5T1UbCB1AgNw
    • Pour séparer les côtés de l'écran du châssis du téléphone, vous devrez détacher cinq clips de métal qui le maintiennent en place.

    • Trois de ces clips sont situés sur le côté gauche, et deux sur le côté droit.

    • Il faudra faire le tour avec votre médiator pour dégager totalement les clips.

    • Vous pouvez glisser votre médiator avec précaution sur le pourtour de l'appareil, ou laisser un médiator d'un côté pendant que vous ouvrez l'autre côté avec un autre médiator.

  2. YyxTpeBKw15ObrOE
    YyxTpeBKw15ObrOE
    VwUrDBeGXbrHNkhB
    lBj5TTL4gnHPtBQJ
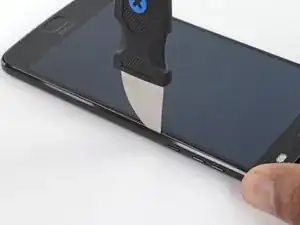
    • Insérez un Jimmy ou un autre outil en métal entre le côté droit en plastique de l'écran et le bord métallique, près des boutons latéraux du téléphone.

    • Cela peut demander beaucoup de force. Poussez l'outil aussi profondément que possible dans l'interstice, en faisant attention à ne pas rayer le châssis de l'appareil.

    • Inclinez le Jimmy vers le bas en continuant à le pousser plus profondément dans l'ouverture, pour dégager le côté droit de l'écran.

    • Il se peut que vous ne souleviez que le LCD qui est souple et fixé par de l'adhésif, au lieu d'enlever l'écran complet. Si cela vous arrive, retirez l'outil et recommencez en vous assurant d'appuyer plus vers le bas pour passer sous l'écran complet.

    • Vérifiez que votre outil est sous l'écran complet et pas juste sous le LCD. Vous pouvez vous en assurer en vérifiant que le support fin en métal est soulevé avec la partie plastique de l'écran (voir photo)

    No — *slaps wrist* No. Bad steps! Don’t use the suction cup at all, ever. It causes the two layers to separate immediately, long before the frame clips give way to let the screen come off.

    I’m being super ultra very careful with this second attempt on a new device (that was in pretty pristine condition, if I can keep it that way!), and right when I tried pulling as instructed, the screen layers started to pull apart. Use a blade shoved into the edge of the phone and pry it apart, releasing the latches in the process!

    Matt Falcon -

    I have to agree with Matt above. At the smallest bit of pressure on the suction cup, the screen de-laminated from the metal base. It still “works”, but….

    None of the tools in the kit is terribly suited for getting in there and prying that clip apart without splitting the screen.

    Phillip Mills -

    lease Read the Comments poste on “STEP 2”, When you apply the heat, the screen becomes unglued from the metal fram that it is attached to. I ended up damaging my screen. You need to make sure that what is coming unglued is the metal, and not just the plastic screen. I found out when I saw another video, where they do not apply heat, they just use a tool to pry the frame-display assembly… But apparently it was too late… You should be more specific about the warning…

    Juan Carlos -

    A jimmy does not come with the kit. Buy one before beginning this procedure. It is the best way to lift the screen assembly without damaging the assembly.

    Linsey Linton -

    This whole guide has been rewritten since my last comment, and I super appreciate it. The steps are now much more appropriate and less likely to cause damage. Jamming your Jimmy (huehue) into the edge of the screen is actually quite a good idea, not likely to hit anything as there’s nothing but body underneath it.

    Matt Falcon -

  3. FySoI4WkdZavbFuD
    FySoI4WkdZavbFuD
    oineIgu4cUuQKsNc
    • Avec le Jimmy toujours en place, insérez un médiator sous le support métallique, juste au-dessus du Jimmy.

    • Retirez le Jimmy.

  4. WICqXXPlsYWtmQnQ
    WICqXXPlsYWtmQnQ
    ttZZtHncTUbjYvfw
    sdFHyS115OSdLdxl
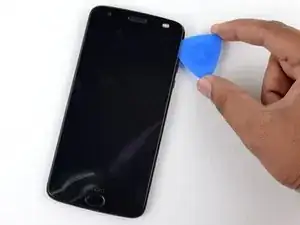
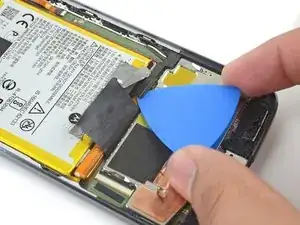
    • Glissez le médiator le long du côté droit de l'appareil pour détacher les clips et les adhésifs qui fixent l'écran Motorola Moto Z2 Force.

    • Lorsque vous atteignez le bas du côté droit, vous devez sentir les deux clips métalliques mentionnés précédemment. Si vous ne voyez ou ne sentez pas ces clips, vous êtes en train de retirer uniquement la moitié supérieure de l'écran. Dans ce cas, remettez l'écran en place et recommencez le processus depuis le début.

    this is really for the digitizer and screen replacement. there are still more steps for just the screen.

    James McKinney -

    There is an enormous amount of adhesive sticking this thing together. As the adhesive is not essential (it holds together with clips, mostly), you really need to focus on *removing* the adhesive, so that it doesn’t stretch and bunch-up, preventing clean reassembly. Leave behind the adhesive that you can prevent from bunching-up (by cleanly breaking it, in turn by holding down one edge to the phone or screen), so you have some sticky left, but just make sure it’s not bunched-up.

    Matt Falcon -

    Revisiting this comment a year later: there’s now replacement adhesive available (or maybe there always was - wish I knew!) for this model in the iFixit store. So, it would be best to remove the adhesive whereever you see it, cleaning everything up and preparing for the new adhesive. That darn adhesive in step 9 below, though… ugh. Work slow, don’t expect it to all be apart by this point.

    Matt Falcon -

  5. 331UcayoWgataJ54
    331UcayoWgataJ54
    gJ1NrpKdKEJQEHtl
    D2FmyshYG4cOPcfT
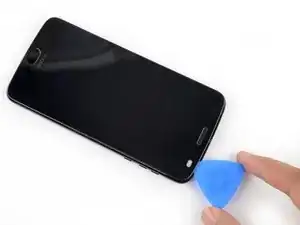
    • Une fois que le côté droit de l'écran est dégagé, glissez votre médiator autour du coin inférieur droit, pour le placer sous le bord inférieur de l'écran Motorola Moto Z2 Force.

    • Glissez le médiator le long du bord inférieur du téléphone pour couper l'adhésif qui maintient l'écran et détacher les clips en plastique.

    • Ces clips devraient se détacher bien plus facilement que les clips en métal de tout à l'heure.

    • Laissez votre outil sous le bord inférieur de l'écran pour empêcher qu'il ne se recolle au châssis. Poursuivez avec un nouvel outil.

  6. k1RJU5eLNZEwUVyf
    k1RJU5eLNZEwUVyf
    EUHAceOJcmjIKoQv
    • Lorsque vous séparez le côté gauche de l'écran, faites attention à ne pas arracher la nappe située vers le bas du bord gauche.

  7. TBPJ1NpKNoipBvsT
    TBPJ1NpKNoipBvsT
    ElKPGacANeXVCdXH
    AaxqNkhG4qsKcaU5
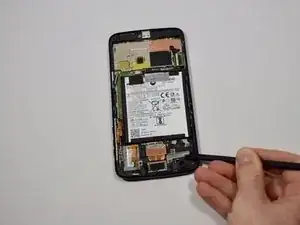
    • Insérez un autre médiator sous le bord inférieur de l'écran et glissez-le autour du coin inférieur gauche de l'appareil, pour le placer sous le bord gauche de l'écran.

    • Glissez votre outil le long du bord gauche pour dégager les clips en métal et l'adhésif qui fixent l'écran.

    • Comme avant, assurez-vous de dégager l'écran complet en repérant les trois clips en métal du côté droit de votre Motorola Moto Z2 Force.

  8. 1Wpjn6rHPBLA4Vxi
    1Wpjn6rHPBLA4Vxi
    II6eIEFCEDQpG1OD
    Z1NjCyHQXLTQeNpE
    • Glissez votre outil le long du bord supérieur de l'écran et coupez l'adhésif.

    • Faites attention à ne pas enfoncer votre outil de plus de 4 mm environ au-delà du bord de l'écran pour ne pas endommager les capteurs de la caméra frontale.

  9. e1rHODmfJvit2VZG
    e1rHODmfJvit2VZG
    XYWFCTTlcPRZKwUL
    • Il y a deux adhésifs qui fixent la partie supérieure de l'écran, en plus des 4 mm qui ont déjà été coupés.

    • Les capteurs et la nappe de la caméra frontale entourent l'adhésif de droite sur le dessus et le côté droit. Couper de ce côté pourrait endommager la nappe. Les étapes suivantes expliquent comment enlever l'adhésif par la gauche.

    This is a tricky part. See the biggest red-squared section in the photo above? That part always wants to detach — the adhesive to the screen is stronger than the molding that holds the metal into the plastic. The metal will detach from the plastic pretty easily, and there’s no way to get that metal back into the plastic frame (as it seems to have been molded as a single part). So, the adhesive is a booby-trap.

    To defuse the booby-trap, heat the heck out of it, insert one end of tweezers (or perhaps a spudger) from the right side, hold the metal plate down, and verrry slooowwly convince the adhesive to separate. At some point, it’ll start cascading and snap free.

    The metal finger area, between the two red squared sections above, also is a problem area — it’s latched into a frame above the battery, and those latches can get pulled up on top of the frame, preventing the phone from reassembling clean and flat. Make sure to re-insert those tabs so that little edge with the metal fingers sits flat and proper.

    Matt Falcon -

  10. 5O6FLw4BJirIg5Yo
    • Appliquez un peu d'alcool isopropylique hautement concentré (> 90 %) sous le bord gauche de l'écran, en haut de l'appareil.

    • Laissez l'appareil reposer sur le bord droit pendant environ 5 minutes, pour permettre à l'alcool de pénétrer et de diluer l'adhésif.

  11. tO6FgTVyRt2aOFv6
    tO6FgTVyRt2aOFv6
    SlT2A2VLWYXSNQXk
    ilVaFBYxBIRJmaRk
    • Insérez un médiator aussi loin que possible sous le coin supérieur gauche de l'écran, pour couper l'adhésif sur la gauche.

    I found that a plastic card inserted from the left side, and worked with a sawing motion, between the screen and the adhesive worked great after the adhesive was softened by the alcohol.

    Linsey Linton -

  12. PgUKYCZXDIcvdUgw
    PgUKYCZXDIcvdUgw
    DpHhwNLViZYmi4wl
    AKKKt23CSIruByLj
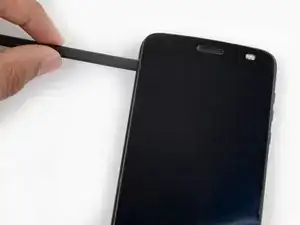
    • Glissez avec précaution la partie plate d'une spatule sous le bord gauche de l'écran. Avancez progressivement pour dégager le haut de l'écran et décoller la partie droite de l'adhésif.

    • Ajoutez de l'alcool isopropylique si besoin, mais en petites quantités pour éviter de décoller d'autres adhésifs dans l'appareil. Attendez toujours que l'alcool ait eu le temps de pénétrer l'adhésif avant de poursuivre.

    • Soulevez l'écran suffisamment pour glisser la spatule et décoller l'adhésif, mais pas plus. L'écran est toujours fixé par la nappe et vous risqueriez de l'endommager en soulevant trop haut.

    Again, pay careful attention to the strong block of adhesive sticking the display to a metal shield that’s molded into the plastic frame - the adhesive strength is quite likely to pull out the metal shield from the plastic frame and there’s no going back from that. Not as catastrophic as ripping a ribbon cable, but still pretty bad. See my comment a couple photos up about that.

    Matt Falcon -

    I added some alcohol directly to the adhesive patches on this side of the phone and waited a couple of minutes before continuing with this step.

    Linsey Linton -

  13. 3MBULUVhnUXRY32g
    3MBULUVhnUXRY32g
    IrDHoEKov2mmNMib
    • Soulevez l'écran depuis le bord droit et faites le basculer. Il est toujours relié au châssis par le coin inférieur gauche, donc attendez avant de le retirer complètement.

    • Si l'écran est coincé, coupez l'adhésif à plusieurs reprises si nécessaire.

    Do this only after slicing all the little ribbons of adhesive that hang around - and clean up any gummed-up, bunched-up strands of adhesive after removing it. I worked at detaching adhesive until the screen was totally free, only held by the ribbon cable, before moving on from this step.

    Matt Falcon -

  14. UqtEVNgsiJBLXkWx
    UqtEVNgsiJBLXkWx
    fqJyQgNMDstAhb4F
    • Utilisez une pincette pour retirer l'adhésif noir qui recouvre le connecteur de la batterie.

    • Essayez de garder cet adhésif intact pour le réutiliser lors du réassemblage.

    Upon disassembly I found no tape on my display cable

    stuff94 -

  15. CLopWYrNjDPahjHv
    CLopWYrNjDPahjHv
    TMYlS1jxWOcEWgBD
    r3SUWJRCpWKDVUYY
    • Utilisez une spatule pour soulever le clapet de verrouillage du connecteur ZIF qui retient la nappe de l'écran.

    • Utilisez une pincette pour dégager la nappe du connecteur.

  16. fC2shEJMOAHJZC51
    • Retirez l'écran.

    • Lors du réassemblage, assurez-vous de bien reconnecter l'écran, allumez l'appareil et testez toutes les fonctionnalités avant de le refermer.

    • Lors du réassemblage, remplacez les adhésifs sur les bords de l'écran si vous réutilisez votre écran.

    • Après avoir refermé votre appareil, placez dessus un objet lourd, comme un ou deux livres épais, pendant 30 à 60 minutes. Cela permettra à l'adhésif de mieux adhérer.

    When reconnecting the display ribbon I found it much easier if you straighten out major 45/90 degree bend that is in the middle of the ribbon until the entire ribbon is all unbent and in parallel with the display face. You will then have a straight shot into the connector without having to hold the display at a 90 degree angle to the chassis and then having to look around, over or through the display to (and if luck is with you) find, lineup and insert the ribbon into the connector. You have to do a little in 3 dimensional thinking to re-bend the ribbon and line the display back up with the chassis but if you’ve made it that far then you should have no problems. Don’t bend the ribbon back and forth too many times.

    Steven E -

  17. XtYTA4DOOPfit6ic
    XtYTA4DOOPfit6ic
    XTFVGHxPgByZtcRw
    4XZjSqHEBbWuMAWQ
    • Utilisez une pincette pour retirer les deux morceaux d'adhésif noir qui fixent la batterie.

    • Veillez à garder ces morceaux intacts pour pouvoir les réutiliser.

    • Sans être essentiel, cet adhésif permet de faciliter la dissipation de la chaleur de la batterie. Les morceaux n'adhéreront plus très bien par eux-mêmes, mais s'ils sont quasi intacts, vous pouvez les recoller avec de l'adhésif lors du réassemblage.

  18. V3cB3Pb6ihqx4YEh
    V3cB3Pb6ihqx4YEh
    OkP1Z5YvQWfSugGN
    w5JeHIflBvABiKp3
    • Utilisez un médiator pour soulever la fixation noire qui recouvre le connecteur de la batterie. Elle est maintenue par un petit morceau d'adhésif.

    • Retirez cette fixation avec une pincette ou avec vos doigts.

  19. DE2PH1Wj4XXWhXRV
    DE2PH1Wj4XXWhXRV
    R2ooKW1vXUThnrLY
    • Utilisez une spatule pour soulever et déconnecter le connecteur de la batterie.

  20. CuWkCIdRfFFBDiqi
    CuWkCIdRfFFBDiqi
    ghDuGeSVbUf6IMwK
    CIW2pJZhSLvnyHMg
    • Dévissez les trois vis Torx T4 de 1,7 mm du haut-parleur.

    There are actually 3 screws in the speaker

    Richard Moffat -

    There are indeed 3 screws in mine as well. I updated this step.

    Matt Falcon -

    There are three screws, one additional is in the lower right corner (orientation like seen in picture)

    mesotes -

    My Z2 Force has 3 T3 sized screws. So be aware that there is often some variance in cell phone construction.

    Krash -

  21. BrRQMQvCFKSiJiyA
    BrRQMQvCFKSiJiyA
    n5Li3fWBjBcZybK1
    6LRIbrAVpDFSCNAV
    • Prenez une spatule en nylon pour soulever et retirer le haut-parleur du châssis du téléphone.

    It’s not mentioned in the guide but you need to make sure to gently pry the ambient light sensor off of the speaker before removing the speaker or you will likely end up ripping its cable and connector from the motherboard.

    If this happens the phone will still boot and work but the screen will be stuck at full brightness and won’t shut off automatically when making phone calls.

    Frederick Hallock -

    Mr Hallock is definitely correct! Definitely something that should have at least noted, if not given a full description of how to do that! Be careful!!

    Krash -

Conclusion

Pour remonter votre appareil, suivez ces instructions en sens inverse.

Davis Reschenberg

Membre depuis le 24/01/18

321 Réputation

2 commentaires

step 6 —- 3 T4 screws (not two)

Oleksandr Panchenko -

Where to buy replacement speaker?

danwat1234 -