Introduction

Ce tutoriel de réparation a été rédigé par le personnel d'iFixit mais n'a pas été approuvé par Google. Apprenez-en plus à propos des tutoriels iFixit ici.

Utilisez ce tutoriel pour démonter et changer votre écran Pixel 7.

Pour votre sécurité, décharger la batterie de votre téléphone en dessous de 25 % avant de démonter votre téléphone. Cela réduit les risques que la batterie prenne feu si elle est accidentellement percée durant la réparation. Si votre batterie est gonflée, prenez les précautions appropriées.

Attention ! Le Pixel 7 contient des lasers de classe 1. Le démontage pourrait entraîner une exposition à des émissions lasers infrarouges invisibles.

Votre nouvel écran Pixel 7 devrait être livré avec le lecteur d'empreintes digitales déjà attaché. Si ce n'est pas le cas, vous serez obligé de réinstaller le lecteur d'empreintes digitales original sur votre nouvel écran et de le recalibrer, afin de conserver la fonctionnalité de lecture d'empreintes digitales.

Le maintien de la résistance à l'eau dépendra de la façon dont vous réappliquez l'adhésif, mais dans tous les cas, votre appareil perdra son Indice de Protection (IP).

Vous aurez besoin de remplacer également l'adhésif, pour une réparation Google Pixel 7 complète.

  1. RH1hNR5DYvEMTNGX
    RH1hNR5DYvEMTNGX
    kUNSpM2wM3aEGX23
    • Laissez votre batterie se décharger en-dessous de 25 % avant de commencer cette réparation. Une batterie chargée peut prendre feu si elle est abîmée.

    • Éteignez complètement votre téléphone et débranchez tous les câbles.

    i replaced my pixel 7 screen, I noticed that my proximity sensor is no longer working, I have tried to calibrate it using 3rd part apps and it ddisnt work,i tried using developer settings to switch the proximity sensor and i also updated my android version...all these didnt work

    Ian -

    If you can't power down your device because the screen is cracked (in my case, the AMOLED didn't light up at all anymore) and the touch is broken, you can also press power, volume up, and volume down all at the same time for 20-30 seconds. This will actually power off the phone, and not restart it (for that, you would hold the power button and volume up for a while).

    Max -

  2. uWsCCoGWV5JIrUns
    uWsCCoGWV5JIrUns
    qBuyTnEhoZIp4ycS
    rCPFaRmEDnGc6YSe
    • L'écran Google Pixel 7 est tenu en place par des clips plastiques et de l'adhésif.

    • Pendant la procédure de retrait, assurez-vous d'insérer vos médiators dans la bonne position, pour éviter de séparer l'écran de son châssis de sécurité au lieu du reste du téléphone.

    • N'insérez le médiator que de 3,5 mm environ pendant la procédure de retrait, pour éviter d'endommager les composants internes et pour éviter d'interférer avec les clips en plastique.

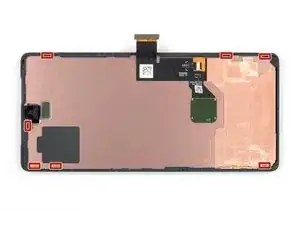
    • Il y a plusieurs clips plastiques tout autour de l'écran. Si votre médiator reste bloqué pendant la procédure, cela signifie que vous l'avez inséré trop loin sous l'écran.

    I accidentally removed the screen from the safety frame. Thankfully, this wasn't a big issue since my screen was broken anyway. In that case, you can still easily pop up the frame, and carefully remove the remaining glue with some pliers afterward.

    Max -

    "During the removal procedure, make sure to insert your opening picks in the right position"

    But then don't share what that position is, or even how to start.

    Great way to start the guide. Fills me with so much confidence in doing a $150 repair.

    Off tonyoutube to find someone who did q better job at a guide.

    HA Halleman -

    Hi there! I apologize that the instructions were not clear. I have updated the guide to clarify where the right place to insert the opening picks.

    Alex Diaz-Kokaisl -

  3. uNWQn4O2iyarfTwP
    uNWQn4O2iyarfTwP
    X4Mot1WmVF3dl5H6
    hwdBtFR1G1bs6cUM
    • Les trois étapes suivantes montrent comment utiliser l'Anti-Clamp, un outil conçu pour faciliter la procédure d'ouverture. Si vous n'utilisez pas l'Anti-Clamp, sautez ces trois étapes pour une autre méthode.

    • Pour des instructions complètes sur l'utilisation de l'Anti-Clamp, suivez ce tutoriel.

    • Si votre écran est fissuré, couvrez-le avec du ruban adhésif transparent pour faciliter l'adhésion de la ventouse.

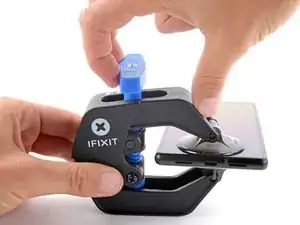
    • Tirez la poignée bleue vers l'arrière pour débloquer les bras de l'Anti-Clamp.

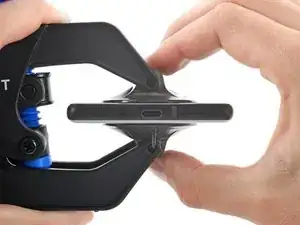
    • Faites glisser les bras sur le côté gauche ou droit de votre téléphone.

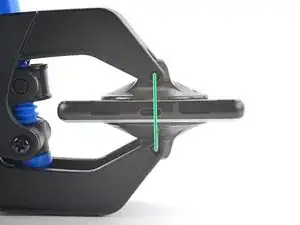
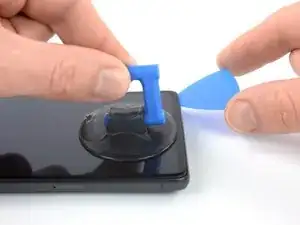
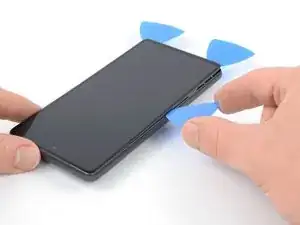
    • Positionnez les ventouses près du bas de l'écran : une devant, une derrière.

    • Appuyez sur les ventouses pour faire le vide à l'endroit désiré.

    • Si vous trouvez que la surface de votre appareil est trop glissante pour que l'Anti-Clamp y adhère, vous pouvez utiliser du ruban adhésif pour obtenir une surface plus agrippante.

  4. C5UOdfJGyBNrPmud
    C5UOdfJGyBNrPmud
    NT1pkIvVebv5WAbQ
    5q3uaImPG2XtyBUP
    • Poussez la poignée bleue vers l'avant pour bloquer les bras.

    • Tournez la poignée dans le sens horaire de 360 degrés ou jusqu'à voir les ventouses se tendre.

    • Assurez-vous que les ventouses restent alignées entre elles. Si elles commencent à se désaligner en glissant, relâchez un peu la tension sur les ventouses et réalignez les bras.

  5. iu5TEcPWZeWgMueB
    iu5TEcPWZeWgMueB
    iklY4LILrc5nWFlx
    mI2NZfhUYJ3QJbYH
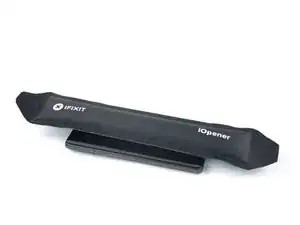
    • Faites chauffer un iOpener et faites-le passer à travers les bras de l'Anti-Clamp.

    • Vous pouvez aussi utiliser un sèche-cheveux, un pistolet à air chaud, mais des températures extrêmes peuvent endommager l'écran et/ou la batterie interne, donc allez-y doucement.

    • Pliez l'iOpener de telle sorte qu'il repose sur le bord inférieur du téléphone.

    • Attendez une minute pour laisser le temps à l'adhésif de se relâcher et d'ouvrir un espace.

    • Insérez un médiator sous le châssis de l'écran lorsque l'Anti-Clamp a créé un espace suffisant.

    • Si l'Anti-Clamp ne crée pas d'espace suffisant, appliquez davantage de chaleur à la zone et tournez la poignée d'un demi-tour supplémentaire dans le sens horaire.

    • Ne tournez pas la poignée plus d'un demi-tour à la fois, et attendez une minute entre chaque demi-tour. Laissez à l'Anti-Clamp le temps de travailler pour vous.

    • Sautez les deux étapes suivantes.

  6. 6cKgLNhBJSeuArNm
    • Appliquez un iOpener chauffé sur l'écran pour ramollir l'adhésif qui se trouve dessous. Laissez-le en place pendant au moins 3 minutes.

    • Un sèche-cheveux, un pistolet à air chaud ou une plaque chauffante peuvent faire l'affaire, mais attention à ne pas surchauffer l'appareil. Le bord devrait être légèrement trop chaud pour être touché.

    This guide is a bit all over the place. Most of the previous pictures show the iOpener being placed on the left side first (with the device having the camera facing upwards)

    However this pictures shows placing the iOpener on the right side. Does it matter? Is there a best practice side to pry first?

    Zachary (Zach) -

  7. CexARCSAqGYQbmha
    CexARCSAqGYQbmha
    4gF4DCWXWHNS2aGI
    gfaVVfZV1RGTbMLx
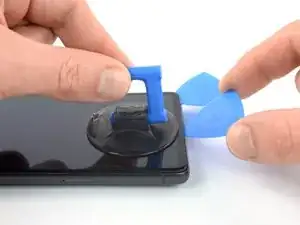
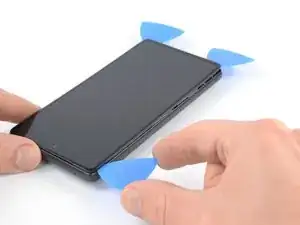
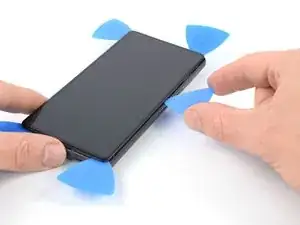
    • Une fois que l'écran est chaud au toucher, appliquez une ventouse sur le bord inférieur de l'écran.

    • Si votre écran est très fissuré, le recouvrir d'une couche de ruban adhésif transparent peut permettre à la ventouse de mieux adhérer. En alternative, un ruban adhésif très résistant peut être utilisé à la place de la ventouse. Si tout échoue, vous pouvez également coller la ventouse à l'écran cassé avec de la colle forte (superglue).

    • Soulevez l'écran, y compris son châssis de protection, avec la ventouse, pour créer un petit espace entre l'écran et le reste du téléphone.

    • Selon l'âge de votre téléphone, cela peut être difficile. Si vous rencontrez des difficultés, appliquez davantage de chaleur sur le bord inférieur et réessayez. Soyez prudent et patient lors de cette étape.

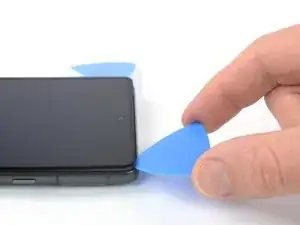
    • Insérez un médiator dans l'espace créé.

    If you're having trouble getting the first pick in, try a different hand position than what is shown. Grip the suction cup's handle with your index finger, and keep your thumb and middle finger on either side of the screen. Choose a forgiving surface underneath in case you slip. Then hold firmly and keep it stable (no need to really push down). Just be prying it open deliberately and evenly. Then take your pick and use gentle prodding, experimenting with your angle and pressure, feel around. That should be all you need to get in.

    Orin Zebest -

  8. IBUeZvgemYHWImZc
    IBUeZvgemYHWImZc
    2SO1E2gi6C2FiaZI
    • Pour éviter de casser votre Pixel 7, n'insérez pas votre médiator de plus de ~2,5 mm lorsque vous séparez l'adhésif de l'écran. Notez les zones suivantes :

    • La nappe de l'écran se trouve juste en dessous du milieu du bord gauche du téléphone. Faites très attention à ne pas la déchirer.

    • Il y a de nombreux contacts à ressort sur le pourtour du téléphone. Faites très attention à ne pas les déformer.

  9. wtdv5UrUMow2CECH
    wtdv5UrUMow2CECH
    djiNoNgaVURRqAnE
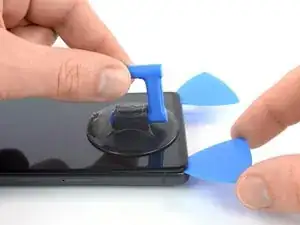
    • Faites glisser le médiator vers le coin inférieur droit de l'écran pour couper l'adhésif.

    • Laissez le médiator en place pour empêcher l'adhésif de réadhérer.

  10. BvVyMHlKdFsfT4jJ
    BvVyMHlKdFsfT4jJ
    STqP6jEultQQM41x
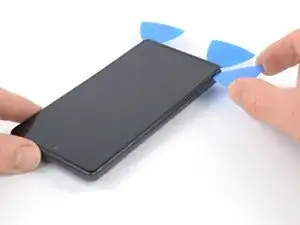
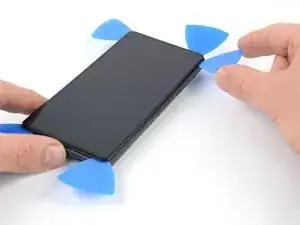
    • Insérez un deuxième médiator dans le bord inférieur et faites-le glisser vers le coin inférieur gauche de l'écran, pour couper l'adhésif.

    • Laissez le médiator en place pour empêcher l'adhésif de réadhérer.

  11. 3TahkFe4ry6RCiY4
    3TahkFe4ry6RCiY4
    3JU6OqcJvHWxqoST
    6ZPHWVqkfEhNxfpF
    • Insérez un troisième médiator sous le coin inférieur gauche de l'écran.

    • Faites glisser le médiator le long du bord gauche de l'écran, pour couper l'adhésif et défaire les clips en plastique.

    • Laissez le médiator dans le coin supérieur gauche pour empêcher l'adhésif de réadhérer.

  12. RAqKHAsrl3xCRUU1
    RAqKHAsrl3xCRUU1
    snvx1NYmrDPfUDaX
    cnPPFVoxMmq3nELB
    • Si l'adhésif devient difficile à couper, il a probablement refroidi. Utilisez votre iOpener ou un pistolet à air chaud pendant 1 à 2 minutes pour le réchauffer à nouveau.

    • Lorsque vous coupez près de la caméra frontale, n'insérez que la pointe du médiator (~2,5 mm) pour éviter d'endommager ou d'abîmer la caméra.

    • Insérez un quatrième médiator d'ouverture dans le coin supérieur gauche de l'écran.

    • Faites glisser le médiator le long du bord supérieur du téléphone pour couper l'adhésif.

    • Laissez le médiator dans le coin supérieur droit pour empêcher l'adhésif de réadhérer.

    This is the only slice that makes me nervous. Never had a problem, but yeah... extra care because of the camera.

    Orin Zebest -

  13. PnfIw3f25Eqr1XHF
    PnfIw3f25Eqr1XHF
    KenvqZiSWYaywVKu
    TZuqyojhZfgKo23H
    • Insérez un cinquième médiator et faites-le glisser le long du bord droit du téléphone, pour couper le reste de l'adhésif et détacher les clips en plastique de droite.

    • Ne tentez pas encore de retirer complètement l'écran, l'écran est toujours relié au reste du téléphone par une nappe.

  14. rhQqo5C35FvoYK3U
    rhQqo5C35FvoYK3U
    IrVMIJexBS6bDSeP
    jLlFZYjxMwL21C2X
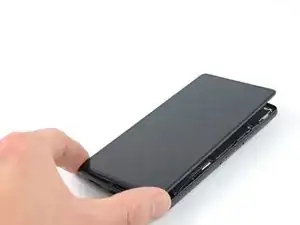
    • Soulevez le bord droit de l'écran vers le haut et vers le côté gauche de l'appareil, comme si vous ouvriez un livre.

    • Ne tordez pas l'écran et ne l'éloignez pas trop du châssis, pour éviter de tendre ou d'endommager la nappe.

    • Posez l'écran à l'envers et parallèlement au châssis avant de continuer.

    The adhesive still sticking to the screen might trip you up... don't let it pull the screen in weird ways. Just pick that stuff off and the screen sits perfectly next to the phone, as pictured.

    Orin Zebest -

  15. PSmtyE4SOWOdAwOu
    PSmtyE4SOWOdAwOu
    EP6lSfkEvCqupEtr
    • Le cache de la nappe de l'écran est bien fixé et nécessite une certaine force pour le détacher.

    • Insérez la pointe d'une pincette dans l'ouverture située à l'extrémité supérieure du cache de la nappe de l'écran.

    • Poussez le cache vers l'intérieur et faites levier vers le haut pour le détacher.

    The way this piece is wedged in there can be a difficult to imagine, so you may need to apply force at a different angle than you expect. I bent mine a few times, but just bent it back into shape with no issue.

    Orin Zebest -

    This was a pain to get out! Felt like I was going to rip the whole cable out. But it popped out eventually.

    Alex Thengvall -

  16. WKPNiJHhVHnhCorC
    WKPNiJHhVHnhCorC
    LhAcZy62xFSngm3n
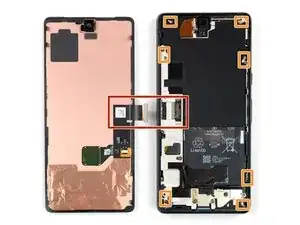
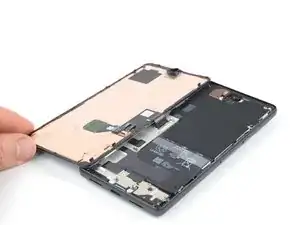
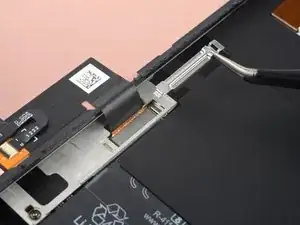
    • Utilisez une pincette pour retirer le cache de la nappe de l'écran, en le tirant de dessous le châssis central et dans la direction des caméras.

    I forgot to replace this the first time. It's not a dealbreaker (phone works fine without it), but if you ever open your phone again you must be super-extra careful -- nothing is securing the connection.

    Orin Zebest -

  17. jRnnMxxSKtAwg2aW
    jRnnMxxSKtAwg2aW
    HaPX5khLMl4bDRNB
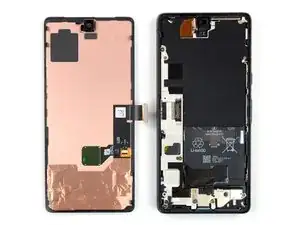
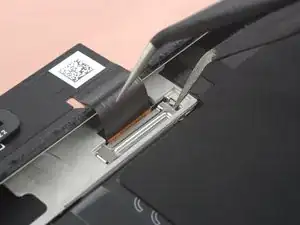
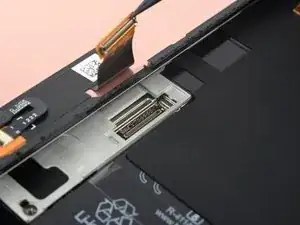
    • Utilisez une spatule (spudger) pour déconnecter la nappe de l'écran de sa prise en faisant levier à la verticale sur son connecteur.

    • Pour rebrancher un connecteur à emboîter comme celui-ci, alignez-le soigneusement et appuyez d'un côté jusqu'à ce qu'il s'emboîte, puis recommencez de l'autre côté. N'appuyez pas au milieu. Si le connecteur n'est pas aligné correctement, les broches risquent de se déformer et de causer des dégâts irréversibles.

    Getting the press connector aligned properly is a very fiddly task and impossible without a light touch and several tries. My only advice is to take a break if you get frustrated. There's no 'click' or anything to help you notice that you've got it right. But when you do, it'll just... fit. And you'll probably think, "wait I did it? oh, not as hard as it sounded. just took awhile."

    Orin Zebest -

    Beware! I tried using the forceps instead of my finger and I ended up tearing into the ribbon cable. So be careful and use your finger if possible. I wouldn't use a sharp tool like I did. There are a couple Youtube videos that probably can help if you search "pixel 7 screen replacement". Sadly I didn't do that first.

    Alex Thengvall -

    Be careful not to hit any circuitry or jumpers in the process. They are so tiny that I did and now sound doesn't work on my bottom speaker. There's a YouTube video on this topic. Take your time!

    Louie Popov -

  18. XYNCjJjvlRE5kfxZ
    XYNCjJjvlRE5kfxZ
    q5ECwAhlHHcqfV4W
    • Retirez l'écran Google Pixel 7.

    • Pendant le remontage :

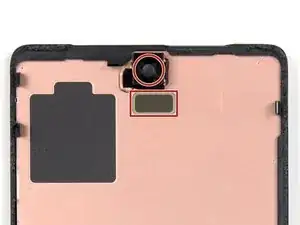
    • Si vous avez remplacé votre écran, vérifiez le trou de la caméra frontale et la découpe du capteur sur votre écran de remplacement, et retirez toutes les protections restantes.

    • N'oubliez pas de réinstaller le cache de la nappe de l'écran.

    • C'est le bon moment pour tester votre téléphone avant de le sceller. Connectez temporairement votre écran, allumez votre téléphone et assurez-vous qu'il fonctionne comme prévu. Avant de poursuivre le remontage, éteignez votre téléphone et débranchez l'écran.

    • Suivez ce tutoriel si vous utilisez des adhésifs découpés sur mesure pour votre appareil.

    • Suivez ce tutoriel si vous utilisez une carte adhésive prédécoupée.

    • Si vous installez un nouvel écran, suivez ce tutoriel pour calibrer le lecteur d'empreintes digitales.

    It was much easier to remove the adhesive after the phone cooled down completely.

    Lacey E -

    That's super strange. There's certainly a middle ground of not being too hot, but I've done this job 3 times now, I can really tell if it needs a little more warmth.

    Orin Zebest -

    IMO this really needs some kind of jig to align the new adhesive. It is nigh on impossible IMO to align properly, and you'll end up with bunched-up sections of stretched adhesive all over the place. It is beyond frustrating, after taking ones time and being so careful.

    It seems that it should be possible to cut the plastic backing that the new adhesive comes on into a shape that would fit in the phone, and index it on some of the existing pins by making accurate holes. That might at least make it possible to get all of the new adhesive in a useful place.

    Otherwise pretty good. Thank you to the people who have taken the time to put this together.

    David B -

    How to unlock the fingerprint sensor ?

    Why is there no adhesive with the display.

    It's not very consumer friendly if you need to buy everything seperate

    paul E -

    Was there a solution to unlocking the fingerprint sensor? I have the same issue.

    Marian -

    Before putting the new screen, remove the black and not so visible black plastic frame under the surrounding scotch. Otherwise you cannot put the new screen, this black and surrounding plastic is also on the new screen with it's claws.

    Ratinox -

    I would have liked to know I had to put the adhesive card before connecting the new screen (which took me 15mn just to connect the wire to the motherboard) because the flat cable makes it very hard to do so...

    Otherwise, tutorial is good, although it misses the fingerprint sensor recalibration as said in other comments

    Gael Rottier -

    I agree, i wish there was an adhesive tutorial, I messed mine up and lost half the adhesive :(

    William Best -

    When testing the new screen, it DID work previously. Now it does not. What could be wrong? Did I break a pin? How can I troubleshoot further?

    David Gannaway -

Conclusion

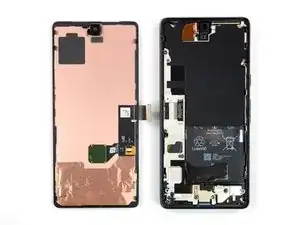
Comparez votre nouvel écran Pixel 7 avec la pièce d'origine. Vous devrez peut-être transférer les composants restants ou retirer les supports adhésifs de la nouvelle pièce avant de l'installer.

Pour réassembler votre appareil, suivez ces instructions dans le sens inverse.

Pour exécuter un test de diagnostic avec l'outil de diagnostic Pixel intégré, cliquez ici.

La réparation Pixel 7 ne s'est pas déroulée comme prévu ? Consultez nos conseils basiques de diagnostic ou notre Forum pour obtenir de l’aide.

Dominik Schnabelrauch

Membre depuis le 23/11/16

224029 Réputation

42 commentaires

This guide was excellent. And the most tedious bit of the repair was removing the remaining adhesive before installing the new screen. Very easy repair for anyone with some patience.

If the fingerprint unlock does not work after this, you may get a message on the lock screen indicating that you need to go to a google website to fix it.

What you actually need to do is:

o Install the Google USB driver for Windows from here: https://developer.android.com/studio/run...

o Put your phone in fast-boot (turn off, then turn on while holding volume down)

o Connect the Pixel to your PC

o Using chrome, visit this site, which will reset the fingerprint reader: https://pixelrepair.withgoogle.com/udfps

I had to reboot twice after this to actually get it to work, but it's all good now.

bradappel -

Thank you for this. Since the message on the phone is unhelpfull, this info should really be added to the manual.

Vincent van Leijden -

Thank you! No driver needed on a Mac (as it says at the first link.) Just go to the withgoogle pixelrepair page and follow the instructions. Worked on the first restart for me.

Chris K. -

Ohhh thank you so much for this, I was about to give up on the fingerprint reader ha

Joshua Chandler -

The above instructions are not complete. These are the full instructions that work for me:

1.Before you turn your phone off, go to the developer options and enable USB debugging.

Go to: Settings, About phone then tap Build number 7 times.

2. Go here Get the Google USB Driver | Android Developers and download the google USB zip file (this is for windows BTW)

3. Unzip however you want it

4. Open the folder usb_Driver and rightclick "android_winusb" and install

5. To make sure it installed, connect your pixel (with USB debugging still enabled) to your PC and open "device manager". You should see "Android Devices > Android Composite ADB Interface".

6. Disconnect pixel from PC

7. Go here Google Fingerprint Calibration website and follow the instructions.

https://pixelrepair.withgoogle.com/udfps

Filip Lou -

Thank you so much. This has worked for me :)

Robot Dog -

Thank you for the extra help. Bradapple pointed me in the right direction and you guided me in for the landing... so to speak. 😏

Already Sanchez -

I did all that but when connecting my computer the monitor shows "Unsupported device

To use this tool, your device must be a Pixel 3, 3 XL, 3a, 3a XL, 4, 4 XL, 4a, 4a (5G), 5, 5a, 6, 6 Pro, 6a, 7, 7 Pro, 7a, Tablet." That is very confusing because I have the Google Pixel 7.

Cedric Willi -

OMG thank you so much for this information, i've spent such a long time on various forums and threads, i even talked to google support they said factory reset would work.. no one mentioned the developer options and enabling USB debugging. Thanks again this finally worked!

Mitchell Rogers -

thanks so much. I think these steps should have been included in the guide. it doesn't seem like the system lets you do a straight swap without it (which makes sense given it is an important security feature)

Jesse Kohn -

Can I use a used screen and still have fingerprint scanning work or can it only be calibrated once?

Joseph Miller -

I found attaching the press cable the most difficult, it eventually went in after a few hours trying on and off, but I couldn't tell you why. Once that was done everything was easy

Sam Rutland -

Yes i agree, this was fiddly and I was very worried about breaking pins.. though for me it was 10mins, not hours :(

Jesse Kohn -

Really good guide. Had some trouble with the removal of the display cable branket and the adhesive, but after an hour in the end, the screen turnee on. Also had to reinstall the fingerscanner….

Steffan Juel Højgaard Jensen -

guys my screen turn on but the touchscreen doesnt work, can anyone tell what do wrong?

ewdor gutierrez -

I have the same problem, did you solve it somehow?

Борис Міндер -

How to order the parts if im outside of shipping region, im in indonesia

Kristian Harjanto Abarja -

Great quality kit. I underestimated how fiddly cleaning off the old adhesive would be but otherwise this was straightforward and there were some really good pointers for things to watch out along the way. Glad I took the time to do this as now my screen is perfectly readable again. A couple of lessons learnt from me: 1/ impressed at how quickly the microwave heat pack gets super hot. one application was enough for me to get the screen off. 2/ The clips along the outside edges are very fragile.. be very careful when cleaning out the adhesive. 3/ Speaking of adhesive cleaning/removal.. I understimated this step. It took a looong time. Take breaks if getting tired/frustrated. Probably spent over an hour just on this step. Maybe more heat would have helped, but I was worried about damaging components 3/ As others have mentioned there are issues with the fingerprint sensor post install, the instructions above worked perfectly for me re/ windows driver, developer mode, google software update tool.

Jesse Kohn -

I followed this guide to open the phone and try to fix my broken glass: not screen, glass only. I decided to post here some advices.

Resources:
- This guide
- Video on how to open and apply OCA Glass
- Video on how to apply OCA without machines

Where I bought things and what I used?
- IFixIt Pro Tech Toolkit
- Glass replacement with OCA
- Molybdenum string
- Isopropyl alcohol
- Heat Gun / Hairdryer

Advices:
- you need to have something that will hold your screen still. It will move a lot, adhesive is strong as hell
- do not apply too much heat: if it's hot to touch, probably is too much (max 80°C)
- make sure to have A LOT of time, a LOT of patience and a LOT of molybdenum
- do not push on the internal screen and its components: go against glass, not the "LCD"
- screen-frame adhesive cannot be reused, you need a new one

At this point I need to tell you that I failed and ordered a new screen from iFixIt.
I managed to get half of the work done, but then my string started to eat the internal screen :(

Marcin Pabich -

Should I remove the thin blue backing off(has what look like serial number stickers on it) the new screen before install? Thanks

Chris Vann -

When installing a replacement screen be sure to remove the black plastic cover that obscures the selfie camera hole, otherwise you won't be able to take selfies!

Josh -

I didn't notice this cover when closing it up, so it didn't want to close at the top edge. Still doesn't close snugly, and the front camera doesn't work now, but idk if it's worth trying to get the screen off again and risk breaking the new display. T_T It would have been helpful to have some information on what to remove from the new screen in the article.

Hitch -

Update, a few minutes later: I was able to fix it! The adhesive was fresh enough that a little heat was enough for me to get just the top edge open enough to slip in a pair of tweezers and remove the covering. Camera is now functioning.

Hitch -

Thank you Hitch!

I encountered the same situation and could solve it just as you did.

mikg -

how important is it to put the display cable bracket back on?? I forgot then sealed up

Kyle Walker -

Hi Kyle,

The display cable bracket with the piece of foam holds the connector in place. Without it, the connector just holds with a little friction and is likely to come off by vibration or shock. Your mileage may vary. At least you know how to fix it, should it come off. Keep the bracket in a safe place.

What I do not know is, if there is a possibility for electrical damage on the screen or the mainboard, should the connector not come off completely, leaving just some contacts connected. But given the low currents, damage seems not very likely. At least in my experience, these things are relatively robust.

mikg -

Hello! Does anyone know if it is possible not to change the whole screen of the phone but somehow to reattach the upper glass only? My problem is that the screen itself is fine but the glass goes off a bit in the left upper corner and now there's a several mm whole in between the glass and the screen. Is it possible somehow to fix it without changing the whole screen? Thanks a lot for your replies!

Lily -

The replacement screen isn't sitting flush with the phone. What have I missed?

Thanks

Jon Smith -

Hi Jon,

If it is on the top, you likely didn't remove the cover that obscures the selfie camera, which will prevent you from taking selfies too (see comments above). Happened to me and solved it, like Hitch described.

Other possibilities include incomplete cleaning of the old adhesive, torn application of the new adhesive or having some other 'body' lodged between frame and screen.

Best of luck!

mikg -

le tuto est genial tout fonctionne merciiiiiiii

Moi Tusauraspas -

Having issues with the proximity sensor after replacing display. Screen no longer turns off when against face on calls, nor does flip to shh work. I checked for all protective films, nothing present (looked just like the original display and even just like what's pictured above). What do I need to do?!

Kyle Walker -

I have used iFixit guides to repair phones/tablets numerous times over the years, and this is yet another thorough, well put together guide that led to another successful repair.

One thing to pay attention to is the additional hyperlinks/steps needed to reinstall the fingerprint sensor and follow them carefully. For anyone who hasn't messed around with installing custom ROMs on phones/tablets, this might seem a bit daunting, but it's just a matter of following the steps carefully and you should be able to get it done - make sure that you are using the Chrome browser too - I wasn't able to get this to work with Firefox.

One last note on the Pixel 7 driver installation if you're on Windows and have already downloaded the driver - make sure to extract it somewhere easy to find (like the Downloads folder). In Device Manager, Pixel 7 was located under "Universal Serial Bus devices". Once you're ready to select the file to install, you only need to select the folder - it will install the correct driver file.

Christopher Ingram -

Just did this! I appreciate the guide! If I had to write a caution to anybody below are things I think I could have done better.

-I put the pick in too deep and bent a spring

-I rushed myself to remove the adhesive, hindsight I should have some solvent or brake cleaner and a wooden toothpicks

- I rushed to try and put the adhesive on, it felt like I took my time but I didn't.... #hindshight...

Allan Whitney -

Hi, Im from Ecuador and my Google Pixel 7 has a broken screen. There's no place here that sells the screen and can fix it. Do you really recommend that I buy the screen or buy another phone?

Dome Niama -

Just replaced the screen. All was good, including the fingerprint sensor (for that you have to go through the steps outlined in many other comments, and use a good USB cable) but what's missing from this guide is the part on how fix the adhesive, which is quite critical and delicate. I recommend this video, also from iFixit (even if it's for the Pro version the steps are the same): https://www.youtube.com/watch?v=Uag55fu5...

Sergio Nalin -

Moin, ich versuche bei euch mein Glück.

Ich suche ein defektes aber noch funktionierendes Display für ein Goggle Pixel 7. Es wird nur zur Datenrettung benötigt, weil meins komplett schwarz ist nach einem Wasserschaden. So das ich den Datenmodus aktivieren kann.

Vielleicht habt ihr noch nicht alle entsorgt.

MfG R. Gierth

ragie@freenet.de

Ralf Gierth -

This mainly worked and i was able to extract the data from the phone. However after glueing in the new screen it is not seamless woth the housing and standing out like almost 1mm. It looks like the screen did not fit into the inner clamps and is now only attached by the glue. Any ideas?

Patrick -

Moin zusammen,

mein Google Pixel 7 hat einen Wasserschaden erlitten und funktionierte danach nicht mehr. Ich habe es zur Reparatur gegeben, aber es wurde nur gereinigt und unrepariert zurückgegeben.

Ich habe dann herausgefunden, dass offenbar nur das Display defekt ist – alles andere scheint zu funktionieren. Ich habe eine Maus und Tastatur per USB angeschlossen und mich über die Microsoft Smartphone-Link-App mit Screenshots behelfen können. Mit TalkBack konnte ich die Eingaben besser verstehen und bin zu dem Schluss gekommen, dass bis auf das Display alles funktioniert (es gibt nur kleinere Darstellungsfehler, wahrscheinlich durch das defekte Display).

Jetzt überlege ich, ob es sich lohnt, das Display selbst zu tauschen. Hat jemand Erfahrungen damit oder würdet ihr eher empfehlen, sich ein neues Gerät zu kaufen?

Vielen Dank schon mal für eure Hilfe!
Jakob

Jakob Ströhlein -

I took off the old screen and replaced it with my new screen, yet it still doesn't display. It has life (vibrates and can do things I think). This was the same issue with the old screen, and I thought replacing screens would work. Any suggestions?

Matthew -

Great guide! The most annoying part was removing the old screen adhesive, so make sure to have some isopropyl alcohol on hand for a repair – only a sad little wipe is provided in iFixit's kit. Other than that, everything else went as intended.

Marat Ismailov -

I was apprehensive to begin with but the kit is really helpful. Some patience, common sense and work is all that is needed. Just like other posts, scraping off the old adhesive was the most time consuming step. And fingerprint calibration is super easy - just takes a couple minutes and it is done.

One more thing I want to add is that it is easy to miss the adhesive fixing steps in this tutorial - there is a small link which takes you to a different page. I kind of missed it and ripped out the entire adhesive before applying on the phone. It is clearly shown in the video tutorial though.

Rakesh S -

Thanks to this guide and ifixit in general, I do not need to purchase a new phone! I was worried when my phone had signs of water damage/screen failure; but took the screen off and had a more knowladgeable friend take a look and say the internals were fine.

The money spent on the fixit kit was reasonable but a bit nervewracking because there was no guarantee the phone would work, but ifixit does accept returns and I do value repairability so I decided to go for it.

This guide was excellent and helped with being able to safely take the screen off without puncturing anything. The trickiest part was removing and adding the adhesive. I do wish the guide went into a bit more depth as far as re-assembly; specifically tips on applying the adhesive. But the linked guide was good at giving general directions and the included strip was well designed.

10/10 would recommend.

I do not currently have the fingerprint reader working; I have a modified version of android flashed on my phone so am not sure how to proceed there.

projectproxy -