Introduction

Ce tutoriel de réparation Google Pixel 7a provient de l'équipe iFixit et n'a pas été soumis à l'approbation de Google. Pour en savoir plus sur nos tutoriels de réparation, c'est par ici.

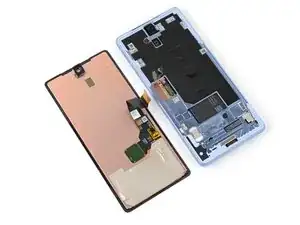
Suivez ce tutoriel pour retirer ou changer un écran cassé ou en panne sur votre Google Pixel 7a.

Pour calibrer le lecteur d'empreintes digitales de l'écran, utilisez ce tutoriel. Les écrans de remplacement Google d'origine sont livrés avec le lecteur d'empreintes digitales déjà préinstallé. Si votre écran de remplacement ne comporte pas de lecteur d'empreintes digitales préinstallé, vous devrez transférer le lecteur d'empreintes digitales d'origine sur votre nouvel écran et le recalibrer pour qu'il conserve sa fonctionnalité.

Vous aurez besoin d'un adhésif de remplacement pour l'écran afin de terminer cette réparation.

Remarque : toute réparation téléphone peut compromettre sa résistance à l'eau. Le maintien de l'étanchéité après la réparation dépendra de la qualité de la réapplication de l'adhésif.

  1. oTvToevuIyEPXQJt
    oTvToevuIyEPXQJt
    DgiJJLhpPrIMBAmo
    • Laissez votre batterie se vider en dessous de 25 % avant de commencer cette réparation. Une batterie lithium-ion chargée est un danger potentiel en terme de sécurité.

    • Débranchez tous les câbles de votre téléphone et éteignez-le complètement.

  2. HT1ZTxX1oNs4XryD
    HT1ZTxX1oNs4XryD
    eyuuYBXSLKEiVgUj
    • Les éclats de verre peuvent compliquer le démontage, ou pire, provoquer des blessures. Si l'écran de votre téléphone est fissuré, procédez comme suit :

    • Appliquez des bandes de ruban adhésif qui se chevauchent sur le verre fissuré, jusqu'à ce que l'ensemble de l'écran soit recouvert.

    • Ne recouvrez que la vitre elle-même - ne collez pas de ruban adhésif sur le châssis.

    • Portez des lunettes de sécurité pour protéger vos yeux des éclats de verre éventuels durant la réparation.

  3. 1TQDVgpOwJiqlSJO
    • L'écran est solidement collé au châssis, n'a pas de clips et résiste à la flexion. Il faut une chaleur importante pour ramollir l'adhésif qui se trouve en dessous.

    • Utilisez un sèche-cheveux, un pistolet à air chaud ou une plaque chauffante pour chauffer le bord supérieur de l'écran jusqu'à ce qu'il soit presque trop chaud pour être touché.

    • Veillez à ne pas surchauffer le téléphone : la batterie et les composants en plastique sont susceptibles d'être endommagés par la chaleur. Arrêtez de chauffer si le châssis devient trop chaud au toucher.

  4. L2GMNNVAAdPVjP2b
    L2GMNNVAAdPVjP2b
    VALpbABicsHrK1sy
    J2ZisEDANkEHpNKA
    • L'insertion d'un médiator d'ouverture est très difficile. Soyez patient et réchauffez l'écran à tout moment s'il semble coincé.

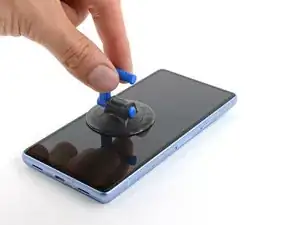
    • Posez une ventouse au centre du bord supérieur de l'écran.

    • Si vous ne pouvez pas appliquer une ventouse à un écran cassé ou inégal, essayez de plier un morceau de ruban adhésif solide en guise de poignée.

    • N'insérez pas votre médiator plus loin que 2 mm, au risque d'endommager la caméra frontale.

    • Tirez sur la ventouse en exerçant une force forte et régulière.

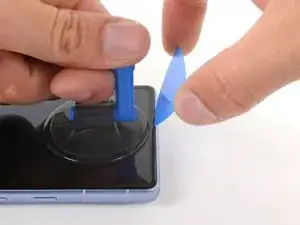
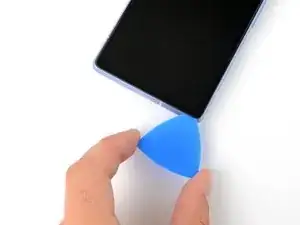
    • Insérez la pointe d'un médiator dans le côté gauche de l'encoche du haut-parleur interne.

    • Enfoncez fermement le médiator dans la découpe et abaissez-le à plat sur l'écran jusqu'à ce qu'il glisse sous la vitre.

    • Si votre médiator est trop épais pour glisser sous la vitre, essayez un objet plus fin, comme le bord plat d'un Jimmy.

    I was replacing a shattered screen and none of the methods worked:

    1. I couldn't get the suction cup to seal against the screen

    2. None of the tapes I used (packaging, duct, & gorilla) would adhere to the screen

    I ended up using a craft knife to pry open the seal. The opening picks worked great on the non-shattered portions of the screen. This step took me a few hours to troubleshoot

    Parker Kincaid -

    I second Parker's comment, if your screen is badly shattered like mine, a craft knife does the trick. You'll scratch the edge of the frame, but there's no avoiding that. Don't be scared to crack the screen more with the knife, you can take if off shard by shard if you have to. At some point you'll have enough leverage to remove the display part as one big piece and then just scrape off any leftover glass and adhesive once the Screen is removed.

    Gabriel Will -

    I third these comments. Enter through the earpiece speaker like the guide says and chip away the glass little by little. Put tape over the section you're cracking so glass doesn't fly everywhere. Rinse and repeat with more small sections of tape. It's a pain, but after you get the edge glass off, the lcd will be loose. I tried iso, I tried heat, but nothing moved this screen. It even broke my suction cup.

    Isaiah Kolesar -

    Replacing the screen is pretty straight forward with the guide. I would get the Jimmy tool. This tool makes it super easy to remove the old screen.

    Justin S. -

    As other comments mentioned, the pick supplied is too thick to lift the screen. I found a method to open it without the Jimmy tool and without breaking the screen. Follow all steps as mentioned but use an utility knife just for the initial lift of the screen (1mm depth is enough, 2mm max). That creates enough gap for the plastic pick to get inside and slide around all edges.

    Alonso -

  5. HvEeM3cpUJsmXJK2
    HvEeM3cpUJsmXJK2
    kA1CD6tOds5fAk2q
    jvZcZhEyEjJLH2dN
    • N'insérez pas votre médiator à plus de 2 mm de profondeur, vous risqueriez d'endommager la caméra frontale.

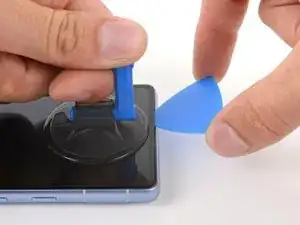
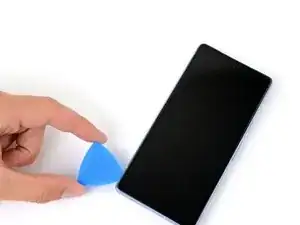
    • Faites glisser votre médiator d'avant en arrière le long du bord supérieur de l'écran pour séparer l'adhésif.

  6. HmAuAqix4Q2Q5hBV
    HmAuAqix4Q2Q5hBV
    jxI2ARJECokoTfUP
    • N'insérez pas votre médiator à plus de 3 mm de profondeur, car vous risqueriez d'endommager les entretoises situées le long du bord droit du châssis.

    • Pour une référence visuelle, vous pouvez mesurer 3 mm à partir de la pointe et marquer votre médiator à l'aide d'un marqueur permanent.

    • Faites glisser votre médiator le long du bord droit vers le bas pour séparer l'adhésif.

  7. UvSmBQCmDPYavYZT
    UvSmBQCmDPYavYZT
    PIKIxRjvG3uGqm2b
    • Si vous prévoyez de réutiliser des composants de votre écran, n'insérez pas votre médiator à plus de 3 mm de profondeur, car vous risqueriez d'endommager l'écran LCD ou les connecteurs.

    • Faites glisser votre médiator vers le coin inférieur gauche pour séparer l'adhésif du bord inférieur.

  8. T3dMF44q1KmBY3oX
    T3dMF44q1KmBY3oX
    uKfOQTeZCVpKql5w
    • Si vous prévoyez de réutiliser des composants de votre écran, n'insérez pas votre médiator à plus de 3 mm de profondeur, car vous risqueriez d'endommager les connecteurs.

    • Faites glisser votre médiator vers le coin supérieur gauche pour séparer l'adhésif du bord gauche.

  9. iVIHoUqtPpd62Og2
    iVIHoUqtPpd62Og2
    VfHEZTCkjMOquSWD
    GbUugky4p5MqNPbT
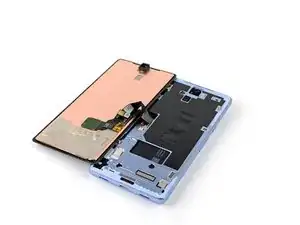
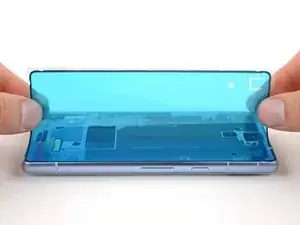
    • Ouvrez le bord droit de l'écran, comme si vous ouvriez la page d'un livre.

    • Veillez à ne pas tirer sur la nappe de l'écran.

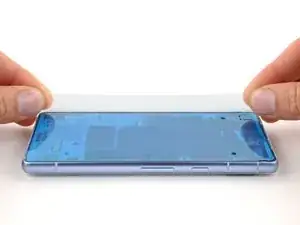
    • Posez l'écran sur le bord gauche du châssis.

    You also have to deal with the square adhesive strip (the one you replace in steps 14 and 17). I ended up forcing the phone open because I was throwing away the old screen.

    I'm not sure how you'd do it if you wanted to avoid damaging the screen

    Parker Kincaid -

  10. cx3lED4XMcYANCj4
    cx3lED4XMcYANCj4
    bATq4FBOiOiWQcvt
    • Éloignez le rabat du film de graphite du connecteur de l'écran.

  11. MVW1AG6inFVxvpwR
    MVW1AG6inFVxvpwR
    N5W2ZIVXv4UvOLS6
    trgjRwHGM5CmaYbD
    • Bien que le Pixel 7a utilise des vis Torx Plus, les embouts Torx standard fonctionnent. Veillez à appliquer une force constante vers le bas afin d'éviter tout dommage.

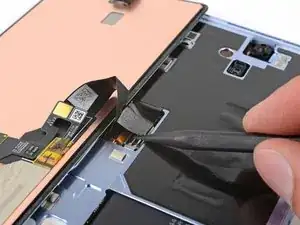
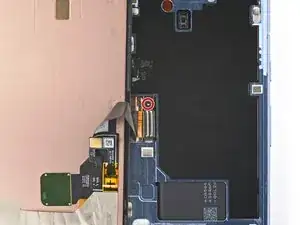
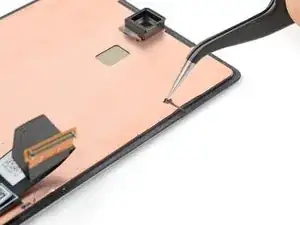
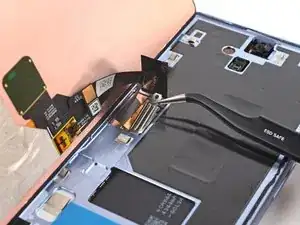
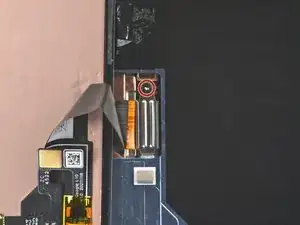
    • Utilisez votre tournevis Torx T3 pour retirer l'unique vis Torx Plus 3IP de 2 mm qui fixe le cache du connecteur de l'écran.

    • Retirez le cache.

    I lost my screw during this process and am trying to find another online. A 2 mm 3IP Torx Plus screw doesn't seem to exist. Are you sure this is the right one? I tried a 2mm socket head screw just to see if it was the same pitch and size, but it was way too large.

    Kaelyn Swetala -

    I also need a replacement screw. Anybody have any luck finding one?

    Aaron Hill -

    I ended up ordering a variety pack off Amazon. The M1*2mm screw seems to fit.

    Aaron Hill -

  12. GPQ4RSMISbSldgn5
    GPQ4RSMISbSldgn5
    DpoQkMiWCsIdthA3
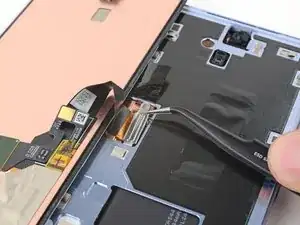
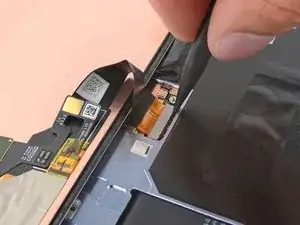
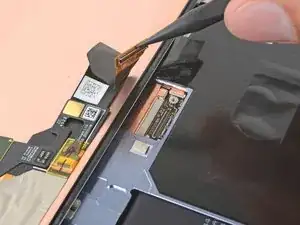
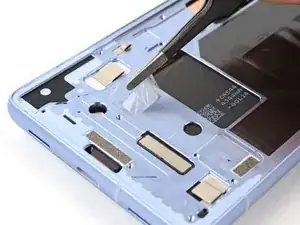
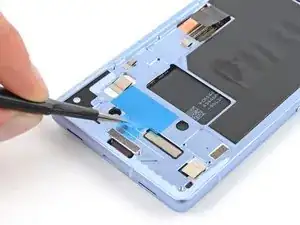
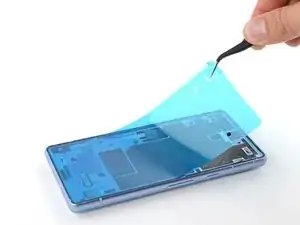
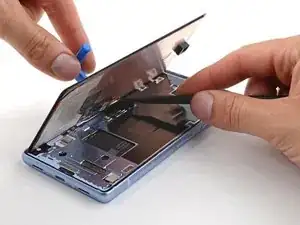
    • Utilisez la pointe de votre spatule ou un ongle pour soulever et débrancher le connecteur à emboîter de l'écran.

    • Pour rebrancher un connecteur à emboîter, alignez-le sur la prise et appuyez doucement sur un côté jusqu'à ce qu'il s'enclenche, puis appuyez sur l'autre côté. Il se peut que vous deviez vous y reprendre à plusieurs fois pour aligner le connecteur.

  13. YNymL1NwqPMqlHHZ
    • Retirez l'écran.

  14. wRmrA3qrHIS1UhjN
    wRmrA3qrHIS1UhjN
    RITgXtO5OgYjlJcl
    • Le dessous de la batterie est exposé à travers une petite découpe dans le châssis. Veillez à ne pas l'endommager avec votre outil.

    • Utilisez une pincette arrondie ou vos doigts pour décoller et retirer le morceau d'adhésif carré situé près de la découpe de la batterie.

  15. 2doFKClJsnfipSGj
    2doFKClJsnfipSGj
    l2qCdqgVRtORtmFq
    CEqSpsSZuxUYK2Y4
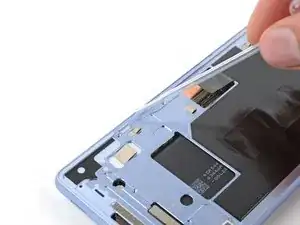
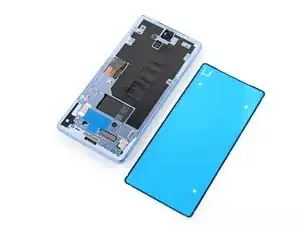
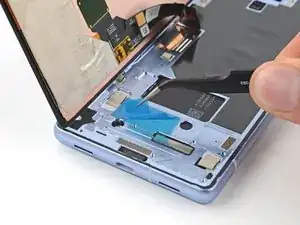
    • Si vous réutilisez votre écran d'origine, décollez et retirez l'ancien adhésif du périmètre de l'écran.

  16. baPe3v5oyQvAjqaY
    baPe3v5oyQvAjqaY
    yPQjiEpVkM3OpFef
    pWN1NAtOMPHCUAlC
    • À l'aide d'une pipette ou d'une seringue, appliquez quelques gouttes d'alcool isopropylique très concentré (plus de 90 %) sur le pourtour du châssis.

    • Essuyez les résidus à l'aide d'un chiffon non pelucheux ou en microfibres.

    • Si vous réutilisez votre écran, répétez cette étape sur son pourtour.

  17. ZKJxClGdCpgIyUwc
    ZKJxClGdCpgIyUwc
    biJbbQHUAUetAFDr
    HBaVQupOCbZFoXit
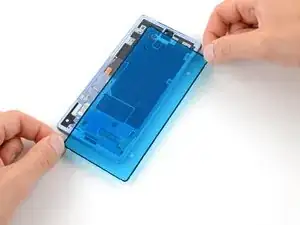
    • Décollez le morceau carré d'adhésif pour écran de sa grande feuille de protection.

    • Appliquez l'adhésif sur le châssis au même endroit que l'ancien adhésif, juste en dessous de la découpe de la batterie.

  18. JKFS1PRUnIPupYFx
    JKFS1PRUnIPupYFx
    tH4ZC4Z42OxT3Cjq
    • Si votre écran est déjà muni d'un adhésif préinstallé, retirez le film de protection et passez les cinq étapes suivantes pour poursuivre le remontage.

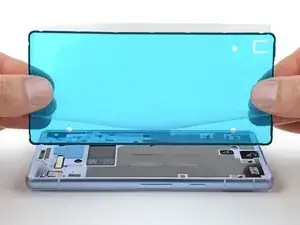
    • Avant de retirer la feuille de protection de l'adhésif de l'écran, tenez-le au-dessus du châssis pour vous assurer qu'il est orienté correctement.

    • Assurez-vous que le revêtement adhésif bleu est orienté vers le haut et que la découpe de la languette se trouve à gauche de la caméra frontale.

    If you bought the "Fix Kit" version of this, the screen adhesive comes pre-installed on the replacement screen.

    Parker Kincaid -

    Is this the small blue "line" at the edges of the screen? Since on the pictures, it seems that the blue adhesive has the full screen size?

    Stef Pillaert -

  19. 3yOvlEFqCLyJ6V2P
    3yOvlEFqCLyJ6V2P
    xvPFJTMBlSTGJoR3
    yKp5caHnMXMh4qJN
    • Prenez votre temps pour aligner l'adhésif sur le châssis. Il est très collant et ne peut plus être déplacé une fois que vous l'avez appliqué.

    • Décollez la moitié droite de la grande feuille adhésive. Ne retirez pas encore la totalité de la doublure.

    • Tenez l'adhésif par ses bords courts, le bord long droit de la feuille étant replié pour exposer l'adhésif.

    • Posez le bord long droit de l'adhésif sur le châssis.

  20. SK5PGPpMZo14eMEl
    SK5PGPpMZo14eMEl
    SJWUe6ovZgkxhMtZ
    DSwRKbFK5Lv5rIFs
    • Déposez lentement le reste de l'adhésif sur le châssis, en décollant la grande feuille de protection au fur et à mesure.

  21. 33wLHPmYqWve2tio
    33wLHPmYqWve2tio
    OTpOlxTIqcKMgPWG
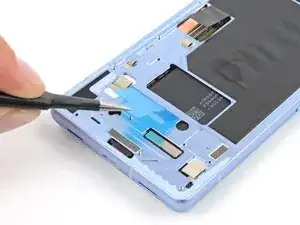
    • Utilisez l'extrémité plate de votre spatule (spudger) pour appuyer sur le périmètre de l'adhésif et le fixer au châssis.

  22. bZlPyDWQkrnlmkJn
    bZlPyDWQkrnlmkJn
    rEpoqGk2mx4XU2Sf
    3TPTS2jh6iYB2IKc
    • Saisissez la languette bleue située dans le coin supérieur gauche.

    • Décollez et retirez lentement le support.

    • Si l'adhésif commence à se décoller avec le support, vérifiez que vous l'avez entièrement mis en place avec votre spatule (spudger). S'il continue à se décoller, maintenez-le en place avec la pointe de votre spatule (spudger) au fur et à mesure que vous avancez.

  23. ZaBMxLjcMQYjnvSr
    ZaBMxLjcMQYjnvSr
    VVOvqiQlrVUF5JdF
    • Placez une ventouse sur le côté gauche de l'écran de remplacement, la poignée étant orientée vers la gauche.

    • Placez votre écran du côté gauche du châssis.

  24. RgYcA4HTWI6xvENl
    RgYcA4HTWI6xvENl
    DYJHuhJqGGTHQtc1
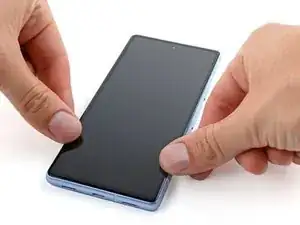
    • Connectez la nappe de l'écran en l'alignant sur la prise et en appuyant d'un côté jusqu'à ce qu'elle s'enclenche avant de l'enfoncer complètement.

    I had to undo the 180 degree bend in the screen cable on the replacement screen, and re-bend it a few millimeters back so the connectors would align with the screen in position. Just a small extra step that might be needed depending on the replacement part you got.

    Andrew Helms -

  25. aYykds1QtQtaE1CG
    aYykds1QtQtaE1CG
    VMvMfdjZ6pSRfkTV
    c2NxjOdHOuo4CXxo
    • Insérez le cache du connecteur de l'écran dans son emplacement sur la carte mère.

    • Utilisez votre tournevis Torx T3 pour installer la vis Torx Plus 3IP de 2 mm et fixer le cache du connecteur de l'écran.

    Achtung! nicht zu feste anziehen - nach fest kommt bekanntlich locker. Man kann die Schraube allerdings ordentlich festziehen.

    Ich habe es allerdings zu gut gemeint und mir den Schraubenkopf abgebrochen.

    Jetzt kommt mein Displaystecker dann wohl ohne Schutzabdeckung aus....

    Gian-Marco -

  26. vAKD4Hbe4lrOr1X2
    • Décollez et retirez le film bleu de l'adhésif carré sur le châssis.

  27. IXsTZCBRqtDLTdvb
    IXsTZCBRqtDLTdvb
    AVkSJvplWCVbuJKo
    ZUJf2kc2JBHIsTF2
    • Tenez l'écran par la ventouse juste au-dessus du châssis.

    • Utilisez un spatule (spudger) pour replier le rabat du film de graphite sur la nappe de l'écran.

    • Appuyez sur l'écran pour le mettre en place.

  28. KUCRVKEiGuqbyhHC
    KUCRVKEiGuqbyhHC
    rkBBtfH26QkXBPOX
    • Retirez la ventouse.

    • Pour une meilleure adhérence, réchauffez légèrement l'écran à l'aide d'un iOpener chauffé, d'un sèche-cheveux, d'un pistolet thermique ou d'une plaque chauffante, avant d'exercer une pression sur le pourtour de l'écran.

    • Appuyez fermement sur le pourtour de l'écran pour le fixer au châssis.

    le joint est pré-collé sur l'écran.

    christophe fresco -

Conclusion

Pour remonter votre appareil, suivez ces instructions dans le sens inverse.

Pour calibrer le lecteur d'empreintes digitales de l'écran, utilisez l'outil de mise à jour et de réparation Pixel de Google.

Déposez vos déchets électroniques dans un point de recyclage certifié.

Pour effectuer un test de diagnostic avec l'outil Pixel Diagnostic intégré, cliquez ici.

Votre réparation Google Pixel 7a ne s’est pas déroulée comme prévu ? Consultez nos conseils basiques de diagnostic ou notre Forum pour obtenir de l’aide.

Clay Eickemeyer

Membre depuis le 19/09/22

76560 Réputation

23 commentaires

This guide worked well for me and I was able to replace my screen despite it being severely cracked - expect a lot of screen breakage and glass pieces if that's the case! I set everything in a tray to minimize glass fragments going all over.
Once the screen was installed, the wrapper for the iFixit provided screen has a label that says "UDFPS calibration required" with a QR code.
This takes you to a Google site that tells you how to set up fingerprints on your phone. I don't think that link is helpful.

I needed to go to https://pixelrepair.withgoogle.com/udfps where Google has a tool that allows easy updating of the fingerprint sensor software on your phone, which is a requirement after a new screen is installed. Open that site on a computer (PC or Mac, no ChromeOS, no tablets) and follow the instructions, which include connecting your phone via USB cable.

Hans Chun -

I had trouble with the calibration step. I ended up having to install the Google USB driver. I downloaded it here and followed this guide, using the Windows 10 instructions for Windows 11

Parker Kincaid -

the link worked for me, thank you so much @hanschun.
I was going to flash my phone, but I just checked this guide again, and I scrolled past the iFixit link, and stumbled at your comment
Thank you again

Emmanuel Damola -

The guide worked very well. Although it was very hard to remove the old display (I have two left hands, all thumbs), I was able to exchange it. Thank you very much!

Martin Kinne -

Just replaced my phone 7a screen using the available kit. It was next to impossible to get the old screen off using the heat and pry tools. Would definitely recommend getting their jimmy tool. I ended up shattering the old screen on purpose using a punch tool and peeling the glass off the digitizer and frame. This was easiest for me without ordering another tool. Would NOT recommend doing it this way! The other deviation from these instructions is that the screen replacement version sent to me (10/2023) had the screen adhesive already applied to the screen. Made it much easier to install since there was no human error applying the screen adhesive to the phone frame first then lining up the screen. Definitely an improvement! Overall, took me way too long to complete, closer to 2+ hours due to the issues getting the old screen off. But certainly manageable by any DIYer. Would definitely buy from iFixIt again in the future if needed.

Harry -

You just described my experience exactly. Busting the old screen was awful but it worked. Without better tools, I can't imagine getting that screen off there!

Jeff -

The customers screen was Spider-Webbed pretty badly, and it was a brand new phone basically so the new adhesive was very sturdy. With a few attempts at reheating well under the point you couldn't touch it and finding the text that states to start at the left side of the top speaker, it broke free. The screen was sturdy enough to apply heat and use a jimmy to pull up while attempting to evenly distribute the weight and it worked. Took some force pulling up, somewhat effort commanding to do while making sure you aren't using any part of the internal organs or cosmetic exterior as leverage. With the brand new old spidered screen now out of the way, the rest of the clean up process was a breeze. I did not quite get though why I was provided with a T2 in the screen kit that didn't fit. I am glad I had the client spend the extra for the tool kit with the T2, T3, and T4! I do have them as well in another kit, but I would rather not use a toolset designated for different tasks. Great guide and genuine parts as always. Thanks again! 1.5 Hrs.

Tec Knows -

The absolutely hardest part was getting the old screen off. Everything else was relatively easy, a bit slow trying not to damage anything. But instructions were straight forward and because my phone had all the latest updates it worked straight away especially with the finger scanner.

Ultimately I had to use a steel butter knife at the top left where the speaker phone is to pry it open. I had gotten my phone so hot that the back glass cover's glue started to separate and yet the front was still locked in like a rock.

Im a first timer doing a self repair kit and yeah hopefully won't be anytime soon in the near future took me over 2.5 hours which most of the time spent was just on the glass cover.

Taroi Tofilau -

I bought my 7a as a discounted warranty return, and I am pretty sure the screen had already been replaced once! So I managed to crack the replacement... Repair went well total time just less than 2 hours.

Getting the screen off went easily with heat from a hairdryer and the iFixit picks. Hardest part for me was attaching the new cable and re-fitting the screen connector cover, then driving in the small screw. But I have shaky hands!

Two warnings for others:

1) I messed up by wiping alcohol onto the selfie camera while I cleaned the adhesive off the frame! Now my selfie camera is clouded around the bottom. Luckily I hardly ever use it...

2) I nearly accepted to wipe my phone while trying to re-activate the fingerprint reader. You don't need to do that! My mistake was putting the phone into "recovery mode" before plugging it into the computer. Just leave it in fastboot and the website detects that you need to re-install the fingerprint reader software. Then reboot two times and it will work.

Matthew MacLeod -

Worked great, thanks ifixit dudes and dudettes!

I forgot to reinstall the little bracket that holds the ribbon cable connector in place... but I'll keep it around in case i actually need it some day.

Tony Phipps -

We're glad your repair went well! That bracket is just responsible for keeping the screen connector in place. The only danger is that it may suddenly disconnect following the device hitting the ground or flexing a severe amount.

Clay Eickemeyer -

Merci beaucoup pour ce tutoriel grâce à laquelle la réparation n'était pas trop difficile.
J'ai mis 2 heures pour la réparation , dont 1,5heure pour enlever l'ancien écran car il était cassé en milles morceaux: j'ai doncdû chauffer au fur et à mesure et enlever les petits morceaux d'écran brisés un par un le long du contour.
Ensuite nétoyage des restes de la colle et des petits débris de verre avec le petit outils en plastique fourni.
Cette version d'écran venait déjà avec le pourtour adésif sur l'écran, donc beaucoup plus facile à installer que dans le tuto.
Seule petit problème: le software pour mettre à jour le lecteur d'emprunte digitale ne reconnaissait pas le 7a sur mon PC. J'ai du installer les drivers pour cela.
Un grand bravo à toute l'équipe de Ifixit pour cette super solution de remplacement d'écran.

Eric Le Leu -

Nous sommes heureux que votre Pixel fonctionne à nouveau ! Merci de partager votre expérience.

Clay Eickemeyer -

Just replaced the screen, the screen was shattered which made it complicated. Couldn't find a way in the screen on the top. Eventually after removing small pieces of glass it was possible. I used a Jimmy to open it more and get under the screen itself then I could remove it in a few tries. Did scratch the screen a little bit, but installing was easy. The steps do not mention peeling off the blue liner of the edges of the genuine replacement screen.

timvde -

Have the same experience as others with the not being able to use suction cup, and also I couldn't get the plastic pick or a craft knife further than the sides of the earpiece speaker cutout because of the shattering glass. Countinued to break the glass around the edges, ..absolutely excruciating(!) So after reading this guide I turned my phone off and started the repair at 19% battery. And when I restarted hours later (without any charging) my phone was at 100%. How, what, I really truly don't understand.. Didn't even connect a cable for the fingerprint sensor config as I don't use it. I accidentally made a scratch to the black tape/material covering the battery when removing glass, could this somehow have caused the 80% extra battery level?

Liz -

Remplacement réalisé en environ 2h. Si c'était à refaire ce serait réglé en 30 min.

Le décollage n'a pas fonctionné chez moi malgré le sèche cheveux le lisseur et le iopener...

Le plus simple est de faire levier en partant du haut parleur puis j'ai arraché l'écran en faisant attention aux morceaux de verre.

Attention à bien localiser la nappe pour éviter de l'arracher et faire attention à ne pas endommager ce qu'il y derrière l'écran.

Rien de sorcier si c'est fait calmement.

Le scotch sur l'écran permets de ne pas projeter du verre partout.

Après un bon nettoyage le montage du nouvel écran est très simple. Le résultat est parfait chez moi.

Bien suivre le protocole pour installer le capteur d'empreinte, penser à installer le pilote sur Windows et activer le mode développeur sur le téléphone.

Le kit de réparation n'est pas impératif si vous avez du scotch, un embout torx T3, un tournevis plat très fin, une petite pince et un outil assez fin qui ne marque pas pour nettoyer la colle

Dispo si besoin d'aide.

Pierre-Louis Français -

I just completed this repair two days ago with the replacement screen from this site.

As others have said, removing the glue around the screen with a hair dryer seemed impossible. I ended up shattering the screen, ripping it off with knife between the glass and the foil like material, followed chiseling off any remaing glass around the edges.

Don't be be klutz like me and accidently turn the phone on while removing the screen. Keep your fingers away from the buttons.

I didn't damage anything, but I didnt know for sure until I had the new screen installed.

Once the screen was removed the install of the new one was pretty straight forward. Calibrating the finger print scanner was pretty easy too. Make sure you follow the directions in the order they are listed in this guide.

DirtyChris -

Please note, if your screen comes with the adhesive pre-installed, you will have to remove the blue liner from the edge of the back of the panel, and from the aperture for the camera (both on the back side of the screen.

Andrew Moir -

Really good guide.

Minor improvement suggestions: I think it should mention the rips on the inside of the new screen tho (over the camera lens hole and around the adhesive). Also applying the suction cup centrally is not possible, considering the labels on the screen rip, but it worked equally well for the purpose applied towards the bottom of the screen.

mcsmith1981 -

absolutely not worth trying with the picks the ifixit kit comes with, I was hopeful but they were too thick to even fit in the earpiece let alone pry it, and pixel's adhesive is very very very strong, if your screen is shattered youre better off peeling it away, i shattered mine to peel as i was impatient for a jimmy to arrive. The rest of the process once the screen is off is well written and very easy to follow, seems to be working fine : ] I wish the kit came with a jimmy instead of iopener, seems cheaper and more helpful

FreyrFox -

hi ! screen replacement went well, the fingerprint sensor works but not the proximity sensor. did I forget to remove a protective plastic? I've read the guide again, I see no such thing but I've read about it on a pixel 5 guide.

hirsch -

Careful!! The guide doesn't mention that there is a sticker over the proximity sensor and it will prevent it from working if you forget to remove it. I made that mistake and now I have a phone without a working proximity sensor. I won't go through the suffering of removing the glue again

Gonzalo -

Very thorough guide, thank you.

I ended up cooking the old screen pretty good with a heat gun to get the adhesive to release- all the way to permanently changing the color and having to use rags to hold the heated phone- I'm hoping that didn't damage anything else, but TBD.

I lost the screw that holds the ribbon cable in place. It appears to be an m1x2mm, fyi.

The ribbon cable on the new screen was bent in the wrong place. So it required a little extra care and force to set the screen into place.

Aaron Hill -