Introduction
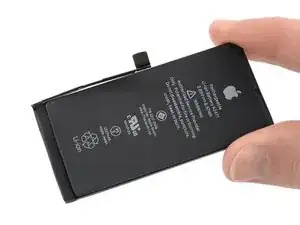
Les batteries d'iPhone sont estimées tenir 80 % de leur charge pendant près de 500 cycles, ce qui équivaut à environ 18–24 mois pour la plupart des utilisateurs. Passé ce délai, peut-être que vous devrez charger plus souvent votre iPhone ou iOS vous préviendra que les performances sont affectées (bref, votre téléphone est plus lent). Remplacez votre batterie avec ce tutoriel et votre iPhone sera à nouveau au top de ses performances.
Si votre batterie est gonflée, prenez les précautions nécessaires.
Remarque : votre iPhone affichera peut-être un avertissement sur “l'authenticité” de la batterie après la réparation, même si vous utilisez une pièce Apple d'origine. Si votre iPhone fonctionne normalement, vous pouvez l'ignorer en toute sécurité.
Lors du remontage, vous aurez besoin d’adhésif de remplacement pour rattacher certains composants.
-
-
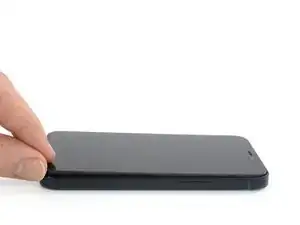
Éteignez votre iPhone avant de commencer à le démonter.
-
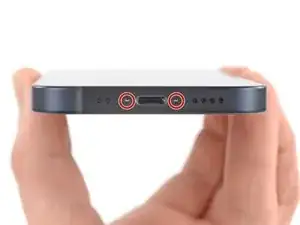
Dévissez les deux vis Pentalobe de 6,7 mm en bas de l'iPhone.
-
-
-
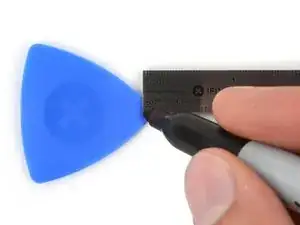
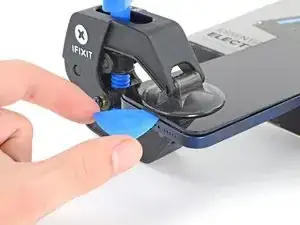
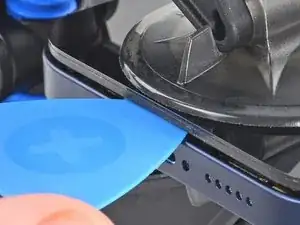
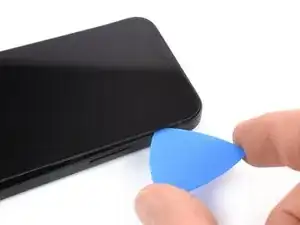
Mesurez 3 mm à partir de la pointe et tracez une ligne sur le médiator avec un marqueur permanent.
-
-
-
Recouvrez l'écran de bandes de ruban adhésif, qui se chevauchent, jusqu'à ce que toute la surface soit couverte.
-
Si la ventouse n'adhère pas au cours des étapes suivantes, pliez un morceau de ruban adhésif épais (du ruban adhésif toilé p.e.) pour former une poignée et soulevez l'écran de cette façon.
-
-
-
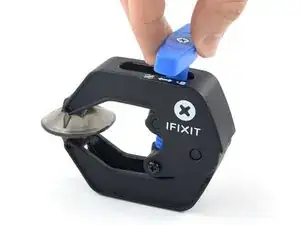
Tirez la poignée bleue vers l'arrière pour débloquer les bras de l'Anti-Clamp.
-
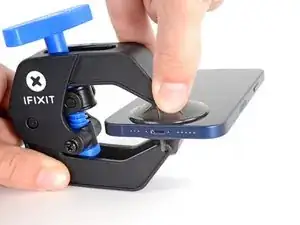
Insérez le côté droit ou gauche de votre iPhone entre les bras.
-
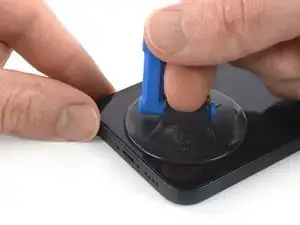
Positionnez les ventouses près du bas de l'écran iPhone : une devant, une derrière.
-
Appuyez sur les ventouses pour faire le vide à l'endroit désiré.
-
-
-
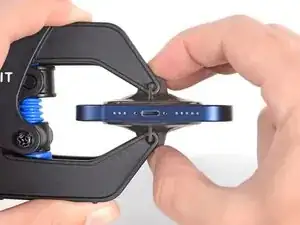
Tirez la poignée bleue vers l'avant pour bloquer les bras.
-
Tournez la poignée dans le sens horaire de 360 degrés ou bien jusqu'à voir les ventouses se tendre.
-
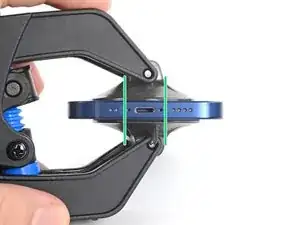
Vérifiez que les ventouses restent bien alignées entre elles. Si elles commencent à se décaler, détachez-les pour les réaligner.
-
-
-
Posez votre iPhone sur quelque chose de solide comme un livre à couverture rigide, pour qu'il tienne tout seul à l'horizontale. Ainsi, il sera plus facile de procéder aux étapes suivantes.
-
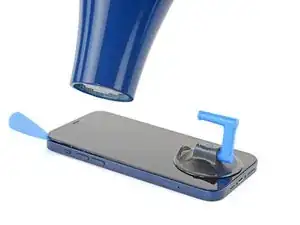
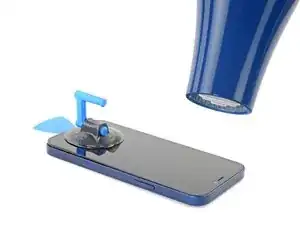
Servez-vous d'un sèche-cheveux pour faire chauffer le bord inférieur de l'iPhone. L'écran doit être légèrement trop chaud au toucher.
-
Attendez une minute pour donner à l'adhésif le temps de se détendre et d'ouvrir un interstice.
-
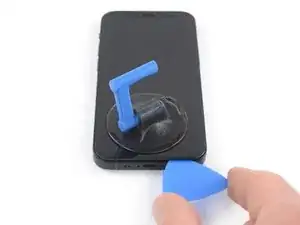
Insérez un médiator sous le joint en plastique de l'écran, dès que l'Anti-Clamp a ouvert un interstice suffisant.
-
Passez les trois étapes suivantes.
-
-
-
Utilisez un sèche-cheveux ou un pistolet thermique pour chauffer le bord de l'iPhone pendant 90 secondes ou jusqu'à ce que l'écran soit légèrement trop chaud au toucher.
-
-
-
Si vous utilisez une simple ventouse, posez-la aussi près que possible du bord inférieur du téléphone.
-
Si votre écran est méchamment fissuré, recouvrez-le d'une couche de ruban adhésif d'emballage transparent pour aider la ventouse à adhérer. Ou bien servez-vous de ruban adhésif très épais à la place de la ventouse. Si aucune des deux astuces ne marchent, vous pouvez essayer de coller la ventouse à l'écran cassé avec de la superglue.
-
-
-
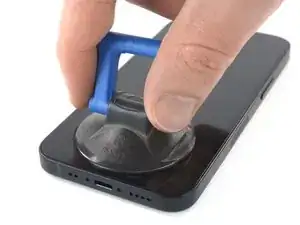
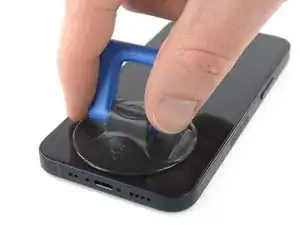
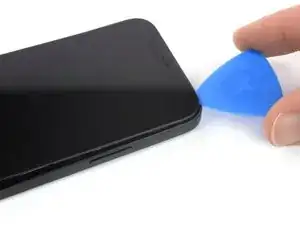
Tirez fermement et constamment sur la ventouse pour ouvrir un léger espace entre l'écran et le châssis
-
Insérez un médiator dans l'interstice sous le joint en plastique de l'écran.
-
-
-
Utilisez un sèche-cheveux pour chauffer le bord droit de l'iPhone (celui avec le bouton de marche) pendant 90 secondes ou jusqu'à ce que l'écran soit légèrement trop chaud au toucher.
-
-
-
Faites glisser le médiator le long du coin inférieur droit et du bord droit de l'iPhone, en tranchant l'adhésif qui maintient l'écran en place.
-
-
-
Utilisez un sèche-cheveux pour chauffer le bord supérieur de l'iPhone pendant 90 secondes ou jusqu'à ce que l'écran soit légèrement trop chaud au toucher.
-
-
-
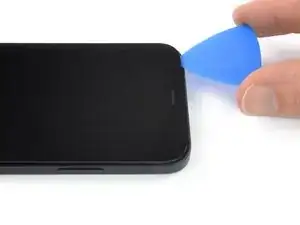
Insérez votre médiator sous le coin supérieur droit de l'écran.
-
Faites glisser le médiator autour du coin supérieur droit. Vous devriez rencontrer de la résistance en raison des clips.
-
Parcourez le bord supérieur avec le médiator et finissez de trancher l'adhésif qui fixe l'écran.
-
-
-
Utilisez un sèche-cheveux pour chauffer le bord gauche de l'iPhone pendant 90 secondes ou jusqu'à ce que l'écran soit légèrement trop chaud au toucher.
-
-
-
Insérez un second médiator dans le coin inférieur gauche de l'iPhone.
-
Faites pivoter les deux médiators en même temps, jusqu'à ce que les clips du bord gauche se détachent.
-
-
-
Tournez votre iPhone de façon que son bord droit est en face de vous.
-
Ouvrez l'iPhone en soulevant le côté droit de l'écran comme on ouvre la couverture avant d'un livre.
-
Calez l'écran contre un objet pour qu'il reste ouvert pendant que vous travaillez sur votre téléphone.
-
-
-
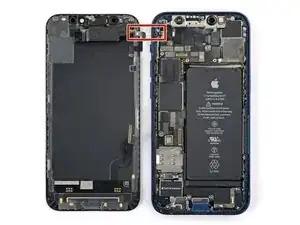
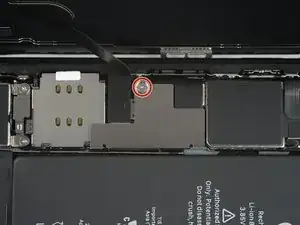
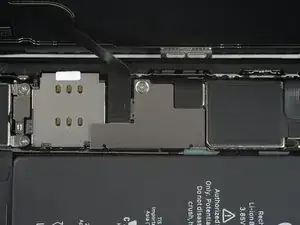
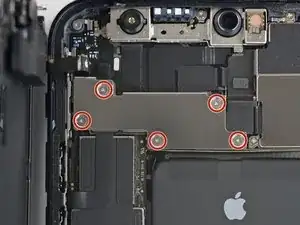
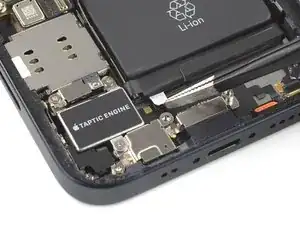
Ôtez la vis Y000 de 1,25 mm qui fixe le cache des connecteurs de la batterie et de l'écran.
-
-
-
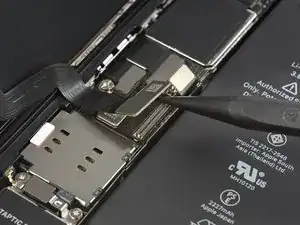
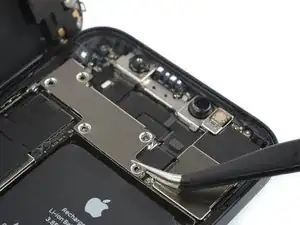
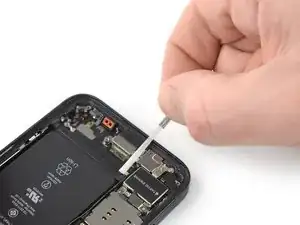
Prenez une spatule (spudger) ou un ongle propre pour soulever le connecteur de la batterie de sa prise sur la carte mère.
-
Repliez légèrement le connecteur par rapport à la carte mère pour l'empêcher de faire accidentellement contact avec la prise et d'alimenter le téléphone pendant que vous effectuez votre réparation.
-
-
-
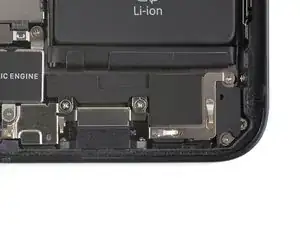
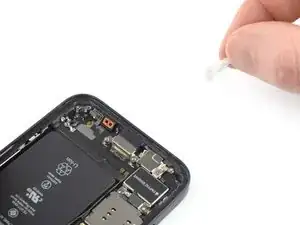
Servez-vous d'une spatule ou d'un ongle pour débrancher le connecteur de la nappe du panneau OLED de sa prise sur la carte mère.
-
-
-
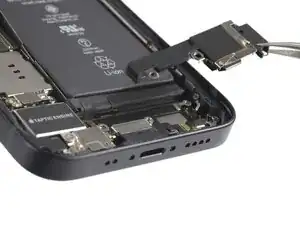
Prenez la pointe d'une spatule ou un ongle propre pour débrancher la nappe de l'ensemble capteurs frontaux.
-
-
-
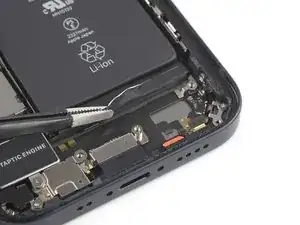
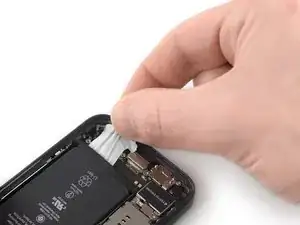
Saisissez la languette d'extraction et éloignez-la lentement de la batterie, en l'étirant vers le bas de l'iPhone.
-
Tirez suffisamment pour garder la languette sous tension constante, mais ne forcez pas. Laissez-lui le temps de s'étirer et de se décoller sous la batterie.
-
N'appuyez pas sur la batterie. Tenez fermement les bords de l'iPhone.
-
Veillez à ce que la bande reste plate et ne fasse pas de plis. Essayez de tirer de façon homogène sur toute la largeur de la bande, et non juste au milieu ou sur le côté.
-
Tirez en formant un angle plat de façon que la bande ne reste pas accrochée au bord de la batterie.
-
Si la bande se déchire, essayez de la récupérer avec vos doigts ou une pincette arrondie, puis continuez à tirer. Mais ne faites surtout pas levier sous la batterie.
-
-
-
Saisissez la languette d'extraction plus large et éloignez-la lentement de la batterie, en l'étirant vers le bas de l'iPhone.
-
-
-
Saisissez la languette d'extraction et éloignez-la lentement de la batterie, en l'étirant vers le bas de l'iPhone.
-
Répétez la procédure précédente pour les deux languettes restantes.
-
Attendez environ une minute que la solution alcoolisée ramollisse l'adhésif.
-
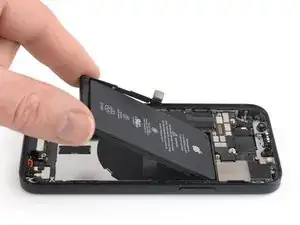
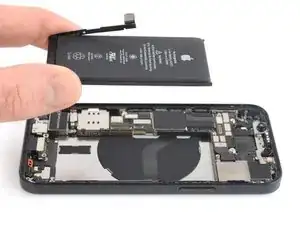
Prenez l'extrémité plate d'une spatule pour soulever délicatement la batterie.
-
-
-
Enlevez la batterie.
-
S'il reste de la solution alcoolisée dans le téléphone, essuyez soigneusement ou faites sécher à l'air avant de poser votre batterie neuve.
-


Si possible, allumez votre téléphone et testez votre réparation avant de poser du nouvel adhésif et de sceller à nouveau votre téléphone.
Fixez la nouvelle batterie avec de l'adhésif prédécoupé ou du ruban adhésif double-face. Afin de la positionner correctement, appliquez le nouvel adhésif sur le téléphone, là où il y avait de l'adhésif auparavant, et non directement sur la batterie. Appuyez fermement sur la nouvelle batterie pour qu’elle adhère bien.
Pour remonter votre appareil, suivez les étapes ci-dessus en sens inverse. Nettoyez les zones d'adhérence avec de l'alcool isopropylique (> 90 %) et posez une nouvelle couche d'adhésif là où c'est nécessaire.
Pour une performance optimale, calibrez votre nouvelle batterie.
Déposez vos déchets électroniques dans un centre de recyclage certifié.
La réparation ne s’est pas déroulée comme prévu ? Consultez nos conseils basiques de diagnostic ou la section iPhone 12 mini de notre Forum pour obtenir de l’aide.

17 commentaires
If you replace the battery (even with a first party one) you will need to go to Apple, unfortunately, as is for the new iPhone 13 models.
Roman -
Since iOS 17, I believe, they have a self-registering mechanism. OS will start a wizard to register replaced first-party battery without going to the store
rbhbokka -
I don't think it's stated clearly enough that the display adhesive is VERY strong and you might think you've gotton a big enough gap when sticking in a pick will actually separate the layers of the screen and break it (defintely not speaking from experience). Make sure the phone is totally, thoroughly heated and be very, very careful.
+1
Tried it without the clamp for two hours and couldn‘t get it open. With clamp, it was opened within 30 minutes.
Overall battery replacement worked well, the instructions were clear enough to follow along. Would do this again… but with the clamp. ;)
same pried in between layer and then realized after after i separated the bottom corners that needed to go deeper
This comment should be pinned to the top of this article / this scenario pinned in bright red... I've replaced previous iphone screens and it was nothing like this. I also ruined my screen by prying in between the screen layers and not underneath as I could not comprehend just how insanely strong the adhesive is even after many rounds of heating. Give the ~100$ cost of apple repair and the 50$ cost of this kit, i would NOT risk doing this repair, no way.
is it oem apple battery, because at some photo shows(Ifixit) and another shows (apple) ... wait your answer?
karim -
is it oem apple battery, because at some photo shows(Ifixit) and another shows (apple) ... wait your answer?
karim -
BEWARE! This screen isn’t the same as older iPhone models’ screens. The iPhone mini 12-screen comes with a thin plastic frame around the screen on its back. Thus, make sure you don’t insert the pick in between the screen and its plastic frame, as you’ll seperate the screen and leave the plastic frame still sitting in the phone’s metal housing (this cost me 100 dollars…). Carefully heat the sides of the metal housing and do not heat directly on the glass, as doing so will potentially loosen the glue from the plastic frame stuck to the screen. My suggestion is that you watch a video of this repair as this step-by-step-guide is undercooked.
Dan -
This is an excellent comment. Following this step-by-step guide to the letter will break your screen; it's by far the worst iFixit guide I've seen to date.
Dormouse -