Introduction

La carte mère contient le processeur (CPU en anglais pour Central Processing Unit, NdT) et la plupart des puces et des circuits intégrés qui contrôlent le fonctionnement du téléphone. Les cartes mères de l'iPhone X sont connues pour être particulièrement difficiles à réparer, car elles sont constituées de deux circuits imprimés empilées l'une sur l'autre et soudées entre elles pour ne plus former qu'une seule unité. Réparer n'importe lequel des composants pris en sandwich entre les deux circuits nécessite de les séparer. Cela représente une étape supplémentaire et difficile, dans une réparation déjà compliquée et qui demande une expertise en microsoudure.

Ce tutoriel montre comment remplacer la carte mère.

Cependant, pour garder la fonction Face ID en état de marche, l'assemblage du haut-parleur/capteur de proximité et l'assemblage de l'appareil photo frontal doivent être également changés, car ils sont couplés à la carte mère.

Si la perte de Face ID est acceptable, alors vous pouvez utiliser ce tutoriel pour remplacer uniquement la carte mère.

  1. vRXModPLNs55tqTQ
    vRXModPLNs55tqTQ
    BWWKIgRVUALLx3aG
    YQQsubFtji66xfqK
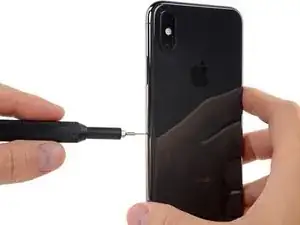
    • Insérez un outil éjecteur de carte SIM ou un trombone dans le petit trou du tiroir SIM. Ce dernier se situe près du bouton latéral, sur le bord de l’iPhone.

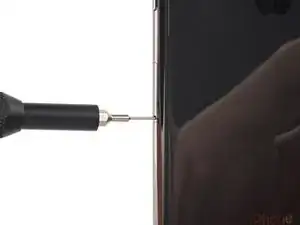
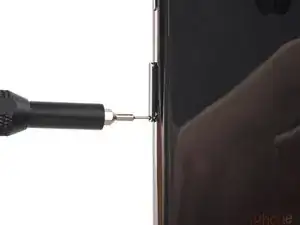
    • Appuyez fermement pour éjecter le tiroir.

  2. AWeBOCbxRUIEBSqn
    AWeBOCbxRUIEBSqn
    sVBt6DpLcF6BXGYB
    • Retirez le tiroir SIM de l’iPhone.

    • La carte SIM va tomber du tiroir facilement.

    • Quand vous réinsérez la carte SIM, assurez-vous qu’elle est correctement orientée par rapport au tiroir.

    • Un petit joint en caoutchouc autour du tiroir SIM protège l’iPhone contre la poussière et l’eau. Si ce joint manque ou est endommagé, remplacez-le ou remplacez le tiroir SIM pour protéger les composants internes de votre iPhone.

    Do not read any simcard in iphone

    PRAVEEN KUMAR -

  3. BO6lEF2W1kX5S1sI
    • Avant de commencer, déchargez votre iPhone en dessous de 25 %. Une batterie lithium-ion chargée peut prendre feu et/ou exploser si elle est accidentellement percée.

    • Éteignez votre iPhone avant de commencer à le démonter.

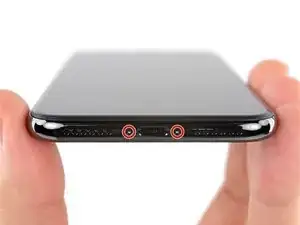
    • Dévissez les deux vis Pentalobe de 6,9 mm en bas de l'iPhone.

    • Si les vis sont dénudées ou endommagées, remplacez-les.

    • Ouvrir votre écran iPhone X va endommager ses joints étanches. Pensez à vous procurer des joints de remplacement avant de vous lancer dans une réparation iPhone, ou bien faites attention à ne plus exposer votre iPhone à des liquides si vous le remontez sans changer les joints.

    There are 6.81mm long screws!

    Daniel -

    One of the pentalobe screws is stripped :( - suggestions for how to get it out?

    cgtyoder -

    same situation here

    kaunomarcius -

    Same issue for me too, how do I get the stripped screw out?

    patronics -

    Update: I was able to get the “stripped” screw out using another Pentalobe-2 screwdriver bit from another company. It seems it wasn’t the screw, but the screw driver that was actually stripped. Hence why the other screwdriver kit I got came with 3 of this bit, I suppose.

    patronics -

    I ended up going to a jewelry store, and they drilled down into the screw, with of course an incredibly tiny bit. That allowed me to insert the P2 driver, and I was able to unscrew it at that point. Good luck!

    cgtyoder -

    Same issue with the stripping. The tip of the iFixit P2 head in my $70 kit just ground off on the first screw and that was that. Not much you can do.

    Kyle Harris -

    yes correct the same happened to me, the screws were perfect shaped never been open and as soon as i used the P2 it stripped the screws, seems like the P2 is slightly smaller but Dremel kit with a very small drill bits and precise knife tool is the way to go.

    Dulce Vidal -

    This step in automatically followed through, without any thought. Why remove these screws? Can anybody explain? The Screen is detachable all the same, with them well screwed in…

    Uri -

    These screws attach to a plate that’s part of the screen half of the phone. If you succeed in detaching the screen without removing those, it would seem reasonable that you will have damaged that plate or its ability to keep the two halves together.

    Dan Long -

    @Dan Long is right

    Uri -

    Clean out the pentalobe screw heads first so the tool goes all the way in. A small sewing needle works well to loosen any build up and then press some putty/chewing gum into the screw head and pull away quickly for a final clean out.

    William Olstad -

    The this kit should include screws because you’re going to strip them. Can’t even get past step one. Did anybody figure this out

    justin -

    Never opened my phone ever, when I went to look at the first step.. I noticed one of my screws was stripped. I thought it was impossible, but I removed the non stripped one, then once I got to the stripped one.. I learned my assumptions were correct. I bought this one straight from the apple site years ago ahaha Any tips to remove the stripped screw?

    Clarence Williams -

    William Olstad's tip about cleaning the screws with a needle and a bit of poster putty worked well for me. There was a lot of crud in there! The opening is shallow, so it's easy to see how the screwdriver wouldn't catch with even a bit of grit in the way, No problem getting the pentalobe screws out with the ifixit screwdriver.

    punkinann -

    If all else fails, very carefully cut a slot across the head of the screw with a Dremel tool using a diamond bit that dentist will gladly give you - I ask my dentist for used bits; and chuck them in a drill bit chuck designed for Dremel. The slot allows you to use a tiny, straight blade screwdriver. You can reuse the screw or replace it with a new pentalobe screw.

    Dan Smith -

  4. 6UPwoloGBO4tmVoS
    6UPwoloGBO4tmVoS
    BmSYPJmOy6dbHipF
    3EOdQPAGOmiuhoKU
    • S'il est inséré trop loin, un médiator risque d'endommager votre appareil. Suivez cette étape pour tracer un repère sur votre médiator et éviter que l'appareil ne soit endommagé.

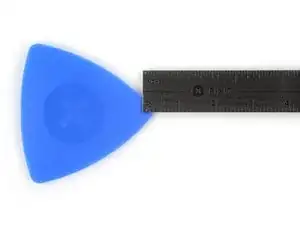
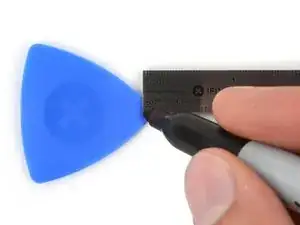
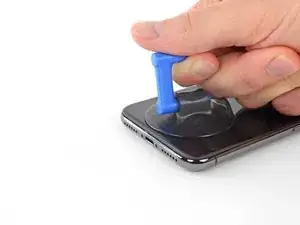
    • Mesurez 3 mm à partir de la pointe et tracez une ligne sur le médiator avec un marqueur permanent.

    • Vous pouvez également marquer les autres coins du médiator avec des mesures différentes.

    • Une autre solution consiste à scotcher une pièce de monnaie sur votre médiator, à 3 mm de la pointe.

    Got to step 2 and realized the fix kit doesn't include an opening pick! Looks like a guitar pick, and I have those lying around. Is that expected? Looks like the pick is used in many steps below. There's a little blue crowbar that isn't mentioned in the instructions. Perhaps that replaces the opening pick?

    Sloan Looney -

    Hi! I can't see which guide you were using when writing this comment. Can you reply here with which guide and fix kit you used?

    Clay Eickemeyer -

    I see you posted this in Meta. I hope it's resolved soon! In the meantime, a guitar pick may work well enough for your repair.

    Clay Eickemeyer -

    what fix kit?

    Meow Purr -

    My fix kit didn't include an opening pick either

    WILLIAM HARRIS -

    Make sure you check inside the black boxes after emptying them. My pick was stuck inside one of the boxes.

    AndyF -

    My AliExpress refurbished screen came with a pick that has a coin-like circle that pops out, so no modification was necessary

    Gijs Leegwater -

    the picture shows 3 cm but the description says 3 mm's. Which one is it?

    John Pena -

    That is a misunderstanding. It is a ruler with a scale for cm, it shows 0.3 cm, i.e. 3 mm.

    VauWeh -

    Oh, come ON!

    Big Ed -

    It will ALWAYS be millimeters on a phone, but this step is ridiculous, skip it!

    Leif DeWolf -

    It's not an Ifixit KIT if it doesn't include everything. You'll need to order the opening pic separately. Or head to Walmart like myself and look for guitar pics. Hopefully, this will work just as well.

    Jaleeljb97@icloud.com -

    No pick in mine as well. It’s really not clear that you have to order this separately when ordering an IPhone SE 202/2022 screen repair kit. Is this the case?

    Jackson Castiglione -

    Frustrated, I ordered a compact package where everything was encapsulated. Useless suction tools could not separate the screen. If it is unable to decouple the screen, then why sucking suction tools you have provided.

    Shourob Datta -

    For my kit the triangle pick was stuck inside the box with the screen not with the other tools maybe it's also there for you

    Henry Scheibehenne -

    Y’all are getting far, FAR too detailed with some of this stuff…. Measuring and marking the pick that you won’t actually use to open the device?!? lol that’s kinda funny. Just heat it up, grab a spudger, and the back just pops right off! The iFixit tech need to stick to the KISS method more often, you know KEEP IT SIMPLE STUPID!!! Like l, for reals, I’ve been doing this stuff for YEARS and using iFixit guides regularly and this is just ridiculous at this point!

    Leif DeWolf -

  5. Whblnhy2uvYmFjIL
    Whblnhy2uvYmFjIL
    4URQtwUtqSQUKdHH
    NgjPkqJtEMhTXkd3
    • Si votre écran iPhone X est fissuré, empêchez les fissures de s'aggraver et les éclats de vous blesser en le recouvrant de ruban adhésif.

    • Recouvrez l'écran de bandes de ruban adhésif, qui se chevauchent, jusqu'à ce que toute la surface soit couverte.

    • Portez des lunettes de sécurité pour vous protéger les yeux des éclats de verre tout au long de la réparation iPhone.

    • Si la ventouse n'adhère pas au cours des étapes suivantes, pliez un morceau de ruban adhésif épais (du ruban adhésif toilé p.e.) pour former une poignée et soulevez l'écran de cette façon.

    • Si tout cela échoue, vous pouvez coller la ventouse à l'écran avec de la superglue.

  6. aaO4KYlBJShASHjk
    aaO4KYlBJShASHjk
    1r6VLlUjodppndSN
    BMhMJ35CLUOmyNqB
    • Les trois étapes suivantes sont consacrées à la procédure avec l'Anti-Clamp, un outil facilitant les procédures d'ouverture. Si vous n'avez pas d'Anti-Clamp, passez à la procédure alternative trois étapes plus loin.

    • Pour des instructions complètes sur comment utiliser l'Anti-Clamp, jetez un œil à ce tutoriel.

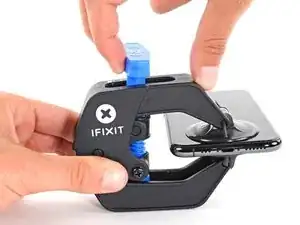
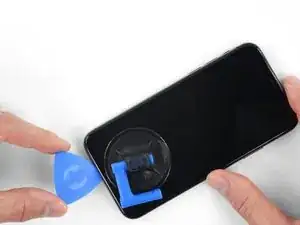
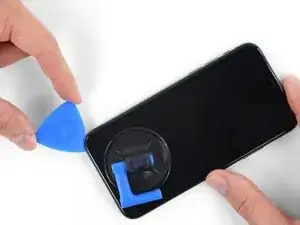
    • Tirez la poignée bleue vers l'arrière pour débloquer les bras de l'Anti-Clamp.

    • Insérez le côté droit ou gauche de votre iPhone entre les bras.

    • Positionnez les ventouses en bas de l'iPhone, une sur le dessus, l'autre en dessous.

    • Appuyez sur les deux ventouses pour qu'elles adhèrent bien.

    • Si vous trouvez que la surface de votre appareil est trop glissante pour que l'Anti-Clamp puisse adhérer, vous pouvez utiliser du ruban adhésif pour créer une surface plus adhérente.

  7. fm1Txb6ZWoZVRccg
    fm1Txb6ZWoZVRccg
    ASYBeEfJh2IqKXlL
    qYIoimNJqUrEuJAT
    • Tirez la poignée vers l'avant pour bloquer les bras.

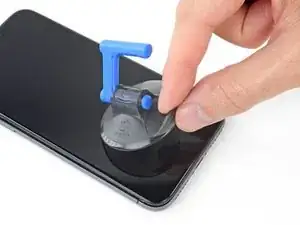
    • Tournez la poignée dans le sens des aiguilles d'une montre, de 360 degrés ou jusqu'à ce que les ventouses commencent à s'étirer.

    • Vérifiez que les ventouses restent bien alignées entre elles. Si elles commencent à se décaler, détachez-les pour les réaligner.

  8. fqtITHlwZLOFLmTY
    fqtITHlwZLOFLmTY
    321YFxdKNFRFVwk3
    YctteqQxMcE3kxyP
    • Chauffez un iOpener et faites-le passer à travers les bras de l'Anti-Clamp.

    • Vous pouvez également utiliser un sèche-cheveux, un pistolet à air chaud ou une plaque chauffante. Mais gare à la surchauffe, l'écran et la batterie sont sensibles à la chaleur. Faites donc bien attention.

    • Pliez l'iOpener de façon qu'il repose sur le bord inférieur de l'iPhone.

    • Attendez une minute que l'adhésif se ramollisse et qu'un espace s'ouvre.

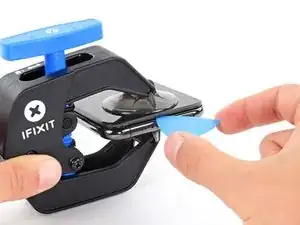
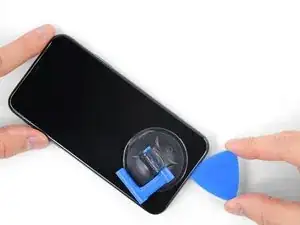
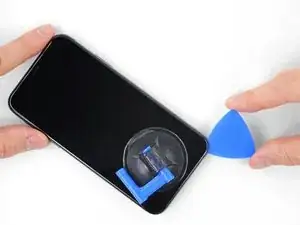
    • Insérez un médiator sous l'écran et le joint en plastique, et non dans l'écran.

    • Si l'Anti-Clamp n'a pas créé un écart suffisamment large, appliquez plus de chaleur sur la surface et tournez la poignée d'un demi-tour de plus.

    • Ne tournez pas plus d'un demi-tour à la fois, et attendez une minute entre chaque rotation. Laissez l'Anti-Clamp et le temps faire le travail pour vous.

    • Passez les trois étapes suivantes.

    DO NOT separate the glass from the plastic bumper or rim around it. These instructions don't clarify that the pick has to be inserted between the plastic rim and the metal body. It is likely that the glass will lift slightly off the plastic surround before the plastic will lift out of the metal body. I had success sliding a card or pick back and forth along the bottom edge of the plastic rim while pulling on the suction cup. Eventually there was a space large enough for the pick to go under the plastic rim.

    Anessa -

    Thanks for pointing this out! I'll revise this step to clarify this point.

    Arthur Shi -

  9. JYhTvDYuGLQw3jiI
    • Chauffer le bord inférieur de l'iPhone va aider à ramollir l'adhésif qui fixe l'écran, et donc faciliter l'ouverture.

    • Utilisez un sèche-cheveux ou un pistolet à air chaud ou préparez un iOpener et appliquez-le sur le bord inférieur de l'iPhone pendant environ une minute afin de ramollir l'adhésif qui se trouve en dessous.

    • Si vous utilisez un sèche-cheveux ou un pistolet à air chaud, ne chauffez pas trop, car vous risqueriez de détériorer l'écran.

    General tip regarding heating necessary to remove adhesive:

    consider using a heated tip of a small screwdriver or metal spudger (not the one made of plastic, provided in kit), rather than to heat the device itself.

    Uri -

    You then need to be careful about the temp of the tool which if hot enough can melt plastic components or harm them. Keeping the heat source (heat gun) far enough away from the object that you’ll eventually melt the glue but would be much harder to melt components. I try to keep 4” or 5” gap between the source & object

    Sandman619 -

    Thanks for the info. Could a air convector do the job

    dominique.br -

    When opening a device that has previously been worked on, and on which the adhesive might not have been replaced, be extremely carful when opening the phone. It will open much more easily than expected. If you’re not careful you might rip a cable.

    jonpol -

    Is this tool required or can I just use the Anti-Clamp by itself.

    Mikail -

    If you have a 3d printer, heat the bed to 80c and put the phone screen side down on it for 30 secs

    philip.joseph123 -

    thaks for this advise, I was looking for this as I dont have a heat gun haha, nice hack

    Andres Chaparro -

  10. qXGGZ2MpZIYeQjKI
    qXGGZ2MpZIYeQjKI
    tGDwxj5neYkh3MDh
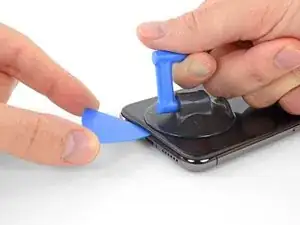
    • Si vous utilisez une ventouse simple, posez-la au niveau du bord inférieur du téléphone tout en évitant la partie incurvée du verre.

    If you were using some form of screen protector, it may come off first as soon as you pull on the suction cup. Do not be alarmed. That is normal behavior.

    Alain-Daniel Wa-Baguma -

    3m VSB double stick tape will stick to the screen when the suction cups fail (see my comment on step 1)

    Tawan Khamapirad -

  11. uTXCGQFa5j4E5T3Y
    uTXCGQFa5j4E5T3Y
    DWfsuj4RCooAtKRa
    Zw4PcEZSTKHaLcqq
    • Tirez fermement sur la poignée de la ventouse en appliquant une pression constante, pour ouvrir une petite fente entre l'écran et le châssis.

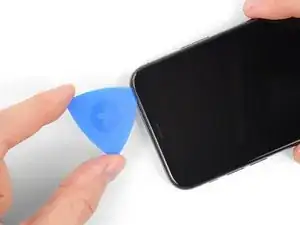
    • Insérez un médiator dans l'espace sous le joint en plastique de l'écran, pas dans l'écran lui-même.

    • L'adhésif étanche qui maintient l'écran est très solide ; ouvrir cette première fente nécessite beaucoup de force. Si vous avez du mal à le faire, chauffez le tout encore une fois. Puis faites doucement basculer l'écran de haut en bas pour faire céder l'adhésif, jusqu'à que vous ayez ouvert une fente suffisamment large pour y insérer le médiator.

    In addition to safety goggles, I would recommend you also wear good gloves to avoid getting cut with the glass as you try to pry it open.

    Alain-Daniel Wa-Baguma -

    The top about applying more heat and gently rocking the screen up and down to weaken the adhesive did the trick for me. Thank you!

    Monil Shah -

    There needs to be more clarity on where to shove the opening pick into. There is actually two openings that the pry tool can be forced into: one below the black plastic bezel, and one above the black plastic bezel. When I heated my screen with a warming pad and pulled up the suction cup, it actually pried apart above the black plastic bezel which removed the touch screen from the display panel. With this being the first newer iPhone I'd opened since the 3GS, I didn't realize that I was opening the wrong opening as the directions only mentioned one opening and did not warn of this. I was pretty disappointed in the lack of mentioning this, as I was taking my time and following it to the tee. As a result, it destroyed my original iPhone screen.

    Caleb Davison -

    DO NOT separate the glass from the plastic bumper or rim around it. As someone else noted, these instructions don't clarify that the pick has to be inserted between the plastic rim and the metal body of the phone. When pulling upwards with the suction cup, it is likely that the glass will lift slightly off the plastic surround before the plastic will lift out of the metal body. I had success sliding a card or pick back and forth along the bottom edge of the plastic rim while pulling on the suction cup. Eventually there was a space large enough for the pick to go under the plastic rim.

    Anessa -

    Thank you for pointing this out! I've updated the step to reflect this.

    Arthur Shi -

    The suction cup doesn't work at all... The minimum force I apply to lift it up, it comes off completely. This is very frustrating!!!

    Mario Silva -

  12. QE4lOUoglbyWQUwm
    QE4lOUoglbyWQUwm
    cHHBBJPBr4bVv24U
    agDTTsHWFYyI2WBC
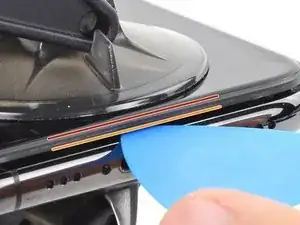
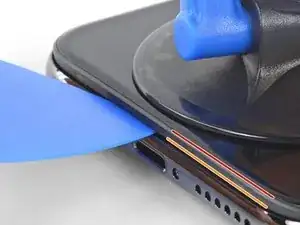
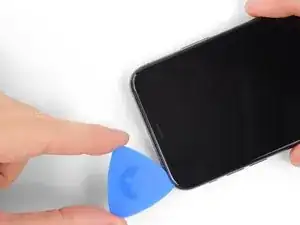
    • Faites glisser le médiator le long du coin inférieur gauche de l'iPhone, ce qui va trancher l'adhésif qui maintient l'écran en place.

    • N'insérez pas le médiator de plus de 3 mm, vous risqueriez d'endommager des composants internes.

  13. mkLvBfvMoYsfQbGS
    • Il y a des nappes très fragiles sur le côté droit de votre iPhone. N'y insérez pas le médiator ! Vous risqueriez de les endommager.

    Wouldn’t it be better to put this part BEFORE the step where you have to pry open the phone?

    Jan D. Höllwarth -

  14. OEUEsoSAmOAWxAMR
    OEUEsoSAmOAWxAMR
    YOhTValkxrevLipu
    aSZ2MAdtw4ZImiCD
    • Ré-insérez votre médiator dans le bord inférieur de l'iPhone, et faites-le glisser jusqu'au côté droit pour continuer à séparer l'adhésif.

    • N'insérez pas votre outil de plus de 3 mm, vous endommageriez les nappes de l'écran.

    If you have flat feeler gauges (for adjusting engine valve tappet clearance, ignition points … old school) the .003” thick gauge goes right in. Work your way up in thickness until you can get the pic or supplied pry tool in. Don’t insert metal feeler gauge in too far, just enough to hold crack open. I didn’t need to use the suction cup. I used a hot/cold gel pack heated in microwave to heat edges to soften glue a bit. Made sure it wasn’t so hot I couldn’t stand it on my skin.

    William Olstad -

  15. WfcjjEBfMZqEySEf
    WfcjjEBfMZqEySEf
    PCXKpWMWg6GWEViY
    McqYslJ4vV1SOOnm
    • Le bord supérieur de l'écran est retenu par de la colle et des clips.

    • Glissez le médiator sous le coin supérieur de l'écran tout en faisant délicatement jouer l'écran vers le bas, en direction du port Lightning.

    • Les clips peuvent se casser si vous forcez trop. Progressez avec prudence et restez patient.

    • N'insérez pas votre outil de plus de 3 mm. Vous risqueriez d'endommager la rangée des capteurs du panneau frontal.

    • Glissez le médiator sous le côté opposé pour faire céder l'adhésif restant.

    These are the best instructions I’ve ever read for anything.! Thank you!

    Peter Andrew -

  16. GnieimxVeXdJJobM
    • Tirez sur la petite bosse de la ventouse pour la décoller du panneau frontal.

  17. XFu5RLJA6ncMAhxo
    XFu5RLJA6ncMAhxo
    nCGOAuVQLFmYsrOd
    XjQSuyqDe1k51mua
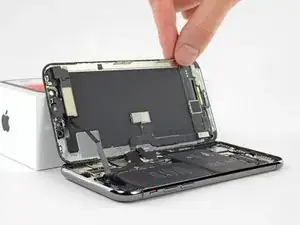
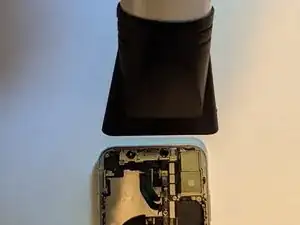
    • Ouvrez l'iPhone en tournant l'écran depuis le côté gauche, comme s'il s'agissait de la couverture au dos d'un livre.

    • N'essayez pas encore d'enlever complètement l'écran, car plusieurs nappes fragiles le relient toujours à la carte mère de l'iPhone.

    • Comme sur la photo, assurez-vous que le châssis se détache avec l'écran et ne reste pas coincé dans l'appareil.

    • Appuyez l'écran contre un objet pour le maintenir à la verticale pendant que vous travaillez sur le téléphone.

    • Lors du remontage, posez l'écran iPhone X à sa place, alignez les clips le long du bord supérieur. Puis appuyez délicatement sur le bord supérieur avant de refermer le reste de l'écran. S'il ne s'enclenche pas facilement, vérifiez l'état des clips sur le pourtour de l'écran et vérifiez qu'ils ne sont pas déformés.

    My phone came apart in a different way and looks not right the little box at the top of the display as actually bolted to the top of the frame body I think something went really wrong when I opened it.

    Mike Kostersitz -

    It opens like a book but be careful not to open it all the way — only as far as shown in the photo. Otherwise it will strain the thin cable that connects the sensor module and then no more FaceID for you (or, as it turns out me). This could have been made more explicit in the instructions.

    Richard Tucker -

    It opens like a book but be careful not to open it all the way  … the small stainless steel tabs that hold the screen around the metal frame, that are on the bend place (right side of the phone)… are tend to bend, you can straighten them back to 90 deg. but the plastic base that they are on? very fragile- watch out not to break the plastic bezel … it may come apart of the glass.

    dabur872 -

    Advice for re-assembly: Before closing up the phone with the seal, check if phone is powering up again and speaker, mic and sensors are still working. If done this check even before installing the board connector bracket in Step 13.

    Alexander Nowak -

  18. XWpMWTY4DJnfeUAy
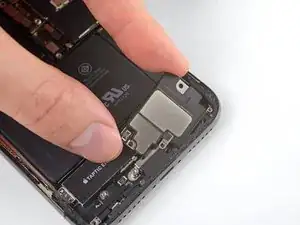
    • Dévissez cinq vis Y000 fixant le cache du connecteur de la carte mère, des dimensions suivantes :

    • Trois vis de 1,1 mm

    • Une vis de 3,1 mm

    • Une vis de 3,7 mm

    • Tout au long de cette réparation, veillez à bien organiser vos vis et à revisser chacune exactement là où elle était, afin d'éviter d'endommager votre iPhone.

    One thing I found helpful for replacing the screws was to use only the 000screwdriver tip, without the handle. This way, the tip isn’t magnetized and the screw doesn’t tend to ‘roll’ off the screwdriver tip (the screw has almost no mass, so the head (largest surface) is pulled around to the side of the screwdriver tip when magnetized).

    Rich May 23, 2020

    ungodly -

    My 3.1mm screw had a stripped head, could not remove it. (Factory defect, this iPhone was never opened)

    So I had to give up removing the display assembly, and jumped directly to battery replacement, Step 20.

    That was tricky as I had to keep the display at 90º with a risk of breaking display connectors, but hopefully the replacement went well.

    I would not recommend to do this but to follow the guide, but, in case someone encounters a similar issue, that could help!

    vingu -

    My 1.1mm screw had a stripped head. Used a 3mm steel drill to cut the head off (just 1 mm deep haha) so i could remove the bracket.

    Renout -

    Be careful on reassembly. Keep the screen supported and not moving. I had difficulty getting the screws in and ended up ruining the screen connectivity at the back of the screen where the ribbon cables go in near the center. I was trying to hand hold the screen and it ended up moving around too much.

    SETH GREEN -

    To keep track of the screws, I copy the photos showing their places, then arrange these photos on document in Pages, print it. Next I apply two sided sticky tape (the roll-on type). So all screws have their corresponding places …

    Max Glanzmann -

  19. SmLayTUTWhZPb5Kb
    • Retirez le cache.

    • Il se peut que le cache soit légèrement collé. Soulevez-le délicatement mais fermement pour le décoller.

    • C'est le moment idéal lors du remontage pour allumer votre iPhone et en tester toutes les fonctions avant de le refermer hermétiquement. Veillez à rééteindre complètement votre iPhone avant de continuer votre ouvrage.

    I tested it, then proceeded to close up the device without the bracket. Do I need to reopen and install? All connections are good?

    monastra7 -

    The bracket helps those many connectors underneath maintain good contact. Probably in the short term nothing bad will happen, but I’d hang onto the bracket and reinstall it when convenient.

    Jeff Suovanen -

    Agree with Jeff

    cgtyoder -

    I tested all imaginable functionality on the new OLED screen. Taptics are fine. Then, I noticed that the battery wasn't charging. Any ideas as to what could have gone wrong?

    Monica -

    for me, the replacement battery was completely dead, small panic when the power-on button was pressed, but quickly realised that this was the situation, and now watching the phone take a power cycle.

    James Stanbridge -

    Before clicking the screen assembly back, I tried to test the iPhone by pushing the start button, but nothing happened. After taking off the bracket, reseating the plugs I tried again - nothing happened! Then I plugged in the charging cable connected with the iMac, and it started immediately. So if the phone does not start using the startup button, it might just be a glitch when reconnecting the battery.

    Max Glanzmann -

  20. eJ1ACHc4FfhUTGYs
    eJ1ACHc4FfhUTGYs
    JGUunolihfMkY3fR
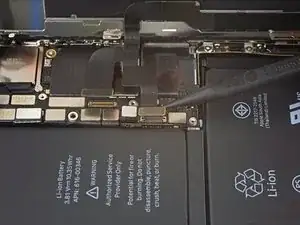
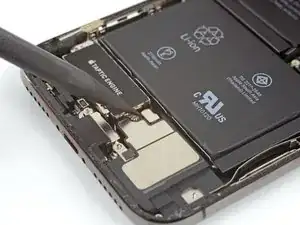
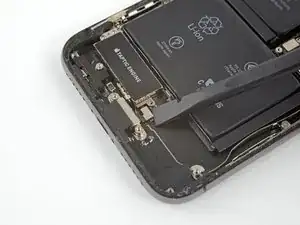
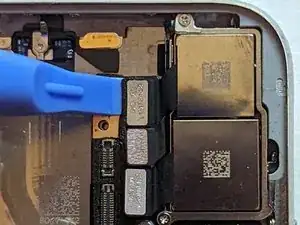
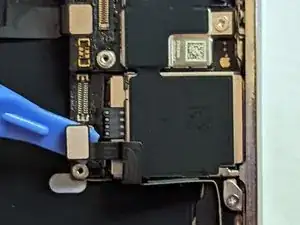
    • Faites levier avec la pointe d'une spatule (spudger) ou un ongle propre pour débrancher le connecteur de la batterie de sa prise sur la carte mère.

    • Essayez de n'endommager aucun des joints en silicone noir qui entourent les connecteurs de la carte. Ces joints sont une protection supplémentaire contre les intrusions de liquide et de poussière.

    • Repliez et écartez légèrement le connecteur de la carte mère pour éviter qu'il ne rentre accidentellement en contact avec la prise et alimente le téléphone pendant que vous effectuez la réparation.

    cosa può succedere se non si disconnette la scheda logica'?

    luca.valli -

    note: be careful not to crush or puncture your battery at this step!! I gave mine a minor dent, which I hope wont be a problem.. but something to keep in mind for fxlks in the future!

    Noal Balint -

    Thanks, already did it)

    Stephen Hedrick -

  21. cHVLkYDwhlp2A1Pw
    cHVLkYDwhlp2A1Pw
    K2c31fAgxStY4xjS
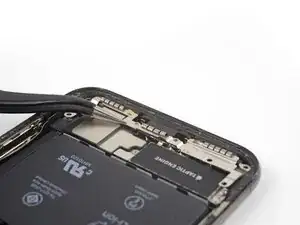
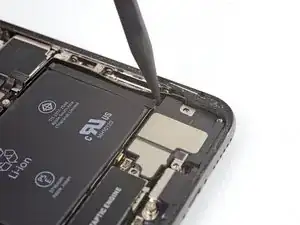
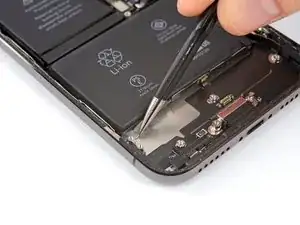
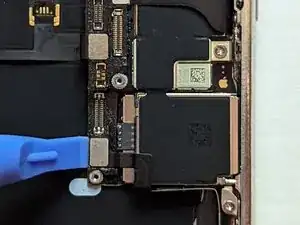
    • Avec la pointe d'une spatule ou un ongle, déconnectez l'ensemble capteur du panneau frontal.

  22. cpYKZSxRSWRr1pJ3
    cpYKZSxRSWRr1pJ3
    ROpbLqGuPSYmQUk2
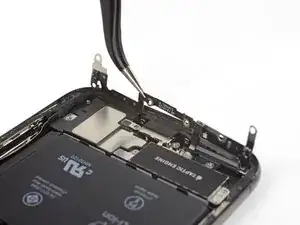
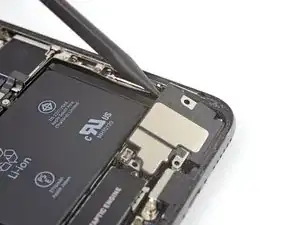
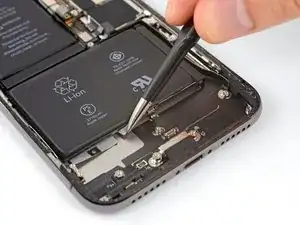
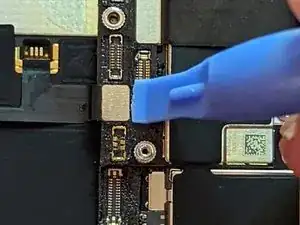
    • Servez-vous de la pointe d'une spatule ou d'un ongle pour déconnecter le connecteur de la nappe du panneau OLED.

    • Les connecteurs à pression comme celui-ci se reconnectent ainsi : alignez-les soigneusement et appuyez d'un côté puis de l'autre pour les enclencher. N'appuyez pas au milieu. Si un connecteur est mal aligné, les broches pourraient se déformer et causer des dommages irrévocables.

    Snap ‘em in like little Legos.

    Ray Johnson -

    Maybe the manual should flip step 17 and 18 (as the digitizer cable from 18, is in the way of the OLED cable of step 17) ?

    Renout -

  23. TD3L6MwMyjAtBQJu
    TD3L6MwMyjAtBQJu
    6ApXsETwRu6PQnKr
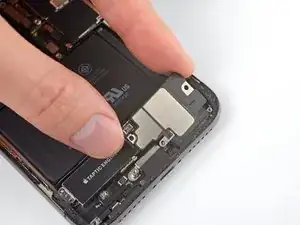
    • Soulevez le connecteur de la nappe de la vitre tactile avec la pointe d'une spatule pour le débrancher de sa prise.

    • L'espace restreint autour de ce connecteur en complique la reconnexion. Prenez votre temps et alignez-le correctement, puis appuyez soigneusement avec le bout du doigt – d'un côté, puis de l'autre. Vous devriez entendre un clic quand il s'enclenche.

    • Si jamais une partie de votre écran ne réagit plus quand vous avez fini la réparation, déconnectez la batterie, puis réenclenchez ce connecteur, en veillant à ce qu'il fasse bien clic et qu'il n'y ait ni poussières ni saletés sur la prise.

    This was probably the hardest part other than trying to get the screen off with the crappy suction cups. I re-installed the bracket only the find out that the touch screen would not respond to touch. Had to remove the five screws, remove the bracket and reseat the recessed screen connector. Reseating the bracket took another 10+ minutes. I carefully used the angled forceps to grab the cable and align the connector being careful not to damage the cable.

    Once you have the connector seated, I would reconnect the battery, power on the phone, and check the touch screen response before re-installing the bracket (step 13).

    Tawan Khamapirad -

    Yeah, this was probably the trickiest part of the reassembly. The power connector cable kept getting in the way so I moved it carefully but fully out of the way. Then it was a matter of fiddling around with it a bit and being careful not to force it on.

    Jeffrey Hoy -

    I was positive that I had messed something up, I had powered up the phone to test three different times and everything seemed find except there was no touch at all. On my fourth attempt, I carefully examined everything for dust and debris (blowing gently), and I did notice that a corner of the connector (more like part of the ribbon) was bent slightly, and I straightened it. I don't know if it was the ribbon or some tiny debris, but after reseating a fourth time, it worked.

    Pol Llovet -

    Very important part of the tutorial. Be careful and patience! In my case the screen and camera didn't respond after assemble, so I tried again to reconnect the connector like tutorial said and it worked well. Now my iPhone feel like a new one 💪🏼

    Efrain Maestre -

  24. T4COCwpNIPZglkVc
    T4COCwpNIPZglkVc
    q145rGUkFfAEwOf1
    EgtbW5Mf1lUuPrWK
    • La nappe de l'ensemble capteur du panneau frontal adhère légèrement en dessous.

    • Soulevez délicatement la nappe jusqu'à ce que l'adhésif cède.

    Do this sensor affect face id?

    bonglkv -

    It is part of the face id part so yes. This is the ear piece too so if the ribbon tears there is a chance the ear piece will stop working as well.

    Stephen Patterson -

    Be super careful handling this ribbon particularly. I did a battery install and, when I was done, I had a phone with a new battery and no Face ID. That’s a $300 Apple repair, and no 3rd party shop will touch it. I believe the ribbon lays vertically (i.e., perpendicular to the “floor” of the phone, against the side edge of the battery. During the re-install, I must have forced the ribbon into position after seating the connector, causing fatal flexing of the ribbon. (Don’t know this for sure, but I see another comment saying that this cable is part of Face ID.) Anyway, bottom line: BE CAREFUL REMOVING AND REINSTALLING THIS RIBBON!

    Jonathan Pines -

    My flex cable was more than lightly adhered in place. I needed to use a guitar pic or similar to help encourage adhesive to separate. I wouldn’t pull too hard like shown in pictures unless you had just the right grip on the ribbon cable so as to avoid damaging flex cable. See note above (5/31/20)

    William Olstad -

    Bizarre — it turns out my whole front panel sensor assembly came entire off of the front screen and is stuck to the logic board.

    Karl Jarvis -

    I also found the glue quite recluctant to release so I applied a second or two of heat using the wife's hair dryer which softened it and the cable lifted much easier then. Be careful not to apply too much heat though which could then impact other internal components.

    LosBenitos -

    Cho ít cồn 90° vào để mềm keo dễ tháo

    huuhaukimngan -

    my iphone x doesn't have a front panel sensor? in fact, it looks completely different than the picture???

    Kenneth McLeod -

    @kennethmcleod, most likely you've separated the screen frame from the screen itself. We see this most commonly when people neglect to remove the pentalobe screws next to the charging port. Usually the cure is to take out those screws, then repeat the screen removal process on the frame that's still attached to the phone.

    Jerry Wheeler -

    You don't need to disconnect the front sensor to change the screen. Just leave it connected and remove from the screen side.

    Anthony Boshell -

    I have damaged the front panel sensor assembly flex cable. Does it carry multiple channels of info or is it just one solid piece that can be soldered back together? If not, will the phone still work except Face ID?

    Bodger Rabbit -

  25. 6ik3wBhFQRTApGki

    I tried this and broke the cable can it still repair

    Alexis Rodriguez -

    At this point I would have found it easier to remove the glue from the edges than later on when I was reassembling it. I bought the kit that had the replacement glue in it.

    Grant -

    Excellent guide! Would love to have a link to moving the sensor assembly from the old display to the new here.

    Nicole -

    CAUTION:

    Removing the Taptic Engine or Speaker in next step is optional and the guide continues as this was per se needed.

    Unnecessary work and also If you remove the speaker you lose the adhesive gasket and this is not included in the scope of delivery of the "Battery replacement" offering.

    So do not remove and avoid losing waterproofing.

    Julian Gonzalez -

    Just to confirm the face id is not affected when replacing the earpiece assembly? Am I correct

    mubeen.2011@hotmail.co.uk -

    Sorry for the late response, but you are NOT correct. Replacing the earpiece speaker assembly will result in the loss of Face ID functionality. That's the whole assembly, including the speaker, dot projector and flood illuminator. If you unsolder the speaker from the assembly, that can be replaced by itself without losing Face ID, but any other part will cause it to quit working.

    Jerry Wheeler -

  26. BoHxHxepsDZEp5B4
    BoHxHxepsDZEp5B4
    dXwiSZ3WZcIoWD1U
    • Faites attention à ne pas toucher les trois lignes de contacts proches du bas de l'iPhone (encadrées en rouge).

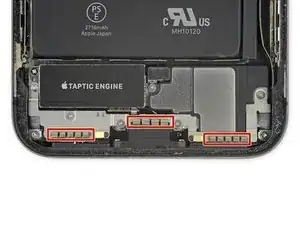
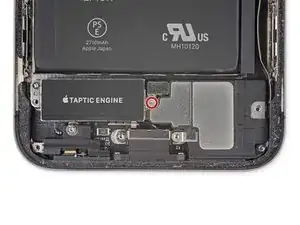
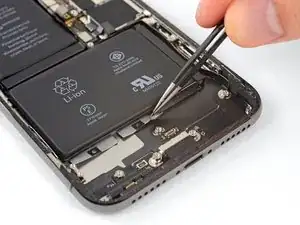
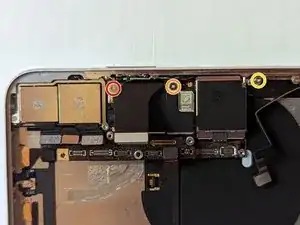
    • Retirez les sept vis qui fixent le cache sur le Taptic Engine et le haut-parleur :

    • Deux vis Y000 de 1,9 mm

    • Une vis Y000 de 1,2 mm

    • Une vis Y000 de 1,6 mm

    • Une vis cruciforme de 2,4 mm

    • Une vis cruciforme de 1,7 mm

    • Une vis cruciforme de 1,5 mm

    For battery replacement:

    It is not necessary to remove Taptic Engine and speaker to replace a battery. Go straight to the step #33

    Additional video: https://youtu.be/2GfBOlJEW10

    Alexander -

    I wish I seen this before I did all that! Thank you for that information. Next time I do something like this. I'm gonna pay more attention to the comments.

    Eric Marino -

    Removing the Taptic Engine and speaker greatly improves your chances of getting the battery adhesive strips out intact. If those break, you’ll have a much tougher time.

    Jeff Suovanen -

    Boy, I tried to skip removing these items but was unable to get the glue strips out with them in place, not much to grab and tabs were kind of stuck to a seam in the battery, and hard to tell the difference between the seam and the strip tabs. For me I had to remove these items to get this done.

    marshallburchard -

    I stopped removing things after getting the display side off. There were 3 screws stripped on the speaker cover which wouldn't come out so I punted. Just pried the battery out with a smudger tool and some patience, starting at the top and working towards the bottom. New battery is in and working fine.

    Andy Price -

    The 2.4mm screw identified as “green” needs a Y000 screwdriver

    seb6po -

    Thanks for not removing the following steps. this made me break the connector for the bottom speakers >:(

    Andrew Romano -

    The color codes are missing from my display — only on this step.

    nat2 -

    The screws color and quantities in list don’t match the schematic ! I wish i had a magnetic screw mat before starting, because not only i removed the Taptic Engine and speaker unnecessarily, but i also lost a screw ?

    fb.mailing.lists -

    For first timer, dont think its possible to skip these steps and remove battery. It’s hard to remove the glue

    Wex -

    Does anyone know the purpose of this bracket "with grounding pads"? What would be the possible side effects if it was damaged or not connected properly during reassembly?

    Anne Aunyme -

    I had to remove the tactic and speaker could not get the glue strips out so glad the steps to do so were in this guide.

    P Bond -

    Sure would like to know WHY the warning "Be careful not to touch the three rows of grounding pads..." What would or could happen if I did touch them??

    Chad Gagnon -

    Removing the battery strips is a major PITA, just skip this step and everything onwards, remove the one strip on the top part of the battery (according to step 33) and for the bottom part of the battery, pry it off with a plastic spudger.

    Yes, this is not the elegant solution, but the quickest and easiest one. This method is better, as you don't want to keep the old battery anyway, so why bother. (You must not puncture the battery though! But as long as you're only working with a plastic tool and are careful, nothing can happen from my experience.)

    speaker gasket -

    Remove the adhesive from the top part of the battery, squirt some ipa into the bottom part and it will come off easily, then skip to 38.

    Kim Boulton -

  27. A6XdCYVX6JwfIKyE
    A6XdCYVX6JwfIKyE
    A4EHUTn22AgwPZxR
    • Soulevez le cache par le bord le plus proche de la batterie. N'essayez pas encore de le retirer complètement, car il est toujours connecté à une petite nappe.

  28. c5QjrHSAGoEVorBq
    c5QjrHSAGoEVorBq
    qMqUiBcQJqrsMsyd
    • Repliez le cache et utilisez la pointe d'une spatule (spudger) pour soulever et déconnecter la nappe qui se trouve en dessous.

  29. eoTqiltfnhM1iScH
    • Ôtez le cache.

    My bracket was in two pieces.

    Jim Steward -

  30. KVsQuGUlRSYJCgwc
    KVsQuGUlRSYJCgwc
    1oMPc41ZwNKvWSjt
    • Dévissez la vis Y000 de 2,1 mm qui fixe le cache du connecteur du haut-parleur.

    L'unique vis non?

    Easy Repair -

    Effectivement ;-) Merci pour les bons yeux et la remarque !

    Claire Miesch -

  31. kEdiRARZCyTLEXJG
    • Retirez le cache du connecteur du haut-parleur.

  32. oTiIqEVBPENNIfRv
    oTiIqEVBPENNIfRv
    bPVea3cUUG5ydybE
    • Avec la pointe de la spatule, soulevez et débranchez le connecteur du haut-parleur.

    As mentioned in a comment by timblake2112 (see step 29), this step is not necessary and can be skipped skipped. I would advise you to do so, as removing your speaker is guaranteed to ruin your gasket and rubber seal. This will result in loss of water resistancy of your iPhone and could potentially harm the sound quality of your speaker.

    Try removing the Taptic Engine without removing the speaker. It might still be possible removing the battery adhesive strips and your speaker will stay in its original condition.

    speaker gasket -

  33. nbqXImWqlhcmZwLp
    nbqXImWqlhcmZwLp
    XKBNris4snqB4vTl
    • Quand vous soulevez le haut-parleur, veillez à ne pas endommager la nappe que vous venez de déconnecter. Si nécessaire, repliez-la de côté pour retirer commodément le haut-parleur.

    • Insérez une spatule sous le bord supérieur du haut-parleur dans le coin de la coque de l'iPhone.

    • Faites délicatement levier pour soulever le bord supérieur du haut-parleur.

    • Au moment de remonter le haut-parleur, vérifiez la position de la nappe et veillez à ce qu'elle ne reste pas coincée sous le haut-parleur.

  34. vP52MSMbQMQVGXDv
    vP52MSMbQMQVGXDv
    jdpMlj6ohBmkmRoF
    aBojFlY2A4cLssW2
    • Saisissez le haut-parleur par les bords latéraux et faites-le osciller d'un côté à l'autre pour faire céder l'adhésif qui le fixe au bord inférieur de l'iPhone.

    • Écartez le haut-parleur du bord inférieur de l'iPhone jusqu'à ce que le joint adhésif se décolle.

    As mentioned in a comment by timblake2112 (see step 29), this step is not necessary and can be skipped skipped. I would advise you to do so, as removing your speaker is guaranteed to ruin your gasket and rubber seal. This will result in loss of water resistancy of your iPhone and could potentially harm the sound quality of your speaker.

    Try removing the Taptic Engine without removing the speaker. It might still be possible removing the battery adhesive strips and your speaker will stay in its original condition.

    speaker gasket -

  35. G1qam2tn3Av5D6ub
    G1qam2tn3Av5D6ub
    RhZADdTaatNHENVB
    • Retirez le haut-parleur.

    • Le joint adhésif du haut-parleur n'est pas réutilisable. Nettoyez tous les résidus d'adhésif avec une pincette.

    • Lors du remontage, remplacez le joint adhésif pour une protection plus efficace contre l'intrusion d'eau et de poussières. Nettoyez la surface avec un peu d'alcool isopropylique et un chiffon non pelucheux ou un filtre à café pour que le joint adhère correctement. Collez un nouveau joint sur le haut-parleur, puis posez le haut-parleur.

    You don’t need to remove the speaker and ruin its gasket. You can wiggle and slide the taptic engine out without removing the speaker. I’ve done this twice on rear shell replacement jobs.

    timblake2112 -

    Maybe I'm a bit daft, but where's the instruction just how to line up the speaker gasket when replacing? I only have one so I'd like to avoid wrecking it. And I completely cleaned off the old one in order to do a good job of things. Why no simple instruction from part supply link?

    MrRoundel -

  36. XATHudC6esRZFEKI
    XATHudC6esRZFEKI
    4b6hhSLIlJT6Pjum
    • Dévissez la vis cruciforme de 2,3 mm qui fixe le Taptic Engine.

  37. aSBjBVvQXPjDTMPE
    aSBjBVvQXPjDTMPE
    JrsJ3crZXUQsaBpo
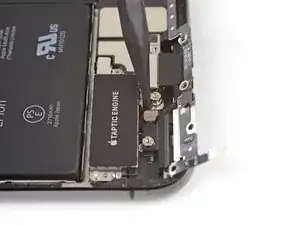
    • Soulevez la nappe du Taptic Engine tout droit vers le haut avec une spatule (spudger) pour la débrancher.

  38. FeOXDWVO1kSwkRYc
    • Ôtez le Taptic Engine.

  39. jPH2WfaMKMfl6WaH
    • La batterie de l'iPhone X est fixée à la coque arrière par quatre bandes adhésives élastiques de retrait – une sur la cellule supérieure et trois sur l'inférieure.

    • Chaque bande adhésive se finit par une languette d'extraction noire. Celle-ci est légèrement collée sur le côté de la batterie.

  40. N2cLTmaAEDoneIBe
    N2cLTmaAEDoneIBe
    CEKvyMgO5tpSfUtV
    XLkNcMvasaA2Sut6
    • Décollez la première languette adhésive de la partie inférieure de la batterie.

    • Au milieu de chaque languette se trouve un petit trou, insérez-y un outil si vous avez du mal à saisir la languette.

    • Ne percez pas la batterie avec un outil pointu. Une batterie perforée risque de laisser s'échapper des produits chimiques dangereux ou de prendre feu.

    hole breaks instantly on pulling. adhesive tab does not release from side of battery

    Dominick garton -

    I had a lot of trouble with this. Only two came out properly and the others snapped off. I heated up the back of the phone with a hair dryer then used the flat end of the spudger to slowly pry it off right to left, bottom to top.

    Grant -

    just pry it off, why bother

    speaker gasket -

  41. bTtUqSlDgjwAjjCA
    bTtUqSlDgjwAjjCA
    jIovnoJnOMqiF2F5
    D2SOJ6hkUYoGjXof
    • Répétez l'étape suivante pour décoller les deux bandes adhésives restantes du bord inférieur de la batterie.

    • Veillez à ne pas endommager le connecteur de la nappe du haut-parleur, qui se trouve juste en dessous de la bande adhésive centrale.

  42. MUaEmAlJJAnWJQ63
    MUaEmAlJJAnWJQ63
    tQV5stGtdxojbKII
    LPbLvYDYU62ADtRY
    • Au cours des étapes suivantes, vous tirerez sur chaque languette pour étirer doucement la bande adhésive sous la batterie. Quand elle s'étire, cette bande adhésive élastique spéciale perd son adhérence et se décolle, ce qui vous permettra de soulever aisément la batterie.

    • Si une des bandes se déchire, ne paniquez pas ! Elles ne fonctionnent pas toujours comme elles le devraient. Allez voir quelques étapes plus loin comment procéder avec les bandes déchirées.

    • Pour augmenter vos chances de succès :

    • N'appuyez pas sur la batterie. Tenez fermement votre iPhone par les côtés.

    • Veillez à ce que les bandes restent le plus horizontales possible et ne fassent pas de plis quand vous tirez dessus.

    • Tirez très lentement pour donner aux bandes le temps de s'étirer et de se décoller. Il vous faut environ 15 à 30 secondes pour chaque bande.

    • Tirez de façon à ce que la bande ne reste pas accrochée le long du bord inférieur de la batterie.

    • Si vous déchirez une bande sous la batterie et n'arrivez pas à l'enlever, continuez avec les autre bandes, puis référez-vous aux instructions spécifiques plus bas.

  43. WfOG2GCU2PCL1gXL
    WfOG2GCU2PCL1gXL
    qfPWHNgPTIgHkisT
    rCTaTAQHPhqflORV
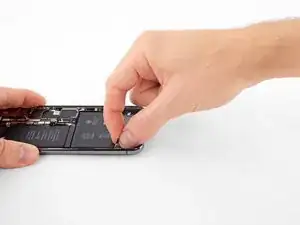
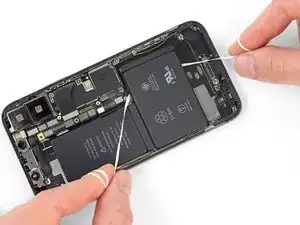
    • Saisissez la languette adhésive à gauche ou à droite de la batterie, puis tirez dessus, depuis la batterie vers le bas de l'iPhone.

    • Tirez régulièrement, en exerçant une tension constante sur la bande jusqu'à ce qu'elle glisse hors de son emplacement entre la batterie et la coque arrière.

    • La bande va s'étirer jusqu'à atteindre plusieurs fois sa longueur de départ. Si nécessaire, ressaisissez la bande du côté de la batterie et continuez à tirer.

    • Si les languettes adhésives de la batterie se déchirent pendant que vous les retirez, servez-vous de vos doigts ou d'une pincette arrondie pour récupérer ce qui reste de la bande et continuer à tirer.

    • Si vous déchirez une bande sous la batterie et n'arrivez pas à la récupérer, essayez de décoller les autres bandes, puis référez-vous aux instructions spécifiques plus bas.

    I found it easier to grab the end of the adhesive strip sideways with narrow tweezers, "twirl " the tweezers to wrap the strip around them a few times, then gently pull the strip with the tweezers.

    punkinann -

  44. DM151YZVc2wm3vIF
    DM151YZVc2wm3vIF
    6rGGVFvvjL5bSKUa
    aB1QyvxZDyNEVIvj
    • Répétez l'étape précédente pour retirer la bande de l'autre côté et gardez celle du milieu pour la fin.

  45. ePixhb61PIEnTUMP
    ePixhb61PIEnTUMP
    upCGIsYEMa6WjVqZ
    VDoEuCDFI6xdsPeY
    • Retirez la bande du milieu en veillant à ce qu'elle ne reste pas accrochée à la nappe du haut-parleur.

  46. ORPTGZTFTGmDxjAS
    ORPTGZTFTGmDxjAS
    KLHsUkUXMWJHNNUY
    • La dernière languette d'extraction est juste à côté du module Face ID. Si vous l'abîmez, seul Apple sera capable de le réparer, donc faites bien attention.

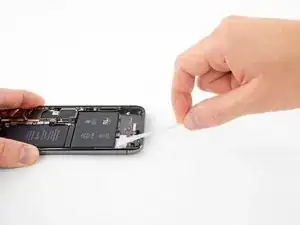
    • Décollez et soulevez la languette d'extraction de la dernière bande adhésive, qui se trouve en haut de la cellule de batterie supérieure.

    surtout ne pas passer avec la spatule par le bas, vous risqueriez d arracher la nappe du volume et du nfc,

    Ludovic Klein -

  47. cjEUeU2SWe3u4sH3
    cjEUeU2SWe3u4sH3
    w2YjaKwLVcrI2iPs
    FYxaRBOiruSCn6Rg
    • Tirez et ôtez la dernière bande adhésive.

    • Cette bande risque d'éjecter la batterie pendant que vous la décollez de l'iPhone, donc posez votre main sur la batterie pour la maintenir en place. Cependant n'appuyez pas dessus. La pression supplémentaire risque de déchirer la bande adhésive sous la batterie.

    • Si vous avez réussi à retirer les quatre bandes adhésives, sautez l'étape suivante.

    • Si une (ou plusieurs) des bandes adhésives s'est cassée sous la batterie et ne peut pas être récupérée, appliquez quelques gouttes d'alcool isopropylique à forte concentration (supérieure à 90 %) sous le bord de la batterie, dans la zone de la ou des bandes adhésives cassées.

    • Attendez une minute que la solution alcoolisée ramollisse la bande adhésive. Utilisez le bout plat d'une spatule antistatique pour faire doucement levier sur la batterie.

    • Ne forcez pas pour faire levier et sortir la batterie. Si nécessaire, appliquez quelques gouttes d'alcool supplémentaires pour continuer à ramollir l'adhésif. Ne jamais déformer ou percer la batterie avec votre outil de levier.

    • Faites attention à n'endommager ni les nappes ni la bobine de recharge sans fil sous la batterie.

    • Pour des méthodes alternatives pour décoller la batterie, continuez à l'étape suivante ci-dessous.

  48. SIqoxjaCLQVGQQTw
    SIqoxjaCLQVGQQTw
    M5YQx5XjHGWUVKWj
    • Si une des bandes adhésives s'est déchirée et que la batterie reste coincée dans la coque arrière, préparez un iOpener ou servez-vous d'un sèche-cheveux pour faire chauffer la coque arrière derrière la batterie.

    • Chauffez l'iPhone jusqu'à ce que la coque arrière soit légèrement trop chaude pour un toucher confortable. Ne le faites pas trop chauffer, la batterie risquerait de prendre feu.

    • Retournez l'iPhone et faites glisser une ficelle solide (du fil dentaire ou une fine corde de guitare par exemple) sous la batterie.

    • Enroulez un chiffon autour des bouts de la corde (ou portez des gants) pour protéger vos doigts.

    • Tirez la ficelle d'un côté puis de l'autre, dans un mouvement de scie, et ce tout le long de la batterie pour faire céder l'adhésif. Cela risque de prendre du temps, car l'adhésif cède lentement. Soyez patient et vous en viendrez à bout. Ne déformez ni endommagez la batterie.

    • Si vous choisissez d'utiliser des outils à levier pour soulever la batterie hors de l'iPhone, faites extrêmement attention, vous risquez d'endommager les nappes ou la bobine de recharge sans fil, qui se trouvent juste au-dessous de la batterie.

    if you use a guitar string, remember NOT to use a METALLIC guitar string.

    Ross King -

    flexible plastic rules with alcohol work too

    Wex -

    I can confirm that IPA (Iso Propyl Alcohol) and, in my case, the plastic plectra in any iFixit kit worked a treat.

    P Bond -

  49. NNcTVEVsOCUmEsVA
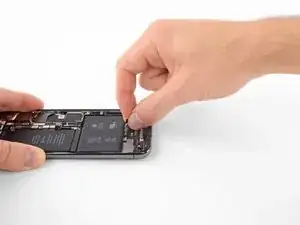
    • Tenez la batterie par le bas et retirez-la de l'iPhone.

    • S'il reste de l'alcool dans le téléphone, essuyez-le soigneusement ou laissez-le sécher à l'air libre avant d'insérer votre nouvelle batterie.

    • Remontez le Taptic Engine et le haut-parleur avant d'installer une nouvelle batterie. Cela aide à aligner correctement la batterie quand on la monte.

    • Avant de coller la batterie de remplacement, rebranchez temporairement le connecteur de la batterie à sa prise sur la carte mère. Cela permet de s'assurer que la batterie est correctement alignée dans son compartiment.

    • Posez la batterie, débranchez-la et continuez à remonter votre appareil.

    • Si votre nouvelle batterie n'est pas fournie avec de l'adhésif, consultez ce tutoriel pour remplacer les bandes adhésives de votre batterie.

    • Forcez le redémarrage après avoir fini de remonter votre iPhone. Cela pourra vous éviter des problèmes et en simplifier le diagnostic.

    When reinstalling the battery, the Taptic Engine does serve as a useful way to orient the battery, but it should also be noted that if you push right up against that as you install the battery (as I did) and don’t pay any attention to power connector (shown in step 14), there is a risk that the connector from the battery will not line exactly with the connector port on the board. Mine was only off a mm so I had to get a little creative to try to get it to stretch to reach and connect to the port on the board. Just keep that in mind as you place the battery (with adhesive) down.

    Jesse Bolane -

    Connect the battery first then put it in place. Other way it is hard to adjust power connector.

    Alexander -

    I would also HIGHLY suggest re-installing the speaker as well before installing the battery - it was a very tight squeeze as the bottom-right of the battery was snug against the speaker when I tried to get that back in.

    cgtyoder -

  50. JsFAtQnd3fKoMMgw
    JsFAtQnd3fKoMMgw
    VBLjJjRRQKQLfsei
    XdE2xunXVNjUGawC
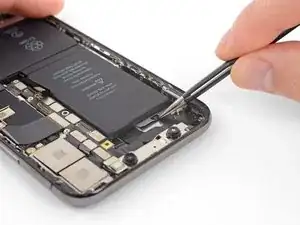
    • Avec le bout plat d'un spudger, déconnectez les trois nappes de l'assemblage de l'appareil photo frontal :

    • Le projecteur de points.

    • L'appareil photo frontal.

    • La caméra infrarouge.

    This thing is highly prone to damage. Treat it with baby hands! Mine stopped working after changing my buttons and I was super careful

    Ryan Kamfolt -

  51. pPTKvJYMrPloDwLI
    pPTKvJYMrPloDwLI
    GVQxTRvWq5fEGYAH
    wmP5APATdJj16lqU
    • Les nappes de l'appareil photo sont légèrement collées au châssis central.

    • Avec le bout d'un spudger, commencez au niveau du connecteur et faites glisser le spudger entre la nappe de la caméra infrarouge et le boîtier pour séparer la nappe du boîtier.

    • Répétez pour la nappe de l'appareil photo frontal.

  52. HwAd4pxbgvufkuhY
    • Faites chauffer pour ramollir l'adhésif de l'assemblage de l'appareil photo frontal.

  53. oLFNa1WLvPNhVUPj
    oLFNa1WLvPNhVUPj
    f1ViYiUjIRJUJDN2
    ivKuuNHrSYChQ6Km
    • Retirez l'assemblage de l'appareil photo frontal.

  54. dgTXVexUpjSKCZ2R
    • Déconnectez les connecteurs suivants :

    • Connecteur de l'antenne Wi-Fi.

    • Connecteur de la caméra grand angle.

    • Connecteur pour le bouton d'alimentation/le flash/le microphone.

    • Le connecteur de la caméra téléphoto.

    • Le connecteur Dock Flex.

    • Le connecteur bouton/chargement sans fil.

    • Le connecteur de l'antenne cellulaire.

  55. 6fMXkiRrTLpgNMBt
    6fMXkiRrTLpgNMBt
    n4ihvoKwCB1Kxef2
    • Déconnectez le connecteur de la nappe de l'antenne WiFi.

  56. LSxMWBsIQK1HQEME
    • Déconnectez le connecteur de la nappe de la caméra grand angle.

  57. AiGJXTxklvjqeSTw
    AiGJXTxklvjqeSTw
    WVwqhVbHXHlPixyZ
    • Déconnectez le connecteur de la nappe du bouton d'alimentation, du flash et du microphone.

  58. INVBCADfZkYDKBkZ
    INVBCADfZkYDKBkZ
    WEIf3VbLUts6JKWC
    • Déconnectez le connecteur de la nappe de la caméra téléphoto.

  59. gxtREIgQhYVEvbYY
    gxtREIgQhYVEvbYY
    4cISXNvdRBNQNK2y
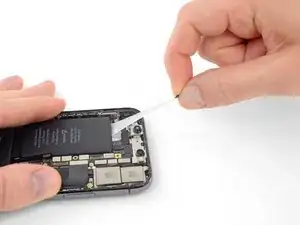
    • Déconnectez le connecteur de la nappe Dock Flex.

    • Pliez la nappe à 90° vers le haut pour dégager l'espace pour retirer la carte mère.

  60. 5OvaZtYYjv62GFEn
    5OvaZtYYjv62GFEn
    MfquZDHnJOvjoII1
    • Déconnectez le connecteur de la nappe du bouton et du chargeur sans fil.

  61. SHdtlPDJFTFpJ63s
    SHdtlPDJFTFpJ63s
    fLoVMOgyTRgaF1va
    iyLHxfNrSLBOvNrG
    • Déconnectez le connecteur de la nappe de l'antenne cellulaire.

    • Pliez la nappe pour la mettre hors du chemin de la carte mère.

  62. RGUI233eXO61Z1r3
    RGUI233eXO61Z1r3
    avGySJX4GBbUKEEg
    CbPZAEXEB1cUsvUw
    • La carte mère ne peut pas être retirée avec le plateau de la carte SIM en place. Si vous ne l'avez pas déjà retiré, faites-le maintenant.

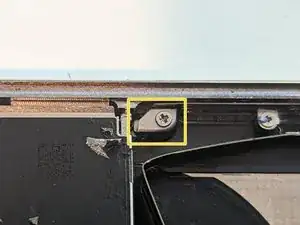
    • Retirez les deux vis de montage :

    • Une vis Phillips de 2,7 mm.

    • Une vis Phillips de 2,1 mm.

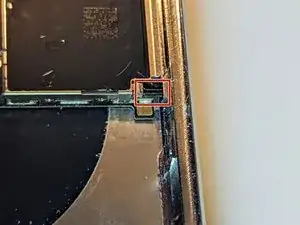
    • Retirez la vis de terre Phillips de 2,0 mm.

    • Retirez la fiche de terre.

    • Assurez-vous de remplacer la fiche de terre pendant la même opération.

  63. hU23nKYwTAoweIyR
    • Lorsque la carte SIM est éjectée, un pointeau glisse hors du cadre et pousse sur le levier d'éjection dans le plateau de la carte SIM. Ce pointeau doit être rentré dans le cadre pour qu'il ne bloque pas le retrait de la carte mère.

  64. lOMySGY6pIZbfito
    lOMySGY6pIZbfito
    CGGJVEtYWTI1KTdX
    ZcncAIXXoMFX46XV
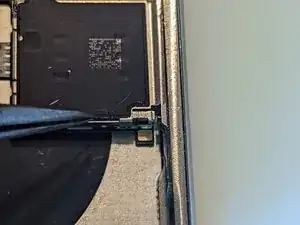
    • Avec des pincettes à bouts fins, faites glisser le levier déjection de la carte SIM vers le côté du boîtier.

    • Le levier déjection devrait ressembler à ça une fois que vous avez terminé. Le pointeau ne bloquera plus le retrait de la carte mère.

  65. BMKvmORhE3AYkPbe
    BMKvmORhE3AYkPbe
    lV1qPtK44nwvdw3U
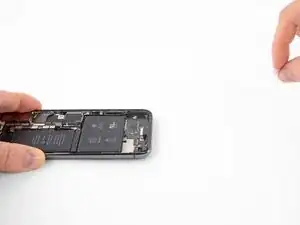
    • L'ensemble de la carte mère est monté sur deux montants qui passent à travers la carte inférieurs et sont attachés à la carte supérieure. Pour le retirer, vous devez soulevez de manière uniforme, vers le haut pour dégager les montants.

    flip phone over and dump it out

    Thomas Ngo -

Conclusion

Pour remonter votre appareil, suivez ces instructions dans l'ordre inverse.

Jerry Wheeler

Membre depuis le 21/03/22

67129 Réputation

14 commentaires

Existe compatibilidad entre la tarjeta lógica del iPhone X y el iPhone XS ??

Es decir, puedo sustituir la del X por la del XS ?

Omar Cisneros Desiano -

Hi Omar,

In general the answer to that is pretty much always no. Each phone is designed with a customized motherboard made specifically for that phone, along with all of the components inside it. Unfortunately for us, that means there is virtually no possibility of interchange between different models and that holds true for the iPhone X and XS. Each model tends to change the type of parts that are plugged into it, the position of those connections and even the type of connector. Those changes also result in different shapes and mounting points of the logic boards, meaning they won't even physically fit into a different housing.

Jerry Wheeler -

Hello Jerry,

Thanks for this tutorial, however are there apple brand motherboards for iphone x available on the market? There are numerous items on numerous websites, how can I be sure it's reliable and works properly etc.?

Ray -

Hi Ray,

Although it's entirely possible for companies (Chinese ones in particular) to reverse engineer iPhone motherboards and components and make a decent copy, the catch is that Apple controls the firmware that goes on them and there are parts of the software that cannot be duplicated. As a result no one but Apple can make a fully functioning iPhone X motherboard, especially not one that is paired to the Face ID components.

However, there is a large market for phones that have been scrapped and scavenged for parts, so there are a lot of places that sell those. Most of the sellers ensure that the motherboards they sell do not have iCloud or SIM locks in place, but you'll want to verify that the seller states that explicitly. And if you want Face ID to work, you have to buy the paired components that go with the motherboard; specifically the front camera assembly and the earpiece speaker assembly on the display.

(Continued...)

Jerry Wheeler -

(...Continued)

Since all the motherboards on the market are used, obviously you can't be 100% sure that every function is going to work correctly, but the reputable sellers will have tested the boards they sell to weed out the ones with issues. The ones sold on AliExpress, for example are generally tested and should have a guarantee of functionality. There are also reputable online stores that sell the parts as well; go through some of the answers forums to get an idea of which companies get recommendations.

eBay can be a good source to save money, but it's definitely a buyer beware situation, depending on the seller. You'll want to verify the IMEI number on an IMEI checking website to make sure the Find My iPhone function is turned off, that it's not iCloud locked and that it's not SIM locked. In general, the boards are pretty reliable so in most cases if it powers up at all, it will usually work.

So it's like buying anything used; you want to find a reputable seller who will guarantee their product.

Jerry Wheeler -

Hallo,

Danke für die tolle Anleitung. Wenn ich zwei gleiche Phone X habe, kann ich dann grundsätzlich die Boards tauschen mit der FaceID oder muss ich da noch etwas beachten. Z.B. gleiches Herstellungsjahr usw. oder ist das egal ? Ich habe ein Iphone X mit Baujahr 2017 und eines mit Baujahr 2019. Gruß Harald

Leo 207 -

Hi Leo,

Yes, you can swap any of the iPhone X parts no matter what year it's made; but only iPhone X, not XS or XR. The other main thing is the screen; if you want True Tone to function you have to either take the screen along with the logic board, or else copy the screen data from the old screen to the new using something like the Qian Li iCopy programmer.

Jerry Wheeler -

I noticed a previous comment you mentioned if you replace the logic board then features like Face ID would no longer work. If I were to swap a logic board from a different phone to back up the data and then put the original logic board that came with the phone back in would the face ID work again?

Joshua Lorimer -

Yes, as far as the original board would know, all you did was take it out and put it back in, so it would see everything as it was before. The other logic board you backed up wouldn't leave behind anything that would interfere with the original board's operation.

So yes, you should be able to do that backup without causing problems for the original phone.

Jerry Wheeler -

If I change motherboard of xs or xs max will my speaker work perfectly?

Allif Mia -

@allifmia It all depends on what is wrong with your speaker. If it's an audio chip or motherboard connector problem, then yes, I suppose replacing the logic board would probably fix the issue. However, if the problem is in the speaker itself or the connection between it and the motherboard, then swapping out the motherboard would still leave the same issue in place.

You really need to be sure of the diagnosis about where the fault lies before you go that far. And remember, you are going to have multiple issues just from changing the motherboard, such as Face ID and True Tone no longer working, as well as a genuine parts warning and the loss of battery health information, so changing the motherboard should definitely not be your first choice for fixing a speaker problem.

Jerry Wheeler -

E' possibile aumentare la memoria? E se si dove si puo' acquistare? Grazie

Maurizio Turolla -

Generally the memory on an iPhone is not considered upgradable. The parts are soldered onto the motherboard in a BGA package, meaning it takes very specialized equipment and expertise to replace, and even then the success rate is far below 100%. When you take into account the cost of that kind of repair, it is quite likely that you would spend less buying a full Face ID set, including the motherboard, front camera assembly and earpiece speaker assembly that already has the amount of memory you want.

Jerry Wheeler -

In genere la memoria di un iPhone non è considerata aggiornabile. Le parti sono saldate sulla scheda madre in un package BGA, il che significa che servono attrezzature e competenze molto specializzate per sostituirle, e anche in questo caso il tasso di successo è ben al di sotto del 100%. Quando si considera il costo di quel tipo di riparazione, è molto probabile che spenderesti meno acquistando un set completo Face ID, che include la scheda madre, il gruppo della fotocamera frontale e il gruppo dell'altoparlante auricolare, che ha già la quantità di memoria desiderata.

Jerry Wheeler -